bonnet CITROEN DS3 CROSSBACK 2019 Owners Manual
[x] Cancel search | Manufacturer: CITROEN, Model Year: 2019, Model line: DS3 CROSSBACK, Model: CITROEN DS3 CROSSBACK 2019Pages: 244, PDF Size: 7.7 MB
Page 5 of 244
3
Contents
bit.ly/helpPSA
115 Active Safety Brake with Collision Risk Alert and
Intelligent emergency braking assistance
117
Parking sensors
118 Reversing camera
121 Park Assist
124 DS PARK PILOT
07 Practical information
129 Compatibility of fuels
129 Refuelling
130 Misfuel prevention (Diesel)
130 Charging system (Electric)
134 Charging the traction battery (Electric)
137 Towing device
137 Roof bars
138 Snow chains
138 Energy economy mode
139 Bonnet
140 Engine compartment
140 Checking levels
142 Checks
144 AdBlue® (BlueHDi)
146 Free-wheeling
146 Advice on care and maintenance
08 In the event of a breakdown
148 Warning triangle
148 Running out of fuel (Diesel)
148 Tool kit
150 Temporary puncture repair kit
152 Spare wheel
155 Changing a bulb
159 Changing a fuse
161 12 V battery / Accessory battery
165 Towing the vehicle
09 Technical data
168 Engine technical data and towed loads
169 Petrol engines
170 Diesel engines
171 Electric motor
172 Identification markings
172 Dimensions
10 Touch screen BLUETOOTH audio system
173 First steps
173 Steering mounted controls
174 Menus
175 Radio
176 DAB (Digital Audio Broadcasting) radio
177 Media
178 Telephone
179 Settings
180 Frequently asked questions
11 DS CONNECT RADIO
182 First steps
183 Steering mounted controls
184 Menus
185 Applications
185 Radio
187 DAB (Digital Audio Broadcasting) radio
187 Media
188 Telephone
192 Settings
193 Frequently asked questions
12 DS CONNECT NAV
195 First steps
196 Steering mounted controls
196 Menus
198 Voice commands
201 Navigation
204 Connected navigation
206 Applications
209 Radio
210 DAB (Digital Audio Broadcasting) radio
210 Media
212 Telephone
214 Settings
216 Frequently asked questions
Alphabetical index
Access to additional videos
Page 6 of 244
4
Overview
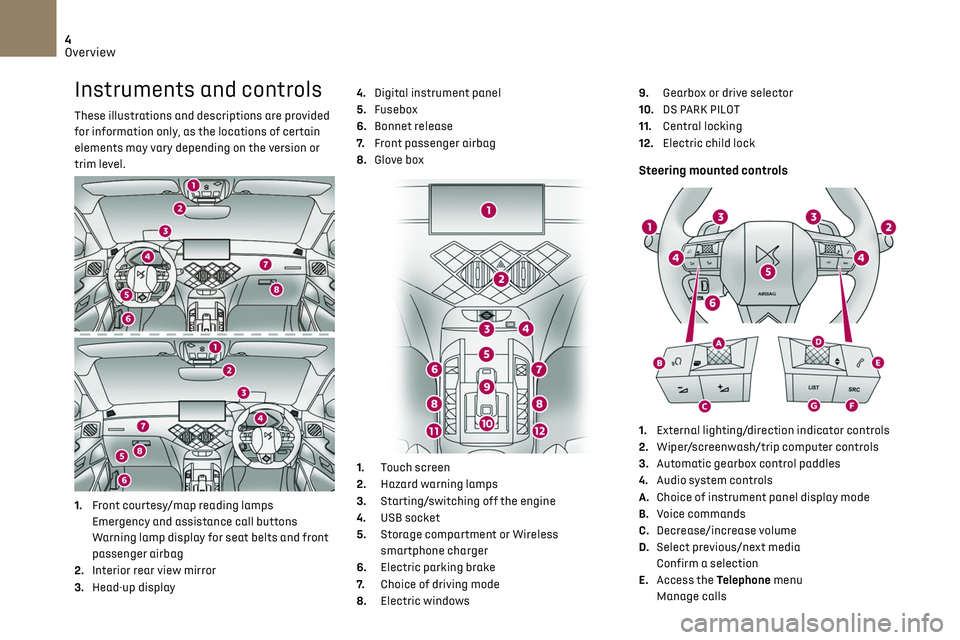
Instruments and controls
These illustrations and descriptions are provided
for information only, as the locations of certain
elements may vary depending on the version or
trim level.
1.Front courtesy/map reading lamps
Emergency and assistance call buttons
Warning lamp display for seat belts and front
passenger airbag
2. Interior rear view mirror
3. Head-up display 4.
Digital instrument panel
5. Fusebox
6. Bonnet release
7. Front passenger airbag
8. Glove box
1. Touch screen
2. Hazard warning lamps
3. Starting/switching off the engine
4. USB socket
5. Storage compartment or Wireless
smartphone charger
6. Electric parking brake
7. Choice of driving mode
8. Electric windows 9.
Gearbox or drive selector
10. DS PARK PILOT
11. Central locking
12. Electric child lock
Steering mounted controls
1.External lighting/direction indicator controls
2. Wiper/screenwash/trip computer controls
3. Automatic gearbox control paddles
4. Audio system controls
A. Choice of instrument panel display mode
B. Voice commands
C. Decrease/increase volume
D. Select previous/next media
Confirm a selection
E. Access the Telephone menu
Manage calls
Page 20 of 244
18
Instruments01
Retrieving the servicing information
You can view the servicing information by
pressing the “Check" button in the Driving
/ Vehicle touch screen menu.
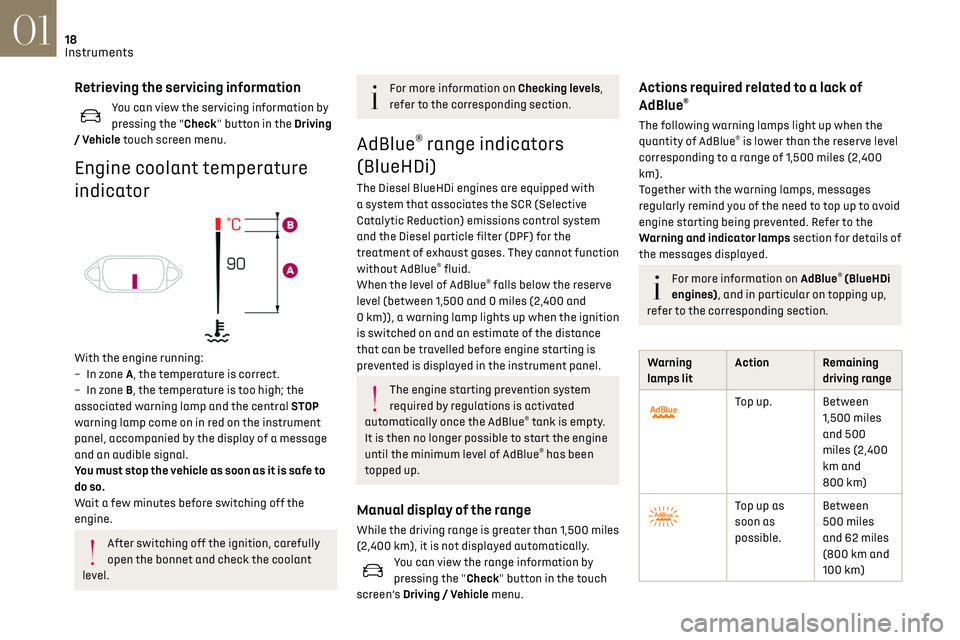
Engine coolant temperature
indicator
With the engine running:
– In z one A, the temperature is correct.
–
In z
one B, the temperature is too high; the
associated warning lamp and the central STOP
warning lamp come on in red on the instrument
panel, accompanied by the display of a message
and an audible signal.
You must stop the vehicle as soon as it is safe to
do so.
Wait a few minutes before switching off the
engine.
After switching off the ignition, carefully
open the bonnet and check the coolant
level.
For more information on Checking levels,
refer to the corresponding section.
AdBlue® range indicators
(BlueHDi)
The Diesel BlueHDi engines are equipped with
a system that associates the SCR (Selective
Catalytic Reduction) emissions control system
and the Diesel particle filter (DPF) for the
treatment of exhaust gases. They cannot function
without AdBlue
® fluid.
When the level of AdBlue® falls below the reserve
level (between 1,500 and 0 miles (2,400 and
0 km)), a warning lamp lights up when the ignition
is switched on and an estimate of the distance
that can be travelled before engine starting is
prevented is displayed in the instrument panel.
The engine starting prevention system
required by regulations is activated
automatically once the AdBlue
® tank is empty.
It is then no longer possible to start the engine
until the minimum level of AdBlue
® has been
topped up.
Manual display of the range
While the driving range is greater than 1,500 miles
(2,400 km), it is not displayed automatically.
You can view the range information by
pressing the "Check" button in the touch
screen’s Driving / Vehicle menu.
Actions required related to a lack of
AdBlue®
The following warning lamps light up when the
quantity of AdBlue® is lower than the reserve level
corresponding to a range of 1,500 miles (2,400
km).
Together with the warning lamps, messages
regularly remind you of the need to top up to avoid
engine starting being prevented. Refer to the
Warning and indicator lamps section for details of
the messages displayed.
For more information on AdBlue® (BlueHDi
engines), and in particular on topping up,
refer to the corresponding section.
Warning
lamps lit Action Remaining
driving range
Top up. Between 1,500 miles
and 500
miles (2,400
km and
800 km)
Top up as
soon as
possible.Between
500 miles
and 62 miles
(800 km and
100 km)
Page 36 of 244
34
Access02
System which protects and provides a deterrent
against theft and break-ins.
Exterior perimeter monitoring
The system checks for opening of the vehicle.
The alarm is triggered if anyone tries to open a
door, the boot or the bonnet, for example.
Interior volumetric monitoring
The system checks for any variation in volume in
the passenger compartment.
The alarm is triggered if anyone breaks a window,
enters the passenger compartment or moves
inside the vehicle.
Self-protection function
The system checks for the putting out of service
of its components.
The alarm is triggered if the battery, the central
control or the siren wiring is put out of service or
damaged.For all work on the alarm system, contact
a dealer or a qualified workshop.
Locking the vehicle with full
alarm system
Activation
► Switch off the ignition and exit the vehicle.
► Lock or deadlock the vehicle using the remote
control or by pressing on one of the front door
handles.
Too frequent presses on the handle up to
the point of resistance may damage its
mechanism.
In case of frost, press the handle to
release it.
From inside the vehicle, it is possible to unfold the
handles:
–
b
y opening a door,
–
b
y pressing the central locking button once
when the vehicle is locked or twice when
unlocked.
When driving, the handles automatically retract
once the vehicle speed exceeds 2 mph (3 km/h).
Opening
From outside
► Unlock your vehicle to unfold the door handles.
► Pull the handle.
When selective unlocking is activated,
only the driver door's handle will unfold
and only the driver's door can be opened.
From inside
► Pull the interior door opening lever; the exterior
door handles unfold automatically.
Opening one of the doors from inside unlocks the
rest of the vehicle.
With selective unlocking activated:
– O pening the driver's door unlocks the
driver's door only (if the vehicle has not already
been completely unlocked).
–
O
pening one of the passenger doors unlocks
the rest of the vehicle.
–
O
pening a door from inside causes the
unfolding of all the exterior handles.
Boot
Opening
► After unlocking the vehicle or just the boot,
press the opening control and then raise the
tailgate.
Closing
► Lower the tailgate using one of the interior
grab handles.
Back-up release
To manually unlock the boot in the event of a
battery or central locking failure.
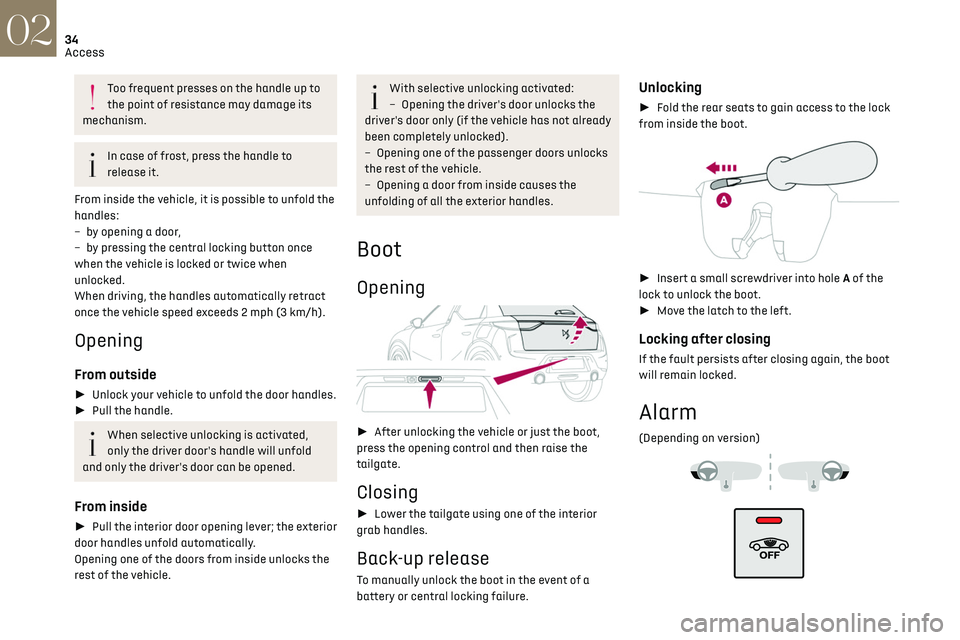
Unlocking
► Fold the rear seats to gain access to the lock
from inside the boot.
► Insert a small screwdriver into hole A of the
lock to unlock the boot.
► Move the latch to the left.
Locking after closing
If the fault persists after closing again, the boot
will remain locked.
Alarm
(Depending on version)
Page 37 of 244
35
Access02
System which protects and provides a deterrent
against theft and break-ins.
Exterior perimeter monitoring
The system checks for opening of the vehicle.
The alarm is triggered if anyone tries to open a
door, the boot or the bonnet, for example.
Interior volumetric monitoring
The system checks for any variation in volume in
the passenger compartment.
The alarm is triggered if anyone breaks a window,
enters the passenger compartment or moves
inside the vehicle.
Self-protection function
The system checks for the putting out of service
of its components.
The alarm is triggered if the battery, the central
control or the siren wiring is put out of service or
damaged.
For all work on the alarm system, contact
a dealer or a qualified workshop.
Locking the vehicle with full
alarm system
Activation
► Switch off the ignition and exit the vehicle.
► Lock or deadlock the vehicle using the remote
control or by pressing on one of the front door
handles.
When the monitoring system is active, the red
indicator lamp in the button flashes once per
second and the direction indicators come on for
about 2 seconds.
The exterior perimeter monitoring is activated
after 5 seconds and the interior volumetric
monitoring after 45 seconds.
The alarm does not activate when locking
automatically from a distance.
If an opening (door, boot or bonnet) is not
properly closed, the vehicle is not locked,
but the exterior perimeter monitoring will be
activated after 45 seconds, at the same time
as the interior volumetric monitoring.
Deactivation
► Press one of the remote control unlocking
buttons:
short press
long press
or
► Unlock the vehicle using the remote control or
by pressing one of the front door handles.
The monitoring system is deactivated: the
indicator lamp in the button goes off and the
direction indicators flash for about 2 seconds.
After unlocking using the remote control
If the vehicle automatically locks itself
again (as happens if a door or the boot is not
opened within 30 seconds of unlocking), the
monitoring system is automatically activated.
Locking the vehicle with
exterior perimeter monitoring
only
Disable volumetric monitoring to avoid unwanted
alarm triggering in certain cases, such as:
–
Sligh
tly open window.
–
W
ashing the vehicle.
–
C
hanging a wheel.
–
T
owing your vehicle.
–
Transport on a ship or ferry
.
Deactivating interior volumetric
monitoring
► Switch off the ignition and within 10 seconds
press the alarm button until the indicator lamp is
on fixed.
► Exit the vehicle.
► Immediately lock the vehicle using the remote
control or by pressing one of the front door
handles.
Only exterior perimeter monitoring is activated;
the red indicator lamp in the button flashes every
second.
To take effect, this deactivation must be
performed whenever the ignition is switched off.
Page 60 of 244
58Lighting and visibility04
Pause
If the situation requires a change of headlamp
beam, the driver can take over at any time.
► A "headlamp flash" pauses the function:
•
If the "
AUTO" and "Dipped beam" indicator
lamps were on, the system changes to main
beam.
•
If the "
AUTO" and "Main beam"
indicator lamps were on, the system changes
to dipped beam.
To reactivate the system, flash the headlamps
again.
The system may be disrupted or not work
correctly:
–
When visibility c
onditions are poor
(snowfall, heavy rain, etc.).
–
If the windscreen in fron
t of the camera is
dirty, misted or obscured (for example, by a
sticker).
–
If the v
ehicle is facing highly reflective
signs.
When the system detects thick fog, it
temporarily deactivates the function.
The system is not able to detect:
–
R
oad users that do not have their own
lighting, such as pedestrians.
–
V
ehicles whose lighting is obscured (for
example, vehicles driving behind a safety
barrier on a motorway).
–
V
ehicles at the top or bottom of a steep
slope, on winding roads, on crossroads.
Clean the windscreen regularly,
particularly the area in front of the
camera.
The internal surface of the windscreen can
also become misted around the camera.
In humid and cold weather, demist the
windscreen regularly.
Do not allow snow to accumulate on the
bonnet or roof of the vehicle as this could
obstruct the detection camera.
DS MATRIX LED VISION
Available only on versions equipped with Full LED
headlamps with the Matrix Beam function.
This system automatically adapts the main
beam according to the driving conditions, so that
optimum illumination is maintained for the driver,
without causing a nuisance to other road users.
The driver remains responsible for the
vehicle's lighting, its correct use for the
prevailing conditions of light, visibility and
traffic, and for observation of driving and
vehicle regulations.
The system is active from 25 mph
(40 km/h) and deactivates below 12 mph
(20 km/h).
Operation
Using a camera, the system detects the driving
conditions (brightess, lights from oncoming or
followed vehicles, road turns) and adapts the
beams of the main headlamps accordingly.
The modules that make up the main beams
switch on and off gradually, segment by segment,
depending on the driving conditions detected:
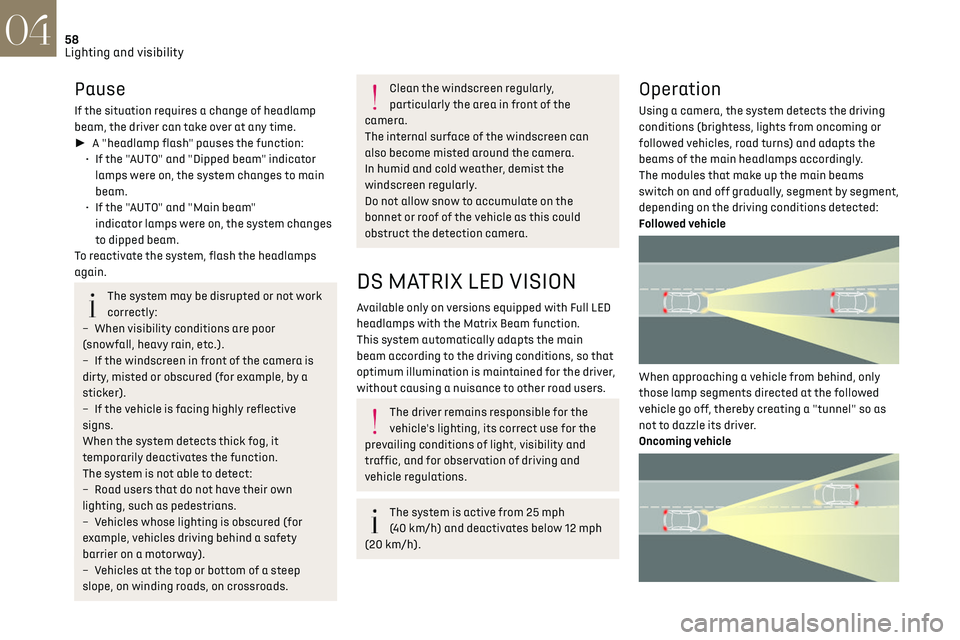
Followed vehicle
When approaching a vehicle from behind, only
those lamp segments directed at the followed
vehicle go off, thereby creating a "tunnel" so as
not to dazzle its driver.
Oncoming vehicle
When an oncoming vehicle approaches, only
those lamp segments directed at this vehicle
go off, thereby creating a "tunnel" during the
duration of the approach.
Nominal main beam lighting is restored as soon
as the vehicle is no longer detected by the system.
Entering an illuminated area
At the entrance to an illuminated area (for
example, a town), the lamp segments are
gradually switched off from the outside to the
inside of the vehicle to switch to the dipped
beams.
Exiting an illuminated area
The lamp segments gradually light up from the
inside to the outside of the vehicle to restore the
main beams.
Activation/Deactivation
► Turn the lighting control stalk ring to the
"AUTO" position.
This indicator lamp comes on in the
instrument panel.
The function can be activated and
deactivated in the Driving / Vehicle touch
screen menu.
When deactivated, the lighting system changes to
"automatic illumination of lamps" mode.
The status of the system remains in the memory
when the ignition is switched off.
Pause
If the situation requires a change of headlamp
beam, the driver can take over at any time.
Page 61 of 244
59
Lighting and visibility04
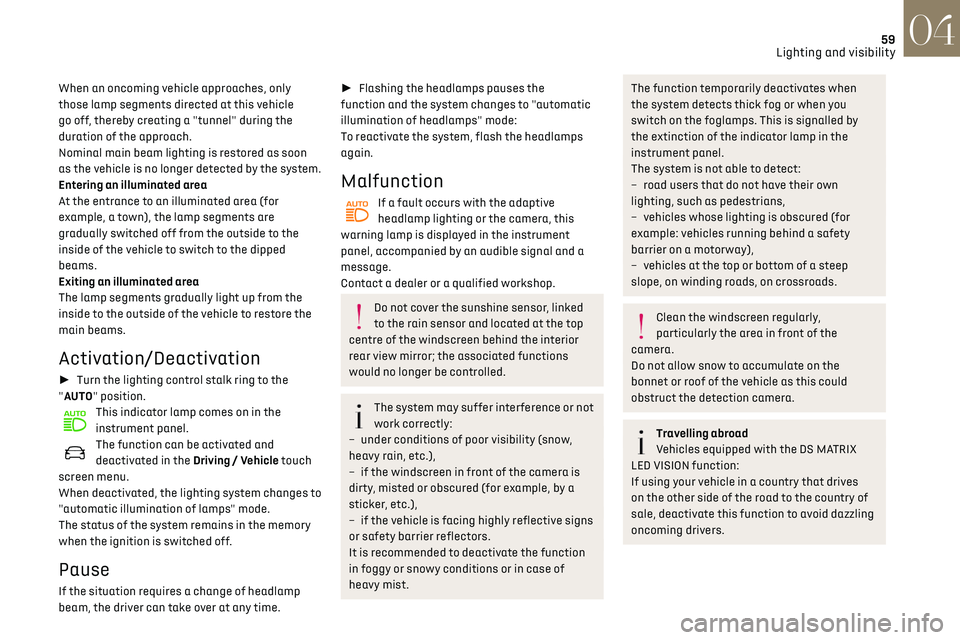
When an oncoming vehicle approaches, only
those lamp segments directed at this vehicle
go off, thereby creating a "tunnel" during the
duration of the approach.
Nominal main beam lighting is restored as soon
as the vehicle is no longer detected by the system.
Entering an illuminated area
At the entrance to an illuminated area (for
example, a town), the lamp segments are
gradually switched off from the outside to the
inside of the vehicle to switch to the dipped
beams.
Exiting an illuminated area
The lamp segments gradually light up from the
inside to the outside of the vehicle to restore the
main beams.
Activation/Deactivation
► Turn the lighting control stalk ring to the
"AUTO" position.
This indicator lamp comes on in the
instrument panel.
The function can be activated and
deactivated in the Driving / Vehicle touch
screen menu.
When deactivated, the lighting system changes to
"automatic illumination of lamps" mode.
The status of the system remains in the memory
when the ignition is switched off.
Pause
If the situation requires a change of headlamp
beam, the driver can take over at any time.
► Flashing the headlamps pauses the
function and the system changes to "automatic
illumination of headlamps" mode:
To reactivate the system, flash the headlamps
again.
Malfunction
If a fault occurs with the adaptive
headlamp lighting or the camera, this
warning lamp is displayed in the instrument
panel, accompanied by an audible signal and a
message.
Contact a dealer or a qualified workshop.
Do not cover the sunshine sensor, linked
to the rain sensor and located at the top
centre of the windscreen behind the interior
rear view mirror; the associated functions
would no longer be controlled.
The system may suffer interference or not
work correctly:
–
under c
onditions of poor visibility (snow,
heavy rain, etc.),
–
if the windscreen in fron
t of the camera is
dirty, misted or obscured (for example, by a
sticker, etc.),
–
if the v
ehicle is facing highly reflective signs
or safety barrier reflectors.
It is recommended to deactivate the function
in foggy or snowy conditions or in case of
heavy mist.
The function temporarily deactivates when
the system detects thick fog or when you
switch on the foglamps. This is signalled by
the extinction of the indicator lamp in the
instrument panel.
The system is not able to detect:
–
road users tha
t do not have their own
lighting, such as pedestrians,
–
v
ehicles whose lighting is obscured (for
example: vehicles running behind a safety
barrier on a motorway),
–
v
ehicles at the top or bottom of a steep
slope, on winding roads, on crossroads.
Clean the windscreen regularly,
particularly the area in front of the
camera.
Do not allow snow to accumulate on the
bonnet or roof of the vehicle as this could
obstruct the detection camera.
Travelling abroad
Vehicles equipped with the DS MATRIX
LED VISION function:
If using your vehicle in a country that drives
on the other side of the road to the country of
sale, deactivate this function to avoid dazzling
oncoming drivers.
Page 94 of 244
92
Driving06
Stop & Start
The Stop & Start function puts the engine
temporarily into standby - STOP mode - during
phases when the vehicle is stopped (red lights,
queues, etc.). The engine restarts automatically
- START mode - as soon as the driver wishes to
move off again.
Primarily designed for urban use, the function
is intended to reduce fuel consumption and
exhaust emissions as well as the noise level when
stationary.
The function does not affect the functionalities of
the vehicle, in particular the braking.
Deactivation/Reactivation
The function is activated by default when the
ignition is switched on.
It is set via the Driving / Vehicle touch
screen menu.
A message in the instrument panel confirms the
change of status.
When the function is deactivated, if the engine
was in standby, it restarts immediately.
Associated indicator lamps
Function activated.
Function deactivated or malfunction.
Opening the bonnet
Before doing anything under the bonnet,
deactivate the Stop & Start system to avoid
any risk of injury caused by the engine
restarting automatically.
Driving on flooded roads
Before entering into a flooded area, it is
strongly recommended that you deactivate the
Stop & Start system.
For more information on Driving
recommendations, particularly on flooded
roads, refer to the corresponding section.
Operation
Main conditions for operation
– The driver’s door must be closed.
– The driv er's seat belt must be fastened.
–
The st
ate of charge of the battery must be
sufficient.
–
The t
emperature of the engine must be within
its nominal operating range.
–
The outside t
emperature must be between 0°C
and 35°C.
Putting the engine into standby (STOP
mode)
The engine automatically goes into standby
as soon as the driver indicates the intention of
stopping.
– With a manual gearbox: with the gear lever in
neutral and the clutch pedal released.
–
With an
automatic gearbox: with the brake
pedal depressed until the vehicle stops or the gear
selector in position N, with the vehicle stopped.
Time counter
A time counter adds up the time spent in standby
during the journey. It is reset to zero every time
the ignition is switched on.
Special cases:
The engine will not go into standby if all of the
conditions for operation are not met and in the
following cases.
–
St
eep slope (ascending or descending).
–
Needed t
o maintain a comfortable temperature
in the passenger compartment.
–
Demisting activ
e.
In these cases, this indicator lamp flashes
for a few seconds, then goes off.
After the engine has restarted, STOP
mode is not available until the vehicle has
reached a speed of 5 mph (8 km/h).
During parking manoeuvres, STOP mode is
not available for a few seconds after
coming out of reverse gear or turning the
steering wheel.
Restarting the engine (START mode)
The engine automatically restarts as soon as the
driver indicates the intention of moving off again.
► With a manual gearbox: with the clutch pedal
fully depressed.
► With an automatic gearbox:
• With the selector in position D or M: with the
brake pedal released.
• With the selector in position N and the brake
pedal released: with the selector at D or M.
• With the selector in position P and the brake
pedal depressed: with the selector at R, N, D
or M.
• Reverse gear engaged.
Special cases
The engine restarts automatically if all the
operating conditions are met again and in the
following cases.
– With a manual gearbox: vehicle speed exceeds
2.5 mph (4 km/h),
– With an automatic gearbox, in mode N, vehicle
speed exceeds 0.6 mph (1 km/h).
In these cases, this indicator lamp flashes
for a few seconds, then goes off.
Malfunctions
In the event of a malfunction, this warning
lamp flashes for a few moments, then
remains on, accompanied by an onscreen
message.
Have the vehicle checked by a dealer or a qualified
workshop.
Page 136 of 244
134
Practical information07
4.Always use an electrical socket protected
by a circuit-breaker appropriate for the
electrical circuit’s current rating.
5. The weight of the control unit must not be
borne by the electrical socket, plug and
cables.
6. Never use this charging cable if it is defective
or in any way damaged.
7. Never attempt to repair or open this charging
cable. It contains no repairable parts -
replace the charging cable if it is damaged.
8. Never immerse this charging cable in water.
9. Never use this charging cable with an
extension cable, a multi-plug socket,
a conversion adaptor or on a damaged
electrical socket.
10. Do not unplug the plug from the wall as a
means of stopping charging.
11. Do not force the connector if it is locked into
the vehicle.
12. Immediately stop charging, by locking and
then unlocking the vehicle using the remote
control key, if the charging cable or wall
socket feel burning hot to the touch.
13. This charging cable includes components
liable to cause electrical arcing or sparks. Do
not expose to flammable vapours.
14. Only use this charging cable with DS
AUTOMOBILES vehicles.
15. Never plug the cable into the wall socket (or
unplug it) with wet hands.Charging the traction
battery (Electric)
To recharge, connect the vehicle to a domestic
electrical system (for domestic or accelerated
charging) or a fast charging station (for fast
charging).
For a full charge, follow the desired charging
procedure without pausing it, until it ends
automatically. Charging may be performed either
immediately or deferred.
You can stop charging at any time by unlocking
the vehicle and removing the nozzle.
For more information on the charging displays on
the Instrument panel and the Touch screen, refer
to the corresponding section.
Depending on version, the deferred charge
function is configured via either the touch
screen or the MyDS application.
For more information on the deferred charge
function, refer to the corresponding section.
A LED, located below the interior rear view
and visible from outside the vehicle,
flashes in blue for a few minutes to confirm
the start of the charging.
It is also possible to monitor the charging
process using the MyDS application.
For more information on Remotely operable
features, refer to the corresponding section.
As a safety measure, the engine will not
start if the charging cable is plugged into
the connector on the vehicle. A warning is
displayed on the instrument panel.
Cooling the traction battery
The cooling fan comes on during charging
to cool the on-board charger and the traction
battery.
Vehicle unused for an extended period
Fully recharge the traction battery every
three months. Follow the domestic charging
procedure.
Before carrying out the charging operation,
check that the accessory battery is not
disconnected or discharged. If it is, refer to
the corresponding section for information on
reconnecting or recharging it.
Precautions
Electric vehicles were developed in accordance
with the guidelines on maximum electromagnetic
fields issued by the International Commission on
Non-Ionizing Radiation Protection (ICNIRP - 1998
Guidelines).
Wearers of pacemakers or equivalent
devices should consult a doctor to enquire
about any applicable precautionary measures, or
contact the manufacturer of their implanted
electronic medical device to check that it is
guaranteed to operate in an environment
compliant with the ICNIRP guidelines.
If in doubt
Domestic or accelerated charging: do
not remain inside or near the vehicle, or near
the charging cable or charging unit, even for a
short time.
Fast charging: do not use the system yourself
and avoid approaching public fast charging
points. Leave the area and ask a third party to
recharge the vehicle.
For domestic or accelerated charging
Before charging
Depending on the context:
► Have a professional check that the
electrical system to be used complies with
applicable standards and is compatible with
the vehicle.
► Have a professional electrician install
a dedicated domestic power socket or
accelerated charging unit (Wallbox)
compatible with the vehicle.
Use the charging cable supplied with the
vehicle.
(During charging)
Never work under the bonnet:
– Some areas remain very hot, even an hour
after charging ends - risk of burns!
– The fan may start at any time - risk of cuts or
strangulation!
Page 137 of 244
135
Practical information07
If in doubt
Domestic or accelerated charging: do
not remain inside or near the vehicle, or near
the charging cable or charging unit, even for a
short time.
Fast charging: do not use the system yourself
and avoid approaching public fast charging
points. Leave the area and ask a third party to
recharge the vehicle.
For domestic or accelerated charging
Before charging
Depending on the context:
► Have a professional check that the
electrical system to be used complies with
applicable standards and is compatible with
the vehicle.
► Have a professional electrician install
a dedicated domestic power socket or
accelerated charging unit (Wallbox)
compatible with the vehicle.
Use the charging cable supplied with the
vehicle.
(During charging)
Never work under the bonnet:
–
Some areas remain v
ery hot, even an hour
after charging ends - risk of burns!
–
The fan ma
y start at any time - risk of cuts or
strangulation!
After charging
Check that the charging flap is closed.
Do not leave the cable connected to the
domestic power socket - risk of short-circuit
or electrocution in the event of contact with or
immersion in water!
For fast charging
Before charging
Check that the fast public charger and
its charging cable are compatible with your
vehicle.
If the exterior temperature is below :
–
-25
°C, charging may not be possible.
–
0°C
, charging times may be extended.
(During charging)
Do not remain in or near the vehicle.
While charging is in progress, opening the
driver's door will interrupt charging.
After charging
Check that the charging flap is closed.
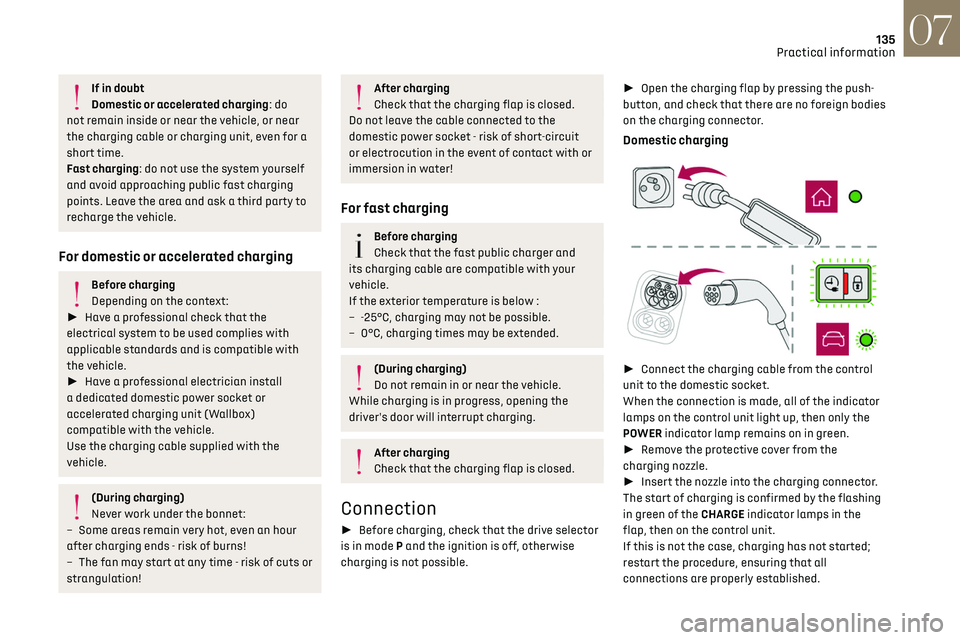
Connection
► Before charging, check that the drive selector
is in mode P and the ignition is off, otherwise
charging is not possible. ►
Open the charging flap by pressing the push-
button, and check that there are no foreign bodies
on the charging connector.
Domestic charging
► Connect the charging cable from the control
unit to the domestic socket.
When the connection is made, all of the indicator
lamps on the control unit light up, then only the
POWER indicator lamp remains on in green.
► Remove the protective cover from the
charging nozzle.
► Insert the nozzle into the charging connector.
The start of charging is confirmed by the flashing
in green of the CHARGE indicator lamps in the
flap, then on the control unit.
If this is not the case, charging has not started;
restart the procedure, ensuring that all
connections are properly established.