isofix CITROEN DS3 CROSSBACK 2019 Owners Manual
[x] Cancel search | Manufacturer: CITROEN, Model Year: 2019, Model line: DS3 CROSSBACK, Model: CITROEN DS3 CROSSBACK 2019Pages: 244, PDF Size: 7.7 MB
Page 4 of 244
2
Contents
Overview
Eco-driving
01 Instruments
9 Digital instrument panel
10 Head-up display
11 Warning and indicator lamps
17 Indicators
21 Manual test
21 Total distance recorder
21 Lighting dimmer
22 Trip computer
22 5-inch touch screen
23 7-inch or 10-inch touch screen
26 Remotely operable features (Electric)
02 Access
27 Electronic key with remote control function and
built-in key,
28
Proximity Keyless Entry and Start
30 DS SMART ACCESS
30 Central locking
31 Emergency procedures
33 Doors
34 Boot
34 Alarm
36 Electric windows
03 Ease of use and comfort
38 Front seats
40 Steering wheel adjustment
41 Mirrors
42 Rear bench seat
43 Heating and Ventilation
44 Manual air conditioning
45 Automatic air conditioning
47 Front demist - defrost
47 Rear screen demist - defrost
47 Heated windscreen and washer jets
48 Remote-controlled heating and air conditioning
(Electric)
48
Interior fittings
51 Courtesy lamps
52 Touch-sensitive courtesy lamps
52 Boot fittings
04 Lighting and visibility
54 Exterior lighting control stalk
55 Daytime running lamps/Sidelamps
55 Direction indicators
55 Automatic illumination of headlamps
56 Headlamp beam height adjustment
56 Guide-me-home and welcome lighting
57 Automatic headlamp dipping
58 DS MATRIX LED VISION
60 Wiper control stalk
61 Changing a wiper blade
62 Automatic wipers
05 Safety
63 General safety recommendations
63 Hazard warning lamps
64 Horn
64 Pedestrian horn (Electric)
64 Emergency or assistance call
66 Electronic stability control (ESC)
67 Advanced Traction Control
68 Seat belts
70 Airbags
72 Child seats
74 Deactivating the front passenger airbag
75 ISOFIX child seats
76 i-Size child seats
79 Child lock
06 Driving
80 Driving recommendations
81 Anti-theft protection
81 Starting/Switching off the engine
83 Starting/Switching off the engine with DS
SMART ACCESS
83
Electric parking brake
86 6-speed manual gearbox
86 Automatic gearbox (EAT8)
89 Drive selector (Electric)
90 Driving modes
90 Hill start assist
91 Gear shift indicator
92 Stop & Start
93 Under-inflation detection
94 Driving and manoeuvring aids - General
recommendations
95
Speed Limit Recognition and Recommendation
99 Speed limiter
100 Cruise control - particular recommendations
101 Cruise control
102 Memorising speeds
103 DS DRIVE ASSIST
103 Adaptive Cruise Control
106 Active Lane Keeping Assist
110 Active Lane Departure Warning System
113 Blind Spot Detection
114 Active Blind Spot Detection
Page 54 of 244
52Ease of use and comfort03
Permanent lighting.
In "permanent lighting" mode, the lighting time
varies according to the circumstances:
–
when the ignition is o
ff, approximately ten
minutes,
–
in energy ec
onomy mode, approximately thirty
seconds,
–
with the engine running, unlimit
ed.
Map reading lamps
► With the ignition on, operate the
corresponding switch.
Take care not to place anything in contact
with the courtesy lamps.
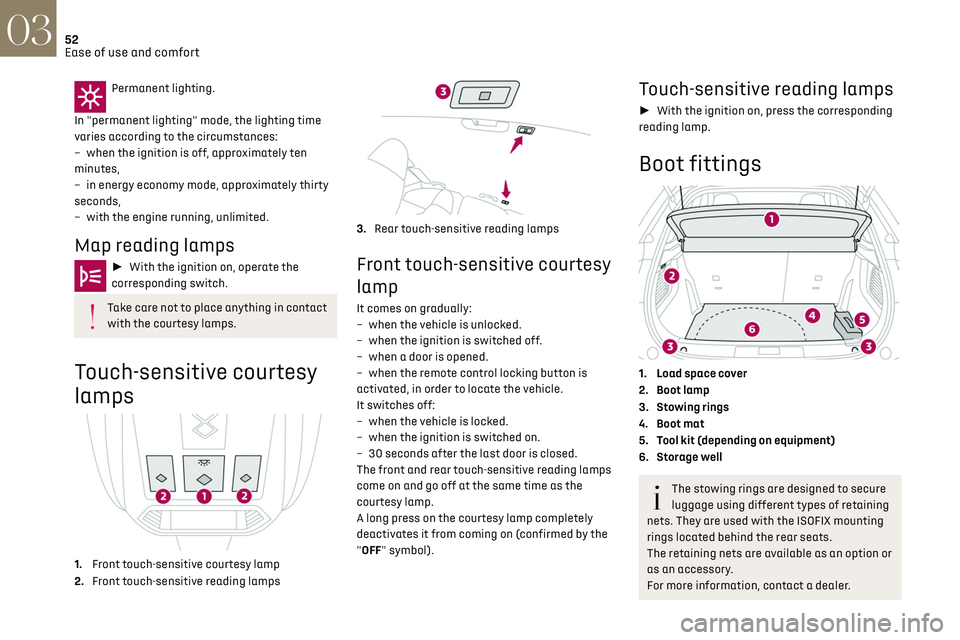
Touch-sensitive courtesy
lamps
1. Front touch-sensitive courtesy lamp
2. Front touch-sensitive reading lamps
3.Rear touch-sensitive reading lamps
Front touch-sensitive courtesy
lamp
It comes on gradually:
–
when the v ehicle is unlocked.
–
when the ignition is s
witched off.
–
when a door is opened.
–
when the remo
te control locking button is
activated, in order to locate the vehicle.
It switches off:
–
when the v
ehicle is locked.
–
when the ignition is s
witched on.
–
30 sec
onds after the last door is closed.
The front and rear touch-sensitive reading lamps
come on and go off at the same time as the
courtesy lamp.
A long press on the courtesy lamp completely
deactivates it from coming on (confirmed by the
"OFF" symbol).
Touch-sensitive reading lamps
► With the ignition on, press the corresponding
reading lamp.
Boot fittings
1. Load space cover
2. Boot lamp
3. Stowing rings
4. Boot mat
5. Tool kit (depending on equipment)
6. Storage well
The stowing rings are designed to secure
luggage using different types of retaining
nets. They are used with the ISOFIX mounting
rings located behind the rear seats.
The retaining nets are available as an option or
as an accessory.
For more information, contact a dealer.
Load space cover
To remove the load space cover:
► unhook the two cords,
► gently lift the shelf, then remove it.
When sharp deceleration occurs, objects
placed on the load space cover can turn
into projectiles.
Storage well
► Fully raise the boot carpet to access the
storage well.
Page 74 of 244
72Safety05
Passengers must not place their feet on the
dashboard.
Do not smoke as deployment of the airbags
can cause burns or the risk of injury from a
cigarette or pipe.
Never remove or pierce the steering wheel or
hit it violently.
Do not fix or attach anything to the steering
wheel or dashboard, as this could cause
injuries when the airbags are deployed.
Lateral airbags
Use only approved covers on the seats,
compatible with the deployment of the lateral
airbags. For information on the range of seat
covers suitable for your vehicle, contact a
dealer.
Do not fix or attach anything to the seat
backrests (clothing, etc.), as this could cause
injuries to the chest or arm when the lateral
airbag is deployed.
Do not sit with the upper part of the body any
nearer to the door than necessary.
At the rear, any objects placed on the outer
seats or the folded backrest of the 1/3 bench
seat could become projectiles when the lateral
airbags are deployed.
The vehicle's front door panels include side
impact sensors.
A damaged door or any unauthorised or
incorrectly executed work (modification or
repair) on the front doors or their interior trim
could compromise the operation of these
sensors - risk of malfunction of the lateral
airbags!
Such work must only be done by a dealer or a
qualified workshop.
Curtain airbags
Do not fix or attach anything to the roof,
as this could cause head injuries when the
curtain airbag is deployed.
Do not remove the grab handles installed on
the roof, as they play a part in securing the
curtain airbags.
Child seats
The legislation on carrying children is
specific to each country. Refer to the
legislation in force in your country.
For maximum safety, please observe the following
recommendations:
–
In ac
cordance with European regulations, all
children under the age of 12 or less than one and
a half metres tall must travel in approved child
seats suited to their weight, on seats fitted with a
seat belt or ISOFIX mountings.
–
Statistically
, the safest seats in your vehicle for
carrying children are the rear seats.
–
A child w
eighing less than 9 kg must travel in
the "rearward facing" position both in the front
and in the rear.
It is recommended that children travel on
the rear seats of the vehicle:
–
"rearward facing" up to the age of 3,
–
"forward facing" over the age of 3.
Make sure that the seat belt is correctly
positioned and tightened.
For child seats with a support leg, ensure that
the support leg is in firm and steady contact
with the floor.
An incorrectly installed child seat
compromises the child's safety in the
event of an accident.
Ensure that there is no seat belt or seat belt
buckle under the child seat, as this could
destabilise it.
Remember to fasten the seat belts or the
harness of child seats, keeping the slack
relative to the child's body to a minimum, even
for short journeys.
When installing a child seat using the seat
belt, ensure that the seat belt is tightened
correctly on the child seat and that it secures
the child seat firmly on the seat of the vehicle.
If the passenger seat is adjustable, move it
forwards if necessary.
Remove the head restraint before installing a
child seat with a backrest on a passenger seat.
Ensure that the head restraint is stored or
attached securely to prevent it from being
thrown around the vehicle in the event of sharp
Page 77 of 244
75Safety05
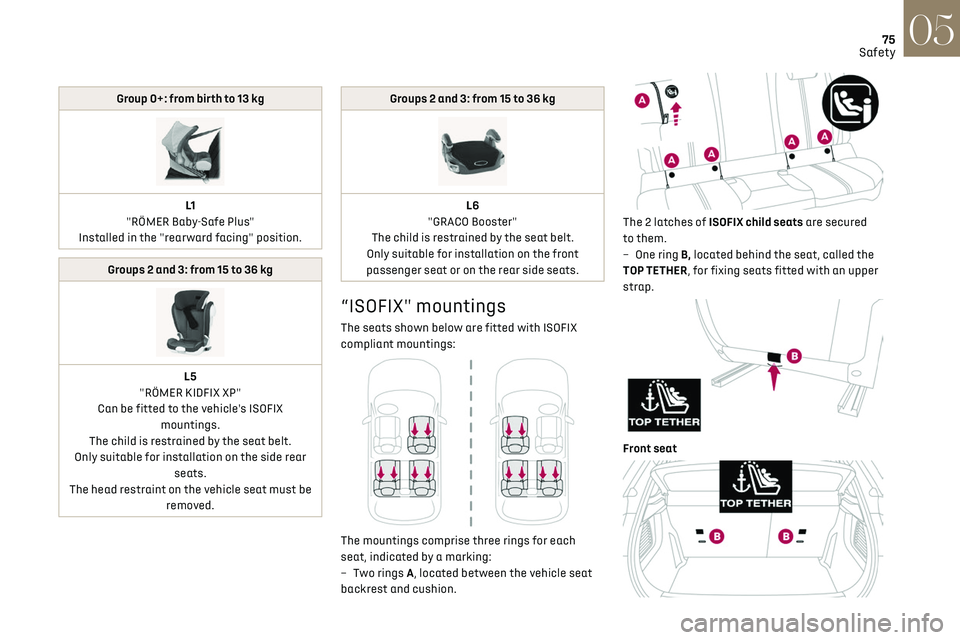
Group 0+: from birth to 13 kg
L1
"RÖMER Baby-Safe Plus"
Installed in the "rearward facing" position.
Groups 2 and 3: from 15 to 36 kg
L5
"RÖMER KIDFIX XP"
Can be fitted to the vehicle's ISOFIX mountings.
The child is restrained by the seat belt.
Only suitable for installation on the side rear seats.
The head restraint on the vehicle seat must be removed.
Groups 2 and 3: from 15 to 36 kg
L6
"GRACO Booster"
The child is restrained by the seat belt.
Only suitable for installation on the front
passenger seat or on the rear side seats.
“ISOFIX" mountings
The seats shown below are fitted with ISOFIX
compliant mountings:
The mountings comprise three rings for each
seat, indicated by a marking:
–
Tw
o rings A, located between the vehicle seat
backrest and cushion.
The 2 latches of ISOFIX child seats are secured
to them.
–
O
ne ring B, located behind the seat, called the
TOP TETHER, for fixing seats fitted with an upper
strap.
Front seat
Page 78 of 244
76Safety05
Installing ISOFIX and i-Size
universal child seats
In compliance with European regulations, this
table indicates the possibilities of installing child
Rear seats
This system prevents the child seat from tipping
forward in the event of a front impact.
This ISOFIX mounting system provides fast,
reliable and safe fitting of the child seat in the
vehicle.
To secure the child seat to the TOP TETHER:
► Remove and stow the head restraint before
installing the child seat on this seat (refit it once
the child seat has been removed).
► Pass the upper strap of the child seat behind
the seat backrest, between the head restraint
rods.
► Secure the upper strap hook to ring B.
► Tighten the upper strap.
When fitting an ISOFIX child seat to the
left-hand rear seat of the bench seat,
before fitting the seat, first move the centre
rear seat belt towards the middle of the
vehicle, so as to avoid the seat interfering with
the operation of the seat belt.
An incorrectly installed child seat
compromises the child's safety in the
event of an accident.
Strictly observe the fitting instructions
provided in the user guide supplied with the
child seat.
For information about the installation
possibilities for ISOFIX child seats in your
vehicle, refer to the summary table.
Recommended ISOFIX child seats
Also consult the user guide from the child
seat’s manufacturer to find out how to
install and remove the seat.
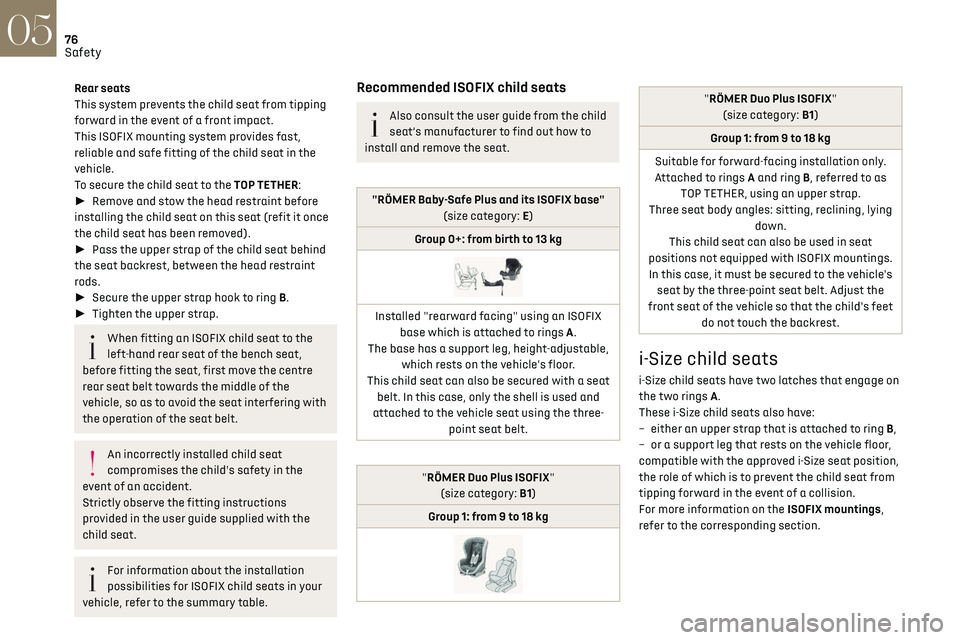
"RÖMER Baby-Safe Plus and its ISOFIX base" (size category: E)
Group 0+: from birth to 13 kg
Installed "rearward facing" using an ISOFIX base which is attached to rings A.
The base has a support leg, height-adjustable, which rests on the vehicle's floor.
This child seat can also be secured with a seat belt. In this case, only the shell is used and
attached to the vehicle seat using the three- point seat belt.
"RÖMER Duo Plus ISOFIX"(size category: B1)
Group 1: from 9 to 18 kg
"RÖMER Duo Plus ISOFIX" (size category: B1)
Group 1: from 9 to 18 kg
Suitable for forward-facing installation only.
Attached to rings A and ring B, referred to as TOP TETHER, using an upper strap.
Three seat body angles: sitting, reclining, lying down.
This child seat can also be used in seat
positions not equipped with ISOFIX mountings. In this case, it must be secured to the vehicle's seat by the three-point seat belt. Adjust the
front seat of the vehicle so that the child's feet do not touch the backrest.
i-Size child seats
i-Size child seats have two latches that engage on
the two rings A.
These i-Size child seats also have:
–
either an upper strap tha
t is attached to ring B,
–
or a support leg tha
t rests on the vehicle floor,
compatible with the approved i-Size seat position,
the role of which is to prevent the child seat from
tipping forward in the event of a collision.
For more information on the ISOFIX mountings,
refer to the corresponding section.
Page 79 of 244
77Safety05
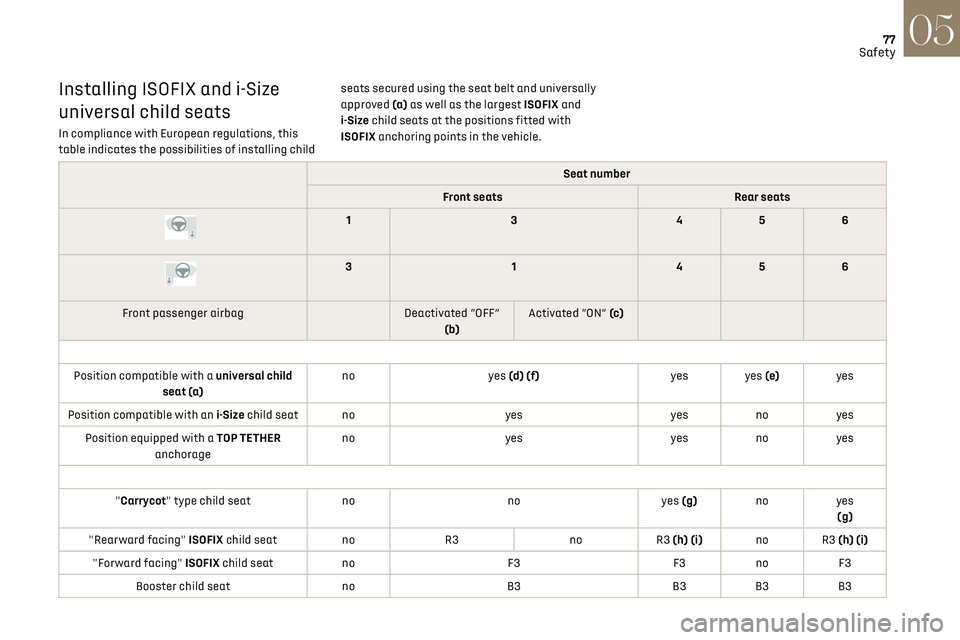
Installing ISOFIX and i-Size
universal child seats
In compliance with European regulations, this
table indicates the possibilities of installing child seats secured using the seat belt and universally
approved (a)
as well as the largest ISOFIX and
i-Size child seats at the positions fitted with
ISOFIX anchoring points in the vehicle.
Seat number
Front seats Rear seats
13 456
3 1456
Front passenger airbag Deactivated “OFF”
(b) Activated “ON” (c)
Position compatible with a universal child seat (a) no
yes (d) (f) yes yes (e)yes
Position compatible with an i-Size child seat no yesyesnoyes
Position equipped with a TOP TETHER anchorage no
yes yesnoyes
"Carrycot" type child seat nonoyes (g)noyes
(g)
"Rearward facing" ISOFIX child seat noR3 noR3 (h) (i) no R3 (h) (i)
"Forward facing" ISOFIX child seat noF3F3no F3
Booster child seat noB3 B3B3B3
Page 80 of 244
78Safety05
– F2X: ISOFIX child seat for toddlers.
– F2: ISOFIX reduced height child seat.
– F3: ISOFIX full height child seat.
Child booster seat.
ISOFIX "carrycot" type child seat:
– L1: head to the left.
– L2: head to the right.
Manual child lock
This system prevents opening of a rear door using
its interior handle.
The control, red in colour, is located on the edge of
each rear door (marked by a label).
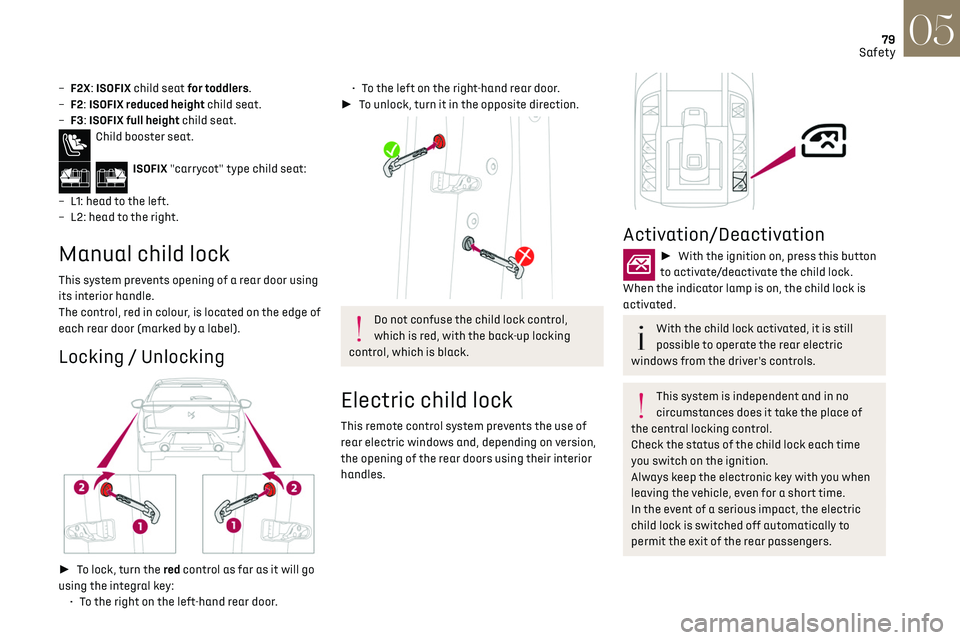
Locking / Unlocking
► To lock, turn the red control as far as it will go
using the integral key: • To the right on the left-hand rear door.
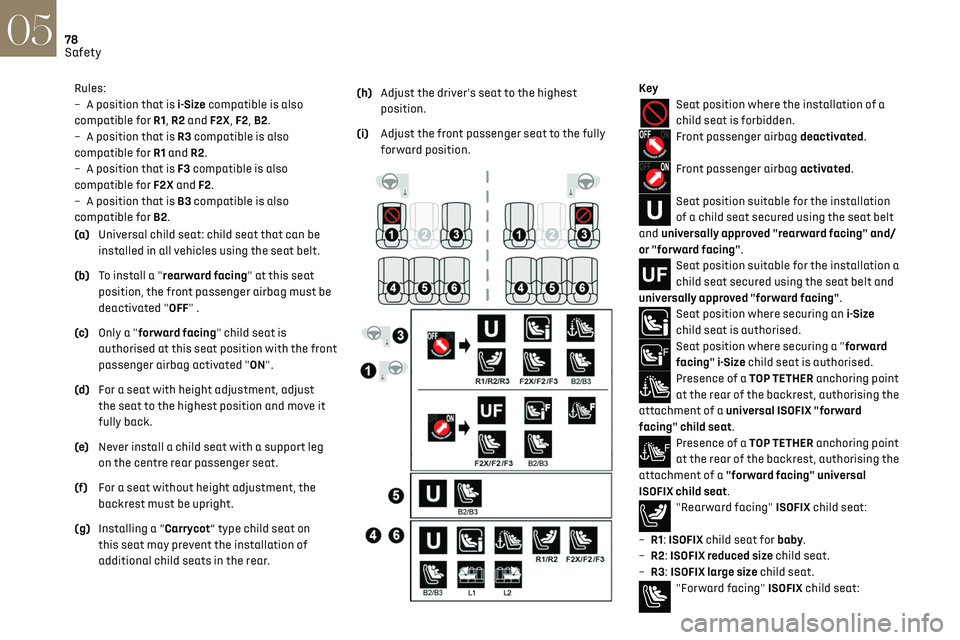
Rules:
–
A po sition that is i-Size compatible is also
compatible for R1, R2 and F2X, F2, B2.
–
A po
sition that is R3 compatible is also
compatible for R1 and R2.
–
A po
sition that is F3 compatible is also
compatible for F2X and F2.
–
A po
sition that is B3 compatible is also
compatible for B2.
(a) Universal child seat: child seat that can be
installed in all vehicles using the seat belt.
(b) To install a "rearward facing" at this seat
position, the front passenger airbag must be
deactivated "OFF" .
(c) Only a "forward facing" child seat is
authorised at this seat position with the front
passenger airbag activated "ON".
(d) For a seat with height adjustment, adjust
the seat to the highest position and move it
fully back.
(e) Never install a child seat with a support leg
on the centre rear passenger seat.
(f) For a seat without height adjustment, the
backrest must be upright.
(g) Installing a “Carrycot” type child seat on
this seat may prevent the installation of
additional child seats in the rear. (h)
Adjust the driver's seat to the highest
position.
(i) Adjust the front passenger seat to the fully
forward position.
KeySeat position where the installation of a
child seat is forbidden.
Front passenger airbag deactivated.
Front passenger airbag activated.
Seat position suitable for the installation
of a child seat secured using the seat belt
and universally approved "rearward facing" and/
or "forward facing".
Seat position suitable for the installation a
child seat secured using the seat belt and
universally approved "forward facing".
Seat position where securing an i-Size
child seat is authorised.
Seat position where securing a "forward
facing" i-Size child seat is authorised.
Presence of a TOP TETHER anchoring point
at the rear of the backrest, authorising the
attachment of a universal ISOFIX "forward
facing" child seat.
Presence of a TOP TETHER anchoring point
at the rear of the backrest, authorising the
attachment of a "forward facing" universal
ISOFIX child seat.
"Rearward facing" ISOFIX child seat:
–
R1
: ISOFIX child seat for baby.
–
R2
: ISOFIX reduced size child seat.
–
R3
: ISOFIX large size child seat.
"Forward facing" ISOFIX child seat:
Page 81 of 244
79Safety05
– F2X: ISOFIX child seat for toddlers.
– F2 : ISOFIX reduced height child seat.
–
F3
: ISOFIX full height child seat.
Child booster seat.
ISOFIX "carrycot" type child seat:
–
L
1: head to the left.
–
L2: head t
o the right.
Manual child lock
This system prevents opening of a rear door using
its interior handle.
The control, red in colour, is located on the edge of
each rear door (marked by a label).
Locking / Unlocking
► To lock, turn the red control as far as it will go
using the integral key: •
T
o the right on the left-hand rear door.
• To the left on the right-hand rear door.
► To unlock, turn it in the opposite direction.
Do not confuse the child lock control,
which is red, with the back-up locking
control, which is black.
Electric child lock
This remote control system prevents the use of
rear electric windows and, depending on version,
the opening of the rear doors using their interior
handles.
Activation/Deactivation
► With the ignition on, press this button
to activate/deactivate the child lock.
When the indicator lamp is on, the child lock is
activated.
With the child lock activated, it is still
possible to operate the rear electric
windows from the driver's controls.
This system is independent and in no
circumstances does it take the place of
the central locking control.
Check the status of the child lock each time
you switch on the ignition.
Always keep the electronic key with you when
leaving the vehicle, even for a short time.
In the event of a serious impact, the electric
child lock is switched off automatically to
permit the exit of the rear passengers.
Page 222 of 244
220
Alphabetical index
A
ABS 66
Accessories
63
Active Safety Brake
115–117
AdBlue®
18, 144
AdBlue® tank
145
Additive, Diesel
143
Adjusting headlamps
56
Adjusting head restraints
39
Adjusting seat
38–39
Adjusting the air distribution
44, 46
Adjusting the air flow
44–45
Adjusting the date
193, 215
Adjusting the height and reach of
the steering wheel
40
Adjusting the lumbar support
39
Adjusting the seat angle
38
Adjusting the temperature
44–45
Adjusting the time
180, 193, 216
Advanced Traction Control
67
Advice on care and maintenance
131, 146
Advice on driving
7, 80–81
Airbags
70–72, 74
Airbags, curtain
71–72
Airbags, front
70–71, 74
Airbags, lateral
71–72
Air conditioning
43, 46
Air conditioning, automatic
45
Air conditioning, manual
44
Air intake
47
Air vents
43
Alarm
34–36
Amplifier, audio
50
Android Auto connection
207
Anti-lock braking system (ABS)
66
Antitheft / Immobiliser 31, 81
Apple CarPlay connection
189, 206
Applications
207
Armrest, front
49
Assistance call
64
Assistance, emergency braking
66, 116
Audible warning
64
Audio streaming (Bluetooth)
177–178, 187, 211
B
Battery 138
Battery, 12 V
142, 161–164
Battery, ancillaries
161–162
Battery, charging
130, 134, 163–164
Battery, remote control
32–33
Blind spot monitoring system, active
114
Blind spot sensors
113–114
BlueHDi
18, 142, 148
Bluetooth (hands-free)
178, 190, 212
Bluetooth (telephone)
178, 190, 212–213
Bodywork
147
Bonnet
139
Boot
34, 53
Brake discs
143
Brake lamps
157–158
Brakes
143
Braking
90
Braking assistance system
66
Braking, automatic emergency
115–117
Braking, dynamic emergency
84–85
Brightness
179, 192
Bulbs
156
Bulbs (changing)
155–158
C
Cable, audio 211
Cable, Jack
211
Capacity, fuel tank
129
Cap, fuel filler
129
Care of the bodywork
147
CD
177, 187
CD, MP3
177, 187
Central locking
30
Changing a bulb
155–158
Changing a fuse
159–161
Changing a wheel
149, 152
Changing a wiper blade
61
Changing the remote control battery
32
Charger, induction
50
Charger, wireless
50
CHECK
21
Checking the levels
140–142
Checking tyre pressures
(using the kit)
150, 152
Checks
140, 142–144
Checks, routine
142–143
Child lock
79
Children
69, 75–76
Children (safety)
79
Child seats
69, 72–74
Child seats, conventional
74
Child seats, i-Size
76
Child seats, ISOFIX
75–76
Cleaning (advice)
131, 146–147
Closing the boot
30, 34
Closing the doors
29–30, 33
Collision Risk Alert
115–116
Configuration, vehicle
24
Connected applications
207
Page 224 of 244
222
Alphabetical index
G
Gauge, fuel 129
Gearbox, automatic
86–89, 91–93, 143
Gearbox, manual
86, 91–93, 143
Gear lever, manual gearbox
86
Gear shift indicator ~ Gear efficiency
indicator
91
Glove box
49
G.P.S.
203
H
Hazard warning lamps 63, 148
headlamp adjustment
56
Headlamp adjustment
56
Headlamps, automatic dipping
57–58
Headlamps, automatic illumination
55–56
Headlamps, dipped beam
156–157
Headlamps, halogen
56, 156–157
Headlamps, main beam
156
Head restraints, front
39
Head restraints, rear
42–43
Head-up display
10–11
Heating
43
Heating, programmable
26, 48
Hi-Fi system
50
High voltage
130
Hill start assist
90–91
Histogramme, fuel consumption
25–26
Horn
64
Horn for pedestrians
64, 80
I
Ignition 83, 213
Ignition on
83
Immobiliser, electronic
81
Indicator, AdBlue® range
18
Indicator, coolant temperature
18
Indicators, direction
55, 156
Inflating tyres
143
Inflating tyres and accessories
(using the kit)
150, 152
Infrared camera
95
Instrument panel
9, 21–22, 95
Internet browser
204, 207
ISOFIX mountings
75
J
Jack 149–150, 152, 211
Jump starting
162
K
Key 27, 29, 31–32
Key, electronic
29–30
Keyless Entry and Starting
28–30, 82
Key not recognised
83
Key with remote control
27, 81
Kit, hands-free
178, 190, 212
Kit, puncture repair
149
Kit, temporary puncture repair
148–150, 152
L
Labels, identification 172
Lamp, boot
53
Lamps, parking
55
Lamps, rear
157
Lane assist
103, 106–108, 110
Lane departure warning active
110, 114
Leather (care)
147
LEDs - Light-emitting diodes
55, 155–157
Level, AdBlue®
142
Level, brake fluid
141
Level, Diesel additive
143
Level, engine coolant
18, 141
Level, engine oil
141
Levels and checks
140–142
Level, screenwash fluid
60, 142
Light-emitting diodes - LEDs
55, 155–157
Lighting dimmer
21
Lighting, exterior
54
Lighting, guide-me home
56–57
Lighting, interior
51–52
Lighting, welcome
56–57
Loading
53, 137–138
Load reduction mode
139
Locating your vehicle
28
Locking
27, 29, 31
Locking from the inside
30
Locking the doors
31
Low fuel level
129
Lumbar
39–40
M