start stop button CITROEN DS3 CROSSBACK 2020 Owners Manual
[x] Cancel search | Manufacturer: CITROEN, Model Year: 2020, Model line: DS3 CROSSBACK, Model: CITROEN DS3 CROSSBACK 2020Pages: 244, PDF Size: 7.7 MB
Page 19 of 244
17
Instruments01
Active Lane Keeping AssistFixed.
The function has been activated.
All the conditions have been met: the system is
operating.
Automatic wipingFixed.
Automatic windscreen wiping is activated.
Direction indicatorsDirection indicators with audible signal.
The direction indicators are on.
SidelampsFixed.
The lamps are on.
Dipped beam headlampsFixed.
The lamps are on.
DS MATRIX LED VISIONFixed.
The function is activated.
Automatic headlamp dippingFixed.
The function has been activated via
the touch screen (Driving / Vehicle menu).
The lighting control stalk is in the "AUTO" position.
Blue warning/indicator lamps
Main beam headlamps
Fixed.
The lamps are on.
Indicators
Service indicator
The servicing information is expressed in terms of
distance (kilometres or miles) and time (months
or days).
The alert is given at whichever of these two terms
is reached first.
The servicing information is displayed in the
instrument panel. Depending on the version of the
vehicle:
–
The dist
ance recorder display line indicates
the distance remaining before the next service
is due, or the distance travelled since it was due
preceded by the "-" sign.
–
An alert me
ssage indicates the distance
remaining, as well as the period before the next
service is due or how long it is overdue.
The value indicated is calculated
according to the distance covered and the
time elapsed since the last service.
The alert may also be triggered close to a due
date.
Service spannerOn temporarily when the ignition is
switched on.
Between 620 and 1,860 miles (1,000 and 3,000
km) remain before the next service is due.
Fixed, when the ignition is switched on.
The next service is due in less than 620
miles (1,000 km).
Have your vehicle serviced very soon.
Service spanner flashingFlashing then fixed, when the
ignition is switched on.
(With BlueHDi Diesel engines, combined with the
Service warning lamp.)
The servicing interval has been exceeded.
Have your vehicle serviced as soon as possible.
Resetting the service indicator
The service indicator must be reset after each
service.
If you have serviced your vehicle yourself:
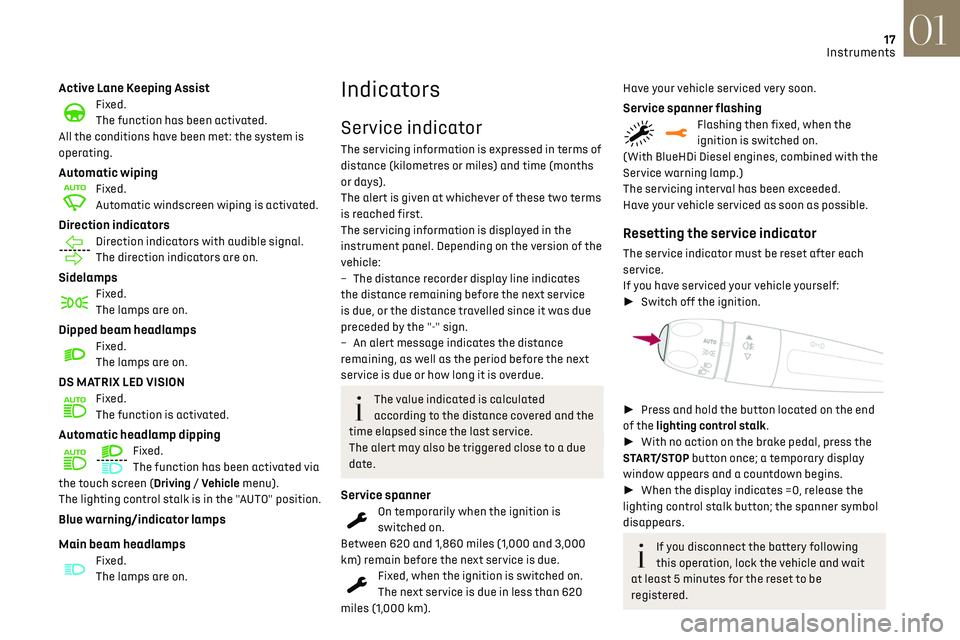
► Switch off the ignition.
► Press and hold the button located on the end
of the lighting control stalk.
► With no action on the brake pedal, press the
START/STOP button once; a temporary display
window appears and a countdown begins.
► When the display indicates =0, release the
lighting control stalk button; the spanner symbol
disappears.
If you disconnect the battery following
this operation, lock the vehicle and wait
at least 5 minutes for the reset to be
registered.
Page 20 of 244
18
Instruments01
Retrieving the servicing information
You can view the servicing information by
pressing the “Check" button in the Driving
/ Vehicle touch screen menu.
Engine coolant temperature
indicator
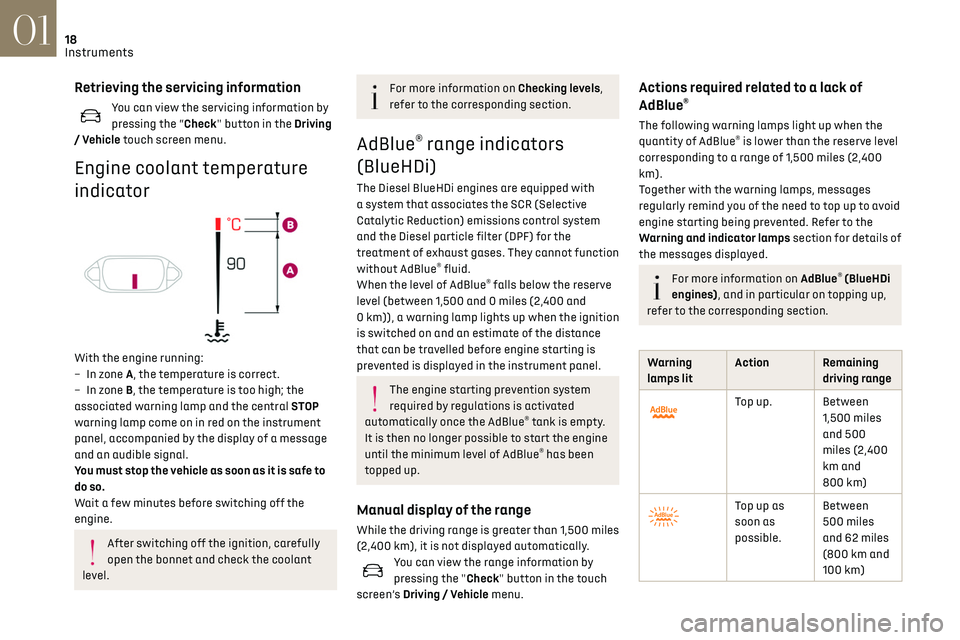
With the engine running:
– In z one A, the temperature is correct.
–
In z
one B, the temperature is too high; the
associated warning lamp and the central STOP
warning lamp come on in red on the instrument
panel, accompanied by the display of a message
and an audible signal.
You must stop the vehicle as soon as it is safe to
do so.
Wait a few minutes before switching off the
engine.
After switching off the ignition, carefully
open the bonnet and check the coolant
level.
For more information on Checking levels,
refer to the corresponding section.
AdBlue® range indicators
(BlueHDi)
The Diesel BlueHDi engines are equipped with
a system that associates the SCR (Selective
Catalytic Reduction) emissions control system
and the Diesel particle filter (DPF) for the
treatment of exhaust gases. They cannot function
without AdBlue
® fluid.
When the level of AdBlue® falls below the reserve
level (between 1,500 and 0 miles (2,400 and
0 km)), a warning lamp lights up when the ignition
is switched on and an estimate of the distance
that can be travelled before engine starting is
prevented is displayed in the instrument panel.
The engine starting prevention system
required by regulations is activated
automatically once the AdBlue
® tank is empty.
It is then no longer possible to start the engine
until the minimum level of AdBlue
® has been
topped up.
Manual display of the range
While the driving range is greater than 1,500 miles
(2,400 km), it is not displayed automatically.
You can view the range information by
pressing the "Check" button in the touch
screen’s Driving / Vehicle menu.
Actions required related to a lack of
AdBlue®
The following warning lamps light up when the
quantity of AdBlue® is lower than the reserve level
corresponding to a range of 1,500 miles (2,400
km).
Together with the warning lamps, messages
regularly remind you of the need to top up to avoid
engine starting being prevented. Refer to the
Warning and indicator lamps section for details of
the messages displayed.
For more information on AdBlue® (BlueHDi
engines), and in particular on topping up,
refer to the corresponding section.
Warning
lamps lit Action Remaining
driving range
Top up. Between 1,500 miles
and 500
miles (2,400
km and
800 km)
Top up as
soon as
possible.Between
500 miles
and 62 miles
(800 km and
100 km)
Page 24 of 244
22
Instruments01
Trip computer
Information displayed about the current journey
(range, fuel consumption, average speed, etc.).
Data displayed on the
instrument panel
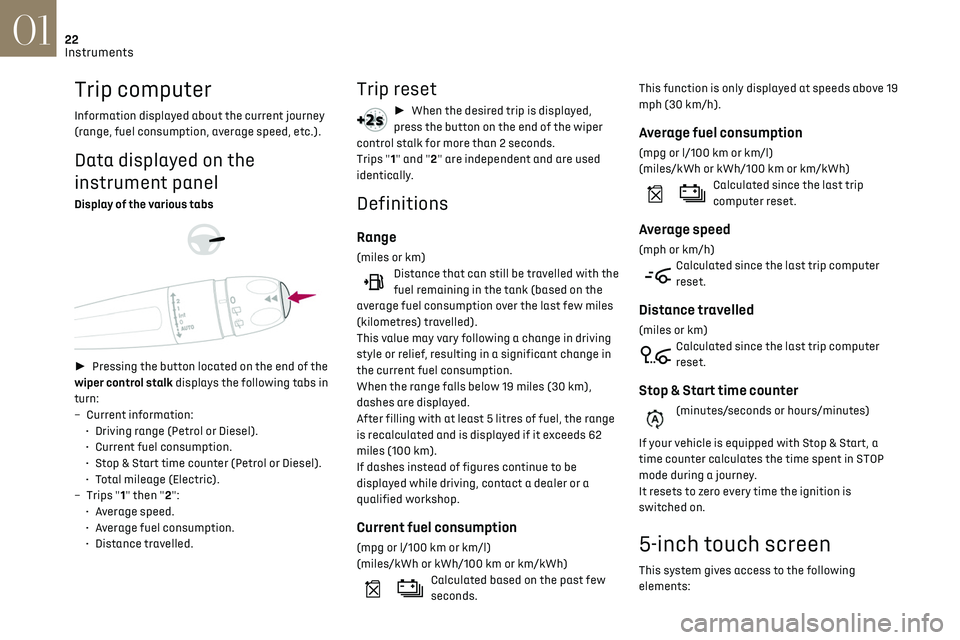
Display of the various tabs
► Pressing the button located on the end of the
wiper control stalk displays the following tabs in
turn:
–
Curren
t information:
•
D
riving range (Petrol or Diesel).
•
Curren
t fuel consumption.
•
St
op & Start time counter (Petrol or Diesel).
•
T
otal mileage (Electric).
–
Trip
s "1" then "2":
•
A
verage speed.
•
A
verage fuel consumption.
•
Dist
ance travelled.
Trip reset
► When the desired trip is displayed,
press the button on the end of the wiper
control stalk for more than 2 seconds.
Trips "1" and "2" are independent and are used
identically.
Definitions
Range
(miles or km)Distance that can still be travelled with the
fuel remaining in the tank (based on the
average fuel consumption over the last few miles
(kilometres) travelled).
This value may vary following a change in driving
style or relief, resulting in a significant change in
the current fuel consumption.
When the range falls below 19 miles (30 km),
dashes are displayed.
After filling with at least 5 litres of fuel, the range
is recalculated and is displayed if it exceeds 62
miles (100 km).
If dashes instead of figures continue to be
displayed while driving, contact a dealer or a
qualified workshop.
Current fuel consumption
(mpg or l/100 km or km/l)
(miles/kWh or kWh/100 km or km/kWh)
Calculated based on the past few
seconds. This function is only displayed at speeds above 19
mph (30 km/h).
Average fuel consumption
(mpg or l/100 km or km/l)
(miles/kWh or kWh/100 km or km/kWh)
Calculated since the last trip
computer reset.
Average speed
(mph or km/h)Calculated since the last trip computer
reset.
Distance travelled
(miles or km)Calculated since the last trip computer
reset.
Stop & Start time counter
(minutes/seconds or hours/minutes)
If your vehicle is equipped with Stop & Start, a
time counter calculates the time spent in STOP
mode during a journey.
It resets to zero every time the ignition is
switched on.
5-inch touch screen
This system gives access to the following
elements:
Page 35 of 244
33
Access02
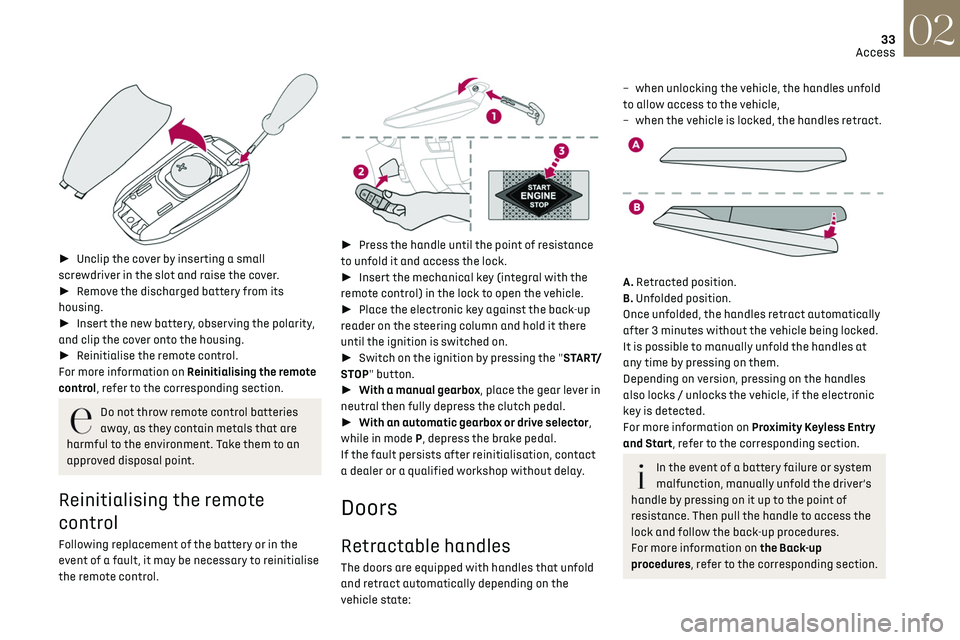
► Unclip the cover by inserting a small
screwdriver in the slot and raise the cover.
► Remove the discharged battery from its
housing.
► Insert the new battery, observing the polarity,
and clip the cover onto the housing.
► Reinitialise the remote control.
For more information on Reinitialising the remote
control, refer to the corresponding section.
Do not throw remote control batteries
away, as they contain metals that are
harmful to the environment. Take them to an
approved disposal point.
Reinitialising the remote
control
Following replacement of the battery or in the
event of a fault, it may be necessary to reinitialise
the remote control.
► Press the handle until the point of resistance
to unfold it and access the lock.
► Insert the mechanical key (integral with the
remote control) in the lock to open the vehicle.
► Place the electronic key against the back-up
reader on the steering column and hold it there
until the ignition is switched on.
► Switch on the ignition by pressing the "START/
STOP" button.
► With a manual gearbox, place the gear lever in
neutral then fully depress the clutch pedal.
► With an automatic gearbox or drive selector,
while in mode P, depress the brake pedal.
If the fault persists after reinitialisation, contact
a dealer or a qualified workshop without delay.
Doors
Retractable handles
The doors are equipped with handles that unfold
and retract automatically depending on the
vehicle state:
– when unlocking the v ehicle, the handles unfold
to allow access to the vehicle,
–
when the v
ehicle is locked, the handles retract.
A. Retracted position.
B. Unfolded position.
Once unfolded, the handles retract automatically
after 3 minutes without the vehicle being locked.
It is possible to manually unfold the handles at
any time by pressing on them.
Depending on version, pressing on the handles
also locks / unlocks the vehicle, if the electronic
key is detected.
For more information on Proximity Keyless Entry
and Start, refer to the corresponding section.
In the event of a battery failure or system
malfunction, manually unfold the driver’s
handle by pressing on it up to the point of
resistance. Then pull the handle to access the
lock and follow the back-up procedures.
For more information on the Back-up
procedures, refer to the corresponding section.
Page 38 of 244
36
Access02
Operating the switch again stops the movement
of the window.Window controls remain operational for
approximately 45 seconds after switching
off the ignition or after locking the vehicle.
After that time, the controls are disabled.
To reactivate them, switch on the ignition or
unlock the vehicle.
Anti-pinch
If the window meets an obstacle while rising, it
stops and immediately partially lowers again.
Deactivation of the rear
controls for the rear electric
windows
For children's safety, press switch 5 to
deactivate the rear electric windows
controls.
The indicator lamp for the button comes on,
accompanied by a message confirming activation.
With the ignition on, it remains lit, as long as the
child lock remains activated.
Use of the rear electric windows from the driver's
controls remains possible.
For versions fitted with an electric child
lock, this control also deactivates the
interior rear door controls.
For more information on the Child lock, refer to
the corresponding section.
Reactivating interior volumetric
monitoring
► Deactivate exterior perimeter monitoring by
unlocking the vehicle using the remote control or
by pressing a door handle.
The indicator lamp in the button goes off.
► Reactivate the full alarm system by locking
the vehicle using the remote control or by
pressing one of the front door handles.
The red indicator lamp in the button once again
flashes every second.
Triggering of the alarm
This is indicated by sounding of the siren and
flashing of the direction indicators for 30
seconds.
The interior volumetric and anti-tilt monitoring
functions remain active until the alarm has been
triggered ten times in succession.
When the vehicle is unlocked, rapid flashing of
the indicator lamp in the button indicates that the
alarm was triggered during your absence. When
the ignition is switched on, this flashing stops
immediately.
Failure of the remote control
To deactivate the monitoring functions:
► Unlock the vehicle using the key in the driver's
door lock.
► Open the door; the alarm is triggered.
► Switch on the ignition; this stops the alarm.
The indicator lamp in the button goes off.
Locking the vehicle without
activating the alarm
► Lock or deadlock the vehicle using the key
(integral to the remote control) in the driver's door
lock.
Automatic activation
(Depending on version)
The system is activated automatically 2 minutes
after the last door or the boot is closed.
► To avoid triggering the alarm on entering the
vehicle, first press the unlocking button on the
remote control or unlock the vehicle using the
“Keyless Entry and Starting” system.
Malfunction
When the ignition is switched on, fixed
illumination of the red indicator lamp in the
button indicates a malfunction of the system.
Have it checked by a dealer or a qualified
workshop.
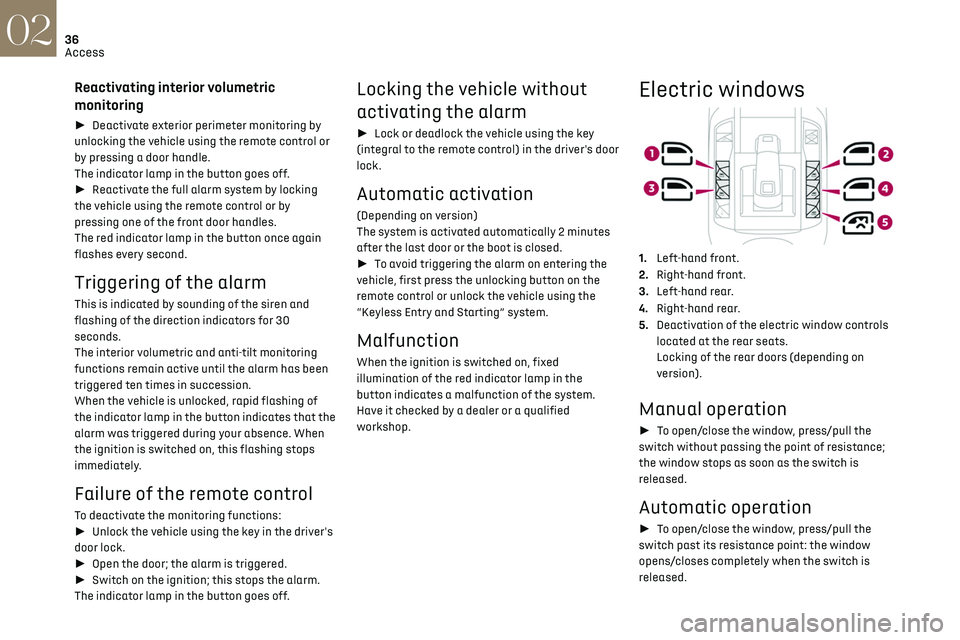
Electric windows
1. Left-hand front.
2. Right-hand front.
3. Left-hand rear.
4. Right-hand rear.
5. Deactivation of the electric window controls
located at the rear seats.
Locking of the rear doors (depending on
version).
Manual operation
► To open/close the window, press/pull the
switch without passing the point of resistance;
the window stops as soon as the switch is
released.
Automatic operation
► To open/close the window, press/pull the
switch past its resistance point: the window
opens/closes completely when the switch is
released.
Page 39 of 244
37
Access02
Operating the switch again stops the movement
of the window.
Window controls remain operational for
approximately 45 seconds after switching
off the ignition or after locking the vehicle.
After that time, the controls are disabled.
To reactivate them, switch on the ignition or
unlock the vehicle.
Anti-pinch
If the window meets an obstacle while rising, it
stops and immediately partially lowers again.
Deactivation of the rear
controls for the rear electric
windows
For children's safety, press switch 5 to
deactivate the rear electric windows
controls.
The indicator lamp for the button comes on,
accompanied by a message confirming activation.
With the ignition on, it remains lit, as long as the
child lock remains activated.
Use of the rear electric windows from the driver's
controls remains possible.
For versions fitted with an electric child
lock, this control also deactivates the
interior rear door controls.
For more information on the Child lock, refer to
the corresponding section.
Reinitialising the electric
windows
After reconnecting the battery, or in the event
of abnormal window movement, the anti-pinch
function must be reinitialised.
The anti-pinch function is disabled during the
following sequence of operations.
For each window:
► Lower the window fully, then raise it; it will
rise in steps of a few centimetres each time the
control is pressed. Repeat the operation until the
window is fully closed.
► Continue to pull the control upwards for at
least one second after the window reaches the
closed position.
If an electric window meets an obstacle
during operation, the movement of the
window must be reversed. To do this, press the
relevant switch.
When the driver operates the passengers’
electric window switches, it is important to
ensure that nothing can prevent the window
from closing properly.
It is important to ensure that passengers use
the electric windows correctly.
Pay particular attention to children when
operating windows.
Be aware of passengers and/or other persons
present when closing windows using the key or
the "Keyless Entry and Starting" system.
Page 46 of 244
44Ease of use and comfort03
air outlets and the air extractor in the boot free
from obstructions.
► Do not cover the sunshine sensor located
on the dashboard; this sensor is used to
regulate the automatic air conditioning
system.
► Operate the air conditioning system for at
least 5 to 10 minutes once or twice a month to
keep it in perfect working order.
► If the system does not produce cold air,
switch it off and contact a dealer or a qualified
workshop.
When towing the maximum load on a steep
gradient in high temperatures, switching off
the air conditioning increases the available
engine power, enhancing the towing capacity.
Avoid driving for too long with the
ventilation off or with prolonged operation
of interior air recirculation. Risk of misting and
deterioration of the air quality!
If the interior temperature is very high
after the vehicle has stood for a long
time in the sunshine, air the passenger
compartment for a few moments.
Put the air flow control at a setting high
enough to quickly change the air in the
passenger compartment.
Condensation created by the air
conditioning results in a discharge of
water underneath the vehicle. This is perfectly
normal.
Servicing the ventilation and air
conditioning system
► Ensure that the passenger compartment
filter is in good condition and have the filter
elements replaced regularly.
We recommend using a composite passenger
compartment filter. Thanks to its special
active additive, this type of filter helps to
purify the air breathed by the occupants
and keep the passenger compartment clean
(by reducing allergic symptoms, unpleasant
odours and greasy deposits).
► To ensure correct operation of the
air conditioning system, have it checked
according to the recommendations in the
Maintenance and Warranty Guide.
Stop & Start
The heating and air conditioning systems
only operate when the engine is running.
Temporarily deactivate the Stop & Start
system to maintain a comfortable temperature
in the passenger compartment.
For more information on the Stop & Start, refer
to the corresponding section.
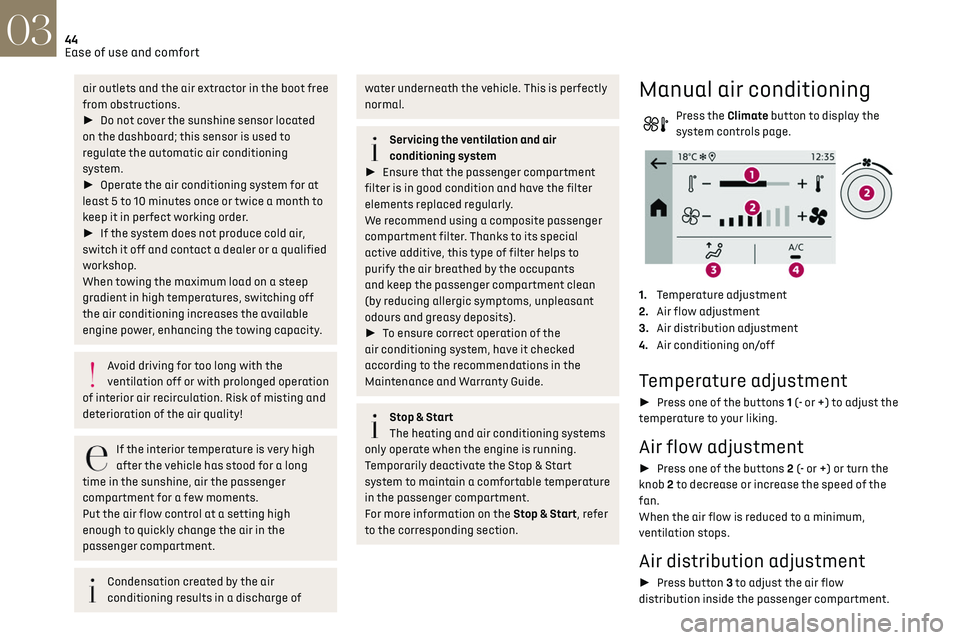
Manual air conditioning
Press the Climate button to display the
system controls page.
1. Temperature adjustment
2. Air flow adjustment
3. Air distribution adjustment
4. Air conditioning on/off
Temperature adjustment
► Press one of the buttons 1 (- or +) to adjust the
temperature to your liking.
Air flow adjustment
► Press one of the buttons 2 (- or +) or turn the
knob 2 to decrease or increase the speed of the
fan.
When the air flow is reduced to a minimum,
ventilation stops.
Air distribution adjustment
► Press button 3 to adjust the air flow
distribution inside the passenger compartment.
Central and side air vents, footwells
Central and side air vents
Windscreen
Windscreen, footwells
Footwells
Air conditioning on / off
The air conditioning system is designed to
operate effectively in all seasons, with the
windows closed.
It is used to:
– lower the temperature in summer,
– increase the effectiveness of the demisting in
winter, above 3°C.
► Press button 4 to activate/deactivate the air
conditioning system.
Air conditioning does not operate when
the air flow is disabled.
To obtain cool air more quickly, enable interior
air recirculation for a brief period. Then return
to the intake of exterior air.
Switching off the air conditioning may result in
some discomfort (humidity or misting).
Page 84 of 244
82Driving06
The lighting state of the "START/STOP"
button indicates the presence or absence
of the electronic key in the passenger
compartment.
Starting
► With a manual gearbox, place the gear lever in
neutral and fully depress the clutch pedal.
► With an automatic gearbox, select mode P
or N and press the brake pedal.
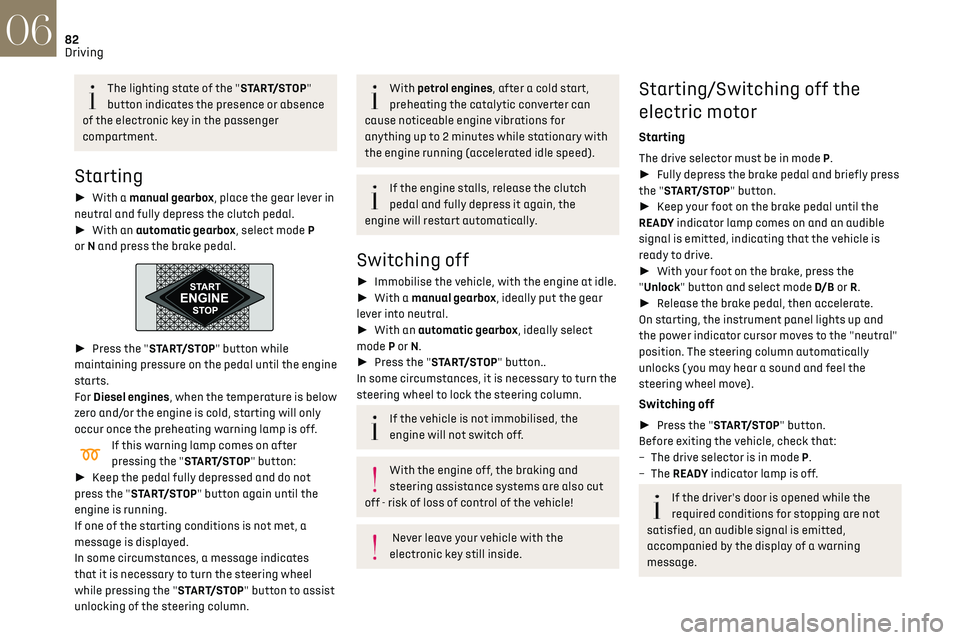
► Press the "START/STOP" button while
maintaining pressure on the pedal until the engine
starts.
For Diesel engines, when the temperature is below
zero and/or the engine is cold, starting will only
occur once the preheating warning lamp is off.
If this warning lamp comes on after
pressing the "START/STOP" button:
► Keep the pedal fully depressed and do not
press the "START/STOP" button again until the
engine is running.
If one of the starting conditions is not met, a
message is displayed.
In some circumstances, a message indicates
that it is necessary to turn the steering wheel
while pressing the "START/STOP" button to assist
unlocking of the steering column.
With petrol engines, after a cold start,
preheating the catalytic converter can
cause noticeable engine vibrations for
anything up to 2 minutes while stationary with
the engine running (accelerated idle speed).
If the engine stalls, release the clutch
pedal and fully depress it again, the
engine will restart automatically.
Switching off
► Immobilise the vehicle, with the engine at idle.
► With a manual gearbox, ideally put the gear
lever into neutral.
► With an automatic gearbox, ideally select
mode P or N.
► Press the "START/STOP" button..
In some circumstances, it is necessary to turn the
steering wheel to lock the steering column.
If the vehicle is not immobilised, the
engine will not switch off.
With the engine off, the braking and
steering assistance systems are also cut
off - risk of loss of control of the vehicle!
Never leave your vehicle with the
electronic key still inside.
Starting/Switching off the
electric motor
Starting
The drive selector must be in mode P.
► Fully depress the brake pedal and briefly press
the "START/STOP" button.
► Keep your foot on the brake pedal until the
READY indicator lamp comes on and an audible
signal is emitted, indicating that the vehicle is
ready to drive.
► With your foot on the brake, press the
"Unlock" button and select mode D/B or R.
► Release the brake pedal, then accelerate.
On starting, the instrument panel lights up and
the power indicator cursor moves to the "neutral"
position. The steering column automatically
unlocks ( you may hear a sound and feel the
steering wheel move).
Switching off
► Press the "START/STOP" button.
Before exiting the vehicle, check that:
–
The driv
e selector is in mode P.
–
The READY indicator lamp is off.
If the driver's door is opened while the
required conditions for stopping are not
satisfied, an audible signal is emitted,
accompanied by the display of a warning
message.
Switching on the ignition
without starting the engine
With the electronic key in the passenger
compartment, pressing the “START/STOP” button,
without pressing any of the pedals, allows the
ignition to be switched on without starting the
engine.
► Press this button again to switch off the
ignition and allow the vehicle to be locked.
Key not detected
Back-up starting
A back-up reader is fitted to the steering column,
to enable the engine to be started if the system
fails to detect the key in the recognition zone, or if
the battery in the electronic key is discharged.
► Place and hold the remote control against the
reader.
► With a manual gearbox, place the gear lever in
neutral, then fully depress the clutch pedal.
► With an automatic gearbox or a drive selector,
select mode P, then fully depress the brake pedal.
► Press the "START/STOP" button.
Page 85 of 244
83Driving06
Switching on the ignition
without starting the engine
With the electronic key in the passenger
compartment, pressing the “START/STOP” button,
without pressing any of the pedals, allows the
ignition to be switched on without starting the
engine.
► Press this button again to switch off the
ignition and allow the vehicle to be locked.
Key not detected
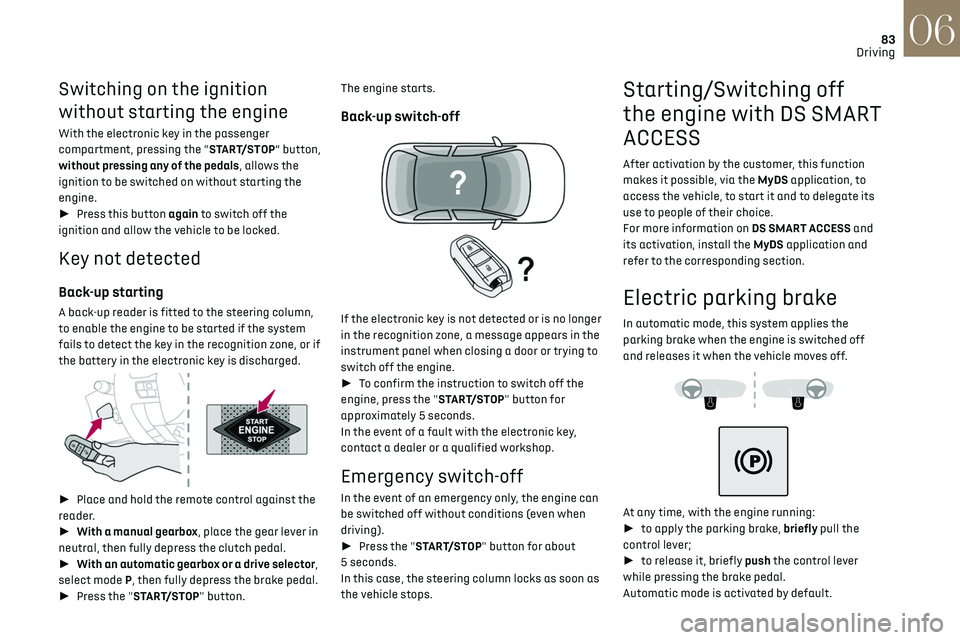
Back-up starting
A back-up reader is fitted to the steering column,
to enable the engine to be started if the system
fails to detect the key in the recognition zone, or if
the battery in the electronic key is discharged.
► Place and hold the remote control against the
reader.
► With a manual gearbox, place the gear lever in
neutral, then fully depress the clutch pedal.
► With an automatic gearbox or a drive selector,
select mode P, then fully depress the brake pedal.
► Press the "START/STOP" button. The engine starts.
Back-up switch-off
If the electronic key is not detected or is no longer
in the recognition zone, a message appears in the
instrument panel when closing a door or trying to
switch off the engine.
►
To confirm the instruction to switch off the
engine, press the "START/STOP" button for
approximately 5 seconds.
In the event of a fault with the electronic key,
contact a dealer or a qualified workshop.
Emergency switch-off
In the event of an emergency only, the engine can
be switched off without conditions (even when
driving).
► Press the "START/STOP" button for about
5 seconds.
In this case, the steering column locks as soon as
the vehicle stops.
Starting/Switching off
the engine with DS SMART
ACCESS
After activation by the customer, this function
makes it possible, via the MyDS application, to
access the vehicle, to start it and to delegate its
use to people of their choice.
For more information on DS SMART ACCESS and
its activation, install the MyDS application and
refer to the corresponding section.
Electric parking brake
In automatic mode, this system applies the
parking brake when the engine is switched off
and releases it when the vehicle moves off.
At any time, with the engine running:
► to apply the parking brake, briefly pull the
control lever;
► to release it, briefly push the control lever
while pressing the brake pedal.
Automatic mode is activated by default.
Page 88 of 244
86
Driving06
electric parking brake control lever will brake the
vehicle. Braking continues while the control lever
is pulled, and ceases when the control lever is
released.
The ABS and DSC systems stabilise the vehicle
during emergency braking.
If emergency braking malfunctions, the message
"Parking brake control faulty" will be displayed on
the instrument panel.
If the ABS and DSC systems
malfunction, indicated by lighting
one or both warning lamps on the instrument
panel, the vehicle’s stability is no longer ensured.
In this event, the driver must keep the vehicle
stable by successively pulling and releasing the
control lever, repeating the operation until the
vehicle has stopped.
6-speed manual gearbox
Engaging 5th or 6th gear
► Move the gear selector fully to the right to
engage 5th or 6th gear.
Failure to follow this instruction could
cause permanent damage to the gearbox
(inadvertent engagement of 3
rd or 4th gear).
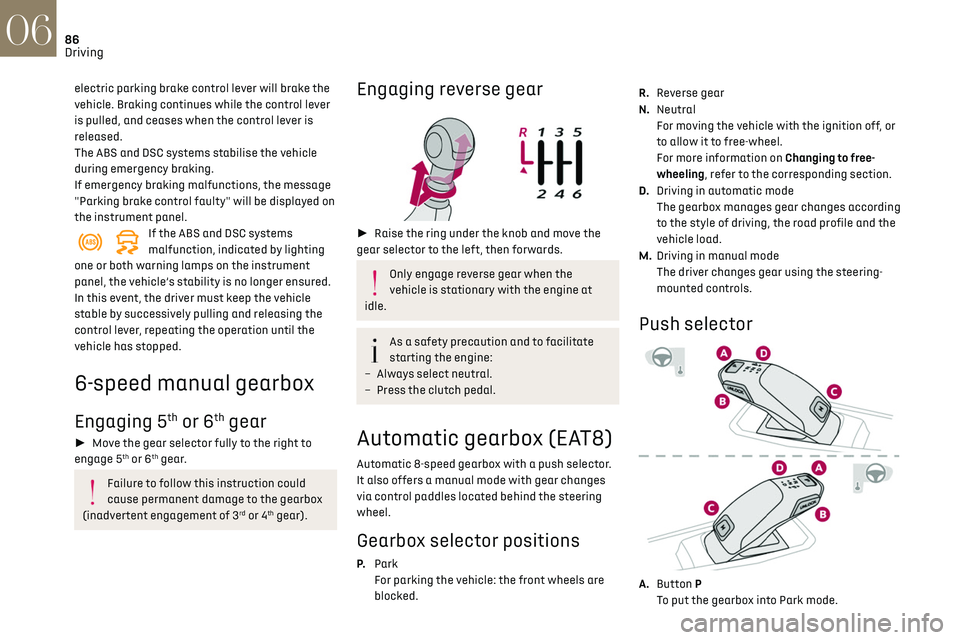
Engaging reverse gear
► Raise the ring under the knob and move the
gear selector to the left, then forwards.
Only engage reverse gear when the
vehicle is stationary with the engine at
idle.
As a safety precaution and to facilitate
starting the engine:
–
Alw
ays select neutral.
–
Pre
ss the clutch pedal.
Automatic gearbox (EAT8)
Automatic 8-speed gearbox with a push selector.
It also offers a manual mode with gear changes
via control paddles located behind the steering
wheel.
Gearbox selector positions
P. Park
For parking the vehicle: the front wheels are
blocked. R.
Reverse gear
N. Neutral
For moving the vehicle with the ignition off, or
to allow it to free-wheel.
For more information on Changing to free-
wheeling, refer to the corresponding section.
D. Driving in automatic mode
The gearbox manages gear changes according
to the style of driving, the road profile and the
vehicle load.
M. Driving in manual mode
The driver changes gear using the steering-
mounted controls.
Push selector
A.Button P
To put the gearbox into Park mode.