high beam CITROEN DS3 CROSSBACK 2020 Owners Manual
[x] Cancel search | Manufacturer: CITROEN, Model Year: 2020, Model line: DS3 CROSSBACK, Model: CITROEN DS3 CROSSBACK 2020Pages: 244, PDF Size: 7.7 MB
Page 56 of 244

54Lighting and visibility04
Exterior lighting control
stalk
Main lighting
Automatic illumination of headlamps/
daytime running lamps.
Sidelamps only.
Dipped or main beam headlamps.
"Highway function"
On versions fitted with "Full LED"
technology headlamps, the range of the dipped
beam headlamps is automatically increased
once the speed of the vehicle is above 68 mph
(110 km/h).
Headlamp dipping
► Pull the stalk to switch between dipped and
main beam headlamps.
In “AUTO” and sidelamps modes, the driver can
switch on the main beam headlamps temporarily
(“headlamp flash”) by pulling the stalk.
Displays
Illumination of the corresponding indicator lamp
in the instrument panel confirms that the lighting
selected is on.
A fault with a lamp is signalled by the
permanent illumination of this warning
lamp, accompanied by the display of a message
and an audible signal.
Rear foglamp
It only works if the dipped or main beam
headlamps are on.
► Rotate the ring forwards to switch it on and
backwards to switch it off.
When the lamps are switched off automatically
("AUTO" position), the foglamp and the dipped
beam headlamps will remain on.
Switching on the foglamps is prohibited in
clear weather or in rain, both day and
night. In these situations, the power of their
beams may dazzle other drivers. They must
only be used in fog or falling snow (rules may
vary depending on country).
Do not forget to switch off the foglamps when
they are no longer necessary.
Switching off of the lamps when the
ignition is switched off
When the ignition is switched off, all of the
lamps turn off immediately, except for dipped
beam headlamps if automatic guide-me-home
lighting is activated.
Switching on the lamps after switching
off the ignition
To reactivate the lighting control, rotate the
ring to the "AUTO" position, then to the desired
position.
If the driver's door is opened, a temporary
audible signal warns the driver that the lamps
are on.
They will go off automatically after a period
of time that depends on the state of charge of
the battery (entering energy economy mode).
In some weather conditions (e.g. low
temperature or humidity), the presence of
misting on the internal surface of the glass of
the headlamps and rear lamps is normal; it
disappears after the lamps have been on for a
few minutes.
Never look too closely at the luminous
beam of “Full LED” headlamps: risk of
serious eye injury.
Travelling abroad
Vehicles equipped with halogen
headlamps:
If planning to use your vehicle in a country
that drives on the other side of the road, the
headlamp dipped beams must be adjusted to
avoid dazzling oncoming drivers. Contact a
dealer or a qualified workshop.
Daytime running lamps/
sidelamps
The front and rear lamps light up automatically
when the engine starts.
Page 60 of 244

58Lighting and visibility04
Pause
If the situation requires a change of headlamp
beam, the driver can take over at any time.
► A "headlamp flash" pauses the function:
•
If the "
AUTO" and "Dipped beam" indicator
lamps were on, the system changes to main
beam.
•
If the "
AUTO" and "Main beam"
indicator lamps were on, the system changes
to dipped beam.
To reactivate the system, flash the headlamps
again.
The system may be disrupted or not work
correctly:
–
When visibility c
onditions are poor
(snowfall, heavy rain, etc.).
–
If the windscreen in fron
t of the camera is
dirty, misted or obscured (for example, by a
sticker).
–
If the v
ehicle is facing highly reflective
signs.
When the system detects thick fog, it
temporarily deactivates the function.
The system is not able to detect:
–
R
oad users that do not have their own
lighting, such as pedestrians.
–
V
ehicles whose lighting is obscured (for
example, vehicles driving behind a safety
barrier on a motorway).
–
V
ehicles at the top or bottom of a steep
slope, on winding roads, on crossroads.
Clean the windscreen regularly,
particularly the area in front of the
camera.
The internal surface of the windscreen can
also become misted around the camera.
In humid and cold weather, demist the
windscreen regularly.
Do not allow snow to accumulate on the
bonnet or roof of the vehicle as this could
obstruct the detection camera.
DS MATRIX LED VISION
Available only on versions equipped with Full LED
headlamps with the Matrix Beam function.
This system automatically adapts the main
beam according to the driving conditions, so that
optimum illumination is maintained for the driver,
without causing a nuisance to other road users.
The driver remains responsible for the
vehicle's lighting, its correct use for the
prevailing conditions of light, visibility and
traffic, and for observation of driving and
vehicle regulations.
The system is active from 25 mph
(40 km/h) and deactivates below 12 mph
(20 km/h).
Operation
Using a camera, the system detects the driving
conditions (brightess, lights from oncoming or
followed vehicles, road turns) and adapts the
beams of the main headlamps accordingly.
The modules that make up the main beams
switch on and off gradually, segment by segment,
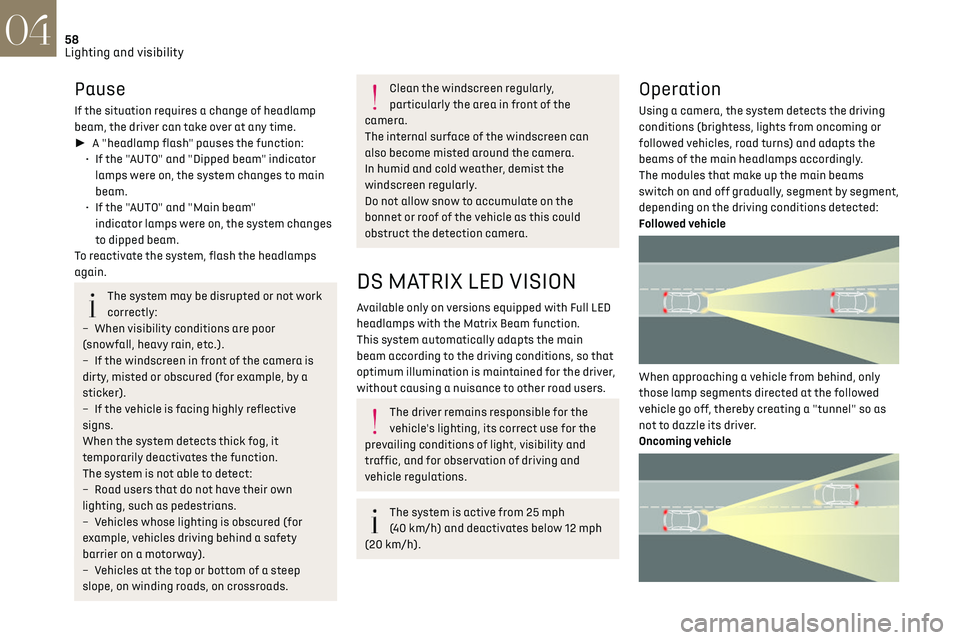
depending on the driving conditions detected:
Followed vehicle
When approaching a vehicle from behind, only
those lamp segments directed at the followed
vehicle go off, thereby creating a "tunnel" so as
not to dazzle its driver.
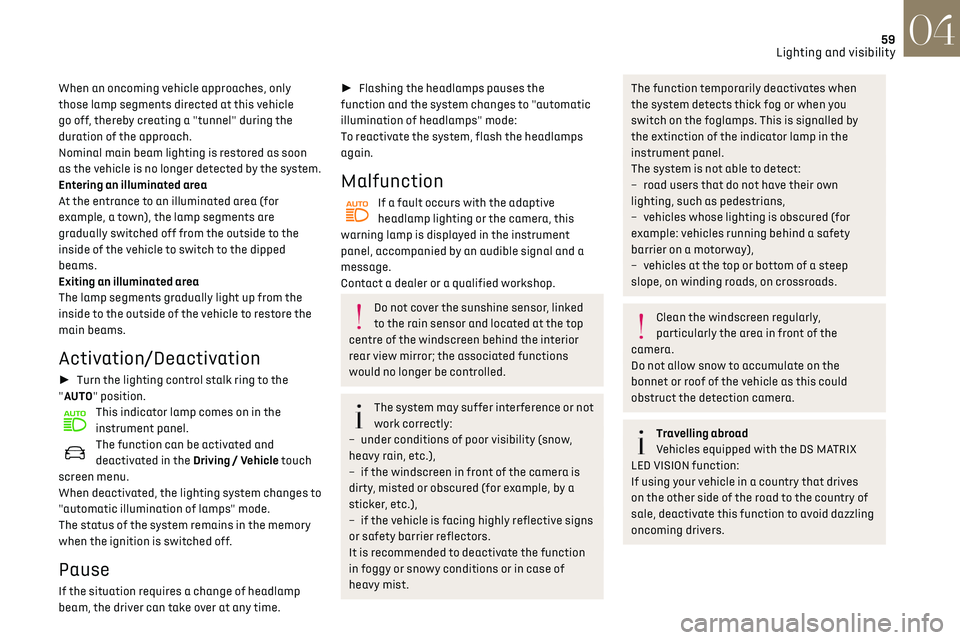
Oncoming vehicle
When an oncoming vehicle approaches, only
those lamp segments directed at this vehicle
go off, thereby creating a "tunnel" during the
duration of the approach.
Nominal main beam lighting is restored as soon
as the vehicle is no longer detected by the system.
Entering an illuminated area
At the entrance to an illuminated area (for
example, a town), the lamp segments are
gradually switched off from the outside to the
inside of the vehicle to switch to the dipped
beams.
Exiting an illuminated area
The lamp segments gradually light up from the
inside to the outside of the vehicle to restore the
main beams.
Activation/Deactivation
► Turn the lighting control stalk ring to the
"AUTO" position.
This indicator lamp comes on in the
instrument panel.
The function can be activated and
deactivated in the Driving / Vehicle touch
screen menu.
When deactivated, the lighting system changes to
"automatic illumination of lamps" mode.
The status of the system remains in the memory
when the ignition is switched off.
Pause
If the situation requires a change of headlamp
beam, the driver can take over at any time.
Page 61 of 244

59
Lighting and visibility04
When an oncoming vehicle approaches, only
those lamp segments directed at this vehicle
go off, thereby creating a "tunnel" during the
duration of the approach.
Nominal main beam lighting is restored as soon
as the vehicle is no longer detected by the system.
Entering an illuminated area
At the entrance to an illuminated area (for
example, a town), the lamp segments are
gradually switched off from the outside to the
inside of the vehicle to switch to the dipped
beams.
Exiting an illuminated area
The lamp segments gradually light up from the
inside to the outside of the vehicle to restore the
main beams.
Activation/Deactivation
► Turn the lighting control stalk ring to the
"AUTO" position.
This indicator lamp comes on in the
instrument panel.
The function can be activated and
deactivated in the Driving / Vehicle touch
screen menu.
When deactivated, the lighting system changes to
"automatic illumination of lamps" mode.
The status of the system remains in the memory
when the ignition is switched off.
Pause
If the situation requires a change of headlamp
beam, the driver can take over at any time.
► Flashing the headlamps pauses the
function and the system changes to "automatic
illumination of headlamps" mode:
To reactivate the system, flash the headlamps
again.
Malfunction
If a fault occurs with the adaptive
headlamp lighting or the camera, this
warning lamp is displayed in the instrument
panel, accompanied by an audible signal and a
message.
Contact a dealer or a qualified workshop.
Do not cover the sunshine sensor, linked
to the rain sensor and located at the top
centre of the windscreen behind the interior
rear view mirror; the associated functions
would no longer be controlled.
The system may suffer interference or not
work correctly:
–
under c
onditions of poor visibility (snow,
heavy rain, etc.),
–
if the windscreen in fron
t of the camera is
dirty, misted or obscured (for example, by a
sticker, etc.),
–
if the v
ehicle is facing highly reflective signs
or safety barrier reflectors.
It is recommended to deactivate the function
in foggy or snowy conditions or in case of
heavy mist.
The function temporarily deactivates when
the system detects thick fog or when you
switch on the foglamps. This is signalled by
the extinction of the indicator lamp in the
instrument panel.
The system is not able to detect:
–
road users tha
t do not have their own
lighting, such as pedestrians,
–
v
ehicles whose lighting is obscured (for
example: vehicles running behind a safety
barrier on a motorway),
–
v
ehicles at the top or bottom of a steep
slope, on winding roads, on crossroads.
Clean the windscreen regularly,
particularly the area in front of the
camera.
Do not allow snow to accumulate on the
bonnet or roof of the vehicle as this could
obstruct the detection camera.
Travelling abroad
Vehicles equipped with the DS MATRIX
LED VISION function:
If using your vehicle in a country that drives
on the other side of the road to the country of
sale, deactivate this function to avoid dazzling
oncoming drivers.
Page 83 of 244

81Driving06
– Jolting and knocking noise during hill starts.
Towing
Driving with a trailer places greater
demands on the towing vehicle and
particular care must be taken.
Do not exceed the maximum towable
weights.
At altitude: reduce the maximum load by 10%
per 1,000 metres of altitude; the lower air
density at high altitudes decreases engine
performance.
New vehicle: do not tow a trailer until the
vehicle has driven at least 620 miles
(1,000 kilometres).
If the outside temperature is high, let the
engine idle for 1 to 2 minutes after the
vehicle comes to a stop, to help it to cool.
Before setting off
Nose weight
► Distribute the load in the trailer so that the
heaviest items are as close as possible to the axle
and the nose weight (at the point where it joins
your vehicle) approaches the maximum permitted
without exceeding it.
Tyres
► Check the tyre pressures of the towing vehicle
and of the trailer, observing the recommended
pressures.
Lighting
► Check the electrical signalling on the trailer
and the headlamp beam height of your vehicle.
If a genuine towing device is used, the
rear parking sensors will be deactivated
automatically to avoid the audible signal.
When driving
Cooling
Towing a trailer uphill causes the coolant
temperature to increase. The maximum towable
load depends on the gradient and the exterior
temperature. The fan’s cooling capacity does not
increase with engine speed.
► Reduce speed and lower the engine speed to
limit heating up.
In all cases, pay attention to the coolant
temperature.
If this warning lamp and the STOP
warning lamp come on, stop the
vehicle and switch off the engine as soon as
possible.
Brakes
Braking distances are increased when towing a
trailer. To avoid overheating the brakes, the use of
engine braking is recommended.
Side wind
Bear in mind that the vehicle will be more
susceptible to wind when towing.
Anti-theft protection
Electronic immobiliser
The keys include an electronic engine immobiliser
system, with a code that must be recognised in
order for starting to be possible.
If the system malfunctions, indicated by the
display of a message, the engine will not start.
Contact a dealer.
Starting/Switching off the
engine
The electronic key must be present in the
passenger compartment.
For versions equipped with Proximity Keyless
Entry and Start, the electronic key is also
detected in the boot.
If it is not detected, a message is displayed.
Move the electronic key so that the engine can
be started or switched off.
If there is still a problem, refer to the "Key not
detected - Back-up starting or Back-up switch-
off" section.
Page 224 of 244

222
Alphabetical index
G
Gauge, fuel 129
Gearbox, automatic
86–89, 91–93, 143
Gearbox, manual
86, 91–93, 143
Gear lever, manual gearbox
86
Gear shift indicator ~ Gear efficiency
indicator
91
Glove box
49
G.P.S.
203
H
Hazard warning lamps 63, 148
headlamp adjustment
56
Headlamp adjustment
56
Headlamps, automatic dipping
57–58
Headlamps, automatic illumination
55–56
Headlamps, dipped beam
156–157
Headlamps, halogen
56, 156–157
Headlamps, main beam
156
Head restraints, front
39
Head restraints, rear
42–43
Head-up display
10–11
Heating
43
Heating, programmable
26, 48
Hi-Fi system
50
High voltage
130
Hill start assist
90–91
Histogramme, fuel consumption
25–26
Horn
64
Horn for pedestrians
64, 80
I
Ignition 83, 213
Ignition on
83
Immobiliser, electronic
81
Indicator, AdBlue® range
18
Indicator, coolant temperature
18
Indicators, direction
55, 156
Inflating tyres
143
Inflating tyres and accessories
(using the kit)
150, 152
Infrared camera
95
Instrument panel
9, 21–22, 95
Internet browser
204, 207
ISOFIX mountings
75
J
Jack 149–150, 152, 211
Jump starting
162
K
Key 27, 29, 31–32
Key, electronic
29–30
Keyless Entry and Starting
28–30, 82
Key not recognised
83
Key with remote control
27, 81
Kit, hands-free
178, 190, 212
Kit, puncture repair
149
Kit, temporary puncture repair
148–150, 152
L
Labels, identification 172
Lamp, boot
53
Lamps, parking
55
Lamps, rear
157
Lane assist
103, 106–108, 110
Lane departure warning active
110, 114
Leather (care)
147
LEDs - Light-emitting diodes
55, 155–157
Level, AdBlue®
142
Level, brake fluid
141
Level, Diesel additive
143
Level, engine coolant
18, 141
Level, engine oil
141
Levels and checks
140–142
Level, screenwash fluid
60, 142
Light-emitting diodes - LEDs
55, 155–157
Lighting dimmer
21
Lighting, exterior
54
Lighting, guide-me home
56–57
Lighting, interior
51–52
Lighting, welcome
56–57
Loading
53, 137–138
Load reduction mode
139
Locating your vehicle
28
Locking
27, 29, 31
Locking from the inside
30
Locking the doors
31
Low fuel level
129
Lumbar
39–40
M