remote start CITROEN DS3 CROSSBACK 2020 Owners Manual
[x] Cancel search | Manufacturer: CITROEN, Model Year: 2020, Model line: DS3 CROSSBACK, Model: CITROEN DS3 CROSSBACK 2020Pages: 244, PDF Size: 7.7 MB
Page 4 of 244
2
Contents
Overview
Eco-driving
01 Instruments
9 Digital instrument panel
10 Head-up display
11 Warning and indicator lamps
17 Indicators
21 Manual test
21 Total distance recorder
21 Lighting dimmer
22 Trip computer
22 5-inch touch screen
23 7-inch or 10-inch touch screen
26 Remotely operable features (Electric)
02 Access
27 Electronic key with remote control function and
built-in key,
28
Proximity Keyless Entry and Start
30 DS SMART ACCESS
30 Central locking
31 Emergency procedures
33 Doors
34 Boot
34 Alarm
36 Electric windows
03 Ease of use and comfort
38 Front seats
40 Steering wheel adjustment
41 Mirrors
42 Rear bench seat
43 Heating and Ventilation
44 Manual air conditioning
45 Automatic air conditioning
47 Front demist - defrost
47 Rear screen demist - defrost
47 Heated windscreen and washer jets
48 Remote-controlled heating and air conditioning
(Electric)
48
Interior fittings
51 Courtesy lamps
52 Touch-sensitive courtesy lamps
52 Boot fittings
04 Lighting and visibility
54 Exterior lighting control stalk
55 Daytime running lamps/Sidelamps
55 Direction indicators
55 Automatic illumination of headlamps
56 Headlamp beam height adjustment
56 Guide-me-home and welcome lighting
57 Automatic headlamp dipping
58 DS MATRIX LED VISION
60 Wiper control stalk
61 Changing a wiper blade
62 Automatic wipers
05 Safety
63 General safety recommendations
63 Hazard warning lamps
64 Horn
64 Pedestrian horn (Electric)
64 Emergency or assistance call
66 Electronic stability control (ESC)
67 Advanced Traction Control
68 Seat belts
70 Airbags
72 Child seats
74 Deactivating the front passenger airbag
75 ISOFIX child seats
76 i-Size child seats
79 Child lock
06 Driving
80 Driving recommendations
81 Anti-theft protection
81 Starting/Switching off the engine
83 Starting/Switching off the engine with DS
SMART ACCESS
83
Electric parking brake
86 6-speed manual gearbox
86 Automatic gearbox (EAT8)
89 Drive selector (Electric)
90 Driving modes
90 Hill start assist
91 Gear shift indicator
92 Stop & Start
93 Under-inflation detection
94 Driving and manoeuvring aids - General
recommendations
95
Speed Limit Recognition and Recommendation
99 Speed limiter
100 Cruise control - particular recommendations
101 Cruise control
102 Memorising speeds
103 DS DRIVE ASSIST
103 Adaptive Cruise Control
106 Active Lane Keeping Assist
110 Active Lane Departure Warning System
113 Blind Spot Detection
114 Active Blind Spot Detection
Page 15 of 244
13Instruments01
Seat belts not fastened/unfastenedFixed or flashing, accompanied by an
increasing audible signal.
A seat belt has not been fastened or has been
unfastened.
Orange warning/indicator lamps
Service
Temporarily on, accompanied by the
display of a message.
One or more minor faults, for which there is/are
no specific warning lamp(s), have been detected.
Identify the cause of the fault using the message
displayed in the instrument panel.
It is possible to deal with some faults yourself,
such as changing the battery of the remote
control.
For other faults, such as with the tyre under-
inflation detection system, carry out (3).
Fixed, accompanied by the display of a
message.
One or more major faults, for which there is/are
no specific warning lamp(s), have been detected.
Identify the cause of the fault using the message
displayed in the instrument panel, then carry out
(3).
Fixed, accompanied by the message
"Parking brake fault".
Automatic release of the electric parking brake is
unavailable.
Carry out (2).
Service warning lamp fixed and service spanner flashing then fixed.
The servicing interval has been exceeded.
The vehicle must be serviced as soon as possible.
Only with BlueHDi Diesel engines.
BrakingFixed.
A minor fault with the braking system has
been detected.
Drive carefully.
Carry out (3).
Malfunction (with electric parking brake)Fixed, accompanied by the message
"Parking brake fault".
The vehicle cannot be immobilised with the
engine running.
If manual application and release commands are
not working, the electric parking brake control
lever is faulty.
The automatic functions must be used at all times
and are automatically re-enabled in the event of a
control lever fault.
Carry out (2).
Fixed, accompanied by the
message "Parking brake
fault".
The parking brake is faulty: manual and
automatic functions may not be working.
When stationary, to immobilise the vehicle:
► Pull and hold the control lever for
approximately 7 to 15 seconds, until the indicator
lamp comes on on the instrument panel. If this procedure does not work, secure the
vehicle:
►
Park on a level surface.
► With a manual gearbox, engage a gear.
► With an automatic gearbox or drive selector,
select P, then place the supplied chock against
one of the wheels.
Then carry out (2).
Deactivation of the automatic functions (with
electric parking brake)
Fixed.
The "automatic application" (on switching
off the engine) and "automatic release" (on
acceleration) functions are deactivated.
If automatic application/release is no longer
possible:
► Start the engine.
► Use the control lever to apply the parking
brake.
► Take your foot fully off the brake pedal.
► Hold the control lever pressed in the release
direction for between 10 and 15 seconds.
► Release the control lever.
► Depress and hold the brake pedal.
► Hold the control lever in the “Application”
direction for 2 seconds.
► Release the control lever and the brake pedal.
Anti-lock braking system (ABS)Fixed.
The anti-lock braking system has a fault.
The vehicle retains conventional braking.
Page 27 of 244
25
Instruments01
– Access to the Settings of the touch screen and
digital instrument panel (date/time, languages,
units, etc.).
Side banners of the DS CONNECT NAV
– Exterior temperature (a blue warning lamp
appears when there is a risk of ice).
–
Ac
cess to the Settings of the touch screen and
digital instrument panel (date/time, languages,
units, etc.).
–
Notifications.
–
R
eminder of the air conditioning information,
and direct access to the corresponding menu.
–
Ac
cess to the heated seat settings.
–
Time.
Electric / Energy menu
Depending on version, this is accessible either:– directly, by pressing the button near the
touch screen.
– via the Applications menu.
Energy flows
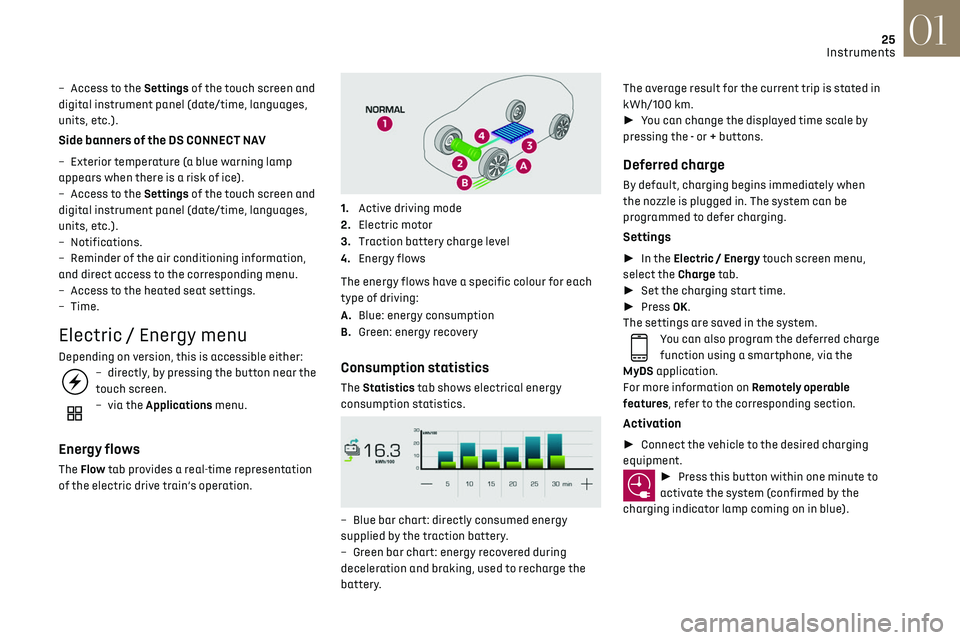
The Flow tab provides a real-time representation
of the electric drive train’s operation.
1.Active driving mode
2. Electric motor
3. Traction battery charge level
4. Energy flows
The energy flows have a specific colour for each
type of driving:
A. Blue: energy consumption
B. Green: energy recovery
Consumption statistics
The Statistics tab shows electrical energy
consumption statistics.
– Blue bar chart: directly c onsumed energy
supplied by the traction battery.
–
G
reen bar chart: energy recovered during
deceleration and braking, used to recharge the
battery. The average result for the current trip is stated in
kWh/100 km.
►
You can change the displayed time scale by
pressing the - or + buttons.
Deferred charge
By default, charging begins immediately when
the nozzle is plugged in. The system can be
programmed to defer charging.
Settings
► In the Electric / Energy touch screen menu,
select the Charge tab.
► Set the charging start time.
► Press OK.
The settings are saved in the system.
You can also program the deferred charge
function using a smartphone, via the
MyDS application.
For more information on Remotely operable
features, refer to the corresponding section.
Activation
► Connect the vehicle to the desired charging
equipment.
► Press this button within one minute to
activate the system (confirmed by the
charging indicator lamp coming on in blue).
Page 32 of 244
30
Access02
Manual
► Press this button to lock/unlock the vehicle
(doors and boot) from inside the vehicle.
The indicator lamp comes on to confirm central
locking of the vehicle.
The central locking does not take place if
one of the doors is open.
To unfold the exterior handles, press the
button once when the vehicle is locked or
twice when it is unlocked.
When locking / deadlocking from the
outside
When the vehicle is locked or deadlocked from
the outside, the indicator lamp flashes and the
button is inoperative.
► After normal locking, pull one of the interior
door controls to unlock the vehicle.
► After deadlocking, it is necessary to use
the remote control, the “Keyless Entry and
Starting” system or the integral key to unlock
the vehicle.
Deadlocking
► Press one of the front handles lightly to lock
the vehicle.
► Press it again within 3 seconds to deadlock
the vehicle (confirmed by the temporary lighting
of the direction indicators).
If the vehicle is unlocked with the handles
retracted, a first press on one of the front
handles unfolds the handle. The vehicle
remains unlocked.
Press the handle again to lock it.
Deadlocking renders the interior door
controls inoperative. It also deactivates
the central locking button.
The horn remains operational.
Never leave anyone inside the vehicle when it
is deadlocked.
If one of the doors or the boot is still open
or if the electronic key for the Keyless
Entry and Starting s ystem has been left inside
the vehicle, central locking will be disabled.
If the vehicle is unlocked but the doors or
boot are not subsequently opened, the
vehicle will automatically lock itself again
after about 30 seconds. If the vehicle is fitted
with an alarm, it will also be reactivated
automatically.
The automatic door mirror folding/
unfolding function is configured via the
touch screen’s Driving / Vehicle menu.
As a safety measure, never leave the
vehicle, even for a short time, without
taking the Keyless Entry and Starting system’s
electronic key with you.
Be aware of the risk of theft of the vehicle if
the key is present in one of the defined areas
while the vehicle is unlocked.
In order to preserve the battery in the
electronic key and the vehicle's battery:
–
The unlocking on approach function (z
one C)
automatically goes into standby after several
days of non-use (approximately one week). To
unlock the vehicle, use the remote control or
press on one of the front door handles. At the
next vehicle start, the automatic unlocking
and locking functions will be reactivated.
– After the welcome lighting is triggered
several times in succession without starting
the vehicle, it will be deactivated.
–
All o
f the "hands-free" functions go into
extended stand-by after 21 days of non-use.
To restore these functions, unlock the vehicle
using the remote control and start the engine.
Electrical interference
The electronic key may not operate if
close to certain electronic devices: telephone
(switched on or on standby), laptop computer,
strong magnetic fields, etc.
DS SMART ACCESS
After activation by the customer, this function
makes it possible, via the MyDS application, to
access the vehicle, to start it and to delegate its
use to people of their choice.
For more information on DS SMART ACCESS and
its activation, install the MyDS application and
refer to the corresponding section.
Central locking
Page 33 of 244
31
Access02
Manual
► Press this button to lock/unlock the vehicle
(doors and boot) from inside the vehicle.
The indicator lamp comes on to confirm central
locking of the vehicle.
The central locking does not take place if
one of the doors is open.
To unfold the exterior handles, press the
button once when the vehicle is locked or
twice when it is unlocked.
When locking / deadlocking from the
outside
When the vehicle is locked or deadlocked from
the outside, the indicator lamp flashes and the
button is inoperative.
► After normal locking, pull one of the interior
door controls to unlock the vehicle.
► After deadlocking, it is necessary to use
the remote control, the “Keyless Entry and
Starting” system or the integral key to unlock
the vehicle.
Automatic (anti-intrusion
security)
The doors and boot lock automatically when
driving (speed above 6 mph (10 km/h)).
To deactivate/reactivate this function (activated
by default):
► Press the button until a confirmation message
appears.
Transporting long or bulky objects
Press the central locking control to drive
with the boot open and the doors locked.
Otherwise, every time the speed of the vehicle
exceeds 6 mph (10 km/h), the locks will
rebound and an alert will appear.
Advice
Remote control
The remote control is a sensitive, high-
frequency device; avoid handling it in your
pocket, due to the risk of unintentionally
unlocking the vehicle.
Avoid pressing the remote control buttons
while out of range of the vehicle, due to
the risk of rendering the remote control
inoperative. It would then be necessary to
reset it.
Anti-theft protection
Do not modify the electronic vehicle
immobiliser, as this might result in
malfunctions.
Locking the vehicle
Driving with the doors locked could make
it more difficult for the emergency services to
enter the vehicle in an emergency.
As a safety precaution, take the electronic key
with you when leaving the vehicle, even for a
short time.
Purchasing a second-hand vehicle
Have the key codes memorised by
a dealer, to ensure that the keys in your
possession are the only ones able to start the
vehicle.
Emergency procedures
Lost keys, remote control,
electronic key
Go to a dealer with the vehicle’s registration
certificate and your personal identification
documents.
The dealer will be able to retrieve the key code
and the transponder code, enabling a new key to
be ordered.
Page 35 of 244
33
Access02
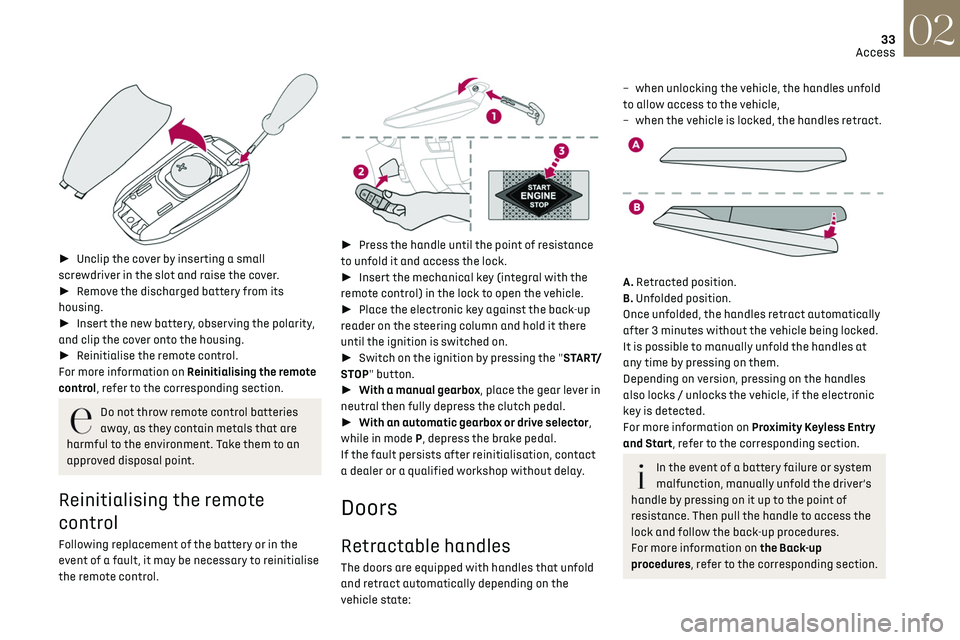
► Unclip the cover by inserting a small
screwdriver in the slot and raise the cover.
► Remove the discharged battery from its
housing.
► Insert the new battery, observing the polarity,
and clip the cover onto the housing.
► Reinitialise the remote control.
For more information on Reinitialising the remote
control, refer to the corresponding section.
Do not throw remote control batteries
away, as they contain metals that are
harmful to the environment. Take them to an
approved disposal point.
Reinitialising the remote
control
Following replacement of the battery or in the
event of a fault, it may be necessary to reinitialise
the remote control.
► Press the handle until the point of resistance
to unfold it and access the lock.
► Insert the mechanical key (integral with the
remote control) in the lock to open the vehicle.
► Place the electronic key against the back-up
reader on the steering column and hold it there
until the ignition is switched on.
► Switch on the ignition by pressing the "START/
STOP" button.
► With a manual gearbox, place the gear lever in
neutral then fully depress the clutch pedal.
► With an automatic gearbox or drive selector,
while in mode P, depress the brake pedal.
If the fault persists after reinitialisation, contact
a dealer or a qualified workshop without delay.
Doors
Retractable handles
The doors are equipped with handles that unfold
and retract automatically depending on the
vehicle state:
– when unlocking the v ehicle, the handles unfold
to allow access to the vehicle,
–
when the v
ehicle is locked, the handles retract.
A. Retracted position.
B. Unfolded position.
Once unfolded, the handles retract automatically
after 3 minutes without the vehicle being locked.
It is possible to manually unfold the handles at
any time by pressing on them.
Depending on version, pressing on the handles
also locks / unlocks the vehicle, if the electronic
key is detected.
For more information on Proximity Keyless Entry
and Start, refer to the corresponding section.
In the event of a battery failure or system
malfunction, manually unfold the driver’s
handle by pressing on it up to the point of
resistance. Then pull the handle to access the
lock and follow the back-up procedures.
For more information on the Back-up
procedures, refer to the corresponding section.
Page 38 of 244
36
Access02
Operating the switch again stops the movement
of the window.Window controls remain operational for
approximately 45 seconds after switching
off the ignition or after locking the vehicle.
After that time, the controls are disabled.
To reactivate them, switch on the ignition or
unlock the vehicle.
Anti-pinch
If the window meets an obstacle while rising, it
stops and immediately partially lowers again.
Deactivation of the rear
controls for the rear electric
windows
For children's safety, press switch 5 to
deactivate the rear electric windows
controls.
The indicator lamp for the button comes on,
accompanied by a message confirming activation.
With the ignition on, it remains lit, as long as the
child lock remains activated.
Use of the rear electric windows from the driver's
controls remains possible.
For versions fitted with an electric child
lock, this control also deactivates the
interior rear door controls.
For more information on the Child lock, refer to
the corresponding section.
Reactivating interior volumetric
monitoring
► Deactivate exterior perimeter monitoring by
unlocking the vehicle using the remote control or
by pressing a door handle.
The indicator lamp in the button goes off.
► Reactivate the full alarm system by locking
the vehicle using the remote control or by
pressing one of the front door handles.
The red indicator lamp in the button once again
flashes every second.
Triggering of the alarm
This is indicated by sounding of the siren and
flashing of the direction indicators for 30
seconds.
The interior volumetric and anti-tilt monitoring
functions remain active until the alarm has been
triggered ten times in succession.
When the vehicle is unlocked, rapid flashing of
the indicator lamp in the button indicates that the
alarm was triggered during your absence. When
the ignition is switched on, this flashing stops
immediately.
Failure of the remote control
To deactivate the monitoring functions:
► Unlock the vehicle using the key in the driver's
door lock.
► Open the door; the alarm is triggered.
► Switch on the ignition; this stops the alarm.
The indicator lamp in the button goes off.
Locking the vehicle without
activating the alarm
► Lock or deadlock the vehicle using the key
(integral to the remote control) in the driver's door
lock.
Automatic activation
(Depending on version)
The system is activated automatically 2 minutes
after the last door or the boot is closed.
► To avoid triggering the alarm on entering the
vehicle, first press the unlocking button on the
remote control or unlock the vehicle using the
“Keyless Entry and Starting” system.
Malfunction
When the ignition is switched on, fixed
illumination of the red indicator lamp in the
button indicates a malfunction of the system.
Have it checked by a dealer or a qualified
workshop.
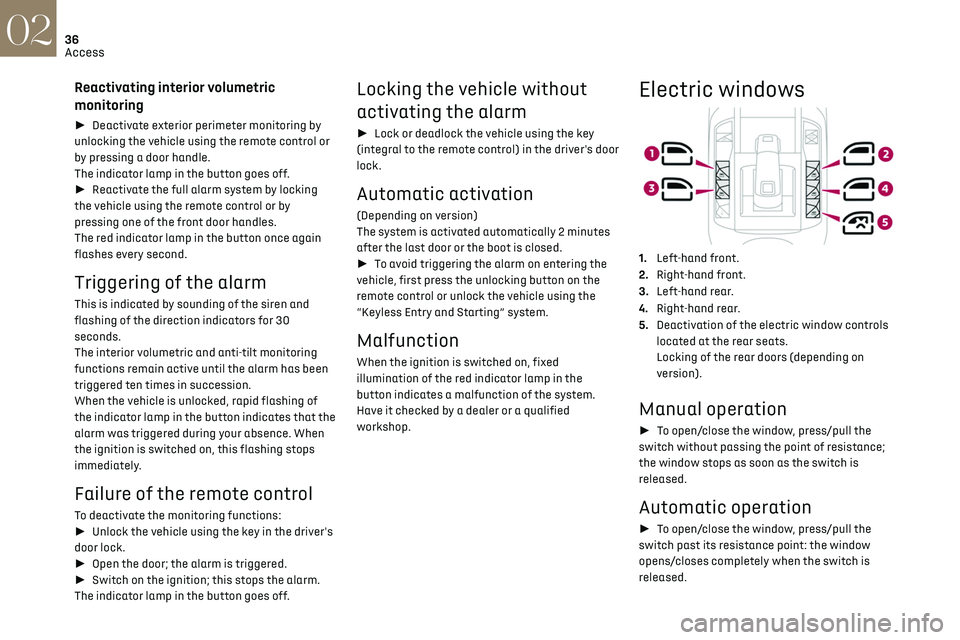
Electric windows
1. Left-hand front.
2. Right-hand front.
3. Left-hand rear.
4. Right-hand rear.
5. Deactivation of the electric window controls
located at the rear seats.
Locking of the rear doors (depending on
version).
Manual operation
► To open/close the window, press/pull the
switch without passing the point of resistance;
the window stops as soon as the switch is
released.
Automatic operation
► To open/close the window, press/pull the
switch past its resistance point: the window
opens/closes completely when the switch is
released.
Page 43 of 244
41
Ease of use and comfort03
Mirrors
Door mirrors
Adjustment
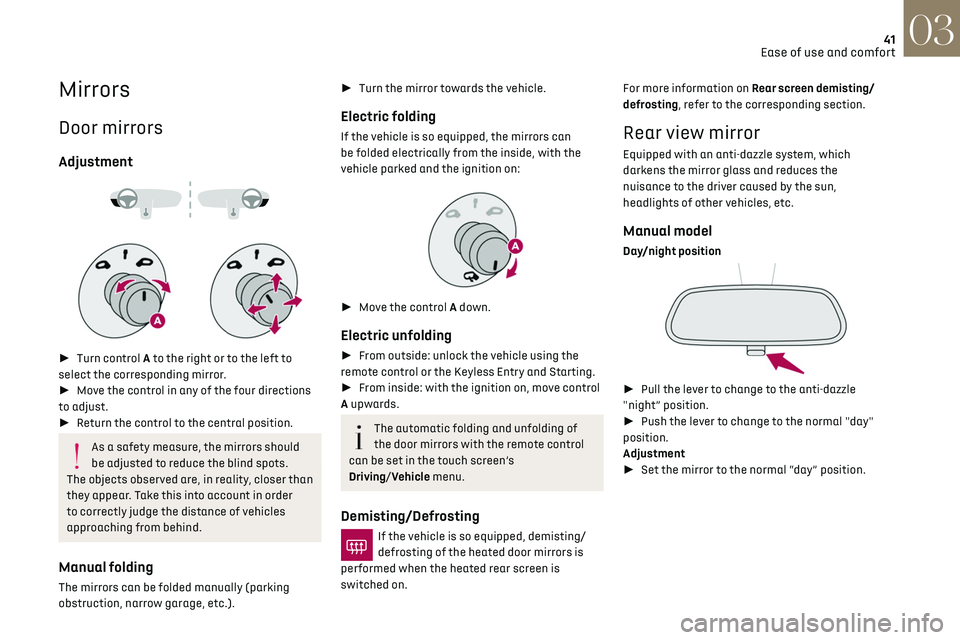
► Turn control A to the right or to the left to
select the corresponding mirror.
► Move the control in any of the four directions
to adjust.
► Return the control to the central position.
As a safety measure, the mirrors should
be adjusted to reduce the blind spots.
The objects observed are, in reality, closer than
they appear. Take this into account in order
to correctly judge the distance of vehicles
approaching from behind.
Manual folding
The mirrors can be folded manually (parking
obstruction, narrow garage, etc.).
► Turn the mirror towards the vehicle.
Electric folding
If the vehicle is so equipped, the mirrors can
be folded electrically from the inside, with the
vehicle parked and the ignition on:
► Move the control A down.
Electric unfolding
► From outside: unlock the vehicle using the
remote control or the Keyless Entry and Starting.
► From inside: with the ignition on, move control
A upwards.
The automatic folding and unfolding of
the door mirrors with the remote control
can be set in the touch screen’s
Driving/Vehicle menu.
Demisting/Defrosting
If the vehicle is so equipped, demisting/
defrosting of the heated door mirrors is
performed when the heated rear screen is
switched on. For more information on Rear screen demisting/
defrosting, refer to the corresponding section.
Rear view mirror
Equipped with an anti-dazzle system, which
darkens the mirror glass and reduces the
nuisance to the driver caused by the sun,
headlights of other vehicles, etc.
Manual model
Day/night position
►
Pull the lever to change to the anti-dazzle
"night” position.
► Push the lever to change to the normal "day"
position.
Adjustment
► Set the mirror to the normal “day” position.
Page 52 of 244
50Ease of use and comfort03
The connection of an unapproved
electrical device, such as a USB charger,
may adversely affect the operation of vehicle
electrical systems, causing faults such as poor
radio reception or interference with displays in
the screens.
FOCAL ELECTRA® Premium Hi-Fi
system
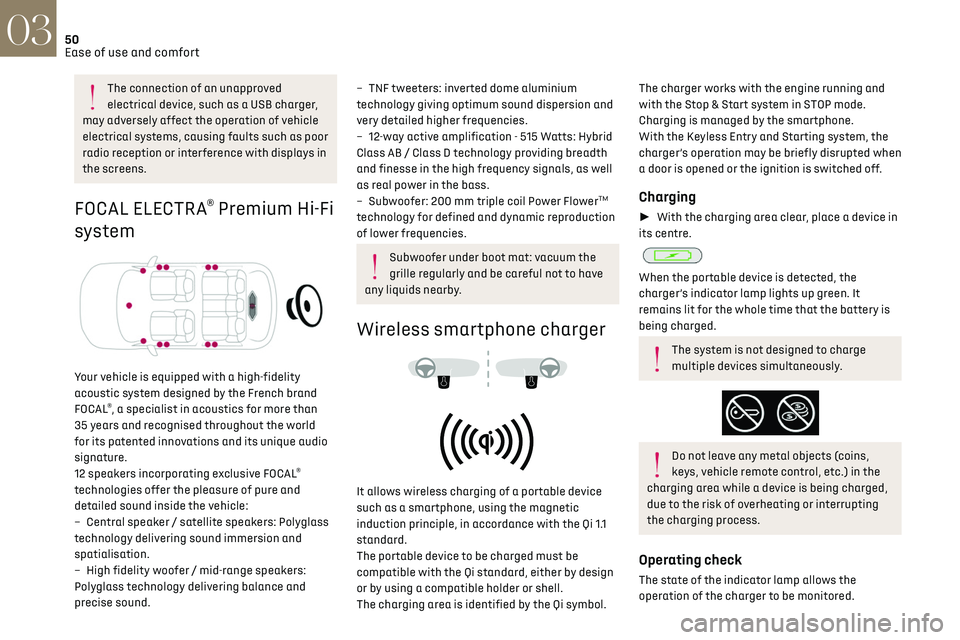
Your vehicle is equipped with a high-fidelity
acoustic system designed by the French brand
FOCAL
®, a specialist in acoustics for more than
35 years and recognised throughout the world
for its patented innovations and its unique audio
signature.
12 speakers incorporating exclusive FOCAL
®
technologies offer the pleasure of pure and
detailed sound inside the vehicle:
–
Cen
tral speaker / satellite speakers: Polyglass
technology delivering sound immersion and
spatialisation.
–
High fidelity w
oofer / mid-range speakers:
Polyglass technology delivering balance and
precise sound.
– TNF tweeters: inverted dome aluminium
technology giving optimum sound dispersion and
very detailed higher frequencies.
–
12-w
ay active amplification - 515 Watts: Hybrid
Class AB / Class D technology providing breadth
and finesse in the high frequency signals, as well
as real power in the bass.
–
Sub
woofer: 200 mm triple coil Power Flower
TM
technology for defined and dynamic reproduction
of lower frequencies.
Subwoofer under boot mat: vacuum the
grille regularly and be careful not to have
any liquids nearby.
Wireless smartphone charger
It allows wireless charging of a portable device
such as a smartphone, using the magnetic
induction principle, in accordance with the Qi 1.1
standard.
The portable device to be charged must be
compatible with the Qi standard, either by design
or by using a compatible holder or shell.
The charging area is identified by the Qi symbol.
The charger works with the engine running and
with the Stop & Start system in STOP mode.
Charging is managed by the smartphone.
With the Keyless Entry and Starting system, the
charger’s operation may be briefly disrupted when
a door is opened or the ignition is switched off.
Charging
► With the charging area clear, place a device in
its centre.
When the portable device is detected, the
charger’s indicator lamp lights up green. It
remains lit for the whole time that the battery is
being charged.
The system is not designed to charge
multiple devices simultaneously.
Do not leave any metal objects (coins,
keys, vehicle remote control, etc.) in the
charging area while a device is being charged,
due to the risk of overheating or interrupting
the charging process.
Operating check
The state of the indicator lamp allows the
operation of the charger to be monitored.
Page 84 of 244
82Driving06
The lighting state of the "START/STOP"
button indicates the presence or absence
of the electronic key in the passenger
compartment.
Starting
► With a manual gearbox, place the gear lever in
neutral and fully depress the clutch pedal.
► With an automatic gearbox, select mode P
or N and press the brake pedal.
► Press the "START/STOP" button while
maintaining pressure on the pedal until the engine
starts.
For Diesel engines, when the temperature is below
zero and/or the engine is cold, starting will only
occur once the preheating warning lamp is off.
If this warning lamp comes on after
pressing the "START/STOP" button:
► Keep the pedal fully depressed and do not
press the "START/STOP" button again until the
engine is running.
If one of the starting conditions is not met, a
message is displayed.
In some circumstances, a message indicates
that it is necessary to turn the steering wheel
while pressing the "START/STOP" button to assist
unlocking of the steering column.
With petrol engines, after a cold start,
preheating the catalytic converter can
cause noticeable engine vibrations for
anything up to 2 minutes while stationary with
the engine running (accelerated idle speed).
If the engine stalls, release the clutch
pedal and fully depress it again, the
engine will restart automatically.
Switching off
► Immobilise the vehicle, with the engine at idle.
► With a manual gearbox, ideally put the gear
lever into neutral.
► With an automatic gearbox, ideally select
mode P or N.
► Press the "START/STOP" button..
In some circumstances, it is necessary to turn the
steering wheel to lock the steering column.
If the vehicle is not immobilised, the
engine will not switch off.
With the engine off, the braking and
steering assistance systems are also cut
off - risk of loss of control of the vehicle!
Never leave your vehicle with the
electronic key still inside.
Starting/Switching off the
electric motor
Starting
The drive selector must be in mode P.
► Fully depress the brake pedal and briefly press
the "START/STOP" button.
► Keep your foot on the brake pedal until the
READY indicator lamp comes on and an audible
signal is emitted, indicating that the vehicle is
ready to drive.
► With your foot on the brake, press the
"Unlock" button and select mode D/B or R.
► Release the brake pedal, then accelerate.
On starting, the instrument panel lights up and
the power indicator cursor moves to the "neutral"
position. The steering column automatically
unlocks ( you may hear a sound and feel the
steering wheel move).
Switching off
► Press the "START/STOP" button.
Before exiting the vehicle, check that:
–
The driv
e selector is in mode P.
–
The READY indicator lamp is off.
If the driver's door is opened while the
required conditions for stopping are not
satisfied, an audible signal is emitted,
accompanied by the display of a warning
message.
Switching on the ignition
without starting the engine
With the electronic key in the passenger
compartment, pressing the “START/STOP” button,
without pressing any of the pedals, allows the
ignition to be switched on without starting the
engine.
► Press this button again to switch off the
ignition and allow the vehicle to be locked.
Key not detected
Back-up starting
A back-up reader is fitted to the steering column,
to enable the engine to be started if the system
fails to detect the key in the recognition zone, or if
the battery in the electronic key is discharged.
► Place and hold the remote control against the
reader.
► With a manual gearbox, place the gear lever in
neutral, then fully depress the clutch pedal.
► With an automatic gearbox or a drive selector,
select mode P, then fully depress the brake pedal.
► Press the "START/STOP" button.