ad blue CITROEN DS3 CROSSBACK 2021 User Guide
[x] Cancel search | Manufacturer: CITROEN, Model Year: 2021, Model line: DS3 CROSSBACK, Model: CITROEN DS3 CROSSBACK 2021Pages: 244, PDF Size: 7.7 MB
Page 27 of 244
25
Instruments01
– Access to the Settings of the touch screen and
digital instrument panel (date/time, languages,
units, etc.).
Side banners of the DS CONNECT NAV
– Exterior temperature (a blue warning lamp
appears when there is a risk of ice).
–
Ac
cess to the Settings of the touch screen and
digital instrument panel (date/time, languages,
units, etc.).
–
Notifications.
–
R
eminder of the air conditioning information,
and direct access to the corresponding menu.
–
Ac
cess to the heated seat settings.
–
Time.
Electric / Energy menu
Depending on version, this is accessible either:– directly, by pressing the button near the
touch screen.
– via the Applications menu.
Energy flows
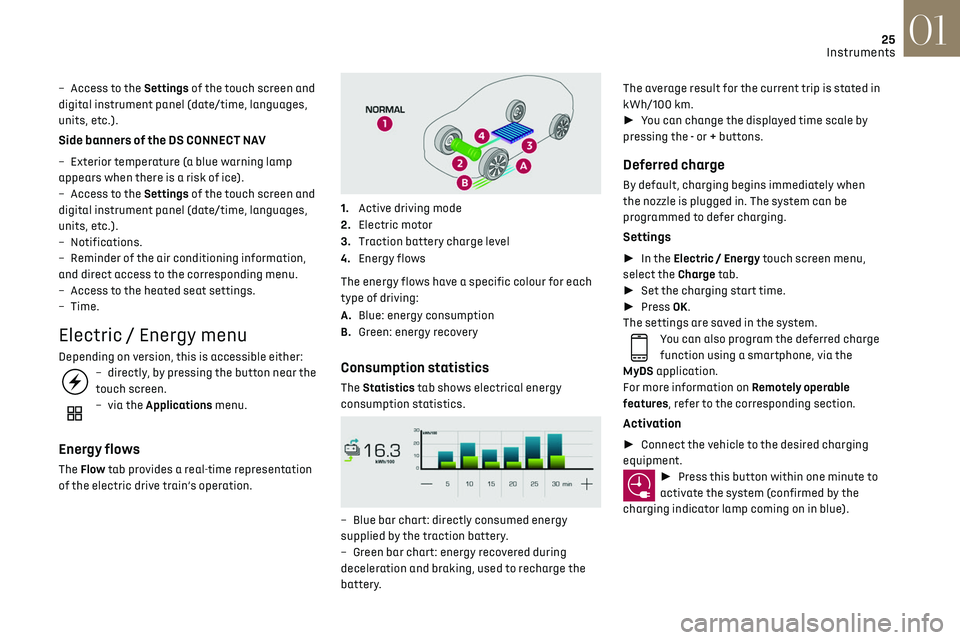
The Flow tab provides a real-time representation
of the electric drive train’s operation.
1.Active driving mode
2. Electric motor
3. Traction battery charge level
4. Energy flows
The energy flows have a specific colour for each
type of driving:
A. Blue: energy consumption
B. Green: energy recovery
Consumption statistics
The Statistics tab shows electrical energy
consumption statistics.
– Blue bar chart: directly c onsumed energy
supplied by the traction battery.
–
G
reen bar chart: energy recovered during
deceleration and braking, used to recharge the
battery. The average result for the current trip is stated in
kWh/100 km.
►
You can change the displayed time scale by
pressing the - or + buttons.
Deferred charge
By default, charging begins immediately when
the nozzle is plugged in. The system can be
programmed to defer charging.
Settings
► In the Electric / Energy touch screen menu,
select the Charge tab.
► Set the charging start time.
► Press OK.
The settings are saved in the system.
You can also program the deferred charge
function using a smartphone, via the
MyDS application.
For more information on Remotely operable
features, refer to the corresponding section.
Activation
► Connect the vehicle to the desired charging
equipment.
► Press this button within one minute to
activate the system (confirmed by the
charging indicator lamp coming on in blue).
Page 47 of 244

45Ease of use and comfort03
Central and side air vents, footwells
Central and side air vents
Windscreen
Windscreen, footwells
Footwells
Air conditioning on / off
The air conditioning system is designed to
operate effectively in all seasons, with the
windows closed.
It is used to:
–
lo
wer the temperature in summer,
–
increase the effectiv
eness of the demisting in
winter, above 3°C.
► Press button 4 to activate/deactivate the air
conditioning system.
Air conditioning does not operate when
the air flow is disabled.
To obtain cool air more quickly, enable interior
air recirculation for a brief period. Then return
to the intake of exterior air.
Switching off the air conditioning may result in
some discomfort (humidity or misting).
System switch-off
► Press this button.
Its indicator lamp comes on and all other indicator
lamps for the system go off.
This action deactivates all functions of the air
conditioning system.
Temperature is no longer regulated. A slight flow
of air can still be felt, resulting from the forward
movement of the vehicle.
Automatic air conditioning
The air conditioning operates with the engine
running, but the ventilation and its controls can
be accessed with the ignition on.
Operation of the air conditioning and regulation
of temperature, air flow and air distribution in the
passenger compartment are automatic.
Press the Climate menu button to access
the system controls.
1. Temperature adjustment
2. Air flow adjustment
3. Air distribution adjustment
4. Air conditioning on/off
5. Automatic comfort programme on/off
6. Maximum A/C
7. Access to the secondary page
8. Adjustment of the automatic comfort
programme (Soft/Normal/Fast)
Temperature adjustment
► Press one of the buttons 1 to increase (red) or
decrease (blue) the value.
The value displayed corresponds to a level of
comfort and not to a precise temperature.
Air flow adjustment
► Press one of the buttons 2 (- or +) to increase
or decrease air flow.
The air flow symbol (a fan) is filled in according to
the request.
Page 122 of 244
120
Driving06
AUTO mode
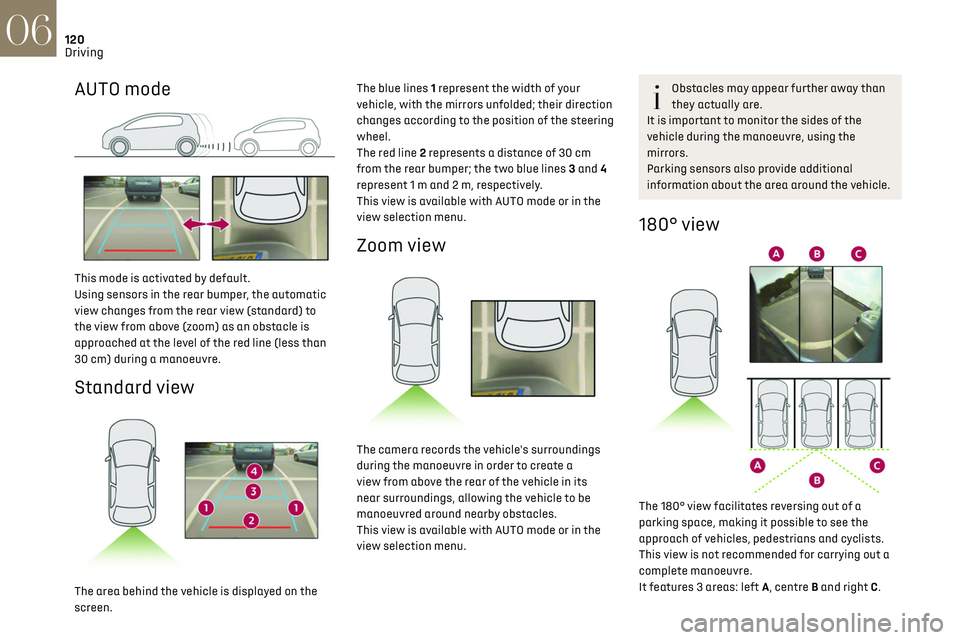
This mode is activated by default.
Using sensors in the rear bumper, the automatic
view changes from the rear view (standard) to
the view from above (zoom) as an obstacle is
approached at the level of the red line (less than
30 cm) during a manoeuvre.
Standard view
The area behind the vehicle is displayed on the
screen.The blue lines 1 represent the width of your
vehicle, with the mirrors unfolded; their direction
changes according to the position of the steering
wheel.
The red line 2 represents a distance of 30 cm
from the rear bumper; the two blue lines 3 and 4
represent 1 m and 2 m, respectively.
This view is available with AUTO mode or in the
view selection menu.
Zoom view
The camera records the vehicle's surroundings
during the manoeuvre in order to create a
view from above the rear of the vehicle in its
near surroundings, allowing the vehicle to be
manoeuvred around nearby obstacles.
This view is available with AUTO mode or in the
view selection menu.
Obstacles may appear further away than
they actually are.
It is important to monitor the sides of the
vehicle during the manoeuvre, using the
mirrors.
Parking sensors also provide additional
information about the area around the vehicle.
180° view
The 180° view facilitates reversing out of a
parking space, making it possible to see the
approach of vehicles, pedestrians and cyclists.
This view is not recommended for carrying out a
complete manoeuvre.
It features 3 areas: left A, centre B and right C.
This view is only available via the view selection
menu.
Park Assist
Refer to the General recommendations on the use
of driving and manoeuvring aids.
This system provides active parking assistance
for vehicles fitted with a manual gearbox: it
detects a parking space and then steers in
the appropriate direction to park in this space
while the driver controls the driving direction,
engagement of gears, acceleration and braking.
To assist the driver in monitoring the correct
manoeuvring operation, the system automatically
triggers the display of Reversing camera and the
activation of the parking sensors.
The system performs the measurements of
available parking spaces and calculations of
distances to obstacles using ultrasonic sensors
built into the front and rear bumpers of the
vehicle.
The system assists with the following
manoeuvres:
Page 134 of 244
132
Practical information07
3.Nozzle locking indicator lamp
Red: nozzle positioned correctly and locked in
the connector.
4. Charging indicator lamp
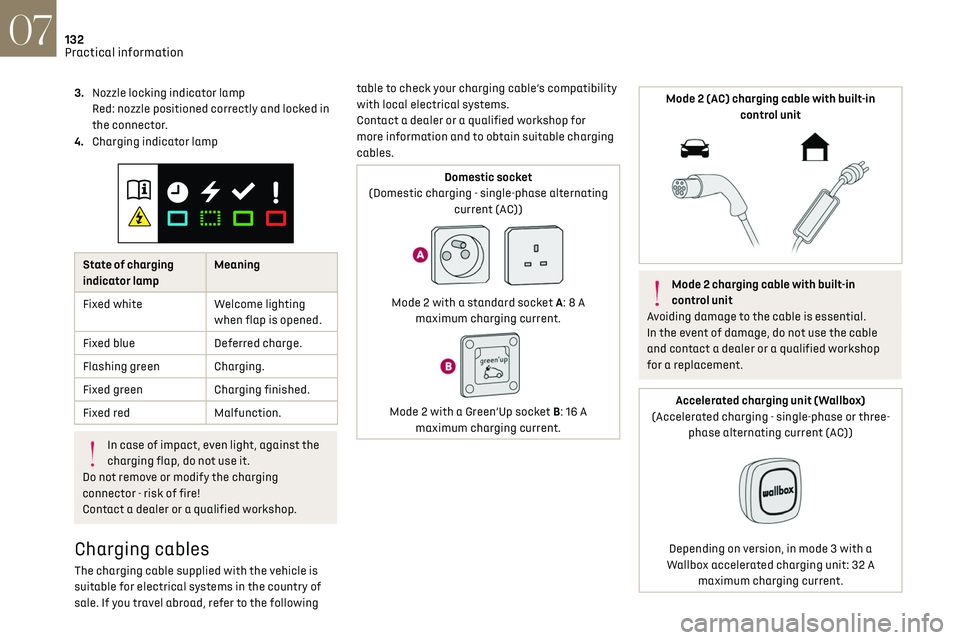
State of charging
indicator lamp Meaning
Fixed white Welcome lighting
when flap is opened.
Fixed blue Deferred charge.
Flashing green Charging.
Fixed green Charging finished.
Fixed red Malfunction.
In case of impact, even light, against the
charging flap, do not use it.
Do not remove or modify the charging
connector - risk of fire!
Contact a dealer or a qualified workshop.
Charging cables
The charging cable supplied with the vehicle is
suitable for electrical systems in the country of
sale. If you travel abroad, refer to the following table to check your charging cable’s compatibility
with local electrical systems.
Contact a dealer or a qualified workshop for
more information and to obtain suitable charging
cables.
Domestic socket
(Domestic charging - single-phase alternating current (AC))
Mode 2 with a standard socket A: 8 A maximum charging current.
Mode 2 with a Green’Up socket B: 16 A maximum charging current.
Mode 2 (AC) charging cable with built-in control unit
Mode 2 charging cable with built-in
control unit
Avoiding damage to the cable is essential.
In the event of damage, do not use the cable
and contact a dealer or a qualified workshop
for a replacement.
Accelerated charging unit (Wallbox)
(Accelerated charging - single-phase or three- phase alternating current (AC))
Depending on version, in mode 3 with a
Wallbox accelerated charging unit: 32 A maximum charging current.
Page 136 of 244
134
Practical information07
4.Always use an electrical socket protected
by a circuit-breaker appropriate for the
electrical circuit’s current rating.
5. The weight of the control unit must not be
borne by the electrical socket, plug and
cables.
6. Never use this charging cable if it is defective
or in any way damaged.
7. Never attempt to repair or open this charging
cable. It contains no repairable parts -
replace the charging cable if it is damaged.
8. Never immerse this charging cable in water.
9. Never use this charging cable with an
extension cable, a multi-plug socket,
a conversion adaptor or on a damaged
electrical socket.
10. Do not unplug the plug from the wall as a
means of stopping charging.
11. Do not force the connector if it is locked into
the vehicle.
12. Immediately stop charging, by locking and
then unlocking the vehicle using the remote
control key, if the charging cable or wall
socket feel burning hot to the touch.
13. This charging cable includes components
liable to cause electrical arcing or sparks. Do
not expose to flammable vapours.
14. Only use this charging cable with DS
AUTOMOBILES vehicles.
15. Never plug the cable into the wall socket (or
unplug it) with wet hands.Charging the traction
battery (Electric)
To recharge, connect the vehicle to a domestic
electrical system (for domestic or accelerated
charging) or a fast charging station (for fast
charging).
For a full charge, follow the desired charging
procedure without pausing it, until it ends
automatically. Charging may be performed either
immediately or deferred.
You can stop charging at any time by unlocking
the vehicle and removing the nozzle.
For more information on the charging displays on
the Instrument panel and the Touch screen, refer
to the corresponding section.
Depending on version, the deferred charge
function is configured via either the touch
screen or the MyDS application.
For more information on the deferred charge
function, refer to the corresponding section.
A LED, located below the interior rear view
and visible from outside the vehicle,
flashes in blue for a few minutes to confirm
the start of the charging.
It is also possible to monitor the charging
process using the MyDS application.
For more information on Remotely operable
features, refer to the corresponding section.
As a safety measure, the engine will not
start if the charging cable is plugged into
the connector on the vehicle. A warning is
displayed on the instrument panel.
Cooling the traction battery
The cooling fan comes on during charging
to cool the on-board charger and the traction
battery.
Vehicle unused for an extended period
Fully recharge the traction battery every
three months. Follow the domestic charging
procedure.
Before carrying out the charging operation,
check that the accessory battery is not
disconnected or discharged. If it is, refer to
the corresponding section for information on
reconnecting or recharging it.
Precautions
Electric vehicles were developed in accordance
with the guidelines on maximum electromagnetic
fields issued by the International Commission on
Non-Ionizing Radiation Protection (ICNIRP - 1998
Guidelines).
Wearers of pacemakers or equivalent
devices should consult a doctor to enquire
about any applicable precautionary measures, or
contact the manufacturer of their implanted
electronic medical device to check that it is
guaranteed to operate in an environment
compliant with the ICNIRP guidelines.
If in doubt
Domestic or accelerated charging: do
not remain inside or near the vehicle, or near
the charging cable or charging unit, even for a
short time.
Fast charging: do not use the system yourself
and avoid approaching public fast charging
points. Leave the area and ask a third party to
recharge the vehicle.
For domestic or accelerated charging
Before charging
Depending on the context:
► Have a professional check that the
electrical system to be used complies with
applicable standards and is compatible with
the vehicle.
► Have a professional electrician install
a dedicated domestic power socket or
accelerated charging unit (Wallbox)
compatible with the vehicle.
Use the charging cable supplied with the
vehicle.
(During charging)
Never work under the bonnet:
– Some areas remain very hot, even an hour
after charging ends - risk of burns!
– The fan may start at any time - risk of cuts or
strangulation!
Page 144 of 244

142
Practical information07
The check and top-up must only be done with the
engine cold.
A low level presents a risk of serious damage to
the engine.
The level of this fluid should be close to the "MAX"
mark but should never exceed it.
If the level is close to or below the "MIN” mark, it
is essential to top up.
When the engine is hot, the temperature of this
fluid is regulated by the fan.
As the cooling system is pressurised, wait at least
one hour after switching off the engine before
carrying out any work.
In order to avoid the risk of scalding if you need to
top up in an emergency, wrap a cloth around the
cap and unscrew the cap by two turns to allow the
pressure to drop.
Once the pressure has dropped, remove the cap
and top up to the required level.
Screenwash fluid
Top up to the required level when
necessary.
Fluid specification
The fluid must be topped up with a ready-to-use
mixture.
In winter (temperatures below zero), a liquid
containing an agent to prevent freezing must
be used which is appropriate for the prevailing
conditions, in order to protect the elements of the
system (pump, tank, ducts, jets, etc.).
Filling with pure water is prohibited under
all circumstances (risk of freezing,
limestone deposits, etc.).
AdBlue (BlueHDi)
An alert is triggered when the reserve level is
reached.
For more information on Indicators and in
particular the AdBlue range indicators, refer to
the corresponding section.
To avoid the vehicle being immobilised in
accordance with regulations, you must top up the
AdBlue tank.
For more information on AdBlue
® (BlueHDi), and
in particular on the supply of AdBlue, refer to the
corresponding section.
Checks
Unless otherwise indicated, check these
components in accordance with the
manufacturer's service schedule and according to
your engine.
Otherwise, have them checked by a dealer or a
qualified workshop.
Only use products recommended by the
Manufacturer or products of equivalent
quality and specification.
In order to optimise the operation of
components as important as those in the
braking system, the Manufacturer selects and
offers very specific products.
12 V battery
The battery does not require any
maintenance.
However, check regularly that the terminals
are correctly tightened (versions without quick
release terminals) and that the connections are
clean.
For more information on the precautions
to take before any work on the 12 V
battery, refer to the corresponding section.
Versions equipped with Stop & Start are
fitted with a 12 V lead-acid battery of
specific technology and specification.
Its replacement should be carried out only by a
dealer or by a qualified workshop.
Passenger compartment filter
Depending on the environment and the use
of the vehicle (e.g. dusty atmosphere, city
driving), change it twice as often, if necessary.
A clogged passenger compartment filter
can adversely affect air conditioning
system performance and generate undesirable
odours.
Air filter
Depending on the environment and the use
of the vehicle (e.g. dusty atmosphere, city
driving), change it twice as often, if necessary.
Oil filter
Change the oil filter each time the engine
oil is changed.
Particle filter (Diesel)
When the particle filter is approaching
saturation, this warning lamp comes on
temporarily, accompanied by a message warning
of the risk of filter clogging.
As soon as the traffic conditions permit,
regenerate the filter by driving at a speed of at
least 37 mph (60 km/h) until the warning lamp
goes off.
Following prolonged operation of the
vehicle at very low speed or at idle, you
may, in exceptional circumstances, notice the
emission of water vapour at the exhaust while
accelerating. This has no impact on the
vehicle’s behaviour or the environment.
New vehicle
During the first few particle filter
regeneration operations, you may notice a
"burning" smell. This is perfectly normal.
Manual gearbox
The gearbox does not require any
maintenance (no oil change).
Page 146 of 244
144
Practical information07
reading and have an adverse effect on road
holding.
Fitting different tyres on the front and rear axles
can cause the ESC to mistime.
Shock absorbers
It is not easy for drivers to detect when
shock absorbers are worn. Nevertheless,
the shock absorbers have a major impact on
road-holding and braking performance.
For your safety and driving comfort, it is important
to have them regularly checked by a dealer or a
qualified workshop.
Timing and accessory kits
Timing and accessory kits are used from
the time the engine is started until it is
switched off. It is normal for them to wear over
time.
A faulty timing or accessory kit can damage
the engine, rendering it unusable. Observe the
recommended replacement frequency, stated in
distance travelled or time elapsed, whichever is
reached first.
AdBlue® (BlueHDi)
To respect the environment and ensure
compliance with the Euro 6 standard, without
adversely affecting the performance or fuel
consumption of Diesel engines, the Manufacturer
has taken the decision to equip its vehicles with a
system that associates SCR (Selective Catalytic
Reduction) with a Diesel particle filter (DPF) for
the treatment of exhaust gases.
SCR System
Using a liquid called AdBlue® that contains
urea, a catalytic converter turns up to 85% of
the nitrogen oxides (NOx) into nitrogen and
water, which are harmless to health and the
environment.
The AdBlue® is contained in a special tank
holding about 15 litres.
Its capacity allows a driving range of
approximately 5,600 miles (9,000 km), which may
vary considerably depending on your driving style.
An alert system is triggered once the reserve level
is reached: it is then possible to drive for a further
1,500 miles (2,400 km) before the tank is empty
and the vehicle blocked.
For more information on the Warning and
indicator lamps and the associated alerts,
or the Indicators, please refer to the
corresponding sections.
Once the AdBlue® tank is empty, a system
required by legislation prevents starting
of the engine.
If the SCR system is faulty, the level of
emissions from the vehicle will no longer meet
the Euro 6 standard: the vehicle becomes
polluting.
In the event of a confirmed SCR system
malfunction, it is essential to visit a dealer or a
qualified workshop. After 680 miles (1,100 km),
a device is automatically activated to prevent
the engine from starting.
In both cases, a range indicator indicates
the distance that can be travelled before the
vehicle is stopped.
Freezing of the AdBlue®
AdBlue® freezes at temperatures below
around -11°C.
The SCR system includes a heater for the
AdBlue
® tank, allowing you to continue driving
in very cold conditions.
Supply of AdBlue®
It is recommended that the AdBlue® be topped up
as soon as the first alert is issued indicating that
the reserve level has been reached.
For the correct operation of the SCR
system:
–
U
se only AdBlue
® fluid that meets the ISO
22241 standard.
–
Ne
ver transfer AdBlue
® to another container
as it would lose its purity.
–
Ne
ver dilute AdBlue
® with water.
It is possible to obtain AdBlue
® from a dealer or a
qualified workshop as well as at service stations
equipped with AdBlue
® pumps specially designed
for passenger vehicles.
Recommendations on storage
AdBlue® freezes at about -11°C and deteriorates
above +25°C. Containers should be stored in a
cool area and protected from direct sunlight.
Under these conditions, the fluid can be kept for
at least a year.
If the fluid has frozen, it can be used once it has
completely thawed out at room temperature.
Never store AdBlue
® containers in your
vehicle.
Precautions for use
AdBlue® is a urea-based solution. This fluid is non-
flammable, colourless and odourless (when kept
in a cool place).
In the event of contact with the skin, wash the
affected area with soap and running water. In the
event of contact with the eyes, immediately rinse
the eyes with large amounts of water or with an
eye wash solution for at least 15 minutes. Seek
medical attention if you feel a persistent burning
sensation or irritation.
If swallowed, immediately wash out the mouth
with clean water and then drink plenty of water.
In certain conditions (high temperature, for
example), the risk of release of ammonia cannot
be excluded: do not inhale the fluid. Ammonia
vapours have an irritant effect on mucous
membranes (eyes, nose and throat).
Store AdBlue
® out of the reach of children,
in its original container.
Page 147 of 244

145
Practical information07
Recommendations on storage
AdBlue® freezes at about -11°C and deteriorates
above +25°C. Containers should be stored in a
cool area and protected from direct sunlight.
Under these conditions, the fluid can be kept for
at least a year.
If the fluid has frozen, it can be used once it has
completely thawed out at room temperature.
Never store AdBlue® containers in your
vehicle.
Precautions for use
AdBlue® is a urea-based solution. This fluid is non-
flammable, colourless and odourless (when kept
in a cool place).
In the event of contact with the skin, wash the
affected area with soap and running water. In the
event of contact with the eyes, immediately rinse
the eyes with large amounts of water or with an
eye wash solution for at least 15 minutes. Seek
medical attention if you feel a persistent burning
sensation or irritation.
If swallowed, immediately wash out the mouth
with clean water and then drink plenty of water.
In certain conditions (high temperature, for
example), the risk of release of ammonia cannot
be excluded: do not inhale the fluid. Ammonia
vapours have an irritant effect on mucous
membranes (eyes, nose and throat).
Store AdBlue® out of the reach of children,
in its original container.
Procedure
Before starting the top-up procedure, ensure that
the vehicle is parked on a flat and level surface.
In wintry conditions, ensure that the temperature
of the vehicle is above -11 °C. Otherwise, the
AdBlue
® may be frozen and therefore cannot be
poured into its tank. Park your vehicle in a warmer
area for a few hours to allow the top-up to be
carried out.
Never pour AdBlue® into the Diesel fuel
tank.
If any AdBlue® is splashed, or if there are
any spillages on the bodywork, rinse
immediately with cold water or wipe with a
damp cloth.
If the fluid has crystallised, clean it off using a
sponge and hot water.
Important: in the event of a top-up after an
AdBlue breakdown, you must wait about
5 minutes before switching on the ignition,
without opening the driver's door, unlocking
the vehicle or bringing the electronic key into
the passenger compartment.
Switch on the ignition, then wait for 10
seconds before starting the engine.
► Press the "START/STOP" button to switch off
the engine.
► Turn the blue cap of the AdBlue® tank a 6th of a
turn anti-clockwise and remove it.
► With a container of AdBlue
®: after checking
the expiry date, read carefully the instructions
on the label before pouring the contents of the
container into the vehicle's AdBlue tank.
► With an AdBlue
® pump: introduce the nozzle
and fill the tank until the automatic cut-off of the
nozzle.
In order not to overfill the AdBlue® tank:
–
Add betw
een 10 and 13 litres using
AdBlue
® containers.
–
St
op after the nozzle’s first automatic cut-
out, if you are refilling at a service station.
If the AdBlue® tank is completely empty
– which is confirmed by the “Top
up AdBlue: Starting impossible” message – it is
essential to add at least 5 litres.
Page 148 of 244

146
Practical information07
Do not dispose of AdBlue® containers in
the household waste.
Place them in a container reserved for this
purpose or take them back to where you
bought them.
Free-wheeling
In certain situations, you must allow the vehicle to
free-wheel (while being towed, on a rolling road,
in an automatic car wash, or being transported by
rail or sea freight, etc.).
The procedure varies according to the type of
gearbox and parking brake.
With a manual gearbox and
electric parking brake
/
Release procedure
► With the engine running and while depressing
the brake pedal, move the gear selector to the
neutral position.
► While depressing the brake pedal, switch off
the ignition.
► Release the brake pedal, then switch on the
ignition again.
► While depressing the brake pedal, press the
control lever to release the parking brake.
► Release the brake pedal, then switch off the
ignition.
Reverting to normal operation
► While depressing the brake pedal, start the
engine.
With EAT8 automatic gearbox
or drive selector and electric
parking brake
/
Release procedure
► With the vehicle stationary and the engine
running, select mode N and switch off the
ignition.
Within 5 seconds:
► Switch on the ignition again.
► While depressing the brake pedal, move the
push selector forwards or backwards to confirm
mode N.
► While depressing the brake pedal, press the
control lever to release the parking brake.
► Release the brake pedal, switch off the
ignition.
If the 5-second time limit is exceeded, the gearbox
engages mode P; it is then necessary to restart
the procedure.
Reverting to normal operation
► While depressing the brake pedal, restart the
engine.
Keyless Entry and Starting
You must not depress the brake pedal
while switching the ignition on or off. If you do,
the engine will start, requiring you to restart
the procedure.
Advice on care and
maintenance
General recommendations
Observe the following recommendations to avoid
damaging your vehicle.
Exterior
Never use a high-pressure jet wash in the
engine compartment, due to the risk of
damaging electrical components.
Do not wash the vehicle in strong sunshine or
extremely cold conditions.
When washing the vehicle at an
automatic roller-brush car wash, be sure
to lock the doors and, depending on version,
remove the electronic key and deactivate the
“hands-free” function (“Hands-Free Tailgate
Access”).
When using a pressure washer, hold the lance
at least 30 cm from the vehicle (particularly
when cleaning areas containing chipped paint,
sensors or seals).
Page 172 of 244

170
Technical data09
Engines and towed loads - Diesel
EnginesBlueHDi 100BlueHDi 130
Gearboxes BVM6
(Manual 6-speed) EAT8
(Automatic 8-speed)
Codes DV5RD MB6 STTdDV5RC ATN8 STTd
Model codes
UC... YHYJ
YHZR
Cubic capacity (cm³) 14991499
Max. power: EC standard (kW) 7593
Fuel DieselDiesel
Braked trailer (within the GTW limit) (kg)
on a 10% or 12% gradient 1200
1200
Unbraked trailer (kg) 640640
Maximum authorised nose weight (kg) 4848
Electric motor
Model codes: ZKXZ
Braked trailer (within the GTW limit) (kg)
on a 10% or 12% gradient 0
Unbraked trailer (kg) 0
Maximum authorised nose weight (kg) 0
Electric motor
Technology Synchronous with permanent magnets
Max. power: EC standard (kW) 100
Traction battery
Technology Lithium-Ion
Installed capacity (kWh) 50
Domestic charging
Alternating current voltage (Vac)
Rating (A) 230 (single-phase)
8 or 16
Accelerated charging
Alternating current voltage (Vac)
Rating (A) 230 (single-phase or three-phase)
16 or 32
Fast charging
Direct current voltage (Vdc) 400