window CITROEN DS3 CROSSBACK 2021 User Guide
[x] Cancel search | Manufacturer: CITROEN, Model Year: 2021, Model line: DS3 CROSSBACK, Model: CITROEN DS3 CROSSBACK 2021Pages: 244, PDF Size: 7.7 MB
Page 39 of 244

37
Access02
Operating the switch again stops the movement
of the window.
Window controls remain operational for
approximately 45 seconds after switching
off the ignition or after locking the vehicle.
After that time, the controls are disabled.
To reactivate them, switch on the ignition or
unlock the vehicle.
Anti-pinch
If the window meets an obstacle while rising, it
stops and immediately partially lowers again.
Deactivation of the rear
controls for the rear electric
windows
For children's safety, press switch 5 to
deactivate the rear electric windows
controls.
The indicator lamp for the button comes on,
accompanied by a message confirming activation.
With the ignition on, it remains lit, as long as the
child lock remains activated.
Use of the rear electric windows from the driver's
controls remains possible.
For versions fitted with an electric child
lock, this control also deactivates the
interior rear door controls.
For more information on the Child lock, refer to
the corresponding section.
Reinitialising the electric
windows
After reconnecting the battery, or in the event
of abnormal window movement, the anti-pinch
function must be reinitialised.
The anti-pinch function is disabled during the
following sequence of operations.
For each window:
► Lower the window fully, then raise it; it will
rise in steps of a few centimetres each time the
control is pressed. Repeat the operation until the
window is fully closed.
► Continue to pull the control upwards for at
least one second after the window reaches the
closed position.
If an electric window meets an obstacle
during operation, the movement of the
window must be reversed. To do this, press the
relevant switch.
When the driver operates the passengers’
electric window switches, it is important to
ensure that nothing can prevent the window
from closing properly.
It is important to ensure that passengers use
the electric windows correctly.
Pay particular attention to children when
operating windows.
Be aware of passengers and/or other persons
present when closing windows using the key or
the "Keyless Entry and Starting" system.
Page 45 of 244
43Ease of use and comfort03
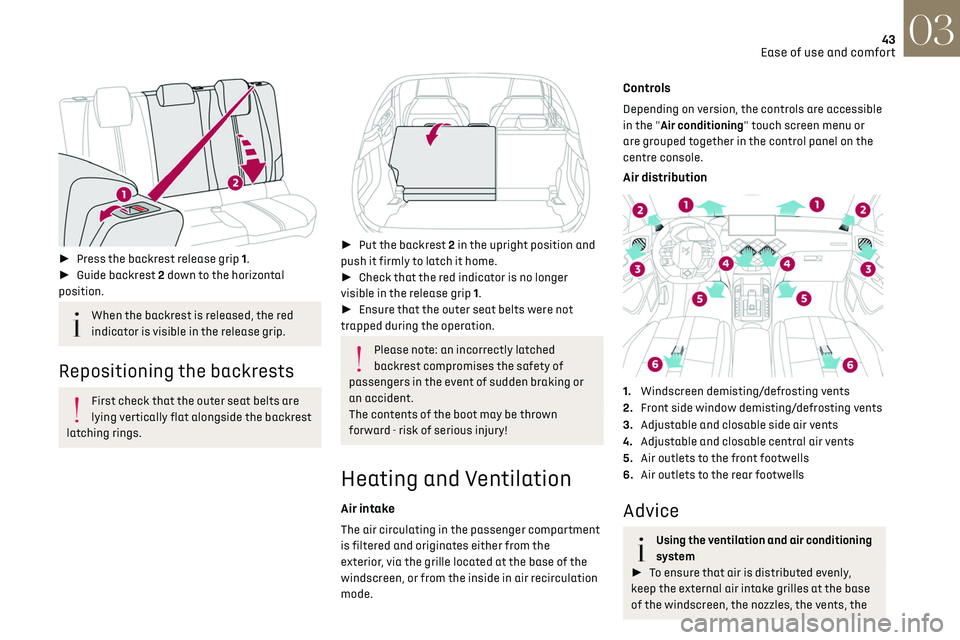
► Press the backrest release grip 1.
► Guide backrest 2 down to the horizontal
position.
When the backrest is released, the red
indicator is visible in the release grip.
Repositioning the backrests
First check that the outer seat belts are
lying vertically flat alongside the backrest
latching rings.
► Put the backrest 2 in the upright position and
push it firmly to latch it home.
► Check that the red indicator is no longer
visible in the release grip 1.
► Ensure that the outer seat belts were not
trapped during the operation.
Please note: an incorrectly latched
backrest compromises the safety of
passengers in the event of sudden braking or
an accident.
The contents of the boot may be thrown
forward - risk of serious injury!
Heating and Ventilation
Air intake
The air circulating in the passenger compartment
is filtered and originates either from the
exterior, via the grille located at the base of the
windscreen, or from the inside in air recirculation
mode.
Controls
Depending on version, the controls are accessible
in the "Air conditioning" touch screen menu or
are grouped together in the control panel on the
centre console.
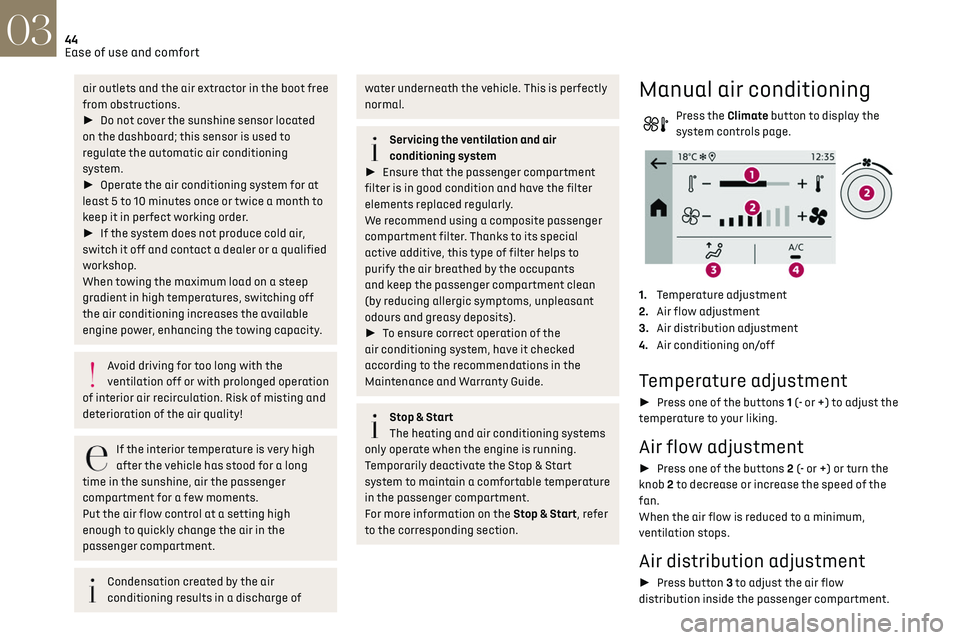
Air distribution
1. Windscreen demisting/defrosting vents
2. Front side window demisting/defrosting vents
3. Adjustable and closable side air vents
4. Adjustable and closable central air vents
5. Air outlets to the front footwells
6. Air outlets to the rear footwells
Advice
Using the ventilation and air conditioning
system
► To ensure that air is distributed evenly,
keep the external air intake grilles at the base
of the windscreen, the nozzles, the vents, the
Page 46 of 244
44Ease of use and comfort03
air outlets and the air extractor in the boot free
from obstructions.
► Do not cover the sunshine sensor located
on the dashboard; this sensor is used to
regulate the automatic air conditioning
system.
► Operate the air conditioning system for at
least 5 to 10 minutes once or twice a month to
keep it in perfect working order.
► If the system does not produce cold air,
switch it off and contact a dealer or a qualified
workshop.
When towing the maximum load on a steep
gradient in high temperatures, switching off
the air conditioning increases the available
engine power, enhancing the towing capacity.
Avoid driving for too long with the
ventilation off or with prolonged operation
of interior air recirculation. Risk of misting and
deterioration of the air quality!
If the interior temperature is very high
after the vehicle has stood for a long
time in the sunshine, air the passenger
compartment for a few moments.
Put the air flow control at a setting high
enough to quickly change the air in the
passenger compartment.
Condensation created by the air
conditioning results in a discharge of
water underneath the vehicle. This is perfectly
normal.
Servicing the ventilation and air
conditioning system
► Ensure that the passenger compartment
filter is in good condition and have the filter
elements replaced regularly.
We recommend using a composite passenger
compartment filter. Thanks to its special
active additive, this type of filter helps to
purify the air breathed by the occupants
and keep the passenger compartment clean
(by reducing allergic symptoms, unpleasant
odours and greasy deposits).
► To ensure correct operation of the
air conditioning system, have it checked
according to the recommendations in the
Maintenance and Warranty Guide.
Stop & Start
The heating and air conditioning systems
only operate when the engine is running.
Temporarily deactivate the Stop & Start
system to maintain a comfortable temperature
in the passenger compartment.
For more information on the Stop & Start, refer
to the corresponding section.
Manual air conditioning
Press the Climate button to display the
system controls page.
1. Temperature adjustment
2. Air flow adjustment
3. Air distribution adjustment
4. Air conditioning on/off
Temperature adjustment
► Press one of the buttons 1 (- or +) to adjust the
temperature to your liking.
Air flow adjustment
► Press one of the buttons 2 (- or +) or turn the
knob 2 to decrease or increase the speed of the
fan.
When the air flow is reduced to a minimum,
ventilation stops.
Air distribution adjustment
► Press button 3 to adjust the air flow
distribution inside the passenger compartment.
Central and side air vents, footwells
Central and side air vents
Windscreen
Windscreen, footwells
Footwells
Air conditioning on / off
The air conditioning system is designed to
operate effectively in all seasons, with the
windows closed.
It is used to:
– lower the temperature in summer,
– increase the effectiveness of the demisting in
winter, above 3°C.
► Press button 4 to activate/deactivate the air
conditioning system.
Air conditioning does not operate when
the air flow is disabled.
To obtain cool air more quickly, enable interior
air recirculation for a brief period. Then return
to the intake of exterior air.
Switching off the air conditioning may result in
some discomfort (humidity or misting).
Page 47 of 244

45Ease of use and comfort03
Central and side air vents, footwells
Central and side air vents
Windscreen
Windscreen, footwells
Footwells
Air conditioning on / off
The air conditioning system is designed to
operate effectively in all seasons, with the
windows closed.
It is used to:
–
lo
wer the temperature in summer,
–
increase the effectiv
eness of the demisting in
winter, above 3°C.
► Press button 4 to activate/deactivate the air
conditioning system.
Air conditioning does not operate when
the air flow is disabled.
To obtain cool air more quickly, enable interior
air recirculation for a brief period. Then return
to the intake of exterior air.
Switching off the air conditioning may result in
some discomfort (humidity or misting).
System switch-off
► Press this button.
Its indicator lamp comes on and all other indicator
lamps for the system go off.
This action deactivates all functions of the air
conditioning system.
Temperature is no longer regulated. A slight flow
of air can still be felt, resulting from the forward
movement of the vehicle.
Automatic air conditioning
The air conditioning operates with the engine
running, but the ventilation and its controls can
be accessed with the ignition on.
Operation of the air conditioning and regulation
of temperature, air flow and air distribution in the
passenger compartment are automatic.
Press the Climate menu button to access
the system controls.
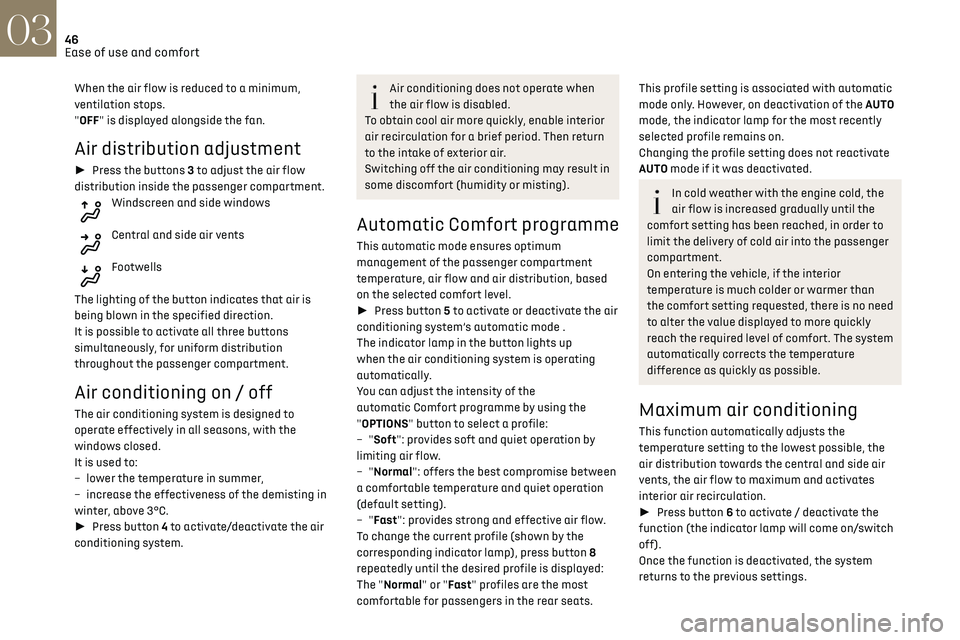
1. Temperature adjustment
2. Air flow adjustment
3. Air distribution adjustment
4. Air conditioning on/off
5. Automatic comfort programme on/off
6. Maximum A/C
7. Access to the secondary page
8. Adjustment of the automatic comfort
programme (Soft/Normal/Fast)
Temperature adjustment
► Press one of the buttons 1 to increase (red) or
decrease (blue) the value.
The value displayed corresponds to a level of
comfort and not to a precise temperature.
Air flow adjustment
► Press one of the buttons 2 (- or +) to increase
or decrease air flow.
The air flow symbol (a fan) is filled in according to
the request.
Page 48 of 244
46Ease of use and comfort03
When the air flow is reduced to a minimum,
ventilation stops.
"OFF" is displayed alongside the fan.
Air distribution adjustment
► Press the buttons 3 to adjust the air flow
distribution inside the passenger compartment.
Windscreen and side windows
Central and side air vents
Footwells
The lighting of the button indicates that air is
being blown in the specified direction.
It is possible to activate all three buttons
simultaneously, for uniform distribution
throughout the passenger compartment.
Air conditioning on / off
The air conditioning system is designed to
operate effectively in all seasons, with the
windows closed.
It is used to:
–
lo
wer the temperature in summer,
–
increase the effectiv
eness of the demisting in
winter, above 3°C.
► Press button 4 to activate/deactivate the air
conditioning system.
Air conditioning does not operate when
the air flow is disabled.
To obtain cool air more quickly, enable interior
air recirculation for a brief period. Then return
to the intake of exterior air.
Switching off the air conditioning may result in
some discomfort (humidity or misting).
Automatic Comfort programme
This automatic mode ensures optimum
management of the passenger compartment
temperature, air flow and air distribution, based
on the selected comfort level.
► Press button 5 to activate or deactivate the air
conditioning system’s automatic mode .
The indicator lamp in the button lights up
when the air conditioning system is operating
automatically.
You can adjust the intensity of the
automatic Comfort programme by using the
"OPTIONS" button to select a profile:
–
"Soft": provides soft and quiet operation by
limiting air flow.
–
"Normal": offers the best compromise between
a comfortable temperature and quiet operation
(default setting).
–
"Fast": provides strong and effective air flow.
To change the current profile (shown by the
corresponding indicator lamp), press button 8
repeatedly until the desired profile is displayed:
The "Normal" or "Fast" profiles are the most
comfortable for passengers in the rear seats.
This profile setting is associated with automatic
mode only. However, on deactivation of the AUTO
mode, the indicator lamp for the most recently
selected profile remains on.
Changing the profile setting does not reactivate
AUTO mode if it was deactivated.
In cold weather with the engine cold, the
air flow is increased gradually until the
comfort setting has been reached, in order to
limit the delivery of cold air into the passenger
compartment.
On entering the vehicle, if the interior
temperature is much colder or warmer than
the comfort setting requested, there is no need
to alter the value displayed to more quickly
reach the required level of comfort. The system
automatically corrects the temperature
difference as quickly as possible.
Maximum air conditioning
This function automatically adjusts the
temperature setting to the lowest possible, the
air distribution towards the central and side air
vents, the air flow to maximum and activates
interior air recirculation.
► Press button 6 to activate / deactivate the
function (the indicator lamp will come on/switch
off).
Once the function is deactivated, the system
returns to the previous settings.
Switching the system off
► Press this button.
Its indicator lamp comes on and all other indicator
lamps for the system go off.
This action deactivates all functions of the air
conditioning system.
The temperature is no longer regulated. A slight
flow of air can still be felt, due to the forward
movement of the vehicle.
Interior air recirculation
The intake of exterior air prevents the formation
of mist on the windscreen and side windows.
Recirculating the interior air isolates the
passenger compartment from outside odours
and fumes and allows the desired passenger
compartment temperature to be achieved more
rapidly.
► Press this button to activate/
deactivate the function (confirmed by the
illumination/extinction of the indicator lamp).
The function is activated automatically
when reverse gear is engaged.
Front demist - defrost
► Press this button to activate/
deactivate the demisting or defrosting of
Page 49 of 244
47Ease of use and comfort03
Switching the system off
► Press this button.
Its indicator lamp comes on and all other indicator
lamps for the system go off.
This action deactivates all functions of the air
conditioning system.
The temperature is no longer regulated. A slight
flow of air can still be felt, due to the forward
movement of the vehicle.
Interior air recirculation
The intake of exterior air prevents the formation
of mist on the windscreen and side windows.
Recirculating the interior air isolates the
passenger compartment from outside odours
and fumes and allows the desired passenger
compartment temperature to be achieved more
rapidly.
► Press this button to activate/
deactivate the function (confirmed by the
illumination/extinction of the indicator lamp).
The function is activated automatically
when reverse gear is engaged.
Front demist - defrost
► Press this button to activate/
deactivate the demisting or defrosting of
the windscreen and side windows (confirmed by
the illumination/extinction of the indicator lamp).
The system automatically manages the air
conditioning, air flow and air intake, and provides
optimum distribution towards the windscreen and
side windows.
Rear screen demist
- defrost
Demisting/defrosting only operates with the
engine running.
Depending on version, this also applies to the door
mirrors.
► Press this button to activate/
deactivate the function (confirmed by the
illumination/extinction of the indicator lamp).
Demisting/defrosting switches off automatically
to prevent an excessive consumption of electrical
current.
Switch off demisting/defrosting as soon
as you no longer consider it necessary,
as reducing the consumption of electrical
current reduces fuel consumption.
Heated windscreen and
washer jets
Depending on country of sale.
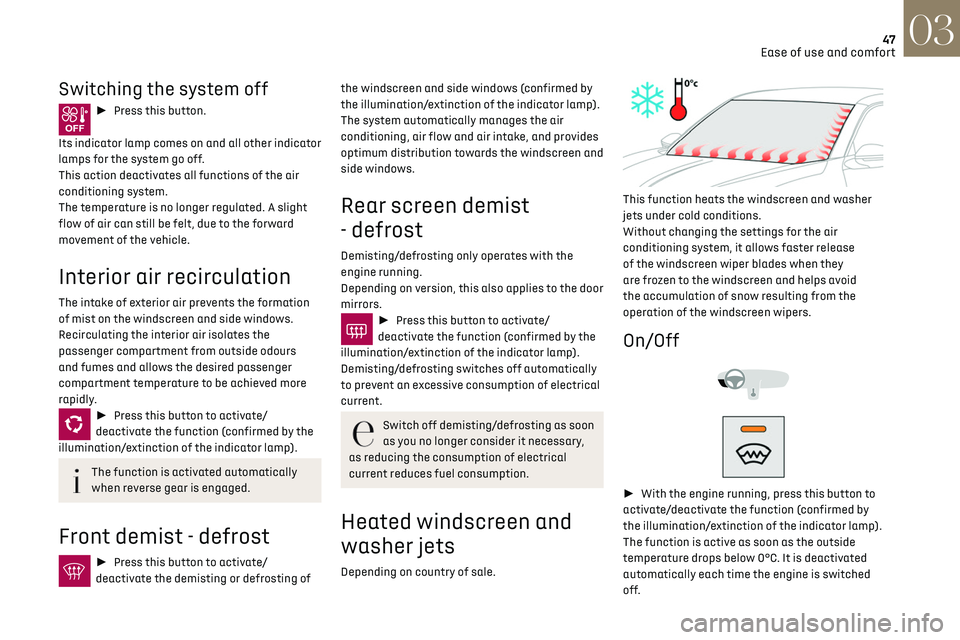
This function heats the windscreen and washer
jets under cold conditions.
Without changing the settings for the air
conditioning system, it allows faster release
of the windscreen wiper blades when they
are frozen to the windscreen and helps avoid
the accumulation of snow resulting from the
operation of the windscreen wipers.
On/Off
► With the engine running, press this button to
activate/deactivate the function (confirmed by
the illumination/extinction of the indicator lamp).
The function is active as soon as the outside
temperature drops below 0°C. It is deactivated
automatically each time the engine is switched
off.
Page 73 of 244
71Safety05
Lateral airbags
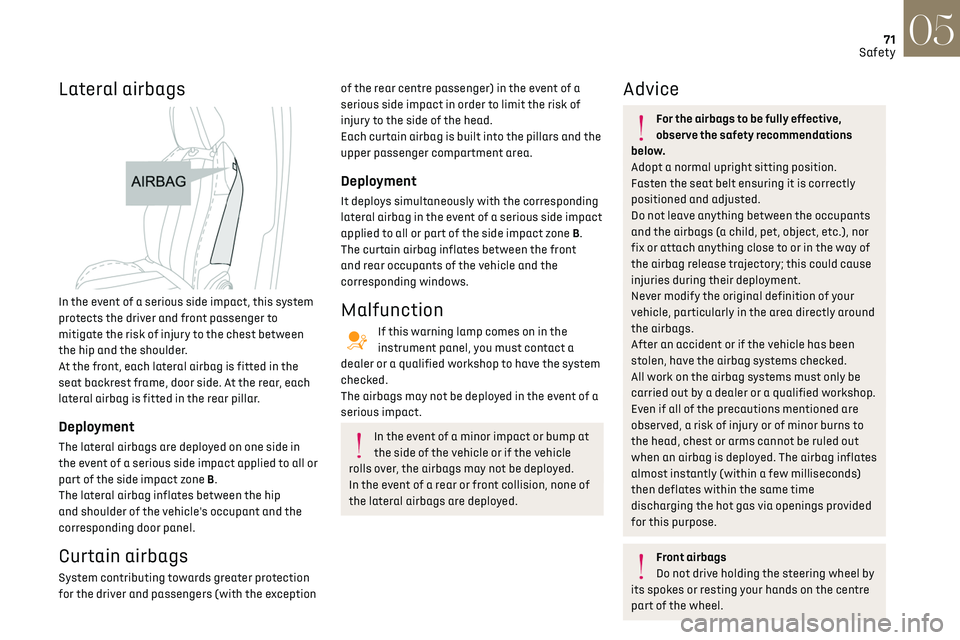
In the event of a serious side impact, this system
protects the driver and front passenger to
mitigate the risk of injury to the chest between
the hip and the shoulder.
At the front, each lateral airbag is fitted in the
seat backrest frame, door side. At the rear, each
lateral airbag is fitted in the rear pillar.
Deployment
The lateral airbags are deployed on one side in
the event of a serious side impact applied to all or
part of the side impact zone B.
The lateral airbag inflates between the hip
and shoulder of the vehicle's occupant and the
corresponding door panel.
Curtain airbags
System contributing towards greater protection
for the driver and passengers (with the exception
of the rear centre passenger) in the event of a
serious side impact in order to limit the risk of
injury to the side of the head.
Each curtain airbag is built into the pillars and the
upper passenger compartment area.
Deployment
It deploys simultaneously with the corresponding
lateral airbag in the event of a serious side impact
applied to all or part of the side impact zone B.
The curtain airbag inflates between the front
and rear occupants of the vehicle and the
corresponding windows.
Malfunction
If this warning lamp comes on in the
instrument panel, you must contact a
dealer or a qualified workshop to have the system
checked.
The airbags may not be deployed in the event of a
serious impact.
In the event of a minor impact or bump at
the side of the vehicle or if the vehicle
rolls over, the airbags may not be deployed.
In the event of a rear or front collision, none of
the lateral airbags are deployed.
Advice
For the airbags to be fully effective,
observe the safety recommendations
below.
Adopt a normal upright sitting position.
Fasten the seat belt ensuring it is correctly
positioned and adjusted.
Do not leave anything between the occupants
and the airbags (a child, pet, object, etc.), nor
fix or attach anything close to or in the way of
the airbag release trajectory; this could cause
injuries during their deployment.
Never modify the original definition of your
vehicle, particularly in the area directly around
the airbags.
After an accident or if the vehicle has been
stolen, have the airbag systems checked.
All work on the airbag systems must only be
carried out by a dealer or a qualified workshop.
Even if all of the precautions mentioned are
observed, a risk of injury or of minor burns to
the head, chest or arms cannot be ruled out
when an airbag is deployed. The airbag inflates
almost instantly (within a few milliseconds)
then deflates within the same time
discharging the hot gas via openings provided
for this purpose.
Front airbags
Do not drive holding the steering wheel by
its spokes or resting your hands on the centre
part of the wheel.
Page 75 of 244
73Safety05
braking. Refit the head restraint once the child
seat has been removed.
Installing a booster seat
The chest part of the seat belt must be
positioned on the child's shoulder without
touching the neck.
Ensure that the lap part of the seat belt passes
correctly over the child's thighs.
Use a booster seat with backrest, equipped
with a belt guide at shoulder level.
Additional protections
To prevent accidental opening of the
doors and rear windows, use the "Child lock".
Take care not to open the rear windows by
more than one third.
To protect young children from the rays of the
sun, fit side blinds on the rear windows.
As a safety precaution, do not leave:
–
a child alone and una
ttended in a vehicle,
–
a child or an animal in a v
ehicle which is
exposed to the sun, with the windows closed,
–
the k
eys within reach of children inside the
vehicle.
Child seat at the rear
"Forward facing" or "Rearward facing"
► Move the vehicle's front seat forward and
straighten the backrest so that the legs of the
child in the "forward facing" child seat or the
"rearward facing" child seat itself do not touch
the vehicle's front seat.
► Verify that the backrest of the "forward
facing" child seat is as close as possible to the
backrest of the vehicle's rear seat, and is ideally
in contact with it.
Centre rear seat
A child seat with a support leg must never be
installed on the centre rear passenger seat.
Child seat at the front
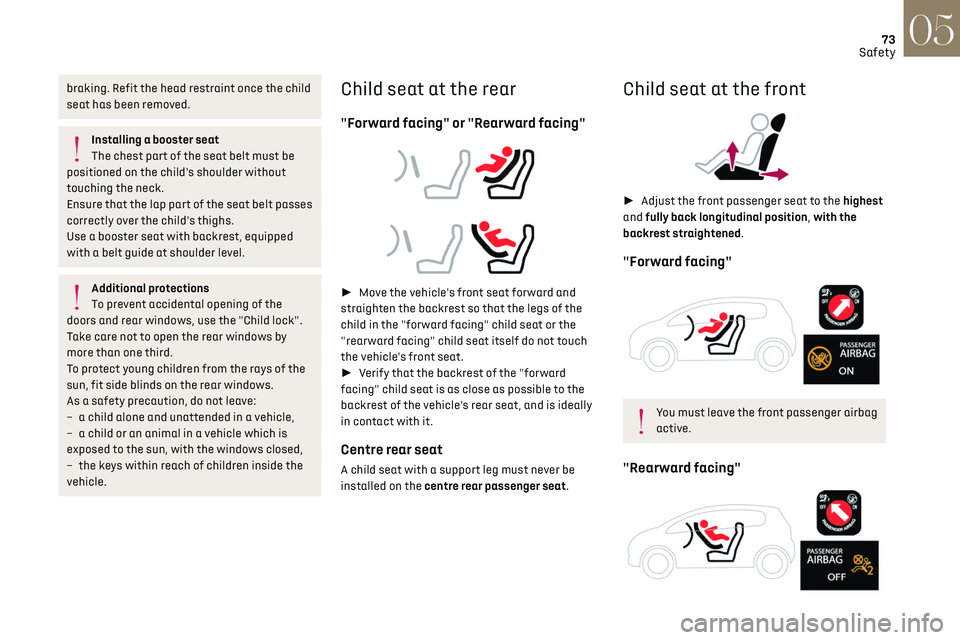
► Adjust the front passenger seat to the highest
and fully back longitudinal position, with the
backrest straightened.
"Forward facing"
You must leave the front passenger airbag
active.
"Rearward facing"
Page 81 of 244

79Safety05
– F2X: ISOFIX child seat for toddlers.
– F2 : ISOFIX reduced height child seat.
–
F3
: ISOFIX full height child seat.
Child booster seat.
ISOFIX "carrycot" type child seat:
–
L
1: head to the left.
–
L2: head t
o the right.
Manual child lock
This system prevents opening of a rear door using
its interior handle.
The control, red in colour, is located on the edge of
each rear door (marked by a label).
Locking / Unlocking
► To lock, turn the red control as far as it will go
using the integral key: •
T
o the right on the left-hand rear door.
• To the left on the right-hand rear door.
► To unlock, turn it in the opposite direction.
Do not confuse the child lock control,
which is red, with the back-up locking
control, which is black.
Electric child lock
This remote control system prevents the use of
rear electric windows and, depending on version,
the opening of the rear doors using their interior
handles.
Activation/Deactivation
► With the ignition on, press this button
to activate/deactivate the child lock.
When the indicator lamp is on, the child lock is
activated.
With the child lock activated, it is still
possible to operate the rear electric
windows from the driver's controls.
This system is independent and in no
circumstances does it take the place of
the central locking control.
Check the status of the child lock each time
you switch on the ignition.
Always keep the electronic key with you when
leaving the vehicle, even for a short time.
In the event of a serious impact, the electric
child lock is switched off automatically to
permit the exit of the rear passengers.
Page 120 of 244
118
Driving06
which increases as the vehicle approaches the
obstacle.
When the distance between the vehicle and
the obstacle becomes less than about thirty
centimetres, the audible signal becomes
continuous.
The sound emitted by the speaker (right or
left) indicates the side on which the obstacle is
located.
Adjusting the audible signalWith DS CONNECT RADIO or DS
CONNECT NAV, pressing this
button opens the window for adjusting the
volume of the audible signal.
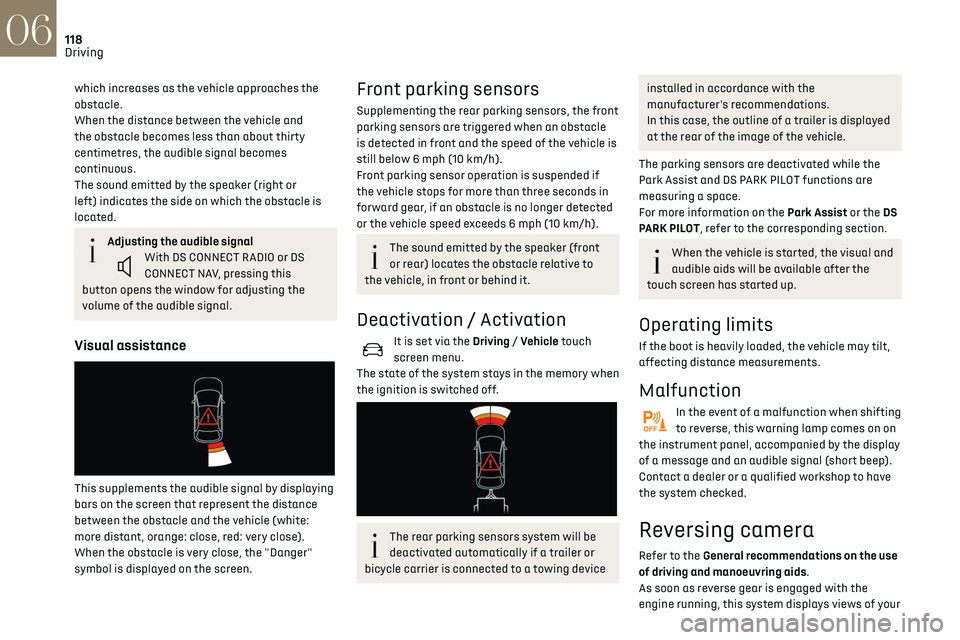
Visual assistance
This supplements the audible signal by displaying
bars on the screen that represent the distance
between the obstacle and the vehicle (white:
more distant, orange: close, red: very close).
When the obstacle is very close, the "Danger"
symbol is displayed on the screen.
Front parking sensors
Supplementing the rear parking sensors, the front
parking sensors are triggered when an obstacle
is detected in front and the speed of the vehicle is
still below 6 mph (10 km/h).
Front parking sensor operation is suspended if
the vehicle stops for more than three seconds in
forward gear, if an obstacle is no longer detected
or the vehicle speed exceeds 6 mph (10 km/h).
The sound emitted by the speaker (front
or rear) locates the obstacle relative to
the vehicle, in front or behind it.
Deactivation / Activation
It is set via the Driving / Vehicle touch
screen menu.
The state of the system stays in the memory when
the ignition is switched off.
The rear parking sensors system will be
deactivated automatically if a trailer or
bicycle carrier is connected to a towing device
installed in accordance with the
manufacturer's recommendations.
In this case, the outline of a trailer is displayed
at the rear of the image of the vehicle.
The parking sensors are deactivated while the
Park Assist and DS PARK PILOT functions are
measuring a space.
For more information on the Park Assist or the DS
PARK PILOT, refer to the corresponding section.
When the vehicle is started, the visual and
audible aids will be available after the
touch screen has started up.
Operating limits
If the boot is heavily loaded, the vehicle may tilt,
affecting distance measurements.
Malfunction
In the event of a malfunction when shifting
to reverse, this warning lamp comes on on
the instrument panel, accompanied by the display
of a message and an audible signal (short beep).
Contact a dealer or a qualified workshop to have
the system checked.
Reversing camera
Refer to the General recommendations on the use
of driving and manoeuvring aids.
As soon as reverse gear is engaged with the
engine running, this system displays views of your