brake CITROEN DS3 CROSSBACK 2021 Owner's Manual
[x] Cancel search | Manufacturer: CITROEN, Model Year: 2021, Model line: DS3 CROSSBACK, Model: CITROEN DS3 CROSSBACK 2021Pages: 244, PDF Size: 7.7 MB
Page 90 of 244
88
Driving06
► Fully depress the brake pedal.
► Press the Unlock button.
► While continuing to press the brake pedal
and the Unlock button, select another mode.
–
F
rom neutral N, at a speed below 3 mph
(5 km/h): ► Fully depress the brake pedal.
► While continuing to depress the brake pedal,
select another mode.
Engaging reverse gear
► Slow down until you come to a stop.
► Depress the brake pedal, then press the
Unlock button.
► While maintaining the presses, select mode R.
Permanent manual mode
Entering the mode:
With EAT8 without DS PARK PILOT button:
► With mode D initially selected.
► Press button M; the green indicator lamp in
the button comes on.
With EAT8 and DS PARK PILOT button:
► Press the DRIVE MODE control.
► Select "Manual" mode, which is displayed on
the instrument panel.
Exiting the mode:
► Push forwards once to return to D.
or
► Press button M; the indicator lamp in the
button goes off.
or
► Select another mode using the DRIVE MODE
control.
Switching off the ignition
To switch off the ignition, the vehicle must be
stationary.
Changing to free-wheeling
For more information on Changing to free-
wheeling, refer to the corresponding section.
If you open the driver's door while mode N
is engaged, an audible signal will sound. It
will stop when you close the driver's door
again.
Special aspects of automatic mode
The gearbox selects the gear that offers optimum
performance, taking account of the outside
temperature, the road profile, the vehicle load and
the driving style.
For maximum acceleration, press the accelerator
fully down (kick-down). The gearbox changes
down automatically or holds the selected gear
until the maximum engine speed is reached.
Steering mounted controls allow the driver to
temporarily select a gear, if the vehicle speed and
engine speed conditions permit.
Special aspects of manual mode
The change from one gear to another takes place
only if the road speed and engine speed permit.
Starting the vehicle
From mode P:
► Fully depress the brake pedal.
► Start the engine.
► Maintaining pressure on the brake pedal,
press the Unlock button.
► Push once or twice rearwards to select
the automatic mode D, or forwards to engage
reverse R.
From neutral N:
► Fully depress the brake pedal.
► Start the engine.
► Maintaining pressure on the brake pedal,
push rearwards to select the automatic mode D,
or forwards, while pressing the Unlock button to
engage reverse R.
Then, from D or R:
► Release the brake pedal.
► Accelerate gradually to automatically release
the electric parking brake.
The vehicle moves off immediately.
With an automatic gearbox, never try to
start the engine by pushing the vehicle.
Stopping the vehicle
Whatever the state of the gearbox, when the
ignition is switched off, mode P is engaged
automatically and immediately.
However, in mode N, mode P will be engaged after
a delay of 5 seconds (allowing for the process of
putting the vehicle into free-wheeling mode).
Check that mode P has been engaged and
that the electric parking brake was applied
automatically; if not, apply it manually.
The corresponding indicator lamps in the
selector and the electric parking brake
control lever must be on, as well as those in the
instrument panel.
Operating faults
Gearbox malfunction
This warning lamp comes on, accompanied
by an audible signal and the display of a
message.
Visit a dealer or a qualified workshop.
Do not drive faster than 62 mph (100 km/h),
keeping to the speed limit.
The gearbox switches to back-up mode: mode D
is locked in third gear, the steering-mounted
control paddles are inoperative, mode M is no
longer available. You may feel a significant jolt on
engaging reverse gear. This will not damage the
gearbox.
Selector malfunction
Minor malfunction
This warning lamp comes on, accompanied
by the display of a message and an audible
signal.
Drive cautiously and visit a dealer or a qualified
workshop.
In certain cases, the selector indicator lamps may
no longer come on, but the gearbox state is still
displayed on the instrument panel.
Page 91 of 244
89
Driving06
The corresponding indicator lamps in the
selector and the electric parking brake
control lever must be on, as well as those in the
instrument panel.
Operating faults
Gearbox malfunction
This warning lamp comes on, accompanied
by an audible signal and the display of a
message.
Visit a dealer or a qualified workshop.
Do not drive faster than 62 mph (100 km/h),
keeping to the speed limit.
The gearbox switches to back-up mode: mode D
is locked in third gear, the steering-mounted
control paddles are inoperative, mode M is no
longer available. You may feel a significant jolt on
engaging reverse gear. This will not damage the
gearbox.
Selector malfunction
Minor malfunction
This warning lamp comes on, accompanied
by the display of a message and an audible
signal.
Drive cautiously and visit a dealer or a qualified
workshop.
In certain cases, the selector indicator lamps may
no longer come on, but the gearbox state is still
displayed on the instrument panel.
Major malfunction
This warning lamp comes on, accompanied
by the display of a message.
Stop as soon as it is safe to do so, away
from traffic, and call a dealer or a
qualified workshop.
Drive selector (Electric)
The drive selector is a pulse selector with a
regenerative braking function.
The drive selector provides traction control based
on the driving style, the road profile and the
vehicle load.
With regenerative braking activated, it also
manages engine braking when the accelerator
pedal is released.
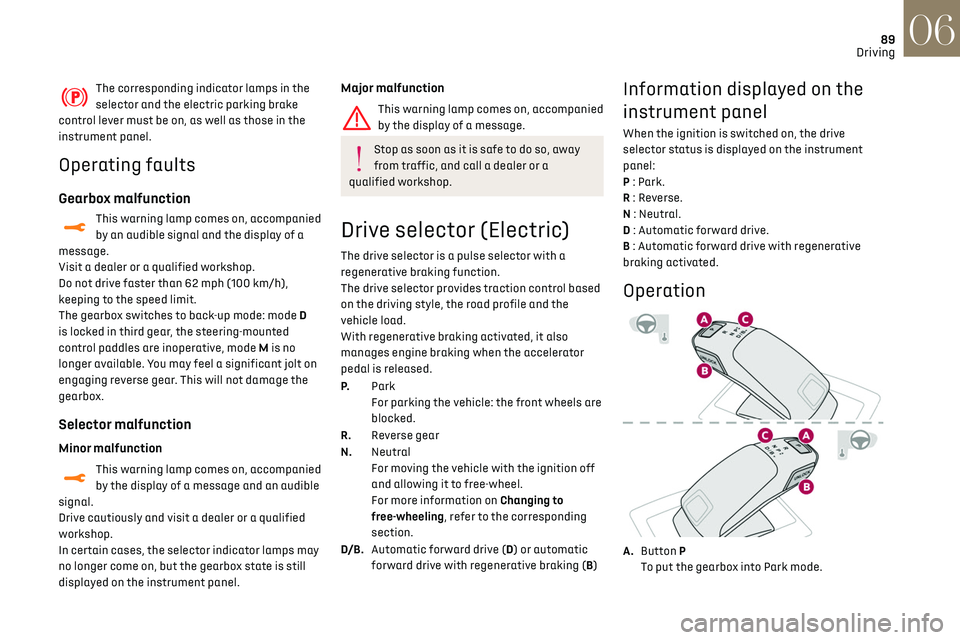
P. Park
For parking the vehicle: the front wheels are
blocked.
R. Reverse gear
N. Neutral
For moving the vehicle with the ignition off
and allowing it to free-wheel.
For more information on Changing to
free-wheeling, refer to the corresponding
section.
D/B. Automatic forward drive (D) or automatic
forward drive with regenerative braking (B)
Information displayed on the
instrument panel
When the ignition is switched on, the drive
selector status is displayed on the instrument
panel:
P : Park.
R : Reverse.
N : Neutral.
D : Automatic forward drive.
B : Automatic forward drive with regenerative
braking activated.
Operation
A.Button P
To put the gearbox into Park mode.
Page 92 of 244

90
Driving06
B. Unlock buttonTo unlock the selector and come out of P or
change to R, with the foot on the brake pedal.
Press and hold this button before pushing the
selector.
C. Selector state indicators (R, N, D/B)
► Move the selector by pushing it forwards (N or
R) or backwards (N or D/B ) once or twice, passing
the point of resistance if necessary.
The push selector returns to its initial position
when released.
For example, to change from P to R, either push
forwards twice without passing the point of
resistance or push just once, passing the point of
resistance:
–
In the first c
ase, the selector goes from P to N,
then from N to R.
–
In the sec
ond case, the selector goes directly
from P to R.
Regenerative braking
The regenerative braking function emulates
engine braking, slowing the vehicle with no
need to depress the brake pedal. The vehicle
slows more quickly when the driver releases the
accelerator pedal.
When the accelerator pedal is released,
mechanical energy is recovered and used to
partially recharge the battery.
► While in mode D/B , pushing the pulse selector
backwards activates/deactivates the function.
The D on the instrument panel is replaced with
a B.
The state of the function is not saved when the
ignition is switched off.
If the battery is almost fully charged, the
braking effect when the accelerator pedal
is released may be limited.
Driving modes
The number and type of driving modes available
depend on the vehicle’s engine and equipment.
Driving modes are selected using the following
control:
With an electric motor, you cannot select a mode
if the READY lamp is off.
The selected mode is activated immediately.
Whenever the ignition is switched on, NORMAL
mode is selected by default.
ECO
Reduces fuel consumption by optimising the
operation of the heating and air conditioning and,
depending on version, the accelerator pedal, the
automatic gearbox and the gear shift indicator.
Free-wheeling in ECO mode: depending on
version, with the EAT8 gearbox, moving into "free-
wheeling" is encouraged to slow the vehicle down
without using engine braking. You can save fuel
by anticipating the need to slow down and lifting
your foot fully off the accelerator pedal.
NORMAL
Restores the vehicle’s original settings.
SPORT
Enables more dynamic driving, acting on the
power steering, accelerator and gear changes
with an automatic gearbox and the possibility of
displaying the vehicle’s dynamic settings on the
instrument panel.
MANUAL
Permanent "Manual" mode with an automatic
gearbox and DS PARK PILOT.
Enables manual gear changing using the steering-
mounted paddles.
Hill start assist
This system keeps your vehicle briefly stationary
(for approximately 2 seconds) when making a hill
start, while you transfer your foot from the brake
pedal to the accelerator pedal.
This system is only active when:
– The vehicle is completely stationary, with your
foot on the brake pedal.
– Certain slope conditions are met.
– The driver’s door is closed.
Do not leave the vehicle while it is being
held temporarily by hill start assist.
If someone needs to get out of the vehicle with
the engine running, apply the parking brake
manually. After that, ensure that the parking
brake indicator lamp and the indicator lamp P
in the electric parking brake control lever are
on fixed.
The hill start assist function cannot be
deactivated. However, use of the parking
brake to immobilise the vehicle interrupts its
operation.
Operation
Page 93 of 244
91
Driving06
This system is only active when:
–
The v ehicle is completely stationary, with your
foot on the brake pedal.
–
Cert
ain slope conditions are met.
–
The driv
er’s door is closed.
Do not leave the vehicle while it is being
held temporarily by hill start assist.
If someone needs to get out of the vehicle with
the engine running, apply the parking brake
manually. After that, ensure that the parking
brake indicator lamp and the indicator lamp P
in the electric parking brake control lever are
on fixed.
The hill start assist function cannot be
deactivated. However, use of the parking
brake to immobilise the vehicle interrupts its
operation.
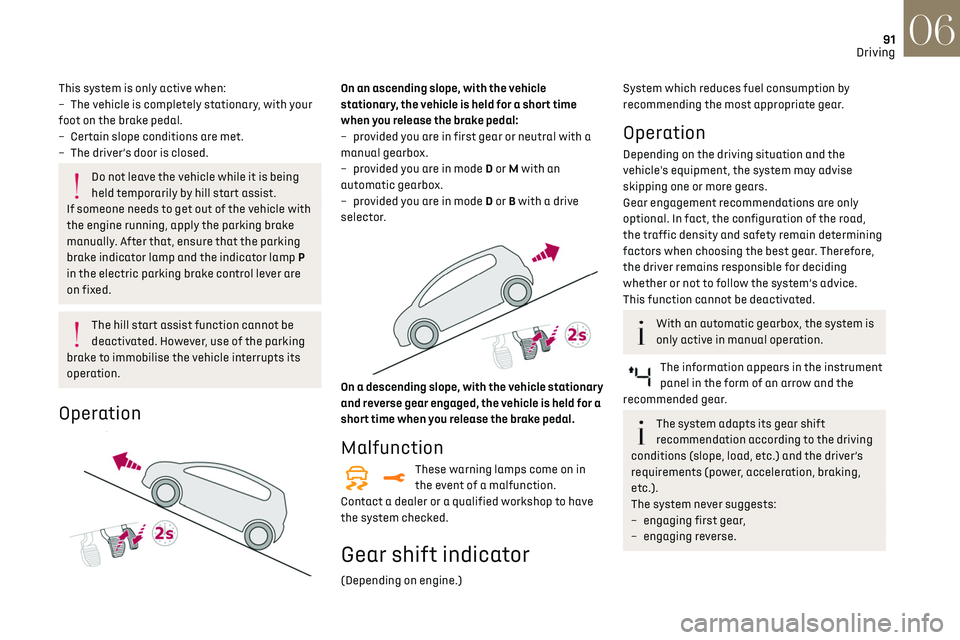
Operation
On an ascending slope, with the vehicle
stationary, the vehicle is held for a short time
when you release the brake pedal:
–
pro
vided you are in first gear or neutral with a
manual gearbox.
–
pro
vided you are in mode D or M with an
automatic gearbox.
–
pro
vided you are in mode D or B with a drive
selector.
On a descending slope, with the vehicle stationary
and reverse gear engaged, the vehicle is held for a
short time when you release the brake pedal.
Malfunction
These warning lamps come on in
the event of a malfunction.
Contact a dealer or a qualified workshop to have
the system checked.
Gear shift indicator
(Depending on engine.)
System which reduces fuel consumption by
recommending the most appropriate gear.
Operation
Depending on the driving situation and the
vehicle's equipment, the system may advise
skipping one or more gears.
Gear engagement recommendations are only
optional. In fact, the configuration of the road,
the traffic density and safety remain determining
factors when choosing the best gear. Therefore,
the driver remains responsible for deciding
whether or not to follow the system’s advice.
This function cannot be deactivated.
With an automatic gearbox, the system is
only active in manual operation.
The information appears in the instrument
panel in the form of an arrow and the
recommended gear.
The system adapts its gear shift
recommendation according to the driving
conditions (slope, load, etc.) and the driver’s
requirements (power, acceleration, braking,
etc.).
The system never suggests:
–
engaging first gear
,
–
engaging re
verse.
Page 94 of 244

92
Driving06
Stop & Start
The Stop & Start function puts the engine
temporarily into standby - STOP mode - during
phases when the vehicle is stopped (red lights,
queues, etc.). The engine restarts automatically
- START mode - as soon as the driver wishes to
move off again.
Primarily designed for urban use, the function
is intended to reduce fuel consumption and
exhaust emissions as well as the noise level when
stationary.
The function does not affect the functionalities of
the vehicle, in particular the braking.
Deactivation/Reactivation
The function is activated by default when the
ignition is switched on.
It is set via the Driving / Vehicle touch
screen menu.
A message in the instrument panel confirms the
change of status.
When the function is deactivated, if the engine
was in standby, it restarts immediately.
Associated indicator lamps
Function activated.
Function deactivated or malfunction.
Opening the bonnet
Before doing anything under the bonnet,
deactivate the Stop & Start system to avoid
any risk of injury caused by the engine
restarting automatically.
Driving on flooded roads
Before entering into a flooded area, it is
strongly recommended that you deactivate the
Stop & Start system.
For more information on Driving
recommendations, particularly on flooded
roads, refer to the corresponding section.
Operation
Main conditions for operation
– The driver’s door must be closed.
– The driv er's seat belt must be fastened.
–
The st
ate of charge of the battery must be
sufficient.
–
The t
emperature of the engine must be within
its nominal operating range.
–
The outside t
emperature must be between 0°C
and 35°C.
Putting the engine into standby (STOP
mode)
The engine automatically goes into standby
as soon as the driver indicates the intention of
stopping.
– With a manual gearbox: with the gear lever in
neutral and the clutch pedal released.
–
With an
automatic gearbox: with the brake
pedal depressed until the vehicle stops or the gear
selector in position N, with the vehicle stopped.
Time counter
A time counter adds up the time spent in standby
during the journey. It is reset to zero every time
the ignition is switched on.
Special cases:
The engine will not go into standby if all of the
conditions for operation are not met and in the
following cases.
–
St
eep slope (ascending or descending).
–
Needed t
o maintain a comfortable temperature
in the passenger compartment.
–
Demisting activ
e.
In these cases, this indicator lamp flashes
for a few seconds, then goes off.
After the engine has restarted, STOP
mode is not available until the vehicle has
reached a speed of 5 mph (8 km/h).
During parking manoeuvres, STOP mode is
not available for a few seconds after
coming out of reverse gear or turning the
steering wheel.
Restarting the engine (START mode)
The engine automatically restarts as soon as the
driver indicates the intention of moving off again.
► With a manual gearbox: with the clutch pedal
fully depressed.
► With an automatic gearbox:
• With the selector in position D or M: with the
brake pedal released.
• With the selector in position N and the brake
pedal released: with the selector at D or M.
• With the selector in position P and the brake
pedal depressed: with the selector at R, N, D
or M.
• Reverse gear engaged.
Special cases
The engine restarts automatically if all the
operating conditions are met again and in the
following cases.
– With a manual gearbox: vehicle speed exceeds
2.5 mph (4 km/h),
– With an automatic gearbox, in mode N, vehicle
speed exceeds 0.6 mph (1 km/h).
In these cases, this indicator lamp flashes
for a few seconds, then goes off.
Malfunctions
In the event of a malfunction, this warning
lamp flashes for a few moments, then
remains on, accompanied by an onscreen
message.
Have the vehicle checked by a dealer or a qualified
workshop.
Page 95 of 244
93
Driving06
Restarting the engine (START mode)
The engine automatically restarts as soon as the
driver indicates the intention of moving off again.
► With a manual gearbox: with the clutch pedal
fully depressed.
► With an automatic gearbox:
•
With the select
or in position D or M: with the
brake pedal released.
•
With the select
or in position N and the brake
pedal released: with the selector at D or M.
•
With the select
or in position P and the brake
pedal depressed: with the selector at R, N, D
or M.
•
R
everse gear engaged.
Special cases
The engine restarts automatically if all the
operating conditions are met again and in the
following cases.
–
With a manual gearbo
x: vehicle speed exceeds
2.5 mph (4 km/h),
–
With an aut
omatic gearbox, in mode N, vehicle
speed exceeds 0.6 mph (1 km/h).
In these cases, this indicator lamp flashes
for a few seconds, then goes off.
Malfunctions
In the event of a malfunction, this warning
lamp flashes for a few moments, then
remains on, accompanied by an onscreen
message.
Have the vehicle checked by a dealer or a qualified
workshop.
The vehicle stalls in STOP mode
All of the instrument panel warning lamps come
on if there is a fault.
► Switch off the ignition then start the engine
again with the "START/STOP" button.
The Stop & Start system requires a 12 V
battery of specific technology and
specification.
All work concerning the battery must be
carried out only by a dealer or a qualified
workshop.
Under-inflation detection
This system automatically checks the pressures
of the tyres while driving.
It compares the information given by the wheel
speed sensors with reference values, which must
be reinitialised every time the tyre pressures are
adjusted or a wheel changed.
The system triggers an alert as soon as it detects
a drop in the inflation pressure of one or more
tyres.
Under-inflation detection does not replace
the need for vigilance on the part of the
driver.
This system does not avoid the need to
regularly check the tyre pressures (including
the spare wheel) as well as before a long
journey.
Driving with under-inflated tyres, particularly
in adverse conditions (heavy load, high speed,
long journey):
–
w
orsens road-holding.
–
lengthens braking dist
ances.
–
c
auses premature wear of the tyres.
–
increase
s fuel consumption.
The inflation pressures defined for the
vehicle can be found on the tyre pressure
label.
For more information on the Identification
markings, refer to the corresponding section.
Checking tyre pressures
This check should be done when the
tyres are "cold" (vehicle stopped for 1 hour or
after a journey of less than 6 miles (10 km) at
moderate speeds).
Otherwise, add 0.3 bar to the pressures shown
on the label.
Under-inflation alert
This is signalled by the fixed illumination of
this warning lamp, accompanied by an
audible signal and, depending on equipment, the
display of a message.
► Reduce speed immediately, avoid excessive
steering movements and avoid sudden braking.
► Stop the vehicle as soon as it is safe to do so.
Page 102 of 244

100
Driving06
Adjusting the limit speed
setting
You do not have to switch the speed limiter on in
order to set the speed.
To modify the limit speed setting based on the
vehicle’s current speed:
► Briefly press button 2 or 3 to change the value
in steps of + or - 1 mph (1.6 km/h).
► Press and hold button 2 or 3 to change the
value in steps of + or - 5 mph (8 km/h).
To change the limit speed setting using
memorised speeds, via the touch screen:
► Press button 5 to display the memorised speed
settings.
► Press the touch screen button for the desired
speed setting.
The selection screen closes after a few moments.
This setting becomes the new limit speed.
To modify the cruise speed setting based on the
speed suggested by the Speed Limit Recognition
and Recommendation, as shown on the
instrument panel:
► Press button 5 once; a message is displayed to
confirm the memorisation request.
► Press button 5 again to save the suggested
speed.
The speed is immediately shown on the
instrument panel as the new speed setting.
Temporarily exceeding the
speed setting
► Press the accelerator pedal down fully.
The speed limiter is deactivated temporarily and
the displayed speed setting flashes.
► Release the accelerator pedal to return to
below the programmed speed.
When the limit speed is exceeded but this is not
due to action by the driver (in case of a steep
slope, for example), an audible signal triggers
immediately.
On a steep descent or in the event of
sharp acceleration, the speed limiter will
not be able to prevent the vehicle from
exceeding the speed setting.
Brake if necessary to control the speed of your
vehicle.
Once the speed of the vehicle returns to the
programmed setting, the speed limiter functions
again: the display of the speed setting becomes
fixed again.
Switching off
► Turn the thumbwheel 1 to the "OFF" position:
the display of information on the speed limiter
disappears.
Malfunction
The display of dashes (flashing then fixed)
indicates a fault with the speed limiter.
Have it checked by a dealer or a qualified
workshop.
Cruise control - particular
recommendations
For the safety of everyone, only use the
cruise control where the driving
conditions allow running at a constant speed
and keeping an adequate safety distance.
Remain vigilant when the cruise control is
activated. If you hold one of the speed setting
modification buttons down, a very rapid
change in the speed of your vehicle may occur.
When descending a steep hill, the cruise
control system cannot prevent the vehicle from
exceeding the set speed. Brake if necessary to
control the speed of your vehicle.
On steep climbs or when towing, the set speed
may not be reached or maintained.
Exceeding the programmed speed setting
The speed setting can be exceeded
temporarily by pressing the accelerator pedal
(the programmed speed flashes).
To return to the speed setting, release the
accelerator pedal (when this speed is reached
again, the display of the speed stops flashing).
Operating limits
Never use the system in the following
situations:
– In an urban area with the risk of pedestrians
crossing the road.
– In heavy traffic (except versions with the
Stop & Go function).
– On winding or steep roads.
– On slippery or flooded roads.
– In poor weather conditions.
– Driving on a speed circuit.
– Driving on a rolling road.
– When using snow chains, non-slip covers or
studded tyres.
Cruise control
Refer to the General recommendations on the use
of driving and manoeuvring aids and to Cruise
control - particular recommendations.
This system automatically keeps the
vehicle’s speed at the cruise value
programmed by the driver (speed setting),
without using the accelerator pedal.
Cruise control is switched on manually.
It requires a minimum vehicle speed of 25 mph
(40 km/h).
With a manual gearbox, third gear or higher must
be engaged.
With an automatic gearbox, mode D or second
gear or higher in mode M must be engaged.
With a drive selector, mode D or B must be
engaged.
Page 104 of 244
102
Driving06
► Pressing button 4 temporarily pauses the
function.
► Pressing button 4 again restores operation of
the cruise control (ON).
Operation of the cruise control can also be
paused temporarily:
–
b
y pressing the brake pedal.
–
aut
omatically, if the electronic stability
control (ESC) system is triggered.
Modifying the cruise speed
setting
Cruise control must be active.
To modify the cruise speed setting, based on the
current speed of the vehicle:
► Briefly press button 2 or 3 to change the value
in steps of + or - 1 mph (km/h).
► Press and hold button 2 or 3 to change the
value in steps of + or - 5 mph (km/h).
Pressing and holding button 2 or 3 results
in a rapid change in the speed of the
vehicle.
As a precaution, we recommend setting a
cruise speed fairly close to the current
speed of your vehicle, to avoid any sudden
acceleration or deceleration of the vehicle.
To change the cruise speed setting using
memorised speed settings and from the touch
screen: ►
Press button 5 to display the memorised speed
settings.
► Press the touch screen button for the desired
speed setting.
The selection screen closes after a few moments.
This setting becomes the new cruise speed.
To modify the cruise speed setting using the
speed suggested by the Speed Limit Recognition
and Recommendation shown on the instrument
panel:
► Press button 5 once; a message is displayed to
confirm the memorisation request.
► Press button 5 again to save the suggested
speed.
The speed is immediately shown on the
instrument panel as the new speed setting.
Switching off
► Turn the thumbwheel 1 to the "OFF" position:
the cruise control information disappears from
the screen.
Malfunction
The display of dashes (flashing then fixed)
indicates a malfunction with the cruise control
system.
Have it checked by a dealer or a qualified
workshop.
Memorising speeds
This function, used only for the speed limiter and
programmable cruise control, lets you save speed
settings that will subsequently be proposed for
the purpose of configuring these two systems.
You can memorise multiple speed settings for
each of the two systems.
By default, some speed settings are already
memorised.
As a safety measure, the driver must only
change speed settings when stationary.
Changing a speed setting
Speed settings can be activated,
deactivated, selected and changed in the
Driving / Vehicle touch screen menu.
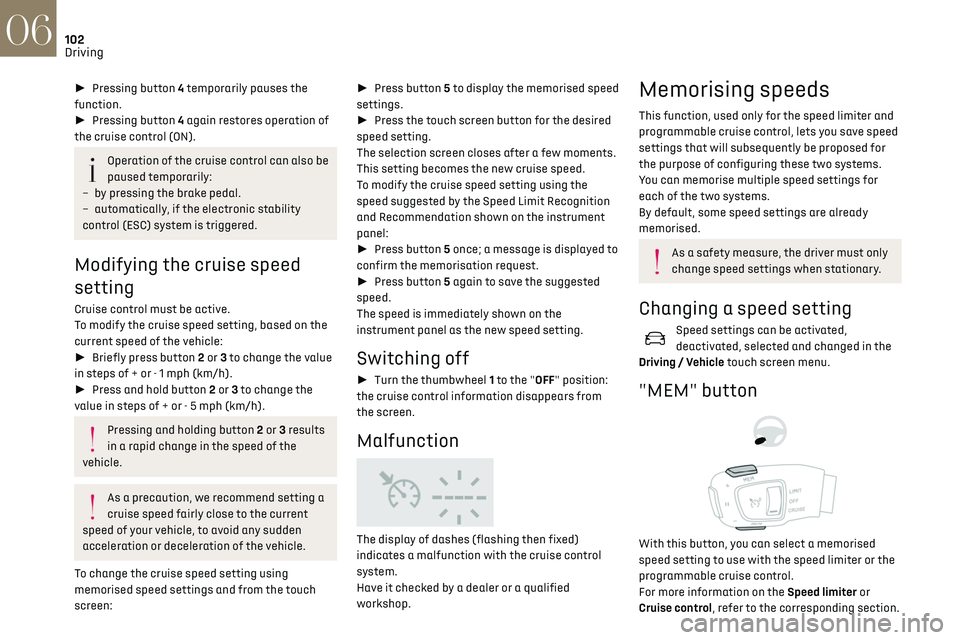
"MEM" button
With this button, you can select a memorised
speed setting to use with the speed limiter or the
programmable cruise control.
For more information on the Speed limiter or
Cruise control, refer to the corresponding section.
DS DRIVE ASSIST
Only available on versions with the EAT8
automatic gearbox and gear selector.
This system automatically adjusts the speed and
corrects the trajectory, using the Adaptive Cruise
Control with Stop & Go function in conjunction
with the Lane Positioning Assist.
These two functions must be activated and in
operation.
This system is especially suitable for driving on
motorways and main roads.
For more information on Adaptive Cruise
Control and Lane Positioning Assist, refer to the
corresponding sections. The system assists the driver by acting on
the steering, acceleration and braking,
within the limits of the laws of physics and the
capabilities of the vehicle. Certain road
infrastructure elements or vehicles present on
the road may not be properly seen or may be
poorly interpreted by the camera and radar,
resulting in an unexpected change in direction,
a lack of steering correction and/or
inappropriate management of acceleration or
braking.
Adaptive Cruise Control
Refer to the General recommendations on the use
of driving and manoeuvring aids and to Cruise
control - particular recommendations.
Page 106 of 244

104
Driving06
5.Depending on version:
Display of speed thresholds recorded using
Memorising speeds
or
Use the speed suggested by the Speed Limit
Recognition and Recommendation (MEM
display)
6. Display and adjustment of the distance
setting to the vehicle in front
Use
Activating the system (pause)
► With the engine running, turn the thumbwheel
1 downwards to the CRUISE position. Cruise
control is ready to operate (grey display).
Switching on cruise control and setting the
speed
With a manual gearbox, your speed must be
between 19 and 112 mph (30 and 180 km/h).
With an EAT8 automatic gearbox or a drive
selector, your speed must be between 0 and
112 mph (0 and 180 km/h).
► Press button 2 or 3: the current speed
becomes the speed setting (minimum 19 mph
(30 km/h)) and cruise control is immediately
activated (green display).
► Press 3 to increase or 2 to decrease the speed
setting (steps of 5 mph (km/h) if held pressed).
Pressing and holding button 2 or 3 results
in a rapid change in the speed of the
vehicle.
Pausing / resumption of cruise control
► Press 4 or depress the brake pedal. To pause
cruise control, it is also possible to: •
shift from mode
D to N;
•
depre
ss the clutch pedal for more than 10
seconds;
•
pre
ss the electric parking brake control.
► Press 4 to restart cruise control. Cruise control
may have been paused automatically: •
when the speed o
f the vehicle goes below 19
mph (30 km/h) with a manual gearbox.
•
when the speed o
f the engine goes below 1100
rpm with a manual gearbox.
•
b
y triggering of the ESC system.
With an EAT8 gearbox or a drive selector,
following braking that has brought the vehicle to
a complete stop, if the traffic conditions do not
allow the vehicle to begin moving again within
3 seconds of stopping, press button 4 or the
accelerator pedal to move off.
If the driver takes no action after the vehicle
has been stopped, the electric parking brake is
applied automatically after about 5 minutes.
Cruise control remains active after
changing gear, regardless of the gearbox
type.
When the driver attempts to reactivate
cruise control, after the function has been
paused, the message "Activation not possible,
unsuitable conditions" is briefly displayed if
reactivation is not possible (safety conditions
not met).
Modifying the programmed speed setting
with the Speed Limit Recognition and
Recommendation function
► Press 5 to accept the speed suggested by
the function on the instrument panel, then press
again to confirm.
To prevent sudden acceleration or
deceleration of the vehicle, select a speed
setting relatively close to the vehicle's current
speed.
Changing the inter-vehicle distance
► Press 6 to display the distance setting
thresholds ("Distant", "Normal" or "Close"), then
press again to select a threshold.
After a few seconds, the option is accepted and
will be memorised when the ignition is switched
off.
Temporarily exceeding the speed setting
► Fully depress the accelerator pedal. Distance
monitoring and cruise control are deactivated
while acceleration is maintained. "Cruise control
suspended" is displayed.
Deactivating the system
► Turn the thumbwheel 1 upwards to the OFF
position.
Information displayed on the
instrument panel
7. Vehicle detected by the system (full symbol)
8. Cruise control active (colour not grey)
9. Speed setting value
10. Speed suggested by the Speed Limit
Recognition and Recommendation
11. Vehicle held stationary (versions with
automatic gearbox or drive selector)
12.Inter-vehicle distance setting
13. Position of the vehicle detected by the
system
Page 107 of 244

105
Driving06
Deactivating the system
► Turn the thumbwheel 1 upwards to the OFF
position.
Information displayed on the
instrument panel
7. Vehicle detected by the system (full symbol)
8. Cruise control active (colour not grey)
9. Speed setting value
10. Speed suggested by the Speed Limit
Recognition and Recommendation
11. Vehicle held stationary (versions with
automatic gearbox or drive selector)
12.Inter-vehicle distance setting
13. Position of the vehicle detected by the
system
Messages and alerts
To benefit from the following information on the
instrument panel, select the DRIVING or Driving
aids display mode.
The display of these messages or alerts is
not sequential.
"Cruise control paused" or "Cruise control
suspended" following a brief acceleration
by the driver.
"Cruise control active", no vehicle
detected.
"Cruise control paused", vehicle detected.
"Cruise control active", vehicle detected.
"Take back control" (orange).
► Brake or accelerate, depending on the context.
"Take back control" (red).
► Take back control of the vehicle immediately:
the system cannot manage the current driving
situation.
"Activation not possible, conditions
unsuitable". The system refuses to
activate cruise control, as the necessary
conditions are not fulfilled.
Stop & Go function
"To move off again, press the
accelerator pedal or press
the II button” (button 4).
The system has brought the vehicle to a complete
stop.
Within 3 seconds, the vehicle gradually and
automatically begins moving again.
After 3 seconds, the driver must accelerate or
press button 4 to move off again.
While the vehicle is immobilised, the
following recommendations apply:
–
Do no
t open doors.
–
Do no
t drop off or pick up passengers.
–
Do no
t engage reverse gear.
When moving off again, watch out for
cyclists, pedestrians and animals, as they
may not be detected properly.
Operating limits
Cruise control operates by day and night, in fog or
moderate rainfall.
Certain situations cannot be managed by the
system and require driver intervention.
Elements not detected by the system:
–
Pede
strians, some cyclists, animals.
–
St
ationary vehicles (traffic jam, breakdown,
etc.).