height adjustment CITROEN DS3 CROSSBACK 2021 Owners Manual
[x] Cancel search | Manufacturer: CITROEN, Model Year: 2021, Model line: DS3 CROSSBACK, Model: CITROEN DS3 CROSSBACK 2021Pages: 244, PDF Size: 7.7 MB
Page 4 of 244
2
Contents
Overview
Eco-driving
01 Instruments
9 Digital instrument panel
10 Head-up display
11 Warning and indicator lamps
17 Indicators
21 Manual test
21 Total distance recorder
21 Lighting dimmer
22 Trip computer
22 5-inch touch screen
23 7-inch or 10-inch touch screen
26 Remotely operable features (Electric)
02 Access
27 Electronic key with remote control function and
built-in key,
28
Proximity Keyless Entry and Start
30 DS SMART ACCESS
30 Central locking
31 Emergency procedures
33 Doors
34 Boot
34 Alarm
36 Electric windows
03 Ease of use and comfort
38 Front seats
40 Steering wheel adjustment
41 Mirrors
42 Rear bench seat
43 Heating and Ventilation
44 Manual air conditioning
45 Automatic air conditioning
47 Front demist - defrost
47 Rear screen demist - defrost
47 Heated windscreen and washer jets
48 Remote-controlled heating and air conditioning
(Electric)
48
Interior fittings
51 Courtesy lamps
52 Touch-sensitive courtesy lamps
52 Boot fittings
04 Lighting and visibility
54 Exterior lighting control stalk
55 Daytime running lamps/Sidelamps
55 Direction indicators
55 Automatic illumination of headlamps
56 Headlamp beam height adjustment
56 Guide-me-home and welcome lighting
57 Automatic headlamp dipping
58 DS MATRIX LED VISION
60 Wiper control stalk
61 Changing a wiper blade
62 Automatic wipers
05 Safety
63 General safety recommendations
63 Hazard warning lamps
64 Horn
64 Pedestrian horn (Electric)
64 Emergency or assistance call
66 Electronic stability control (ESC)
67 Advanced Traction Control
68 Seat belts
70 Airbags
72 Child seats
74 Deactivating the front passenger airbag
75 ISOFIX child seats
76 i-Size child seats
79 Child lock
06 Driving
80 Driving recommendations
81 Anti-theft protection
81 Starting/Switching off the engine
83 Starting/Switching off the engine with DS
SMART ACCESS
83
Electric parking brake
86 6-speed manual gearbox
86 Automatic gearbox (EAT8)
89 Drive selector (Electric)
90 Driving modes
90 Hill start assist
91 Gear shift indicator
92 Stop & Start
93 Under-inflation detection
94 Driving and manoeuvring aids - General
recommendations
95
Speed Limit Recognition and Recommendation
99 Speed limiter
100 Cruise control - particular recommendations
101 Cruise control
102 Memorising speeds
103 DS DRIVE ASSIST
103 Adaptive Cruise Control
106 Active Lane Keeping Assist
110 Active Lane Departure Warning System
113 Blind Spot Detection
114 Active Blind Spot Detection
Page 7 of 244
5
Overview
F. Select an audio source
G. Display the list of radio stations/audio tracks
5. Horn
6. Controls for Speed limiter/Cruise control/
Adaptive Cruise Control
Side controls
1. Halogen headlamp beam height adjustment
2. Lane positioning assist
3. Active lane departure warning system
4. Alarm
5. Heated windscreen
6. Opening the boot
7. Door mirrors adjustment
8. Head-up display controls
Central controls
1. Touch screen menus
Access to the Electric menu
2. Heated seats
3. Recirculation of interior air
4. Rear screen defrosting
5. Automatic air conditioning off
6. Front demisting/defrosting
7. Audio system on/off
8. Decrease/increase volume
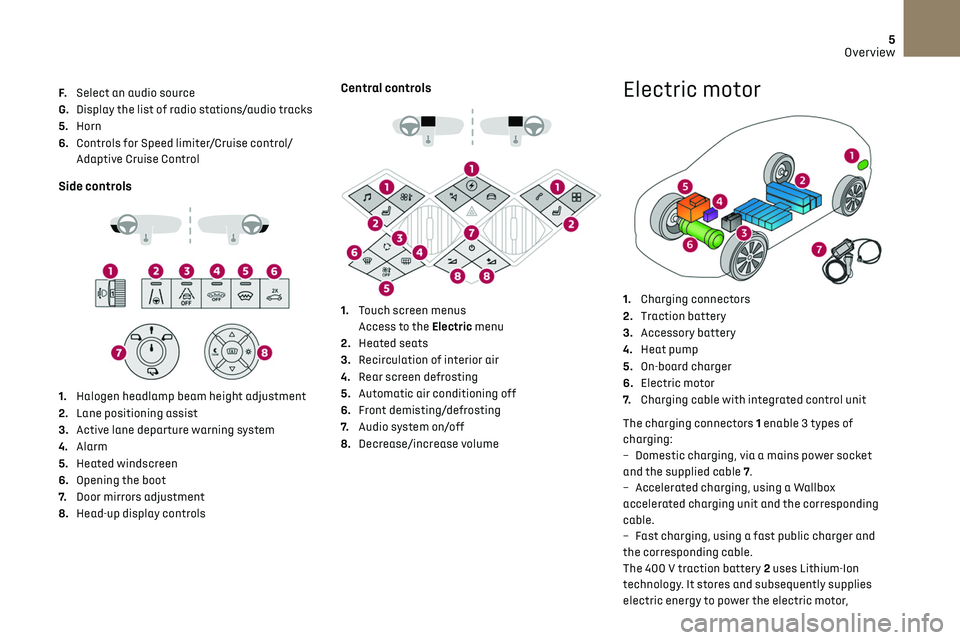
Electric motor
1.Charging connectors
2. Traction battery
3. Accessory battery
4. Heat pump
5. On-board charger
6. Electric motor
7. Charging cable with integrated control unit
The charging connectors 1 enable 3 types of
charging:
–
Dome
stic charging, via a mains power socket
and the supplied cable 7.
–
Ac
celerated charging, using a Wallbox
accelerated charging unit and the corresponding
cable.
–
Fast charging, using a fast public charger and
the c
orresponding cable.
The 400 V traction battery 2 uses Lithium-Ion
technology. It stores and subsequently supplies
electric energy to power the electric motor,
Page 13 of 244
11Instruments01
C.If the vehicle is so equipped, inter-vehicle
distance information, lane departure warning
system information, lane positioning assist
information, and automatic emergency
braking alerts.
D. If the vehicle is so equipped, navigation
information.
For more information on Navigation, refer
to the Audio and telematics section.
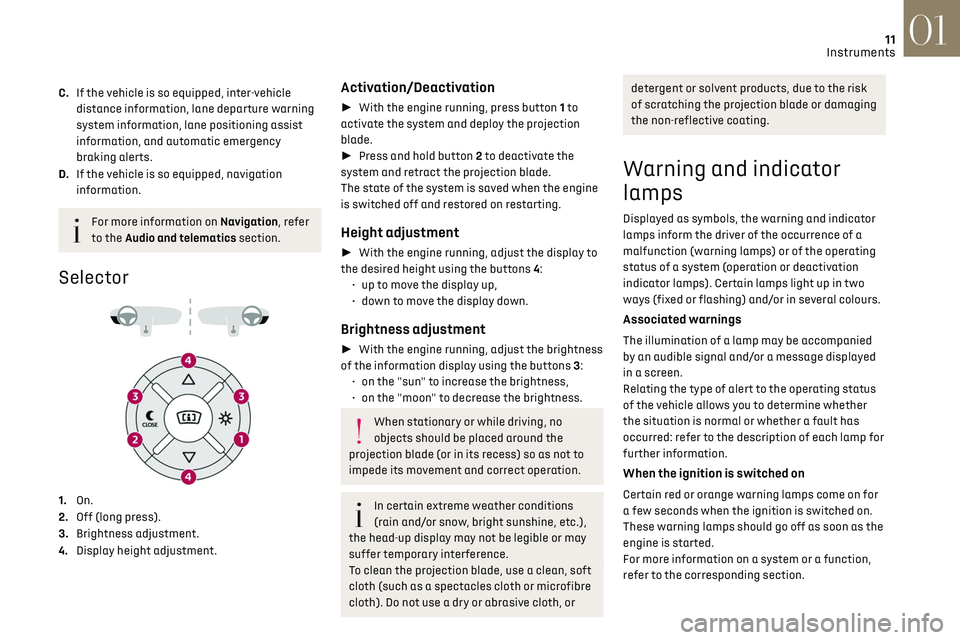
Selector
1. On.
2. Off (long press).
3. Brightness adjustment.
4. Display height adjustment.
Activation/Deactivation
► With the engine running, press button 1 to
activate the system and deploy the projection
blade.
► Press and hold button 2 to deactivate the
system and retract the projection blade.
The state of the system is saved when the engine
is switched off and restored on restarting.
Height adjustment
► With the engine running, adjust the display to
the desired height using the buttons 4: •
up t
o move the display up,
•
do
wn to move the display down.
Brightness adjustment
► With the engine running, adjust the brightness
of the information display using the buttons 3: •
on the "
sun" to increase the brightness,
•
on the "moon
" to decrease the brightness.
When stationary or while driving, no
objects should be placed around the
projection blade (or in its recess) so as not to
impede its movement and correct operation.
In certain extreme weather conditions
(rain and/or snow, bright sunshine, etc.),
the head-up display may not be legible or may
suffer temporary interference.
To clean the projection blade, use a clean, soft
cloth (such as a spectacles cloth or microfibre
cloth). Do not use a dry or abrasive cloth, or
detergent or solvent products, due to the risk
of scratching the projection blade or damaging
the non-reflective coating.
Warning and indicator
lamps
Displayed as symbols, the warning and indicator
lamps inform the driver of the occurrence of a
malfunction (warning lamps) or of the operating
status of a system (operation or deactivation
indicator lamps). Certain lamps light up in two
ways (fixed or flashing) and/or in several colours.
Associated warnings
The illumination of a lamp may be accompanied
by an audible signal and/or a message displayed
in a screen.
Relating the type of alert to the operating status
of the vehicle allows you to determine whether
the situation is normal or whether a fault has
occurred: refer to the description of each lamp for
further information.
When the ignition is switched on
Certain red or orange warning lamps come on for
a few seconds when the ignition is switched on.
These warning lamps should go off as soon as the
engine is started.
For more information on a system or a function,
refer to the corresponding section.
Page 40 of 244

38
Ease of use and comfort03
Correct driving position
For safety reasons, adjustments must
only be made when the vehicle is
stationary.
Before taking to the road and to make the most
of the ergonomic layout of the instruments and
controls, carry out these adjustments in the
following order:
–
head re
straint height.
–
sea
t backrest angle.
–
sea
t cushion height.
–
longit
udinal seat position.
–
st
eering wheel height and reach.
–
rear vie
w mirror and door mirrors.
Once these adjustments have been made,
check that the instrument panel can be
viewed correctly from your driving position.
Front seats
Before moving the seat backwards,
ensure that there is no person or object
that might prevent the full travel of the seat.
There is a risk of trapping or pinching
passengers if present in the rear seats or of
jamming the seat if large objects are placed on
the floor behind the seat.
Manual adjustments
Longitudinal
► Raise the control bar and slide the seat
forwards or backwards.
Backrest angle
► Turn the knob to adjust the backrest.
Height
► Pull the control upwards to raise the seat or
push it downwards to lower it until the desired
position is obtained.
Electric adjustments
Longitudinal
► Push the control forwards or rearwards to
slide the seat.
Backrest angle
► Tilt the control forwards or rearwards.
Cushion height and angle
► Tilt the rear of the control upwards or
downwards to obtain the required height and
angle.
Front head restraints
Height adjustment
► Upward: pull the head restraint up to the
desired position; the head restraint can be felt to
click into position.
► Downward: press lug A to lower the head
restraint.
Page 41 of 244
39
Ease of use and comfort03
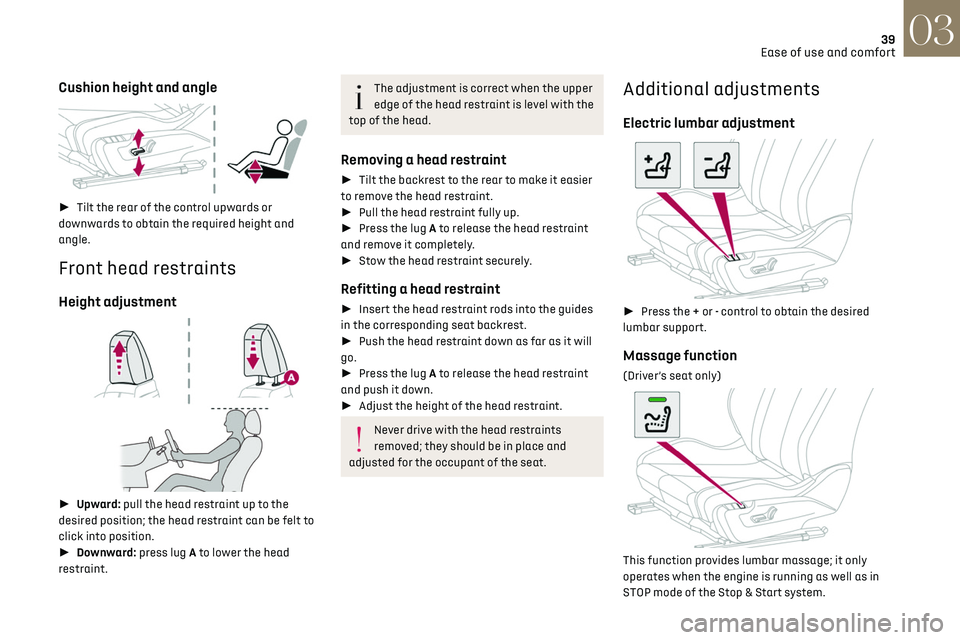
Cushion height and angle
► Tilt the rear of the control upwards or
downwards to obtain the required height and
angle.
Front head restraints
Height adjustment
► Upward: pull the head restraint up to the
desired position; the head restraint can be felt to
click into position.
► Downward: press lug A to lower the head
restraint.
The adjustment is correct when the upper
edge of the head restraint is level with the
top of the head.
Removing a head restraint
► Tilt the backrest to the rear to make it easier
to remove the head restraint.
► Pull the head restraint fully up.
► Press the lug A to release the head restraint
and remove it completely.
► Stow the head restraint securely.
Refitting a head restraint
► Insert the head restraint rods into the guides
in the corresponding seat backrest.
► Push the head restraint down as far as it will
go.
► Press the lug A to release the head restraint
and push it down.
► Adjust the height of the head restraint.
Never drive with the head restraints
removed; they should be in place and
adjusted for the occupant of the seat.
Additional adjustments
Electric lumbar adjustment
► Press the + or - control to obtain the desired
lumbar support.
Massage function
(Driver’s seat only)
This function provides lumbar massage; it only
operates when the engine is running as well as in
STOP mode of the Stop & Start system.
Page 42 of 244

40
Ease of use and comfort03
Activation/Deactivation
► Press this button to activate/
deactivate the function.
Upon activation, the indicator lamp comes on.
The massage function is activated for a period of
one hour.
During this time, massage is performed in 6 cycles
of 10 minutes (6 minutes of massage followed by
a 4-minute break).
After one hour, the function is deactivated; the
indicator lamp goes off.
Heated seats
The function is active only with the engine
running.
On/Off
► Press the button corresponding to your seat.
► Each press changes the heating level; the
corresponding number of indicator lamps come
on.
► To stop heating, press the button again until
all the indicator lamps are off.
The system status is memorised when the ignition
is switched off.
Do not use the function when the seat is
not occupied.
Reduce the heating intensity as soon as
possible.
When the seat and passenger compartment
have reached a satisfactory temperature,
switch the function off; reducing electricity
consumption in turn decreases fuel
consumption.
Prolonged use of heated seats is not
recommended for people with sensitive
skin.
There is a risk of burns for people whose
perception of heat is impaired (illness, taking
medication, etc.).
To keep the heated pad intact and to prevent a
short circuit:
–
Do no
t place heavy or sharp objects on the
seat.
–
Do no
t kneel or stand on the seat.
–
Do no
t spill liquids onto the seat.
–
Ne
ver use the heating function if the seat
is damp.
Steering wheel
adjustment
► When stationary, pull the control to release
the steering wheel.
► Adjust the height and reach to suit your driving
position.
► Push the control lever to lock the steering
wheel.
As a safety measure, these adjustments
must only be carried out with the vehicle
stationary.
Mirrors
Door mirrors
Adjustment
► Turn control A to the right or to the left to
select the corresponding mirror.
► Move the control in any of the four directions
to adjust.
► Return the control to the central position.
As a safety measure, the mirrors should
be adjusted to reduce the blind spots.
The objects observed are, in reality, closer than
they appear. Take this into account in order
to correctly judge the distance of vehicles
approaching from behind.
Manual folding
The mirrors can be folded manually (parking
obstruction, narrow garage, etc.).
Page 58 of 244
56Lighting and visibility04
As soon as the brightness returns to a sufficient
level or after the windscreen wipers are switched
off, the lamps are switched off automatically.
Malfunction
In the event of a malfunction of the rain/
sunshine sensor, the vehicle’s lighting
comes on and this warning lamp is displayed in
the instrument panel, accompanied by an audible
signal and/or the display of a message.
Contact a dealer or a qualified workshop.
Do not cover the rain/sunshine sensor
located at the top centre of the
windscreen behind the interior rear view
mirror; the associated functions would no
longer be controlled.
In fog or snow, the rain/sunshine sensor
may detect sufficient light. In this case,
the lighting will not come on automatically.
Headlamp beam height
adjustment
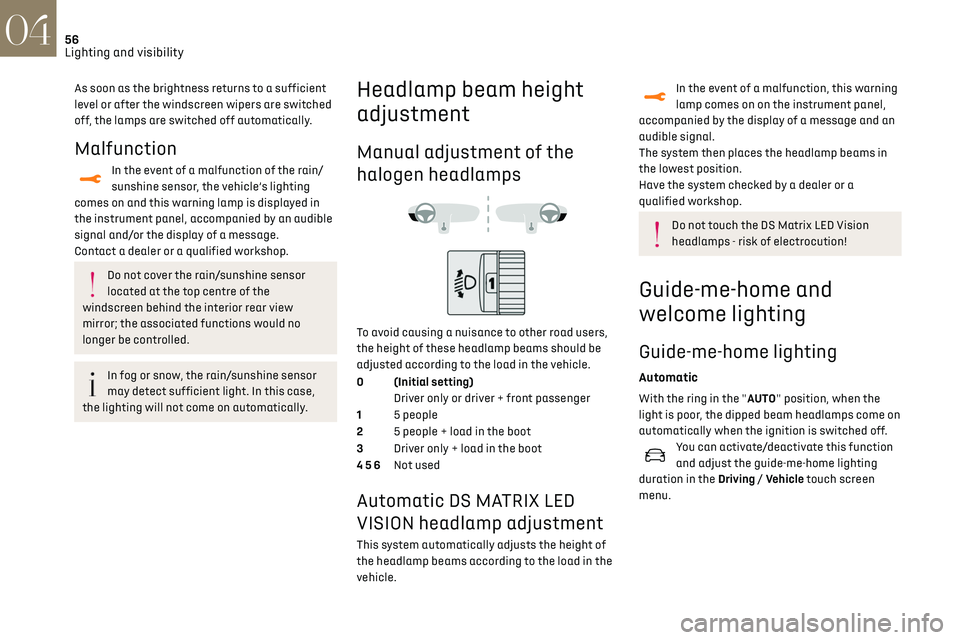
Manual adjustment of the
halogen headlamps
To avoid causing a nuisance to other road users,
the height of these headlamp beams should be
adjusted according to the load in the vehicle.
0 (Initial setting) Driver only or driver + front passenger
1 5 people
2 5 people + load in the boot
3 Driver only + load in the boot
4 5 6 Not used
Automatic DS MATRIX LED
VISION headlamp adjustment
This system automatically adjusts the height of
the headlamp beams according to the load in the
vehicle.
In the event of a malfunction, this warning
lamp comes on on the instrument panel,
accompanied by the display of a message and an
audible signal.
The system then places the headlamp beams in
the lowest position.
Have the system checked by a dealer or a
qualified workshop.
Do not touch the DS Matrix LED Vision
headlamps - risk of electrocution!
Guide-me-home and
welcome lighting
Guide-me-home lighting
Automatic
With the ring in the "AUTO" position, when the
light is poor, the dipped beam headlamps come on
automatically when the ignition is switched off.
You can activate/deactivate this function
and adjust the guide-me-home lighting
duration in the Driving / Vehicle touch screen
menu.
Manual
► With the ignition off, pull the lighting control
stalk toward you ("headlamp flash") to activate/
deactivate the function.
Manual guide-me-home lighting goes off
automatically after a period of time.
Welcome lighting
When the vehicle is unlocked in low light
conditions and the "Automatic illumination of
headlamps" function is activated, this system
automatically switches on:
– On the outside, sidelamps, dipped beam
headlamps and door mirror spotlamps.
– Inside, courtesy lamps and footwell lighting.
Activation / deactivation and adjustment
of the duration of the welcome lighting are
set via the Driving / Vehicle touch screen menu.
Door mirror spotlamps
These spotlamps facilitate access to the vehicle
by lighting the ground near the front doors.
The spotlamps come on automatically:
– when the vehicle is unlocked.
– when a door is opened.
Page 80 of 244

78Safety05
– F2X: ISOFIX child seat for toddlers.
– F2: ISOFIX reduced height child seat.
– F3: ISOFIX full height child seat.
Child booster seat.
ISOFIX "carrycot" type child seat:
– L1: head to the left.
– L2: head to the right.
Manual child lock
This system prevents opening of a rear door using
its interior handle.
The control, red in colour, is located on the edge of
each rear door (marked by a label).
Locking / Unlocking
► To lock, turn the red control as far as it will go
using the integral key: • To the right on the left-hand rear door.
Rules:
–
A po sition that is i-Size compatible is also
compatible for R1, R2 and F2X, F2, B2.
–
A po
sition that is R3 compatible is also
compatible for R1 and R2.
–
A po
sition that is F3 compatible is also
compatible for F2X and F2.
–
A po
sition that is B3 compatible is also
compatible for B2.
(a) Universal child seat: child seat that can be
installed in all vehicles using the seat belt.
(b) To install a "rearward facing" at this seat
position, the front passenger airbag must be
deactivated "OFF" .
(c) Only a "forward facing" child seat is
authorised at this seat position with the front
passenger airbag activated "ON".
(d) For a seat with height adjustment, adjust
the seat to the highest position and move it
fully back.
(e) Never install a child seat with a support leg
on the centre rear passenger seat.
(f) For a seat without height adjustment, the
backrest must be upright.
(g) Installing a “Carrycot” type child seat on
this seat may prevent the installation of
additional child seats in the rear. (h)
Adjust the driver's seat to the highest
position.
(i) Adjust the front passenger seat to the fully
forward position.
KeySeat position where the installation of a
child seat is forbidden.
Front passenger airbag deactivated.
Front passenger airbag activated.
Seat position suitable for the installation
of a child seat secured using the seat belt
and universally approved "rearward facing" and/
or "forward facing".
Seat position suitable for the installation a
child seat secured using the seat belt and
universally approved "forward facing".
Seat position where securing an i-Size
child seat is authorised.
Seat position where securing a "forward
facing" i-Size child seat is authorised.
Presence of a TOP TETHER anchoring point
at the rear of the backrest, authorising the
attachment of a universal ISOFIX "forward
facing" child seat.
Presence of a TOP TETHER anchoring point
at the rear of the backrest, authorising the
attachment of a "forward facing" universal
ISOFIX child seat.
"Rearward facing" ISOFIX child seat:
–
R1
: ISOFIX child seat for baby.
–
R2
: ISOFIX reduced size child seat.
–
R3
: ISOFIX large size child seat.
"Forward facing" ISOFIX child seat: