ignition CITROEN DS3 CROSSBACK 2022 User Guide
[x] Cancel search | Manufacturer: CITROEN, Model Year: 2022, Model line: DS3 CROSSBACK, Model: CITROEN DS3 CROSSBACK 2022Pages: 244, PDF Size: 7.7 MB
Page 24 of 244
22
Instruments01
Trip computer
Information displayed about the current journey
(range, fuel consumption, average speed, etc.).
Data displayed on the
instrument panel
Display of the various tabs
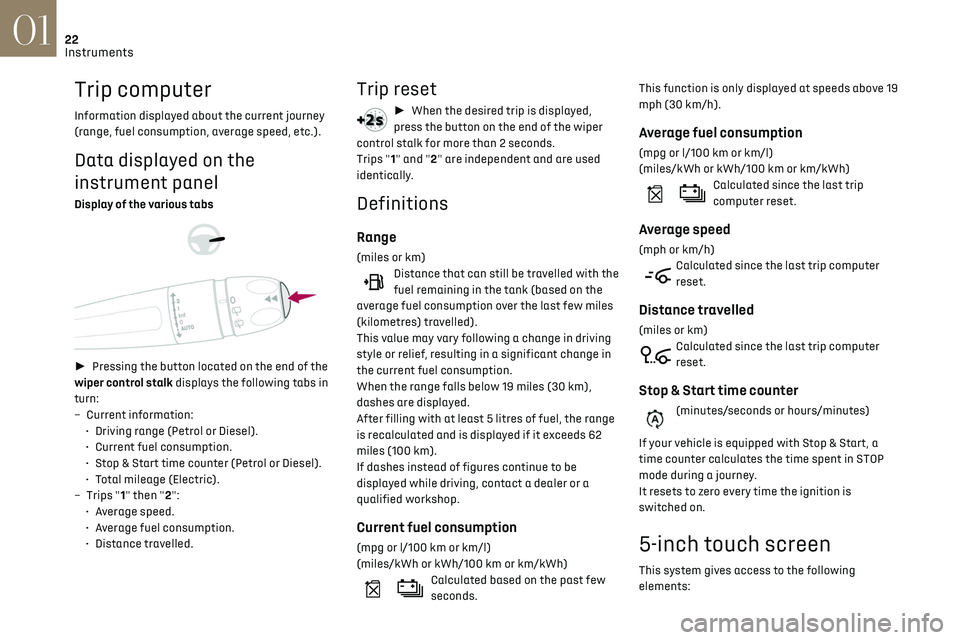
► Pressing the button located on the end of the
wiper control stalk displays the following tabs in
turn:
–
Curren
t information:
•
D
riving range (Petrol or Diesel).
•
Curren
t fuel consumption.
•
St
op & Start time counter (Petrol or Diesel).
•
T
otal mileage (Electric).
–
Trip
s "1" then "2":
•
A
verage speed.
•
A
verage fuel consumption.
•
Dist
ance travelled.
Trip reset
► When the desired trip is displayed,
press the button on the end of the wiper
control stalk for more than 2 seconds.
Trips "1" and "2" are independent and are used
identically.
Definitions
Range
(miles or km)Distance that can still be travelled with the
fuel remaining in the tank (based on the
average fuel consumption over the last few miles
(kilometres) travelled).
This value may vary following a change in driving
style or relief, resulting in a significant change in
the current fuel consumption.
When the range falls below 19 miles (30 km),
dashes are displayed.
After filling with at least 5 litres of fuel, the range
is recalculated and is displayed if it exceeds 62
miles (100 km).
If dashes instead of figures continue to be
displayed while driving, contact a dealer or a
qualified workshop.
Current fuel consumption
(mpg or l/100 km or km/l)
(miles/kWh or kWh/100 km or km/kWh)
Calculated based on the past few
seconds. This function is only displayed at speeds above 19
mph (30 km/h).
Average fuel consumption
(mpg or l/100 km or km/l)
(miles/kWh or kWh/100 km or km/kWh)
Calculated since the last trip
computer reset.
Average speed
(mph or km/h)Calculated since the last trip computer
reset.
Distance travelled
(miles or km)Calculated since the last trip computer
reset.
Stop & Start time counter
(minutes/seconds or hours/minutes)
If your vehicle is equipped with Stop & Start, a
time counter calculates the time spent in STOP
mode during a journey.
It resets to zero every time the ignition is
switched on.
5-inch touch screen
This system gives access to the following
elements:
Page 25 of 244
23
Instruments01
– Audio system and telephone controls and
display of related information.
–
V
ehicle function and equipment setting menus.
–
Air c
onditioning system controls (depending on
version).
For safety reasons, always stop the
vehicle before performing operations that
require sustained attention.
Some functions are not accessible while
driving.
Recommendations
Do not use pointed objects on the touch screen.
Do not touch the touch screen with wet hands.
Use a soft, clean cloth to clean the touch screen.
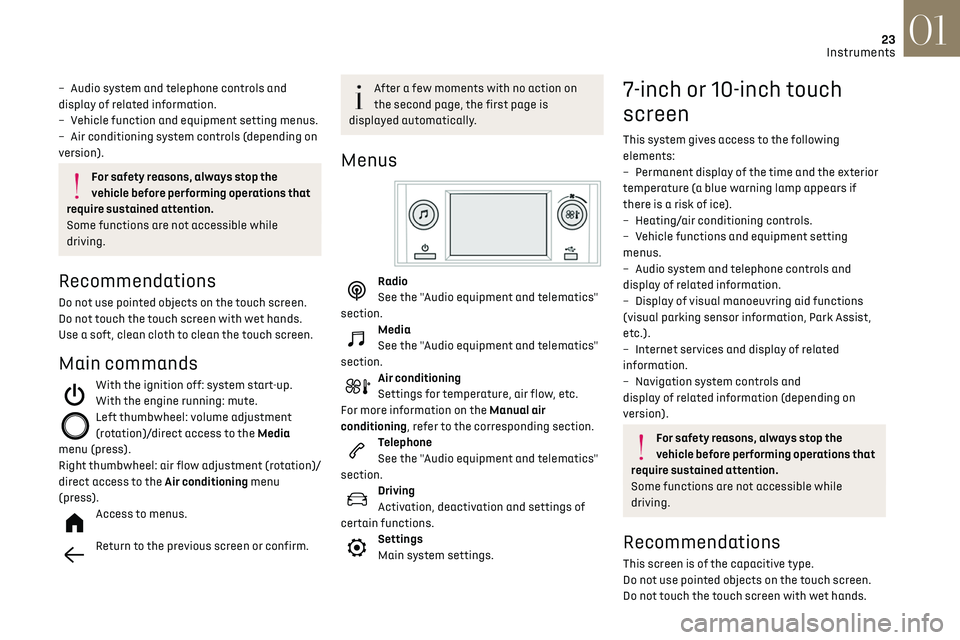
Main commands
With the ignition off: system start-up.
With the engine running: mute.
Left thumbwheel: volume adjustment
(rotation)/direct access to the Media
menu (press).
Right thumbwheel: air flow adjustment (rotation)/
direct access to the Air conditioning menu
(press).
Access to menus.
Return to the previous screen or confirm.
After a few moments with no action on
the second page, the first page is
displayed automatically.
Menus
Radio
See the "Audio equipment and telematics"
section.
Media
See the "Audio equipment and telematics"
section.
Air conditioning
Settings for temperature, air flow, etc.
For more information on the Manual air
conditioning, refer to the corresponding section.
Telephone
See the "Audio equipment and telematics"
section.
Driving
Activation, deactivation and settings of
certain functions.
Settings
Main system settings.
7-inch or 10-inch touch
screen
This system gives access to the following
elements:
–
Permanen
t display of the time and the exterior
temperature (a blue warning lamp appears if
there is a risk of ice).
–
Hea
ting/air conditioning controls.
–
V
ehicle functions and equipment setting
menus.
–
Audio s
ystem and telephone controls and
display of related information.
–
Displa
y of visual manoeuvring aid functions
(visual parking sensor information, Park Assist,
etc.).
–
In
ternet services and display of related
information.
–
Na
vigation system controls and
display of related information (depending on
version).
For safety reasons, always stop the
vehicle before performing operations that
require sustained attention.
Some functions are not accessible while
driving.
Recommendations
This screen is of the capacitive type.
Do not use pointed objects on the touch screen.
Do not touch the touch screen with wet hands.
Page 34 of 244

32
Access02
► Unclip the cover by inserting a small
screwdriver in the slot and raise the cover.
► Remove the discharged battery from its
housing.
► Insert the new battery, observing the polarity,
and clip the cover onto the housing.
► Reinitialise the remote control.
For more information on Reinitialising the remote
control, refer to the corresponding section.
Do not throw remote control batteries
away, as they contain metals that are
harmful to the environment. Take them to an
approved disposal point.
Reinitialising the remote
control
Following replacement of the battery or in the
event of a fault, it may be necessary to reinitialise
the remote control.
Complete unlocking/locking of
the vehicle with the key
Use this procedure in the following situations:
– R emote control battery discharged.
–
R
emote control malfunction.
–
V
ehicle battery discharged.
–
V
ehicle in an area subject to strong
electromagnetic interference.
In the first case, change the remote control
battery.
In the second case, reinitialise the remote control.
Refer to the corresponding sections.
► Press the driver's door handle until the point
of resistance to unfold it then pull it to access the
lock.
► Insert the key in the door lock.
► Turn the key towards the front/rear to unlock/
lock the vehicle.
► Turn the key rearwards again within 3 seconds
to deadlock the vehicle.
If the vehicle is fitted with an alarm, it will
not be activated when locking with the
key.
If the alarm is activated, the siren sounds
when the door is opened; switch on the ignition
to stop it.
Central locking not functioning
Use these procedures in the following cases:
– Cen tral locking malfunction.
–
Ba
ttery disconnected or discharged.
In the event of a malfunction of the
central locking system, the battery must
be disconnected to ensure that the vehicle is
locked fully.
Driver's door
► If the handle is retracted, press on it up to the
point of resistance to unfold it.
► Pull the handle to access the lock.
► Insert the key in the lock and turn it to lock
the door.
Passenger doors
Unlocking
► Pull the interior door opening control.
Locking
► Open the doors.
► For the rear doors, check that the child lock is
not on.
Refer to the corresponding section.
► Remove the black cap, located on the edge of
the door, using the key.
► Insert the key into the socket without forcing
it, then turn the latch towards the inside of the
door.
► Remove the key and refit the black cap.
► Close the doors and check from the outside
that the vehicle is locked.
Changing the battery
A message is displayed in the instrument panel
when the battery needs changing.
Battery ref.: CR2032/3 Volts.
Page 35 of 244

33
Access02
► Unclip the cover by inserting a small
screwdriver in the slot and raise the cover.
► Remove the discharged battery from its
housing.
► Insert the new battery, observing the polarity,
and clip the cover onto the housing.
► Reinitialise the remote control.
For more information on Reinitialising the remote
control, refer to the corresponding section.
Do not throw remote control batteries
away, as they contain metals that are
harmful to the environment. Take them to an
approved disposal point.
Reinitialising the remote
control
Following replacement of the battery or in the
event of a fault, it may be necessary to reinitialise
the remote control.
► Press the handle until the point of resistance
to unfold it and access the lock.
► Insert the mechanical key (integral with the
remote control) in the lock to open the vehicle.
► Place the electronic key against the back-up
reader on the steering column and hold it there
until the ignition is switched on.
► Switch on the ignition by pressing the "START/
STOP" button.
► With a manual gearbox, place the gear lever in
neutral then fully depress the clutch pedal.
► With an automatic gearbox or drive selector,
while in mode P, depress the brake pedal.
If the fault persists after reinitialisation, contact
a dealer or a qualified workshop without delay.
Doors
Retractable handles
The doors are equipped with handles that unfold
and retract automatically depending on the
vehicle state:
– when unlocking the v ehicle, the handles unfold
to allow access to the vehicle,
–
when the v
ehicle is locked, the handles retract.
A. Retracted position.
B. Unfolded position.
Once unfolded, the handles retract automatically
after 3 minutes without the vehicle being locked.
It is possible to manually unfold the handles at
any time by pressing on them.
Depending on version, pressing on the handles
also locks / unlocks the vehicle, if the electronic
key is detected.
For more information on Proximity Keyless Entry
and Start, refer to the corresponding section.
In the event of a battery failure or system
malfunction, manually unfold the driver’s
handle by pressing on it up to the point of
resistance. Then pull the handle to access the
lock and follow the back-up procedures.
For more information on the Back-up
procedures, refer to the corresponding section.
Page 36 of 244
34
Access02
System which protects and provides a deterrent
against theft and break-ins.
Exterior perimeter monitoring
The system checks for opening of the vehicle.
The alarm is triggered if anyone tries to open a
door, the boot or the bonnet, for example.
Interior volumetric monitoring
The system checks for any variation in volume in
the passenger compartment.
The alarm is triggered if anyone breaks a window,
enters the passenger compartment or moves
inside the vehicle.
Self-protection function
The system checks for the putting out of service
of its components.
The alarm is triggered if the battery, the central
control or the siren wiring is put out of service or
damaged.For all work on the alarm system, contact
a dealer or a qualified workshop.
Locking the vehicle with full
alarm system
Activation
► Switch off the ignition and exit the vehicle.
► Lock or deadlock the vehicle using the remote
control or by pressing on one of the front door
handles.
Too frequent presses on the handle up to
the point of resistance may damage its
mechanism.
In case of frost, press the handle to
release it.
From inside the vehicle, it is possible to unfold the
handles:
–
b
y opening a door,
–
b
y pressing the central locking button once
when the vehicle is locked or twice when
unlocked.
When driving, the handles automatically retract
once the vehicle speed exceeds 2 mph (3 km/h).
Opening
From outside
► Unlock your vehicle to unfold the door handles.
► Pull the handle.
When selective unlocking is activated,
only the driver door's handle will unfold
and only the driver's door can be opened.
From inside
► Pull the interior door opening lever; the exterior
door handles unfold automatically.
Opening one of the doors from inside unlocks the
rest of the vehicle.
With selective unlocking activated:
– O pening the driver's door unlocks the
driver's door only (if the vehicle has not already
been completely unlocked).
–
O
pening one of the passenger doors unlocks
the rest of the vehicle.
–
O
pening a door from inside causes the
unfolding of all the exterior handles.
Boot
Opening
► After unlocking the vehicle or just the boot,
press the opening control and then raise the
tailgate.
Closing
► Lower the tailgate using one of the interior
grab handles.
Back-up release
To manually unlock the boot in the event of a
battery or central locking failure.
Unlocking
► Fold the rear seats to gain access to the lock
from inside the boot.
► Insert a small screwdriver into hole A of the
lock to unlock the boot.
► Move the latch to the left.
Locking after closing
If the fault persists after closing again, the boot
will remain locked.
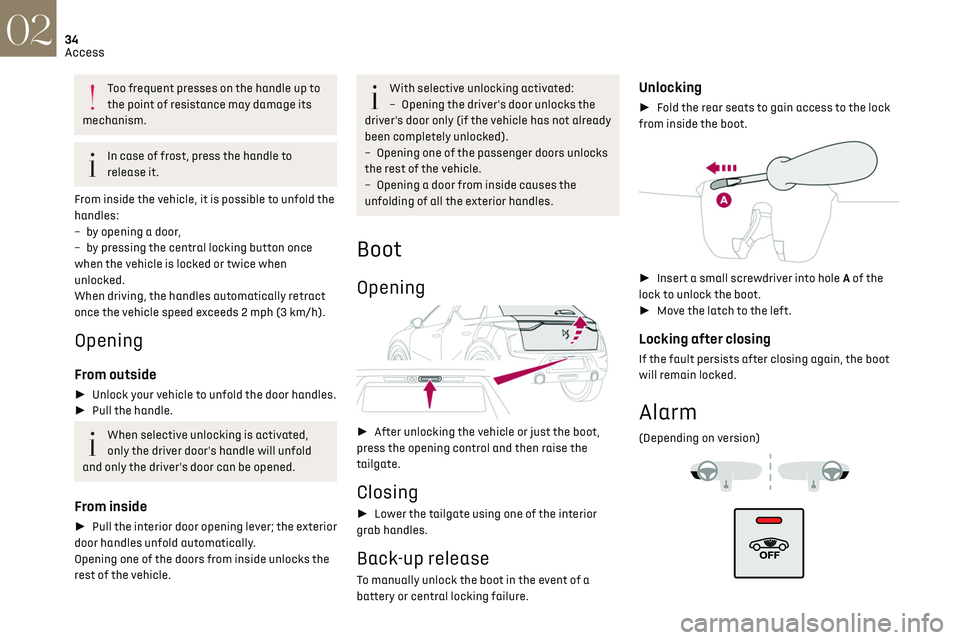
Alarm
(Depending on version)
Page 37 of 244

35
Access02
System which protects and provides a deterrent
against theft and break-ins.
Exterior perimeter monitoring
The system checks for opening of the vehicle.
The alarm is triggered if anyone tries to open a
door, the boot or the bonnet, for example.
Interior volumetric monitoring
The system checks for any variation in volume in
the passenger compartment.
The alarm is triggered if anyone breaks a window,
enters the passenger compartment or moves
inside the vehicle.
Self-protection function
The system checks for the putting out of service
of its components.
The alarm is triggered if the battery, the central
control or the siren wiring is put out of service or
damaged.
For all work on the alarm system, contact
a dealer or a qualified workshop.
Locking the vehicle with full
alarm system
Activation
► Switch off the ignition and exit the vehicle.
► Lock or deadlock the vehicle using the remote
control or by pressing on one of the front door
handles.
When the monitoring system is active, the red
indicator lamp in the button flashes once per
second and the direction indicators come on for
about 2 seconds.
The exterior perimeter monitoring is activated
after 5 seconds and the interior volumetric
monitoring after 45 seconds.
The alarm does not activate when locking
automatically from a distance.
If an opening (door, boot or bonnet) is not
properly closed, the vehicle is not locked,
but the exterior perimeter monitoring will be
activated after 45 seconds, at the same time
as the interior volumetric monitoring.
Deactivation
► Press one of the remote control unlocking
buttons:
short press
long press
or
► Unlock the vehicle using the remote control or
by pressing one of the front door handles.
The monitoring system is deactivated: the
indicator lamp in the button goes off and the
direction indicators flash for about 2 seconds.
After unlocking using the remote control
If the vehicle automatically locks itself
again (as happens if a door or the boot is not
opened within 30 seconds of unlocking), the
monitoring system is automatically activated.
Locking the vehicle with
exterior perimeter monitoring
only
Disable volumetric monitoring to avoid unwanted
alarm triggering in certain cases, such as:
–
Sligh
tly open window.
–
W
ashing the vehicle.
–
C
hanging a wheel.
–
T
owing your vehicle.
–
Transport on a ship or ferry
.
Deactivating interior volumetric
monitoring
► Switch off the ignition and within 10 seconds
press the alarm button until the indicator lamp is
on fixed.
► Exit the vehicle.
► Immediately lock the vehicle using the remote
control or by pressing one of the front door
handles.
Only exterior perimeter monitoring is activated;
the red indicator lamp in the button flashes every
second.
To take effect, this deactivation must be
performed whenever the ignition is switched off.
Page 38 of 244
36
Access02
Operating the switch again stops the movement
of the window.Window controls remain operational for
approximately 45 seconds after switching
off the ignition or after locking the vehicle.
After that time, the controls are disabled.
To reactivate them, switch on the ignition or
unlock the vehicle.
Anti-pinch
If the window meets an obstacle while rising, it
stops and immediately partially lowers again.
Deactivation of the rear
controls for the rear electric
windows
For children's safety, press switch 5 to
deactivate the rear electric windows
controls.
The indicator lamp for the button comes on,
accompanied by a message confirming activation.
With the ignition on, it remains lit, as long as the
child lock remains activated.
Use of the rear electric windows from the driver's
controls remains possible.
For versions fitted with an electric child
lock, this control also deactivates the
interior rear door controls.
For more information on the Child lock, refer to
the corresponding section.
Reactivating interior volumetric
monitoring
► Deactivate exterior perimeter monitoring by
unlocking the vehicle using the remote control or
by pressing a door handle.
The indicator lamp in the button goes off.
► Reactivate the full alarm system by locking
the vehicle using the remote control or by
pressing one of the front door handles.
The red indicator lamp in the button once again
flashes every second.
Triggering of the alarm
This is indicated by sounding of the siren and
flashing of the direction indicators for 30
seconds.
The interior volumetric and anti-tilt monitoring
functions remain active until the alarm has been
triggered ten times in succession.
When the vehicle is unlocked, rapid flashing of
the indicator lamp in the button indicates that the
alarm was triggered during your absence. When
the ignition is switched on, this flashing stops
immediately.
Failure of the remote control
To deactivate the monitoring functions:
► Unlock the vehicle using the key in the driver's
door lock.
► Open the door; the alarm is triggered.
► Switch on the ignition; this stops the alarm.
The indicator lamp in the button goes off.
Locking the vehicle without
activating the alarm
► Lock or deadlock the vehicle using the key
(integral to the remote control) in the driver's door
lock.
Automatic activation
(Depending on version)
The system is activated automatically 2 minutes
after the last door or the boot is closed.
► To avoid triggering the alarm on entering the
vehicle, first press the unlocking button on the
remote control or unlock the vehicle using the
“Keyless Entry and Starting” system.
Malfunction
When the ignition is switched on, fixed
illumination of the red indicator lamp in the
button indicates a malfunction of the system.
Have it checked by a dealer or a qualified
workshop.
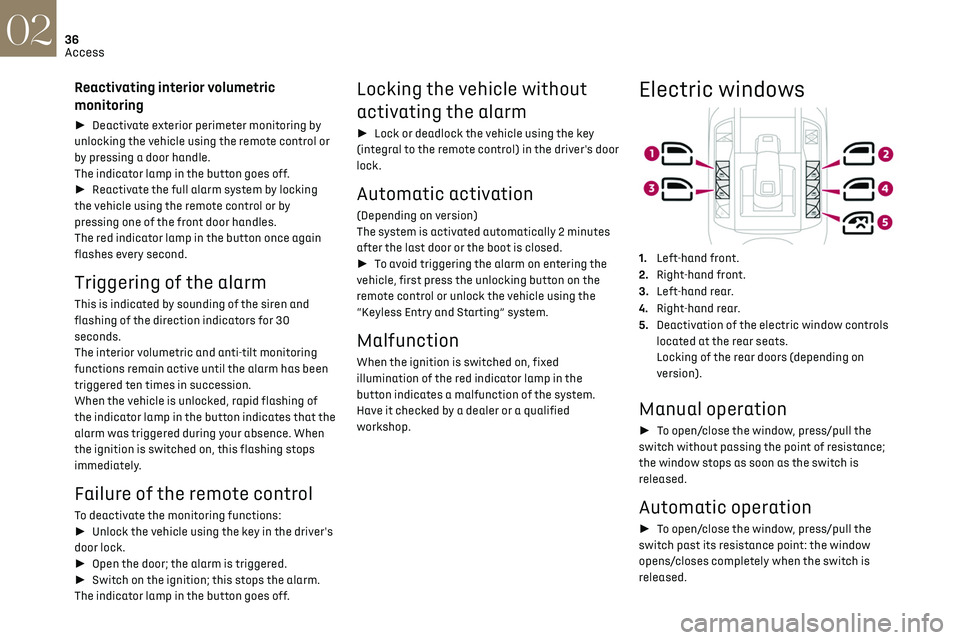
Electric windows
1. Left-hand front.
2. Right-hand front.
3. Left-hand rear.
4. Right-hand rear.
5. Deactivation of the electric window controls
located at the rear seats.
Locking of the rear doors (depending on
version).
Manual operation
► To open/close the window, press/pull the
switch without passing the point of resistance;
the window stops as soon as the switch is
released.
Automatic operation
► To open/close the window, press/pull the
switch past its resistance point: the window
opens/closes completely when the switch is
released.
Page 39 of 244

37
Access02
Operating the switch again stops the movement
of the window.
Window controls remain operational for
approximately 45 seconds after switching
off the ignition or after locking the vehicle.
After that time, the controls are disabled.
To reactivate them, switch on the ignition or
unlock the vehicle.
Anti-pinch
If the window meets an obstacle while rising, it
stops and immediately partially lowers again.
Deactivation of the rear
controls for the rear electric
windows
For children's safety, press switch 5 to
deactivate the rear electric windows
controls.
The indicator lamp for the button comes on,
accompanied by a message confirming activation.
With the ignition on, it remains lit, as long as the
child lock remains activated.
Use of the rear electric windows from the driver's
controls remains possible.
For versions fitted with an electric child
lock, this control also deactivates the
interior rear door controls.
For more information on the Child lock, refer to
the corresponding section.
Reinitialising the electric
windows
After reconnecting the battery, or in the event
of abnormal window movement, the anti-pinch
function must be reinitialised.
The anti-pinch function is disabled during the
following sequence of operations.
For each window:
► Lower the window fully, then raise it; it will
rise in steps of a few centimetres each time the
control is pressed. Repeat the operation until the
window is fully closed.
► Continue to pull the control upwards for at
least one second after the window reaches the
closed position.
If an electric window meets an obstacle
during operation, the movement of the
window must be reversed. To do this, press the
relevant switch.
When the driver operates the passengers’
electric window switches, it is important to
ensure that nothing can prevent the window
from closing properly.
It is important to ensure that passengers use
the electric windows correctly.
Pay particular attention to children when
operating windows.
Be aware of passengers and/or other persons
present when closing windows using the key or
the "Keyless Entry and Starting" system.
Page 42 of 244
40
Ease of use and comfort03
Activation/Deactivation
► Press this button to activate/
deactivate the function.
Upon activation, the indicator lamp comes on.
The massage function is activated for a period of
one hour.
During this time, massage is performed in 6 cycles
of 10 minutes (6 minutes of massage followed by
a 4-minute break).
After one hour, the function is deactivated; the
indicator lamp goes off.
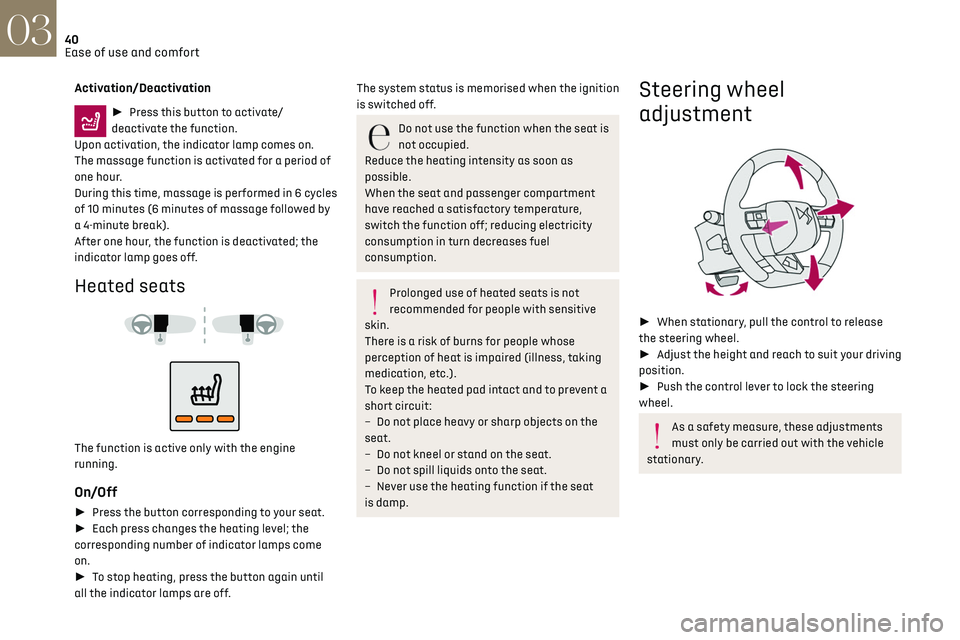
Heated seats
The function is active only with the engine
running.
On/Off
► Press the button corresponding to your seat.
► Each press changes the heating level; the
corresponding number of indicator lamps come
on.
► To stop heating, press the button again until
all the indicator lamps are off.
The system status is memorised when the ignition
is switched off.
Do not use the function when the seat is
not occupied.
Reduce the heating intensity as soon as
possible.
When the seat and passenger compartment
have reached a satisfactory temperature,
switch the function off; reducing electricity
consumption in turn decreases fuel
consumption.
Prolonged use of heated seats is not
recommended for people with sensitive
skin.
There is a risk of burns for people whose
perception of heat is impaired (illness, taking
medication, etc.).
To keep the heated pad intact and to prevent a
short circuit:
–
Do no
t place heavy or sharp objects on the
seat.
–
Do no
t kneel or stand on the seat.
–
Do no
t spill liquids onto the seat.
–
Ne
ver use the heating function if the seat
is damp.
Steering wheel
adjustment
► When stationary, pull the control to release
the steering wheel.
► Adjust the height and reach to suit your driving
position.
► Push the control lever to lock the steering
wheel.
As a safety measure, these adjustments
must only be carried out with the vehicle
stationary.
Mirrors
Door mirrors
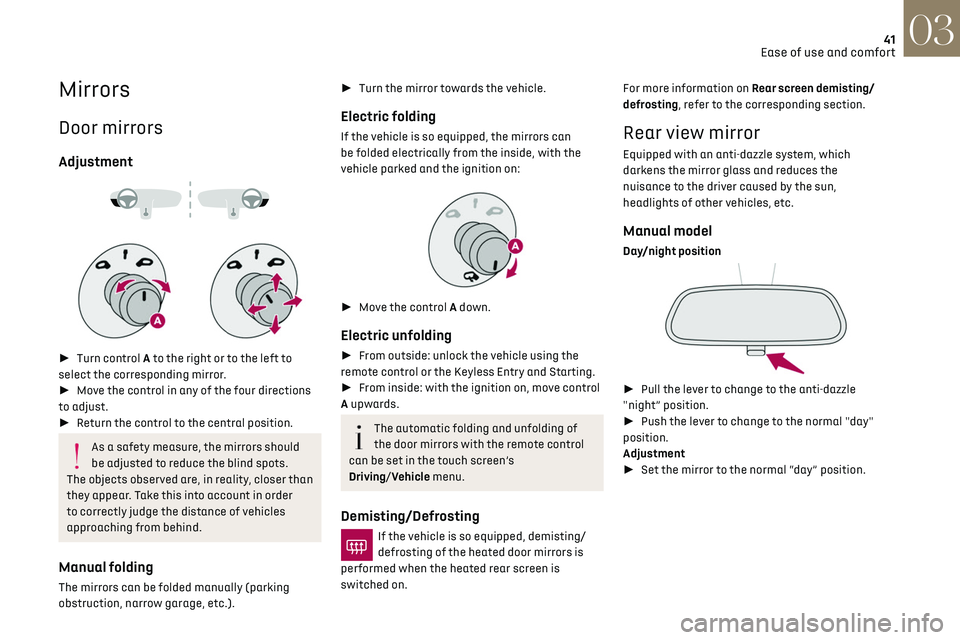
Adjustment
► Turn control A to the right or to the left to
select the corresponding mirror.
► Move the control in any of the four directions
to adjust.
► Return the control to the central position.
As a safety measure, the mirrors should
be adjusted to reduce the blind spots.
The objects observed are, in reality, closer than
they appear. Take this into account in order
to correctly judge the distance of vehicles
approaching from behind.
Manual folding
The mirrors can be folded manually (parking
obstruction, narrow garage, etc.).
Page 43 of 244
41
Ease of use and comfort03
Mirrors
Door mirrors
Adjustment
► Turn control A to the right or to the left to
select the corresponding mirror.
► Move the control in any of the four directions
to adjust.
► Return the control to the central position.
As a safety measure, the mirrors should
be adjusted to reduce the blind spots.
The objects observed are, in reality, closer than
they appear. Take this into account in order
to correctly judge the distance of vehicles
approaching from behind.
Manual folding
The mirrors can be folded manually (parking
obstruction, narrow garage, etc.).
► Turn the mirror towards the vehicle.
Electric folding
If the vehicle is so equipped, the mirrors can
be folded electrically from the inside, with the
vehicle parked and the ignition on:
► Move the control A down.
Electric unfolding
► From outside: unlock the vehicle using the
remote control or the Keyless Entry and Starting.
► From inside: with the ignition on, move control
A upwards.
The automatic folding and unfolding of
the door mirrors with the remote control
can be set in the touch screen’s
Driving/Vehicle menu.
Demisting/Defrosting
If the vehicle is so equipped, demisting/
defrosting of the heated door mirrors is
performed when the heated rear screen is
switched on. For more information on Rear screen demisting/
defrosting, refer to the corresponding section.
Rear view mirror
Equipped with an anti-dazzle system, which
darkens the mirror glass and reduces the
nuisance to the driver caused by the sun,
headlights of other vehicles, etc.
Manual model
Day/night position
►
Pull the lever to change to the anti-dazzle
"night” position.
► Push the lever to change to the normal "day"
position.
Adjustment
► Set the mirror to the normal “day” position.