mirror controls CITROEN DS3 CROSSBACK 2022 Owners Manual
[x] Cancel search | Manufacturer: CITROEN, Model Year: 2022, Model line: DS3 CROSSBACK, Model: CITROEN DS3 CROSSBACK 2022Pages: 244, PDF Size: 7.7 MB
Page 6 of 244
4
Overview
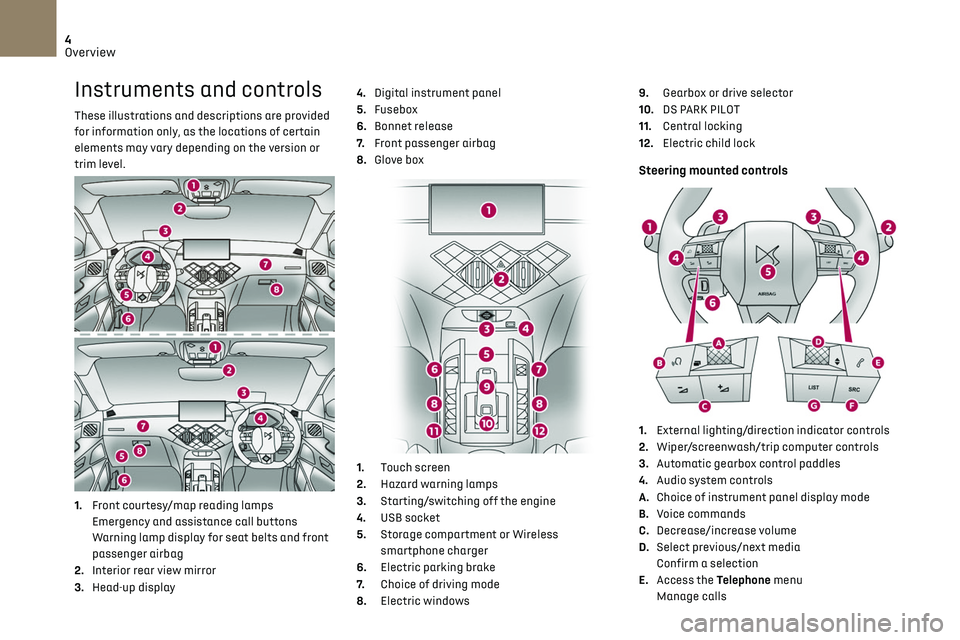
Instruments and controls
These illustrations and descriptions are provided
for information only, as the locations of certain
elements may vary depending on the version or
trim level.
1.Front courtesy/map reading lamps
Emergency and assistance call buttons
Warning lamp display for seat belts and front
passenger airbag
2. Interior rear view mirror
3. Head-up display 4.
Digital instrument panel
5. Fusebox
6. Bonnet release
7. Front passenger airbag
8. Glove box
1. Touch screen
2. Hazard warning lamps
3. Starting/switching off the engine
4. USB socket
5. Storage compartment or Wireless
smartphone charger
6. Electric parking brake
7. Choice of driving mode
8. Electric windows 9.
Gearbox or drive selector
10. DS PARK PILOT
11. Central locking
12. Electric child lock
Steering mounted controls
1.External lighting/direction indicator controls
2. Wiper/screenwash/trip computer controls
3. Automatic gearbox control paddles
4. Audio system controls
A. Choice of instrument panel display mode
B. Voice commands
C. Decrease/increase volume
D. Select previous/next media
Confirm a selection
E. Access the Telephone menu
Manage calls
Page 7 of 244
5
Overview
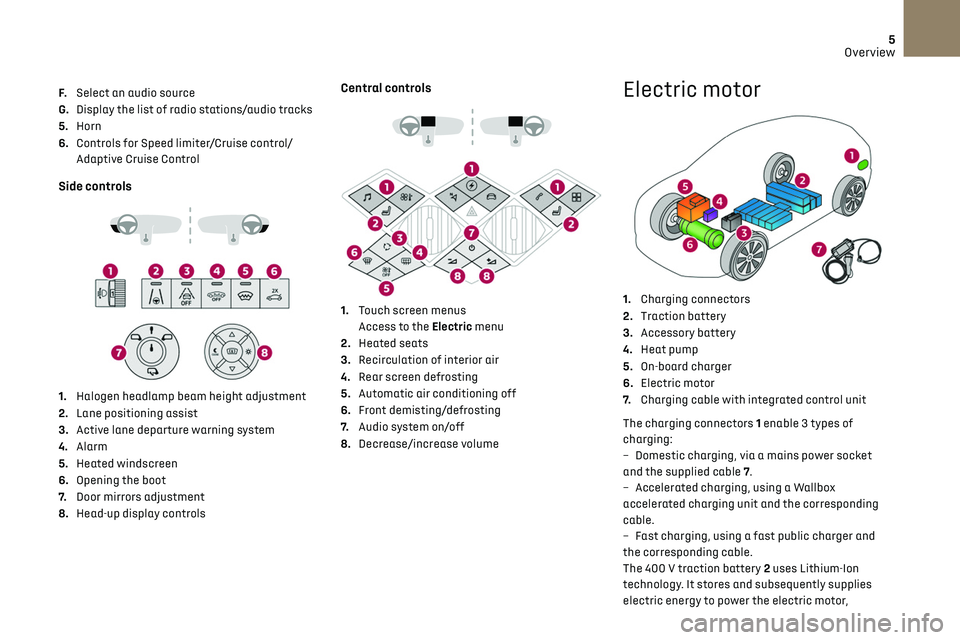
F. Select an audio source
G. Display the list of radio stations/audio tracks
5. Horn
6. Controls for Speed limiter/Cruise control/
Adaptive Cruise Control
Side controls
1. Halogen headlamp beam height adjustment
2. Lane positioning assist
3. Active lane departure warning system
4. Alarm
5. Heated windscreen
6. Opening the boot
7. Door mirrors adjustment
8. Head-up display controls
Central controls
1. Touch screen menus
Access to the Electric menu
2. Heated seats
3. Recirculation of interior air
4. Rear screen defrosting
5. Automatic air conditioning off
6. Front demisting/defrosting
7. Audio system on/off
8. Decrease/increase volume
Electric motor
1.Charging connectors
2. Traction battery
3. Accessory battery
4. Heat pump
5. On-board charger
6. Electric motor
7. Charging cable with integrated control unit
The charging connectors 1 enable 3 types of
charging:
–
Dome
stic charging, via a mains power socket
and the supplied cable 7.
–
Ac
celerated charging, using a Wallbox
accelerated charging unit and the corresponding
cable.
–
Fast charging, using a fast public charger and
the c
orresponding cable.
The 400 V traction battery 2 uses Lithium-Ion
technology. It stores and subsequently supplies
electric energy to power the electric motor,
Page 30 of 244
28
Access02
Unlocking the vehicle
Selective unlocking (driver’s door, boot) is
configured in the Driving/Vehicle touch
screen menu.
Selective unlocking is deactivated by default.
Complete unlocking
The vehicle (doors and boot) unlocks:
► either automatically when the driver is
approaching (zone C), if the automatic functions
are activated;
► or by a light press on a handle.
The unlocking, and the deactivation of the
alarm depending on version, is confirmed by
flashing of the direction indicators and lighting of
the daytime running lamps.
The vehicle door handles, and depending on
version, the door mirrors, unfold.
If the key remains in zone B for more than
15 minutes without any action on the
vehicle doors, the automatic functions are
An access (door or boot) that is not
properly closed prevents locking of the
vehicle. However, if the vehicle has an alarm, it
will be activated after 45 seconds.
If the vehicle is unlocked and there is no
action at the doors or boot, the vehicle will
automatically lock itself again after about
30 seconds. If the vehicle has an alarm, it will
also be reactivated automatically.
Deadlocking
► Press the locking button again within
3 seconds to deadlock the vehicle (confirmed by
the temporary lighting of the direction indicators).
Deadlocking renders the interior door
controls inoperative. It also deactivates
the central locking button.
The horn remains operational.
Never leave anyone inside the vehicle when it
is deadlocked.
Closing the windows
Holding the locking button pressed for
more than 3 seconds closes the windows.
When closing the windows, ensure that
no person or object could prevent their
correct closure.
To leave the windows partly open on versions
with alarm, you must first deactivate the
interior volumetric alarm protection.
For more information on the Alarm, refer to the
corresponding section.
Locating the vehicle
This function helps you to spot your vehicle from a
distance, with the vehicle locked:
–
The direction indic
ators flash for approximately
10 seconds.
–
The door mirror spo
tlamps come on.
–
The c
ourtesy lamps come on.
► Press this button.
Proximity Keyless Entry
and Start
This Keyless Entry and Starting system enables
automatic vehicle locking/unlocking simply by
detection of the electronic key.
As long as the driver has the electronic key on
their person, the vehicle unlocks as they approach
and locks when they walk away.
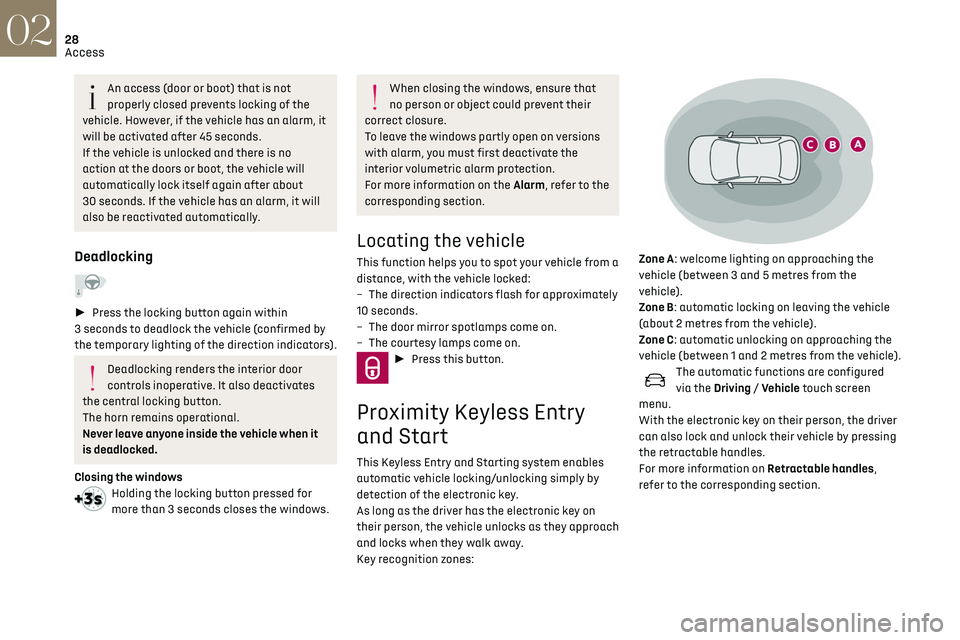
Key recognition zones:
Zone A: welcome lighting on approaching the
vehicle (between 3 and 5 metres from the
vehicle).
Zone B: automatic locking on leaving the vehicle
(about 2 metres from the vehicle).
Zone C: automatic unlocking on approaching the
vehicle (between 1 and 2 metres from the vehicle).
The automatic functions are configured
via the Driving / Vehicle touch screen
menu.
With the electronic key on their person, the driver
can also lock and unlock their vehicle by pressing
the retractable handles.
For more information on Retractable handles,
refer to the corresponding section.
Page 32 of 244
30
Access02
Manual
► Press this button to lock/unlock the vehicle
(doors and boot) from inside the vehicle.
The indicator lamp comes on to confirm central
locking of the vehicle.
The central locking does not take place if
one of the doors is open.
To unfold the exterior handles, press the
button once when the vehicle is locked or
twice when it is unlocked.
When locking / deadlocking from the
outside
When the vehicle is locked or deadlocked from
the outside, the indicator lamp flashes and the
button is inoperative.
► After normal locking, pull one of the interior
door controls to unlock the vehicle.
► After deadlocking, it is necessary to use
the remote control, the “Keyless Entry and
Starting” system or the integral key to unlock
the vehicle.
Deadlocking
► Press one of the front handles lightly to lock
the vehicle.
► Press it again within 3 seconds to deadlock
the vehicle (confirmed by the temporary lighting
of the direction indicators).
If the vehicle is unlocked with the handles
retracted, a first press on one of the front
handles unfolds the handle. The vehicle
remains unlocked.
Press the handle again to lock it.
Deadlocking renders the interior door
controls inoperative. It also deactivates
the central locking button.
The horn remains operational.
Never leave anyone inside the vehicle when it
is deadlocked.
If one of the doors or the boot is still open
or if the electronic key for the Keyless
Entry and Starting s ystem has been left inside
the vehicle, central locking will be disabled.
If the vehicle is unlocked but the doors or
boot are not subsequently opened, the
vehicle will automatically lock itself again
after about 30 seconds. If the vehicle is fitted
with an alarm, it will also be reactivated
automatically.
The automatic door mirror folding/
unfolding function is configured via the
touch screen’s Driving / Vehicle menu.
As a safety measure, never leave the
vehicle, even for a short time, without
taking the Keyless Entry and Starting system’s
electronic key with you.
Be aware of the risk of theft of the vehicle if
the key is present in one of the defined areas
while the vehicle is unlocked.
In order to preserve the battery in the
electronic key and the vehicle's battery:
–
The unlocking on approach function (z
one C)
automatically goes into standby after several
days of non-use (approximately one week). To
unlock the vehicle, use the remote control or
press on one of the front door handles. At the
next vehicle start, the automatic unlocking
and locking functions will be reactivated.
– After the welcome lighting is triggered
several times in succession without starting
the vehicle, it will be deactivated.
–
All o
f the "hands-free" functions go into
extended stand-by after 21 days of non-use.
To restore these functions, unlock the vehicle
using the remote control and start the engine.
Electrical interference
The electronic key may not operate if
close to certain electronic devices: telephone
(switched on or on standby), laptop computer,
strong magnetic fields, etc.
DS SMART ACCESS
After activation by the customer, this function
makes it possible, via the MyDS application, to
access the vehicle, to start it and to delegate its
use to people of their choice.
For more information on DS SMART ACCESS and
its activation, install the MyDS application and
refer to the corresponding section.
Central locking
Page 40 of 244
38
Ease of use and comfort03
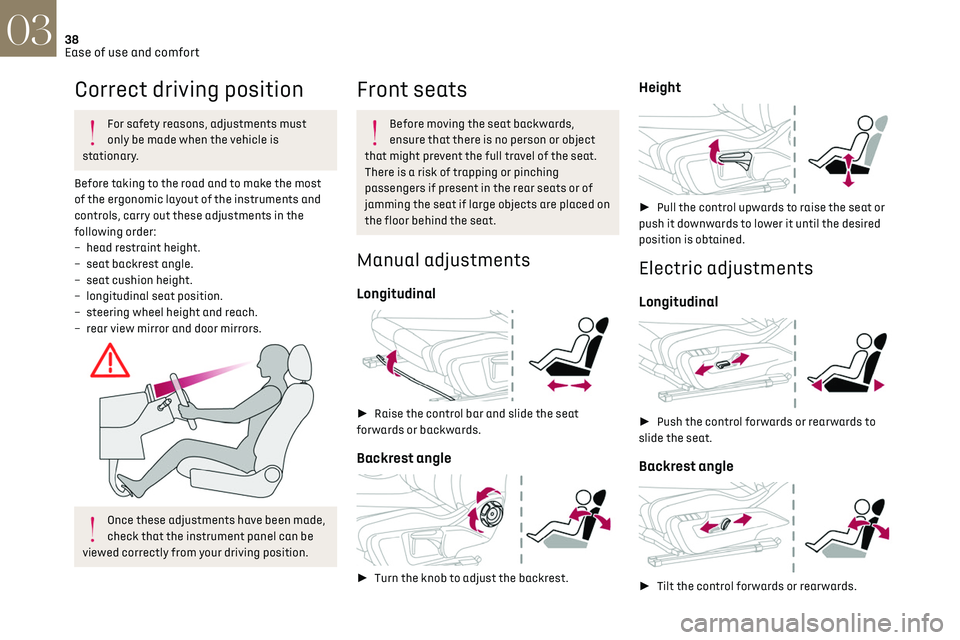
Correct driving position
For safety reasons, adjustments must
only be made when the vehicle is
stationary.
Before taking to the road and to make the most
of the ergonomic layout of the instruments and
controls, carry out these adjustments in the
following order:
–
head re
straint height.
–
sea
t backrest angle.
–
sea
t cushion height.
–
longit
udinal seat position.
–
st
eering wheel height and reach.
–
rear vie
w mirror and door mirrors.
Once these adjustments have been made,
check that the instrument panel can be
viewed correctly from your driving position.
Front seats
Before moving the seat backwards,
ensure that there is no person or object
that might prevent the full travel of the seat.
There is a risk of trapping or pinching
passengers if present in the rear seats or of
jamming the seat if large objects are placed on
the floor behind the seat.
Manual adjustments
Longitudinal
► Raise the control bar and slide the seat
forwards or backwards.
Backrest angle
► Turn the knob to adjust the backrest.
Height
► Pull the control upwards to raise the seat or
push it downwards to lower it until the desired
position is obtained.
Electric adjustments
Longitudinal
► Push the control forwards or rearwards to
slide the seat.
Backrest angle
► Tilt the control forwards or rearwards.
Cushion height and angle
► Tilt the rear of the control upwards or
downwards to obtain the required height and
angle.
Front head restraints
Height adjustment
► Upward: pull the head restraint up to the
desired position; the head restraint can be felt to
click into position.
► Downward: press lug A to lower the head
restraint.
Page 51 of 244
49Ease of use and comfort03
7.Central armrest with USB port and 12 V
accessory socket (depending on version)
8. Storage compartment below the steering
wheel
Sun visor
► With the ignition on, raise the concealing flap;
the mirror is illuminated automatically.
This sun visor is also equipped with a ticket
holder.
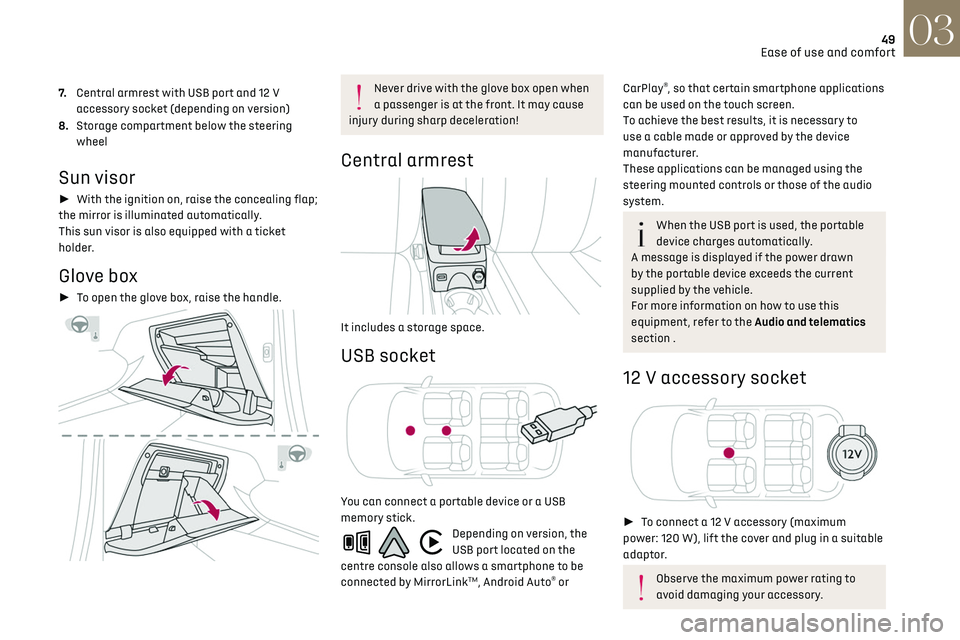
Glove box
► To open the glove box, raise the handle.
Never drive with the glove box open when
a passenger is at the front. It may cause
injury during sharp deceleration!
Central armrest
It includes a storage space.
USB socket
You can connect a portable device or a USB
memory stick.
Depending on version, the
USB port located on the
centre console also allows a smartphone to be
connected by MirrorLink
TM, Android Auto® or
CarPlay®, so that certain smartphone applications
can be used on the touch screen.
To achieve the best results, it is necessary to
use a cable made or approved by the device
manufacturer.
These applications can be managed using the
steering mounted controls or those of the audio
system.
When the USB port is used, the portable
device charges automatically.
A message is displayed if the power drawn
by the portable device exceeds the current
supplied by the vehicle.
For more information on how to use this
equipment, refer to the Audio and telematics
section .
12 V accessory socket
► To connect a 12 V accessory (maximum
power: 120 W), lift the cover and plug in a suitable
adaptor.
Observe the maximum power rating to
avoid damaging your accessory.
Page 122 of 244
120
Driving06
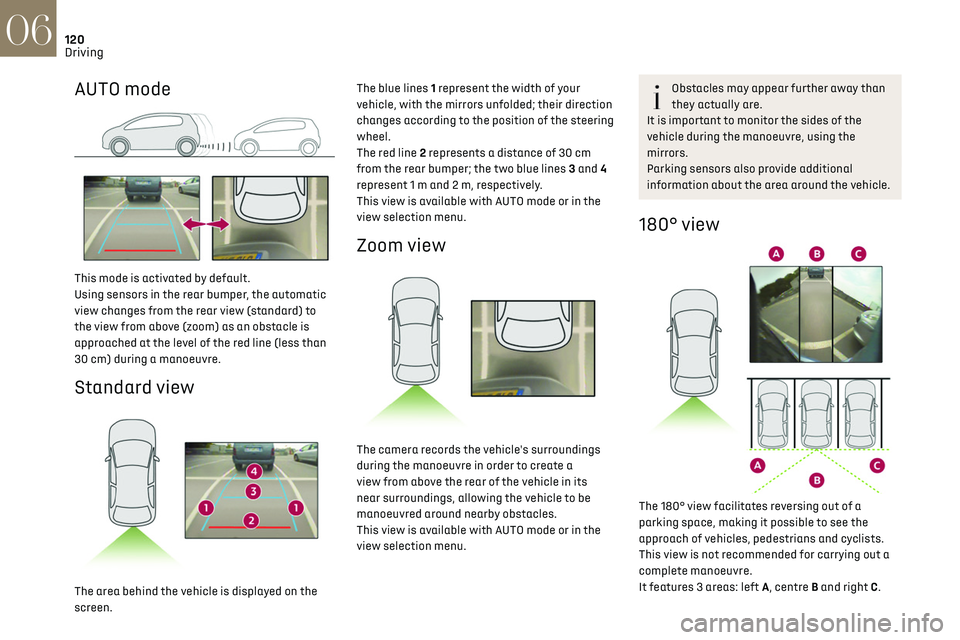
AUTO mode
This mode is activated by default.
Using sensors in the rear bumper, the automatic
view changes from the rear view (standard) to
the view from above (zoom) as an obstacle is
approached at the level of the red line (less than
30 cm) during a manoeuvre.
Standard view
The area behind the vehicle is displayed on the
screen.The blue lines 1 represent the width of your
vehicle, with the mirrors unfolded; their direction
changes according to the position of the steering
wheel.
The red line 2 represents a distance of 30 cm
from the rear bumper; the two blue lines 3 and 4
represent 1 m and 2 m, respectively.
This view is available with AUTO mode or in the
view selection menu.
Zoom view
The camera records the vehicle's surroundings
during the manoeuvre in order to create a
view from above the rear of the vehicle in its
near surroundings, allowing the vehicle to be
manoeuvred around nearby obstacles.
This view is available with AUTO mode or in the
view selection menu.
Obstacles may appear further away than
they actually are.
It is important to monitor the sides of the
vehicle during the manoeuvre, using the
mirrors.
Parking sensors also provide additional
information about the area around the vehicle.
180° view
The 180° view facilitates reversing out of a
parking space, making it possible to see the
approach of vehicles, pedestrians and cyclists.
This view is not recommended for carrying out a
complete manoeuvre.
It features 3 areas: left A, centre B and right C.
This view is only available via the view selection
menu.
Park Assist
Refer to the General recommendations on the use
of driving and manoeuvring aids.
This system provides active parking assistance
for vehicles fitted with a manual gearbox: it
detects a parking space and then steers in
the appropriate direction to park in this space
while the driver controls the driving direction,
engagement of gears, acceleration and braking.
To assist the driver in monitoring the correct
manoeuvring operation, the system automatically
triggers the display of Reversing camera and the
activation of the parking sensors.
The system performs the measurements of
available parking spaces and calculations of
distances to obstacles using ultrasonic sensors
built into the front and rear bumpers of the
vehicle.
The system assists with the following
manoeuvres:
Page 184 of 244
182
DS CONNECT RADIO11
DS CONNECT RADIO
Multimedia audio system
- Applications - Bluetooth
®
telephone
The functions and settings described vary
according to the vehicle version and
configuration.
For safety reasons and because they
require sustained attention by the driver,
the following operations must be carried out
with the vehicle stationary and the ignition on:
–
Pairing the smartphone with the s
ystem in
Bluetooth mode.
–
U
sing the smartphone.
–
Connection t
o the CarPlay
®, MirrorLinkTM
or Android Auto applications (certain
applications interrupt their display while the
vehicle is moving).
– Changing the system settings and
configuration.
The system is protected in such a way
that it will only operate in the vehicle.
The Energy Economy Mode message is
displayed when the system is about to enter
the corresponding mode.
The system’s Open Source Software (OSS)
source codes are available at the
following addresses:
https://www.groupe-psa.com/fr/oss/
https://www.groupe-psa.com/en/oss/
First steps
With the engine running, a press mutes the
sound.
With the ignition off, a press turns the system on.
Increase or decrease the volume using the wheel
or the "plus" or "minus" buttons (depending on
the equipment).
Use the buttons on either side of or below the
touch screen for access to the menus, then press
the virtual buttons in the touch screen.
At all times it is possible to display the rolling
menus by pressing the screen briefly with three
fingers.
All of the touch areas of the screen are white.
For pages with multiple tabs at the bottom of the
screen, it is possible to switch between pages
either by tapping the tab for the desired page, or
by using a finger, sliding the pages to the left or
to the right.
Press in the grey zone to go back up a level or to
confirm.
Press the back arrow to go back a level or confirm.
The touch screen is of the "capacitive"
type.
To clean the screen, use a soft, non-abrasive
cloth (e.g. spectacles cloth) with no additional
product.
Do not use sharp objects on the screen.
Do not touch the screen with wet hands.
Certain information is displayed permanently in
the upper bar of the touch screen:
–
Air c
onditioning status information
(depending on version), and direct access to the
corresponding menu.
–
Radio Media and T
elephone menu status
information.
–
Priv
acy status information.
–
Ac
cess to the touch screen and digital
instrument panel settings.
Audio source selection (depending on equipment):
–
FM/D
AB/AM radio stations (depending on
equipment).
–
T
elephone connected via Bluetooth and
Bluetooth multimedia broadcast (streaming).
–
USB Memory stick.
–
Media pla
yer connected via the auxiliary socket
(depending on equipment).
In the "Settings" menu, it is possible to
create a profile for an individual or for a
group of people with shared interests, and
configure a wide range of settings (radio
presets, audio settings, ambiences, etc.).
Settings are applied automatically.
In very hot conditions, the volume may be
limited to protect the system. It may enter
standby mode (with the screen and sound off)
for 5 minutes or more.
The system will resume normal operation
when the temperature in the passenger
compartment has dropped.
Steering mounted controls
Steering mounted controls -
Type 1
Page 190 of 244
188
DS CONNECT RADIO11
The Bluetooth profile must be activated.
First adjust the volume on the portable device
(to a high level). Then adjust the volume of the
system.
If play does not start automatically, it may be
necessary to start the audio playback from the
smartphone.
Control is from the portable device or by using the
system's touch buttons.
Once connected in Streaming mode, the
smartphone is considered to be a media
source.
Connecting Apple® players
Connect the Apple® player to the USB socket using
a suitable cable (not supplied).
Play starts automatically.
Control is via the audio system.
The classifications available are those of
the portable device connected (artists/
albums/genres/playlists/audio books/
podcasts). It is also possible to use a
classification structured in the form of a
library.
The default classification used is by artist. To
modify the classification used, return to the
first level of the menu then select the desired
classification (playlists for example) and
confirm to go down through the menu to the
desired track.
The version of software in the audio system may
not be compatible with the generation of the
Apple
® player.
Information and advice
The system supports USB mass storage devices,
BlackBerry® devices or Apple® players via the USB
ports. The adapter cable is not supplied.
Devices are managed using the audio system
controls.
Other devices, not recognised on connection,
must be connected to the auxiliary socket using
a jack cable (not supplied) or via Bluetooth
streaming, if compatible.
To protect the system, do not use a USB
hub.
The audio system will only play audio files with
".wav", ".wma", ".aac", ".ogg" and ".mp3" file
extensions, at bit rates between 32 Kbps and 320
Kbps.
It also supports VBR (Variable Bit Rate) mode.
No other file types (".mp4", etc.) can be read.
All ".wma" files must be standard WMA 9 files.
The supported sampling rates are 11, 22, 44 and
48 KHz.
To avoid reading and display problems, we
recommend choosing file names less than 20
characters long that do not contain any special
characters (e.g. “ ? . ; ù).
Use only USB memory sticks in FAT32 format (File
Allocation Table).
We recommend using the original USB
cable for the portable device.
Telephone
USB sockets
Depending on equipment, for more information
on the USB sockets compatible with the CarPlay®,
MirrorLinkTM or Android Auto applications, refer to
the "Ease of use and comfort" section.
The synchronisation of a smartphone
allows users to display applications
adapted to the CarPlay
®, MirrorLinkTM or
Android Auto technology of the smartphone on
the vehicle screen. For the CarPlay
®
technology, the CarPlay® function must be
activated on the smartphone beforehand.
For the communication process between the
smartphone and the system to work, it is
essential in all cases that the smartphone is
unlocked.
As the principles and standards are constantly
changing, it is recommended that you keep the
smartphone's operating system up-to-date, as
well as the date and time of the smartphone
and of the system.
For the list of eligible smartphones, go to the
Brand's national website.
MirrorLinkTM smartphone
connection
The "MirrorLinkTM" function requires a
compatible smartphone and applications.
Telephone not connected by Bluetooth®
When connecting a smartphone to the
system, we recommend enabling
Bluetooth
® on the smartphone.Connect a USB cable. The smartphone
charges when connected by a USB cable.
From the system, press "Telephone" to
display the main page.
Press "MirrorLinkTM" to start the
application in the system.
Depending on the smartphone, it may be
necessary to activate the "MirrorLink
TM" function.During the procedure, several screen
pages relating to certain features are
displayed.
Accept to start and complete the connection.
Telephone connected by Bluetooth®
Connect a USB cable. The smartphone
charges when connected by a USB cable.
From the system, press "Telephone" to
display the main page.
Press the "PHONE" button to display the
secondary page.
Press "MirrorLinkTM" to start the
application in the system.
Page 198 of 244
196
DS CONNECT NAV12
Applications
Run certain applications on a smartphone
connected via CarPlay®, MirrorLinkTM
(available in some countries) or Android Auto.
Check the status of Bluetooth
® and Wi-Fi
connections.
Radio Media
87.5 MHz
Select an audio source or radio station, or
display photographs.
– Telephone connected via Bluetooth and
Bluetooth multimedia broadcast (streaming).
–
USB memory stick.
–
Media pla
yer connected via the auxiliary socket
(depending on equipment).
–
Video (
depending on equipment).
In the "Settings" menu, it is possible to
create a profile for an individual or for a
group of people with shared interests, and
configure a wide range of settings (radio
presets, audio settings, navigation history,
favourite contacts, etc.). Settings are applied
automatically.
In very hot conditions, the volume may be
limited to protect the system. It may enter
standby mode (with the screen and sound off)
for 5 minutes or more.
The system will resume normal operation
when the temperature in the passenger
compartment has dropped.
Steering mounted controls
Voice control:
This control is located on the steering
wheel or at the end of the lighting control stalk
(depending on equipment).
Short press, system voice control.
Long press, voice control for smartphone or
CarPlay
®, MirrorLinkTM (availability depending on
country), Android Auto via the system.
Increase volume.
Decrease volume.
Mute by pressing the volume increase and
decrease buttons simultaneously (depending on
equipment).
Restore the sound by pressing one of the two
volume buttons.
Media (short press): change the
multimedia source.
Telephone (short press): start telephone
call.
Call in progress (short press): access telephone
menu.
Telephone (long press): reject an incoming call,
end call; when no call is in progress, access
telephone menu.
Radio (rotate): automatic search for the
previous / next station.
Media (rotate): previous / next track, move in a
list.
Short press: confirm a selection; if nothing
selected, access to presets.
Radio: display the list of stations.
Media: display the list of tracks.
Radio (press and hold): update the list of stations
received.
Menus
Connected navigation
Enter navigation settings and choose a
destination.
Use real-time services, depending on equipment.