heating Citroen DS3 RHD 2015 1.G Owner's Manual
[x] Cancel search | Manufacturer: CITROEN, Model Year: 2015, Model line: DS3 RHD, Model: Citroen DS3 RHD 2015 1.GPages: 387, PDF Size: 12.26 MB
Page 26 of 387
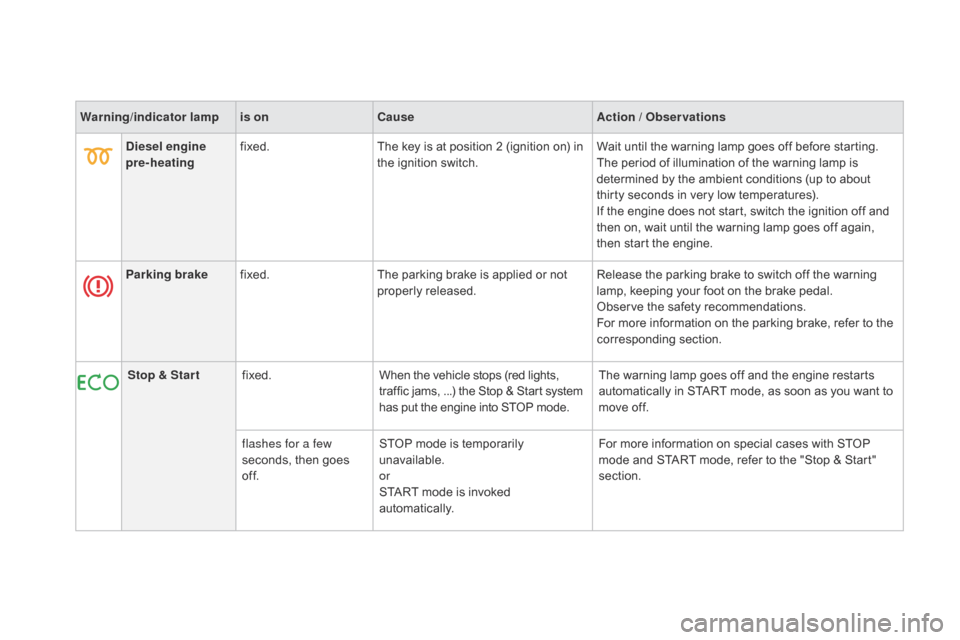
Warning/indicator lampis on Cause Action / Observations
di
esel engine
pre-heating fixed.
The
 key  is  at  position  2  (ignition  on)  in Â
t
he  ignition  switch.Wait
 until  the  warning  lamp  goes  off  before  starting.
The
 period  of  illumination  of  the  warning  lamp  is Â
d
etermined  by  the  ambient  conditions  (up  to  about Â
t
hirty  seconds  in  very  low  temperatures).
If
 the  engine  does  not  start,  switch  the  ignition  off  and Â
t
hen  on,  wait  until  the  warning  lamp  goes  off  again, Â
t
hen  start  the  engine.
Parking brake fixed. The
 parking  brake  is  applied  or  not Â
p
roperly
 r
eleased.Release
 the  parking  brake  to  switch  off  the  warning Â
l
amp,  keeping  your  foot  on  the  brake  pedal.
Observe
 the  safety  recommendations.
For
 more  information  on  the  parking  brake,  refer  to  the Â
c
orresponding
 s
ection.
Stop & Star t fixed. When
 the  vehicle  stops  (red  lights,
 t
raffic  jams,  ...)  the  Stop  &  Start  system
 h
as  put  the  engine  into  STOP  mode.The
 warning  lamp  goes  off  and  the  engine  restarts Â
a
utomatically  in  START  mode,  as  soon  as  you  want  to Â
m
ove  off.
flashes for a few
seconds,
 then  goes Â
o
f f.STOP
 mode  is  temporarily Â
u
navailable.
or
START
 mode  is  invoked Â
au
tomatically.For
 more  information  on  special  cases  with  STOP Â
m
ode  and  START  mode,  refer  to  the  "Stop  &  Start" Â
s
ection.
Page 87 of 387
85
Ventilation
Air intake
The air circulating in the passenger compartment is  filtered  and  originates  either  from  the  outside  via t
he  grille  located  at  the  base  of  the  windscreen  or
 f
rom  the  inside  in  air  recirculation  mode.
Air treatment
The incoming air follows various routes depending  on  the  controls  selected  by  the Â
d
river:
-
Â
d
irect  arrival  in  the  passenger Â
c
ompartment  (air  intake),
-
Â
p
assage  through  a  heating  circuit  (heating),
-
Â
p
assage  through  a  cooling  circuit  (air Â
c
onditioning).
The
 temperature  control  enables  you  to  obtain Â
t
he  level  of  comfort  required  by  mixing  the  air  of Â
t
he  various  circuits.
The
 air  distribution  control  enables  you  to Â
d
iffuse  the  air  in  the  passenger  compartment Â
c
ombining  several  air  vents.
The air flow control enables you to increase or
reduce
 the  speed  of  the  ventilation  blower.
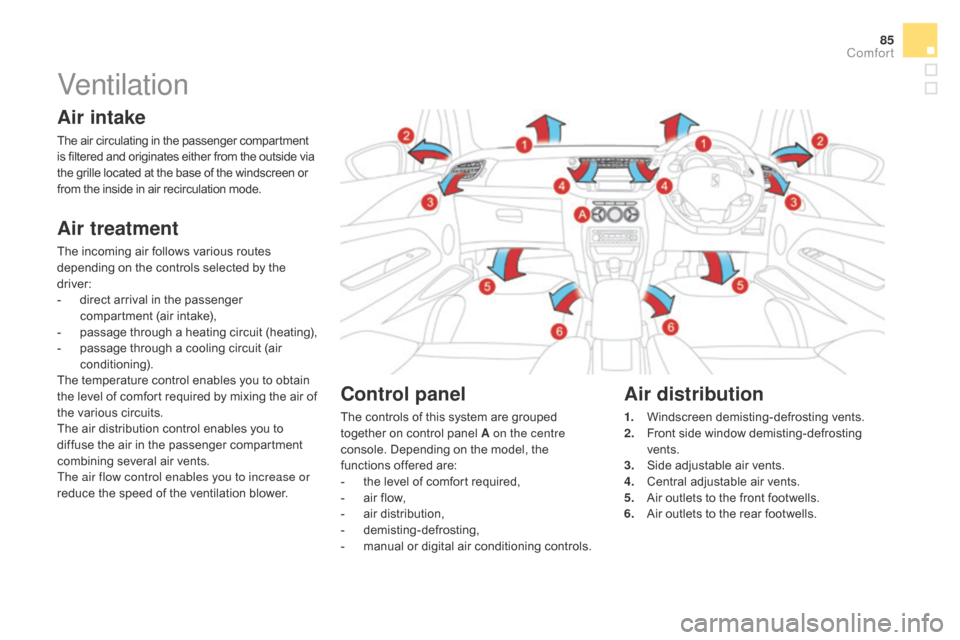
Control panel
The controls of this system are grouped together  on  control  panel  A on the centre
console.
 Depending  on  the  model,  the Â
f
unctions  offered  are:
-
Â
t
he  level  of  comfort  required,
-
Â
a
ir  flow,
-
Â
a
ir  distribution,
-
 d
emisting-defrosting,
-
Â
m
anual  or  digital  air  conditioning  controls.
Air distribution
1. Windscreen demisting-defrosting v ents.
2. F ront  side  window  demisting-defrosting Â
ve
nts.
3.
 S
ide  adjustable  air  vents.
4.
 C
entral  adjustable  air  vents.
5.
 A
ir  outlets  to  the  front  footwells.
6.
 A
ir  outlets  to  the  rear  footwells.
Comfort
Page 89 of 387
87
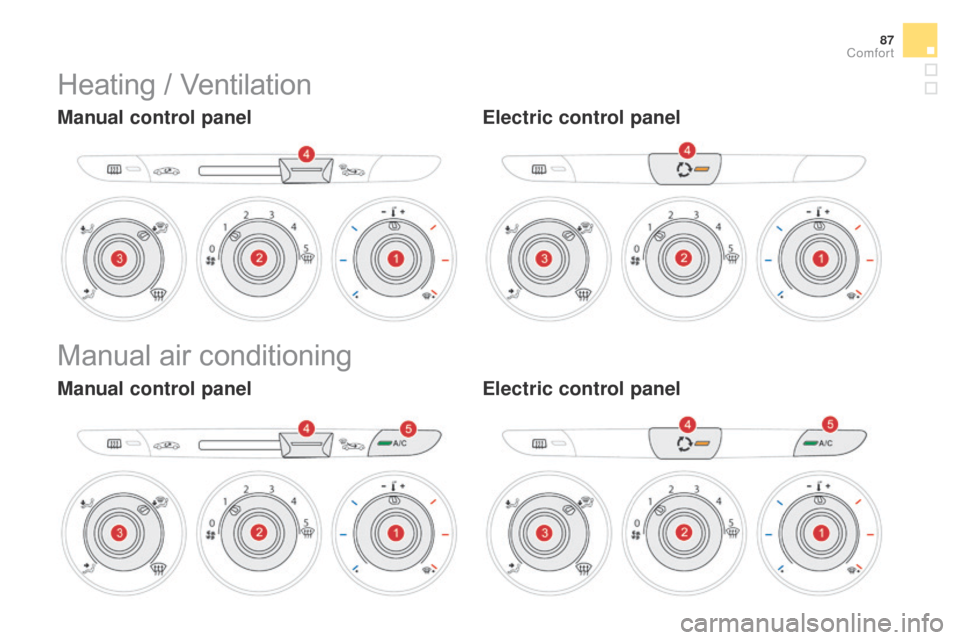
Heating / Ventilation
Manual control panelElectric control panel
Manual air conditioning
Manual control panel Electric control panel
Comfort
Page 90 of 387

The heating / ventilation or air conditioning systems operates with the engine running, as well as in STOP mode with Stop & Start.
1. Temperature adjustment
F Turn the  dial  from  blue  (
cold)  to  red  (hot)  to  adjust Â
t
he  temperature  to  your Â
r
equirements.
2. Air flow adjustment
F Turn  the  dial  from  position  1
to position 5 to obtain a
comfortable
 air  flow.
F
I
f you place the air flow control
in position 0
 (deactivation  of  the Â
s
ystem),  the  temperature  is  no Â
l
onger  maintained  at  a  comfortable Â
l
evel.  However,  a  slight  flow  of  air, Â
d
ue Â
t
o Â
t
he Â
m
ovement Â
o
f Â
t
he Â
v
ehicle, Â
c
an  still  be  felt.
3. Air distribution adjustment
Windscreen and side windows.
W indscreen,  side  windows  and Â
f
ootwells.
Footwells.
Central
 and  side  vents.
The
 air  distribution  can  be Â
a
dapted  by  placing  the  dial Â
i
n  an  intermediate  position.
4. Air intake / Air recirculation
The intake of exterior air avoids the formation of  mist  on  the  windscreen  and  side  windows.
The recirculation of interior air insulates the
passenger
 compartment  from  exterior  odours Â
a
nd  smoke.
Return
 to  exterior  air  intake  as  soon  as  possible Â
t
o  prevent  deterioration  of  the  air  quality  and Â
t
he  formation  of  mist.
Manual control panel F
Â
M
ove  the  manual  control  to Â
t
he  left  to  be  in  the  "recycling Â
i
nterior  air"  position.
F
Â
M
ove  the  manual  control  to  the Â
r
ight  to  return  to  the  "fresh  air Â
i
ntake" Â position.
Page 93 of 387

91
It is possible to adjust one or more functions manually  while  leaving  the  other  functions  in Â
a
utomatic  mode.
The "AUTO"
Â
symbol  switches  off.
To
 return  to  automatic  mode,  press  the  "AUTO"
button.
Manual override
4. Air conditioning on/off
For maximum cooling or heating of the c abin,  it  is  possible  to  go  beyond  the Â
m
inimum  14  or  maximum  28  values.
F
P
ress the blue button 2 until "LO"
is
 displayed  or  the  red  button  2
until
"HI"
Â
is  displayed. Press this button to switch off the air
conditioning.
Stopping
 the  air  conditioning  may  cause
 s
ome  problems  (humidity,  misting).
5. Air intake / Air recirculation
Press this button for recirculation of
the
 interior  air.  The  air  recirculation Â
s
ymbol
 5
 is  displayed.
Avoid
 prolonged  recirculation  of Â
i
nterior  air  (risk  of  condensation  or Â
d
eterioration  of  the  air  quality).
Switching
Â
to
Â
manual
Â
mode
Â
may
Â
not
Â
be
Â
s
uitable
Â
(temperature,
Â
humidity,
Â
odour,
Â
c
ondensation)
Â
and
Â
does
Â
not
Â
provide
Â
o
ptimum
 c
omfort. Automatic
Â
operation
Â
of
Â
the
Â
air
Â
conditioning
Â
is
Â
r
esumed
Â
when
Â
the
Â
button
Â
is
Â
pressed
Â
again.
Â
The
Â
symbol
Â
"A /C "
Â
is
Â
displayed. Air
Â
recirculation  enables  the  passenger Â
c
ompartment  to  be  isolated  from  exterior Â
o
dours
Â
and  smoke.
Press
Â
this
 button  again  or  press  the  "AUTO"
button
Â
to
Â
resume  automatic  management  of Â
t
he
Â
intake
 of  air.  The  air  recirculation  symbol  5
goes
Â
off.
Comfort
Page 95 of 387

93
Front demist - defrost
With the heating /
ventilation system
F Put the  temperature  and  air  flow  controls  to  t
he  dedicated  marked  position.
F
Â
P
ut  the  air  intake  control  to  the  "Exterior  air Â
i
ntake" Â position Â
Â
(
manual  control  to  the  right  or  electric Â
c
ontrol  with  indicator  lamp  off).
F
Â
P
ut  the  air  distribution  control  to  the Â
"
Windscreen"
 p
osition.
These
 markings  on  the  control  panel  indicate  the  control  positions  for  rapid  demisting  or Â
d
efrosting  of  the  windscreen  and  side  windows.
With the manual air
conditioning system
FÂ Put
 the  temperature  and  air  flow  controls  to  t
he  dedicated  marked  position.
F
Â
P
ut  the  air  intake  control  to  the  "Exterior  air Â
i
ntake" Â position Â
Â
(
manual  control  to  the  right  or  electric Â
c
ontrol  with  indicator  lamp  off).
F
Â
P
ut  the  air  distribution  control  to  the Â
"
Windscreen"
 p
osition.
F
Â
S
witch  on  the  air  conditioning  by  pressing Â
t
he "A /C "
Â
button;  the  associated  green Â
w
arning  lamp  comes  on.
With
 Stop  &  Start,  when  the  demisting, Â
a
ir  conditioning  and  air  flow  functions Â
a
re  activated,  STOP  mode  is  not Â
a
vailable.
Comfort
Page 96 of 387

Rear screen demist - defrost
The control button is located on the heating or air conditioning system control panel.
Switching on
The rear screen demisting/defrosting can only operate  when  the  engine  is  running.
F
Â
P
ress  this  button  to  demist /defrost  the Â
r
ear  screen  and  (depending  on  version) Â
t
he  door  mirrors.  The  indicator  lamp Â
a
ssociated  with  the  button  comes  on.
Switching off
The demisting/defrosting switches off automatically  to  prevent  an  excessive Â
c
onsumption  of  current.
F
Â
I
t  is  possible  to  stop  the  demisting/
defrosting
 operation  before  it  is  switched Â
o
ff  automatically  by  pressing  the  button Â
a
gain.  The  indicator  lamp  associated  with Â
t
he  button  switches  off. Switch
 off  the  demisting/defrosting Â
o
f  the  rear  screen  and  door  mirrors Â
a
s  soon  as  appropriate,  as  reducing  e
lectrical  power  consumption  results  in  r
educed f uel c onsumption.
If the engine is switched off before the d
emisting/defrosting  is  switched  off a
utomatically,
 d
emisting/defrosting
 w
ill
 r
esume  next  time  the  engine  is  switched  on.
Scented airÂ
f
reshener
This diffuses a fragrance in the passenger c
ompartment,  by  means  of  the  adjustment  dial Â
a
nd  the  various  fragrance  cartridges  available.
This
 dial  is  located  on  the  dashboard.
It
 allows  you  to  adjust  the  intensity  of  diffusion Â
o
f  the  fragrance.
F
Â
T
urn  the  dial  to  the  right  to  permit  diffusion Â
o
f  the  fragrance.
F
Â
T
urn  the  dial  to  the  left  to  stop  diffusion  of Â
t
he
 f
ragrance.
Adjustment dial
Leave the central vents open.
T he  intensity  of  diffusion  of  the Â
f
ragrance  may  depend  on  the Â
v
entilation  or  air  conditioning  settings.
Page 106 of 387
A few driving recommendations
Observe the driving regulations at all times and remain vigilant whatever the traffic conditions.
P ay  close  attention  to  the  traffic  and  keep  your  hands  on  the  wheel  so  that  you  are  ready  to  react  at Â
a
ny  time  to  any  eventuality.
On
 a  long  journey,  a  break  every  two  hours  is  strongly  recommended.
In
 difficult  weather,  drive  smoothly,  anticipate  the  need  to  brake  and  increase  the  distance  from Â
o
ther
 v
ehicles.
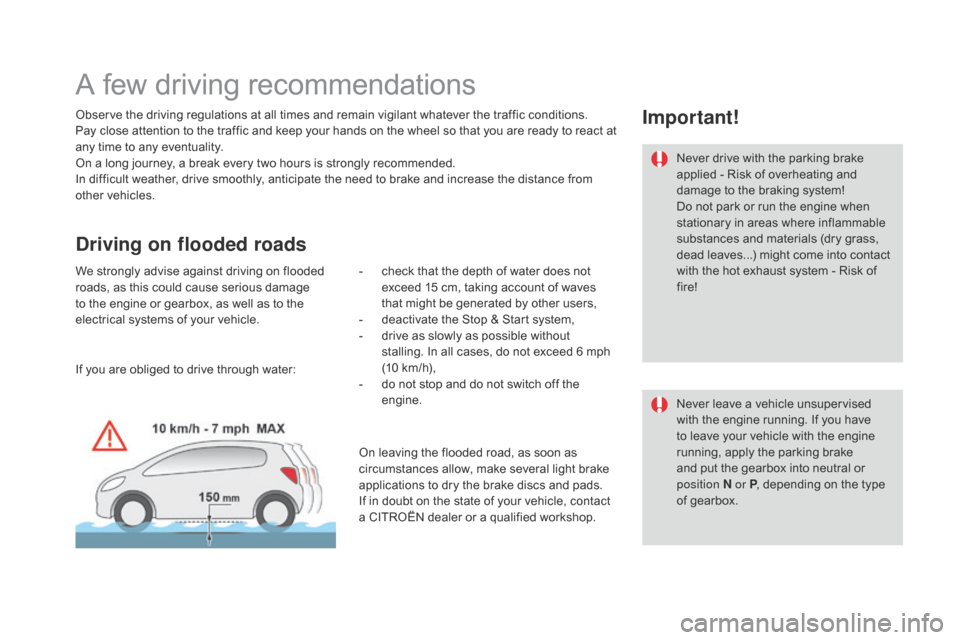
driving on flooded roads
We strongly advise against driving on flooded roads,  as  this  could  cause  serious  damage Â
t
o  the  engine  or  gearbox,  as  well  as  to  the Â
e
lectrical  systems  of  your  vehicle.
Important!
Never drive with the parking brake applied  -  Risk  of  overheating  and Â
d
amage  to  the  braking  system!
Do
 not  park  or  run  the  engine  when Â
s
tationary  in  areas  where  inflammable Â
s
ubstances  and  materials  (dry  grass, Â
d
ead  leaves...)  might  come  into  contact Â
w
ith  the  hot  exhaust  system  -  Risk  of Â
f
ire!
Never
 leave  a  vehicle  unsupervised Â
w
ith  the  engine  running.  If  you  have Â
t
o  leave  your  vehicle  with  the  engine Â
r
unning,  apply  the  parking  brake Â
a
nd  put  the  gearbox  into  neutral  or Â
p
osition
n or P,
 depending  on  the  type Â
o
f  gearbox.
-
Â
c
heck
Â
that
Â
the
Â
depth
Â
of
Â
water
Â
does
Â
not
Â
e
xceed
Â
15
Â
cm,
Â
taking
Â
account
Â
of
Â
waves
Â
t
hat
Â
might
Â
be
Â
generated
Â
by
Â
other
Â
users,
-
Â
d
eactivate
Â
the
Â
Stop
Â
&
Â
Start
Â
system,
-
Â
d
rive
Â
as
Â
slowly
Â
as
Â
possible
Â
without
Â
s
talling.
Â
In
Â
all
Â
cases,
Â
do
Â
not
Â
exceed
Â
6
Â
mph
Â
(
10Â km/h),
-
Â
d
o
Â
not
Â
stop
Â
and
Â
do
Â
not
Â
switch
Â
off
Â
the
Â
e
ngine.
If
Â
you
Â
are
Â
obliged
Â
to
Â
drive
Â
through
Â
water: On
Â
leaving
Â
the
Â
flooded
Â
road,
Â
as
Â
soon
Â
as
Â
c
ircumstances
Â
allow,
Â
make
Â
several
Â
light
Â
brake
Â
a
pplications
Â
to
Â
dry
Â
the
Â
brake
Â
discs
Â
and
Â
pads.
If
Â
in
Â
doubt
Â
on
Â
the
Â
state
Â
of
Â
your
Â
vehicle,
Â
contact
Â
a
Â
CITROĂ‹N
Â
dealer
Â
or
Â
a
Â
qualified
Â
workshop.
Page 108 of 387
F Apply the  parking  brake.
F  W ith  a  manual  gearbox:  place  the  lever  in Â
n
eutral  and  fully  depress  the  clutch  pedal.
F
Â
W
ith  an  electronic  gearbox:  place  the  lever Â
a
t position n and  press  the  brake  pedal Â
f
i r m l y.
F
Â
W
ith  an  automatic  gearbox:  place  the  lever Â
a
t position P  and  press  the  brake  pedal Â
f
i r m l y.
F
Â
I
nsert  the  key  in  the  ignition  switch;  the Â
s
ystem  recognises  the  code.
F
Â
U
nlock  the  steering  column  by Â
s
imultaneously  turning  the  steering  and  the Â
k
ey.
Starting the engine
In some circumstances, you may have to  apply  some  force  to  turn  the  steering Â
w
heel  (wheels  on  lock  for  example).In
 wintry  conditions,  the  warning  lamp Â
w
ill  stay  on  longer.  When  the  engine  is Â
h
ot,  it  does  not  come  on.In  temperate  conditions,  do  not Â
w
arm  the  engine  up  with  the  vehicle Â
s
tationary,  but  move  off  straight  away Â
a
nd  drive  at  moderate  engine  speeds.
If  the  engine  does  not  start  straight  a
way,  switch  the  ignition  off.  Wait  a Â
f
ew  moments  before  trying  again.  If Â
t
he  engine  does  not  start  after  a  few Â
a
ttempts,  do  not  keep  trying:  you  risk Â
d
amaging  the  starter  motor  and  the Â
e
ngine.  Call  on  a  CITROĂ‹N  dealer  or  a Â
q
ualified
 w
orkshop.Never
 leave  the  engine  running  in Â
a
n  enclosed  area  without  adequate Â
v
entilation:
 in
ternal
 c
ombustion
 e
ngines  emit  toxic  exhaust  gases, Â
s
uch  as  carbon  monoxide.  Danger  of Â
i
ntoxication  and  death.  In  very  severe Â
w
inter  conditions  (temperatures  b
elow -23°C),  it  is  necessary  to  allow  t
he  engine  to  run  for  4  minutes  before Â
s
etting  off,  in  order  to  ensure  the Â
c
orrect  operation  and  durability  of Â
t
he  mechanical  components  of  your Â
v
ehicle,  the  engine  and  gearbox.
F
Â
W
ith  a  petrol  engine,  operate  the  starter Â
m
otor  by  turning  the  key  to  position  3 until
the
 engine  starts,  without  pressing  the Â
a
ccelerator  pedal.  Once  the  engine  starts, Â
r
elease  the  key.
F
Â
W
ith  a  Diesel  engine,  turn  the  key  to Â
p
osition 2 ,
 ignition  on,  to  operate  the Â
eng
ine
 p
reheating
 s
ystem. Wait
 until  this  warning  lamp  goes  off
 i
n  the  instrument  panel,  then  operate
 t
he  starter  motor  by  turning  the  key  to
 p
osition
3
Â
until  the  engine  starts,  without
 p
ressing  the  accelerator  pedal.  Once
 t
he  engine  starts,  release  the  key.
Page 237 of 387

235
Towing with the RACIng version
Your vehicle cannot be fitted with a t
owbar.  The  space  occupied  by  the Â
s
port  diffuser  prevents  this.
Side wind
F Take into  account  the  increased  sensitivity  t
o  side  wind.
Cooling
Towing a trailer on a slope increases the temperature  of  the  coolant.
As
 the  fan  is  electrically  controlled,  its  cooling Â
c
apacity  is  not  dependent  on  the  engine  speed.
F
Â
T
o  lower  the  engine  speed,  reduce  your Â
s
peed.
The
 maximum  towed  load  on  a  long  incline Â
d
epends  on  the  gradient  and  the  ambient Â
t
emperature.
In
 all  cases,  keep  a  check  on  the  coolant Â
t
emperature. F
Â
I
f  the  warning  lamp  and  the Â
S
TOP
Â
warning  lamp  come  on, Â
s
top  the  vehicle  and  switch  off Â
t
he  engine  as  soon  as  possible.
Braking
Towing a trailer increases the braking distance.
T o  avoid  overheating  of  the  brakes  on  a  long Â
m
ountain  type  of  descent,  the  use  of  engine Â
b
raking  is  recommended.
Ty r e s
F Check  the  tyre  pressures  of  the  towing  v
ehicle  and  of  the  trailer,  observing  the Â
re
commended
 p
ressures.
Lighting
F Check the  electrical  lighting  and  signalling  o
n  the  trailer.
The
 rear  parking  sensors  will  be Â
d
eactivated  automatically  if  a  genuine Â
C
ITROËN  towbar  is  used.
Practical information