ESP Citroen DS4 2010.5 1.G Owner's Guide
[x] Cancel search | Manufacturer: CITROEN, Model Year: 2010.5, Model line: DS4, Model: Citroen DS4 2010.5 1.GPages: 341, PDF Size: 10.59 MB
Page 195 of 341

219Driving
Parking sensors
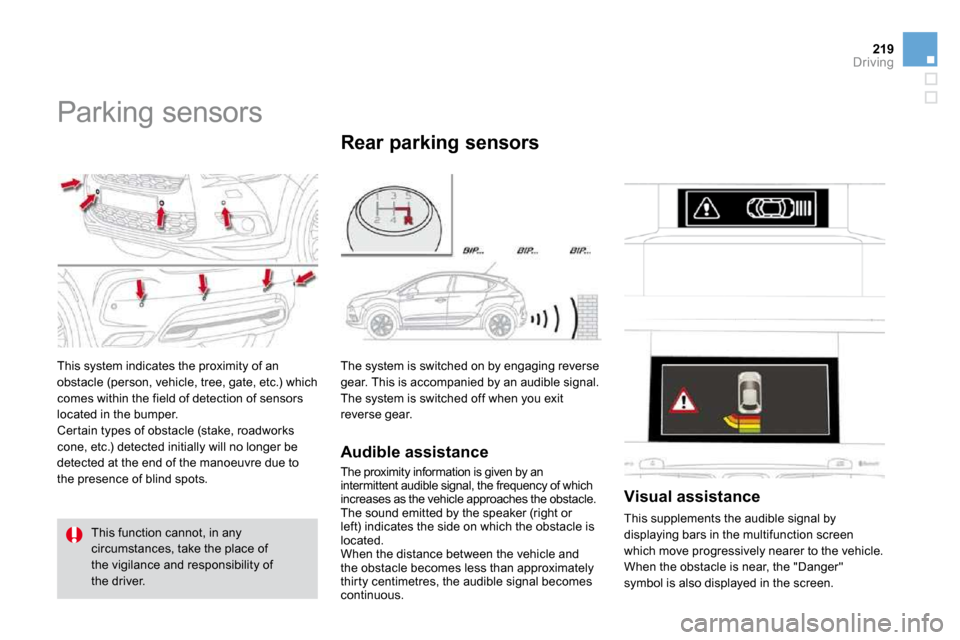
This system indicates the proximity of an obstacle (person, vehicle, tree, gate, etc.) which comes within the field of detection of sensors located in the bumper.
Cer tain types of obstacle (stake, roadworks cone, etc.) detected initially will no longer be detected at the end of the manoeuvre due to
the presence of blind spots.
This function cannot, in any circumstances, take the place of the vigilance and responsibility of the driver.
The system is switched on by engaging reverse gear. This is accompanied by an audible signal. The system is switched off when you exit reverse gear.
Rear parking sensors
Audible assistance
The proximity information is given by an intermittent audible signal, the frequency of which increases as the vehicle approaches the obstacle. The sound emitted by the speaker (right or left) indicates the side on which the obstacle is located. When the distance between the vehicle and the obstacle becomes less than approximately thir ty centimetres, the audible signal becomes continuous.
Visual assistance
This supplements the audible signal by displaying bars in the multifunction screen which move progressively nearer to the vehicle. When the obstacle is near, the "Danger" symbol is also displayed in the screen.
Page 202 of 341

229Checks
Checking levels
Check all of these levels regularly and top them up if necessary, unless other wise indicated. If a level drops significantly, have the corresponding system checked by a CITROËN dealer or a qualified wo rkshop.
Oil level
Engine oil change
Refer to the Maintenance and Warranty Guide for the inter val for this operation.
In order to maintain the reliability of the engine and emission control system, the use of additives in the engine oil is prohibited.
� � �O�i�l� �s�p�e�c�i�fi� �c�a�t�i�o�n�
The oil must correspond to your engine and conform to the manufacturer's recommendations.
Brake fluid level
� � �C�h�a�n�g�i�n�g� �t�h�e� �fl� �u�i�d�
Refer to the Maintenance and Warranty Guide for the inter val for this operation.
� � �F�l�u�i�d� �s�p�e�c�i�fi� �c�a�t�i�o�n�
The brake fluid must conform to the manufacturer's recommendations and meet the DOT4 standard.
The brake fluid level should be close to the "MA X" mark. If it is not, check the brake pad wear.
The reading will only be correct if the vehicle is on level ground and the engine has been off for more than30 minutes. The check is carried out either when the ignition is switched on using the oil level indicator in the instrument panel, or using the dipstick.
When working under the bonnet, take care, as cer tain areas of the engine may be extremely hot (risk of burns).
Page 226 of 341

255Practical information
1. Brake lamps (P21/5W).2. Sidelamps (LEDs).3. Direction indicators (PY21W amber)4. Reversing lamp (P21W).
5. Rear foglamps (P21W).
Rear lamps
Amber bulbs, such as those for the
direction indicators, must be replaced by bulbs of the same rating and colour. The lamps on the tailgate, other than
the guide lamps, are dummy units. They are there for aesthetic purposes only.
Changing stop lamp, reversing lamp and direction indicator bulbs
These three bulbs are changed from inside the boot:
� open the boot, � remove the access grille from the
corresponding side trim panel, � slacken the two nuts using a 10 mm tube
spanner then remove the nuts by hand, � unclip the lamp unit connector, � extract the lamp unit carefully pulling in its middle towards the outside,
� remove the foam seal, � unclip the two small secondary connectors,
� spread the two tabs and remove the bulb holder,
� turn the bulb a quarter of a turn and change it. To reassemble, carry out these operations in reverse order. Take care to engage the lamp unit in its guides, while keeping it in line with the vehicle. Tighten sufficiently to ensure sealing, but without damaging the lamp.
Page 230 of 341

Installing electrical accessories
Your vehicle’s electrical system is designed to operate with standard or optional equipment. Before installing other electrical equipment or accessories on your vehicle, contact a CITROËN dealer or a qualified workshop.
CITROËN will not accept responsibility for the cost incurred in repairing your vehicle or for rectifying malfunctions resulting from the installation of accessories not supplied and not
recommended by CITROËN and not installed in accordance with its instructions, in par ticular when the combined consumption of all of the additional equipment connected exceeds 10 milliamperes.
Before changing a fuse: � the cause of the failure must be identified and rectified, � all electrical consumers must be switched off, � the vehicle must be immobilised with the ignition off, � identify the failed fuse using the tables and layout drawings in the following pages.
Changing a fuse
GoodFailed
The replacement of a fuse not shown in the tables below may cause a serious malfunction of your vehicle. Contact
a CITROËN dealer or a qualified workshop.
Tweezer To replace a fuse, you must: � use the special tweezer to extract the fuse from its housing and check the condition of its filament
� always replace the failed fuse with a fuse of the same rating (same colour); using a different rating could cause faults(risk of fire). If the fuse fails again soon after replacement, have the vehicle’s electrical system checked by
a CITROËN dealer or a qualified workshop.
Page 233 of 341

261Practical information
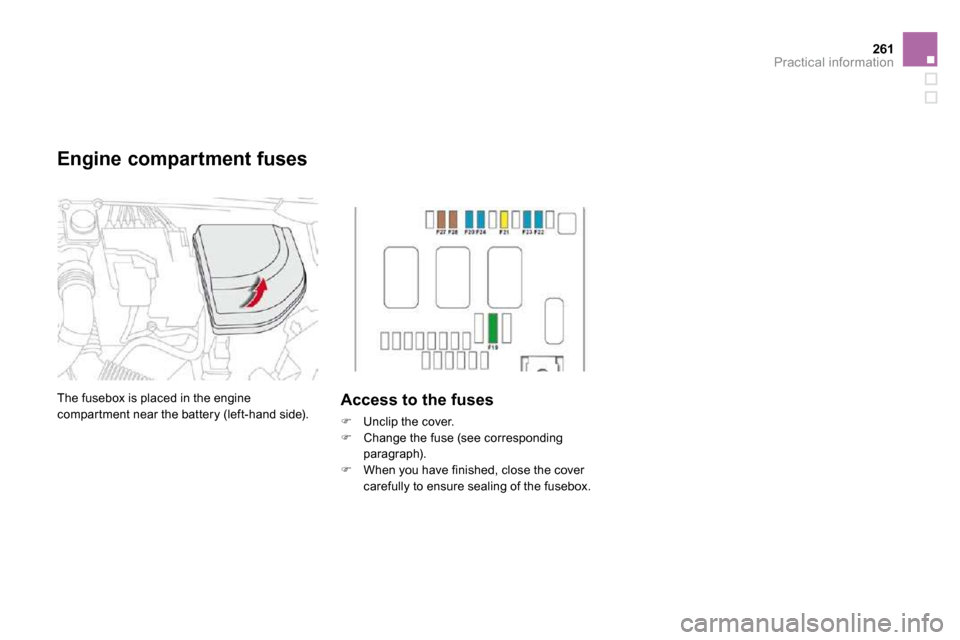
Engine compartment fuses
The fusebox is placed in the engine compar tment near the battery (left-hand side). Access to the fuses
� Unclip the cover. � Change the fuse (see corresponding paragraph). � When you have finished, close the cover carefully to ensure sealing of the fusebox.
Page 237 of 341

265Practical information
Load reduction mode
System which manages the use of cer tain functions according to the level of charge remaining in the battery. When the vehicle is being driven, the load reduction function temporarily deactivates cer tain functions, such as the air conditioning,
the heated rear screen... The deactivated functions are reactivated automatically as soon as conditions permit.
Do not disconnect the terminals while the engine is running. Do not charge the batteries without disconnecting the terminals first. Do not push the vehicle to star t the engine if it is fitted with the 6 -speed electronic gearbox system.
Before disconnecting the battery
Wait 2 minutes after switching off the ignition before disconnecting the battery. Close the windows and the doors before disconnecting the battery.
Following reconnection of the battery
Following reconnection of the battery, switch on the ignition and wait 1 minute before star ting to permit initialisation of the electronic systems. However, if problems are encountered following this operation, contact a CITROËN dealer or a qualified workshop. Referring to the corresponding section, you must yourself reinitialise: - the remote control key, - the GPS satellite navigation system.
Page 238 of 341

265Practical information
Load reduction mode
System which manages the use of cer tain functions according to the level of charge remaining in the battery. When the vehicle is being driven, the load reduction function temporarily deactivates cer tain functions, such as the air conditioning,
the heated rear screen... The deactivated functions are reactivated automatically as soon as conditions permit.
Do not disconnect the terminals while the engine is running. Do not charge the batteries without disconnecting the terminals first. Do not push the vehicle to star t the engine if it is fitted with the 6 -speed electronic gearbox system.
Before disconnecting the battery
Wait 2 minutes after switching off the ignition before disconnecting the battery. Close the windows and the doors before disconnecting the battery.
Following reconnection of the battery
Following reconnection of the battery, switch on the ignition and wait 1 minute before star ting to permit initialisation of the electronic systems. However, if problems are encountered following this operation, contact a CITROËN dealer or a qualified workshop. Referring to the corresponding section, you must yourself reinitialise: - the remote control key, - the GPS satellite navigation system.
Page 239 of 341

Energy economy mode System which manages the period of use of cer tain functions to conser ve a sufficient level of charge in the battery. After the engine has stopped, you can still use func tions such as the audio equipment, windscreen wipers, dipped beam headlamps, cour tesy lamps, etc. for a maximum combined period of thir ty minutes.
This period may be greatly reduced if the battery is not fully charged.
A flat battery prevents the engine from star ting (refer to the corresponding paragraph).
If the telephone is being used at the same time on the navigation system, it will be interrupted after 10 minutes.
Switching to economy mode
Once this period has elapsed, a message
appears in the screen indicating that the vehicle has switched to economy mode and the active functions are put on standby.
Exiting economy mode
These functions are reactivated automatically
the next time the vehicle is driven. � In order to resume the use of these functions immediately, star t the engine and let it run for a few minutes. The time available to you will then be double the period for which the engine is left running. However, this period will always be between five and thir ty minutes.
Page 240 of 341

267Practical information
Changing a wiper blade
Before removing a front
wiper blade
� Within one minute after switching off the ignition, operate the wiper stalk to position the wiper blades ver tically on the windscreen.
Removing
� Raise the corresponding wiper arm. � Unclip the wiper blade and remove it.
Fitting
� Put the corresponding new wiper blade in place and clip it. � Fold down the wiper arm carefully.
After fitting a front wiper
blade
� Switch on the ignition. � Operate the wiper stalk again to park the wiper blades.
Very cold climate screen * Removable protective screen which prevents the accumulation of snow at the radiator cooling fan.
Fitting
� Offer up the very cold climate screen to the front of the lower section of the front bumper. � Press around its edge to engage its fixing clips one by one.
Removal
� Use a screwdriver as a lever to release each fixing clip in turn.
* According to country.
Do not forget to remove the very cold
climate screen: - when the ambient temperature exceeds 10 °C, - when towing, - at speeds above 75 mph (120 km/h).
Page 328 of 341

360
2e
2d
05 USING THE TELEPHONE
� �F�r�o�m� �t�h�e� �c�o�n�t�e�x�t�u�a�l� �m�e�n�u�,� �s�e�l�e�c�t� " DTMF tones� �"� �a�n�d� �c�o�n�fi� �r�m� �t�o� �u�s�e� �t�h�e� �d�i�g�i�t�a�l� �k�e�y�p�a�d� �t�o� �n�a�v�i�g�a�t�e� �i�n� �t�h�e� interactive voice response menu.
� �F�r�o�m� �t�h�e� �c�o�n�t�e�x�t�u�a�l� �m�e�n�u�,� select " Switch " and conform to return to a call left on hold.
Interactive voice response
Consultation call