Stop and start Citroen DS4 2014 1.G Owner's Guide
[x] Cancel search | Manufacturer: CITROEN, Model Year: 2014, Model line: DS4, Model: Citroen DS4 2014 1.GPages: 444, PDF Size: 12.68 MB
Page 217 of 444

215
This system requires a specific battery with a
special specification and technology (reference
numbers available from a CITROËN dealer or a
qualified workshop).
Fitting a battery not listed by CITROËN
introduces the risk of malfunction of the
system.
In the event of a malfunction with the system,
the "ECO OFF" switch warning lamp flashes,
then comes on continuously.
have it checked by a CITROËN dealer or a
qualified workshop.
Operating fault
Maintenance
Before doing anything under the
bonnet, deactivate the Stop & Start
system to avoid any risk of injury
resulting from automatic operation of
START mode.
The Stop & Start system makes use
of advanced technology. All work on
this type of battery must be done only
by a CITROËN dealer or a qualified
workshop.
In the event of a fault in STOP mode, the
vehicle may stall. All of the instrument
panel warning lamps come on.
Depending on version, an alert
message may also be displayed asking
you to put the gear lever into position N
and put your foot on the brake pedal.
It is then necessary to switch off the
ignition, then restart the engine using
the key or the "START/STOP" button.
driving
Page 235 of 444

233
Fuel tankCapacity of the tank: approximately 60 litres.
Low fuel level
When the low fuel level in the
tank is reached, this warning lamp
comes on in the instrument panel,
accompanied by an audible warning
Refuelling
F Press control A until the automatic opening of the fuel flap is heard.
T
his control remains active for a few
minutes after switching off the ignition. If
necessary, switch the ignition on again to
reactivate it.
F
T
ake care to select the pump that delivers
the correct fuel for your vehicle.
With Stop & Start, never refuel with the
system in STOP mode; you must switch
off the ignition with the key, or the
START/STOP button if your vehicle has
Keyless Entry and Starting.
Additions of fuel must be of at least 5 litres to
be registered by the fuel gauge.
Opening the filler cap may result in an inrush of
air. This vacuum is entirely normal and results
from the sealing of the fuel system.
and the display of an alert message. When it
first comes on, around 6 litres of fuel remain
in the tank.
Until sufficient fuel has been added, every
time the ignition is switched on, this warning
lamp appears, accompanied by an audible
signal and an alert message. When driving,
this audible signal and the display of this
alert message are repeated with increasing
frequency, as the level drops towards 0
.
You must refuel as soon as possible to avoid
running out.
If you run out of fuel (Diesel), refer to the
corresponding section.
Checks
Page 240 of 444

Bonnet
Opening
F Open the front left door.
F P ull the interior bonnet release lever A ,
located at the bottom of the door aperture. F
P
ush the exterior safety catch B to the left
and raise the bonnet.
F
U
nclip the stay C from its housing on the
back of the bonnet.
F
F
ix the stay in the notch to hold the bonnet
open.
The location of the interior bonnet
release lever prevents opening of
the bonnet while the front left door is
closed. Do not open the bonnet in high winds.
When the engine is hot, handle the
exterior safety catch and the bonnet
stay with care (risk of burns).
Before doing anything under the bonnet,
switch off the Stop & Start system to
avoid any risk of injury resulting from an
automatic change to START mode.
Closing
F Take the stay out of the support notch.
F
C lip the stay in its housing on the back of
the bonnet.
F
L
ower the bonnet and release it at the end
of its travel.
F
P
ull on the bonnet to check that it is
secured correctly.
The cooling fan may star t after switching
off the engine: take care with ar ticles and
clothing that might be caught by the fan
blades.
Because of the presence of electrical
equipment under the bonnet, it is
recommended that exposure to water
(rain, washing, ...) be limited.
Page 247 of 444

245
Checks
Air filter and passenger compartment filter
Oil filter
Unless other wise indicated, check these components in accordance with the manufacturer's service schedule and according to your engine.
Other wise, have them checked by a CITROËN dealer or a qualified workshop.Refer to the manufacturer's
service schedule for details of the
replacement intervals for these
components.
Replace the oil filter each time the
engine oil is changed.
Refer to the manufacturer's
service schedule for details of
the replacement interval for this
component.
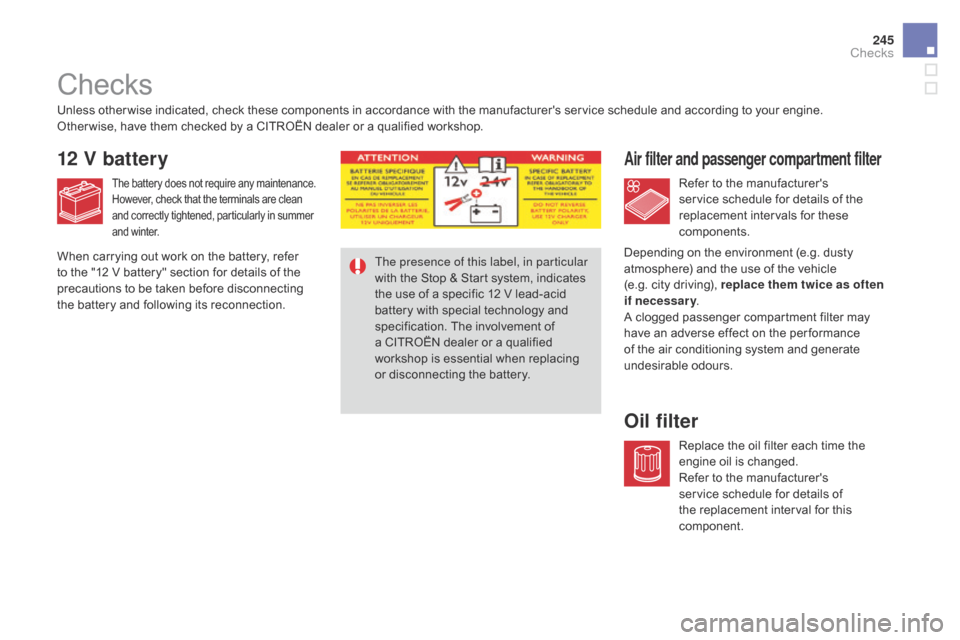
The presence of this label, in particular
with the Stop & Start system, indicates
the use of a specific 12 V lead-acid
battery with special technology and
specification. The involvement of
a CITROËN dealer or a qualified
workshop is essential when replacing
or disconnecting the battery.
12 V battery
When carrying out work on the battery, refer
to the "12 V battery" section for details of the
precautions to be taken before disconnecting
the battery and following its reconnection.
The battery does not require any maintenance.
However, check that the terminals are clean
and correctly tightened, particularly in summer
and winter.
Depending on the environment (e.g. dusty
atmosphere) and the use of the vehicle
(e.g. city driving), replace them twice as often
if necessary
.
A clogged passenger compartment filter may
have an adverse effect on the per formance
of the air conditioning system and generate
undesirable odours.
Checks
Page 258 of 444

Never store bottles of AdBlue® in your
vehicle.
Recommendations on storage
AdBlue® freezes at about -11°C and
deteriorates above 25°C. It is recommended
that bottles be stored in a cool area and
protected from direct sunlight.
Under these conditions, the additive can be
kept for at least a year.
If the additive has frozen, it can be used once it
has completely thawed out. Before topping-up, ensure that the vehicle is
parked on a flat and level sur face.
In wintry conditions, ensure that the
temperature of the vehicle is above -11°C.
Other wise, by freezing, the AdBlue
® cannot
be poured into its tank. Park your vehicle in a
warmer area for a few hours to allow the top-up
to be carried out.
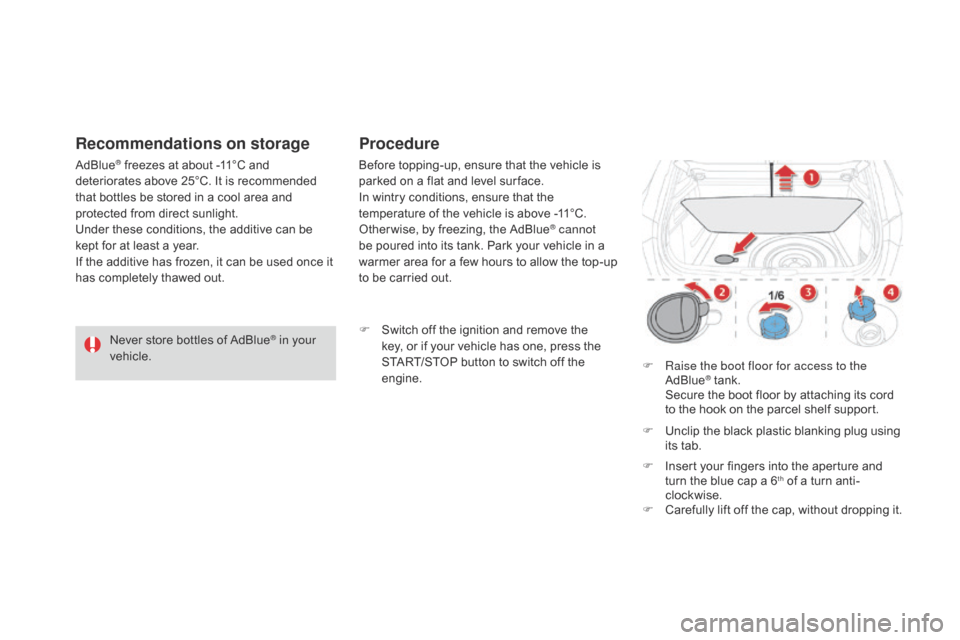
Procedure
F Switch off the ignition and remove the key, or if your vehicle has one, press the
START/STOP button to switch off the
engine. F
R
aise the boot floor for access to the
AdBlue
® tank. S
ecure the boot floor by attaching its cord
to the hook on the parcel shelf support.
F
U
nclip the black plastic blanking plug using
its tab.
F
I
nsert your fingers into the aperture and
turn the blue cap a 6
th of a turn anti-
clockwise.
F
C
arefully lift off the cap, without dropping it.
Page 259 of 444

257
Never dispose of AdBlue® additive
bottles in the household waste. Place
them in a special container provided
this purpose or take them to your
dealer.
Important: if your vehicle's
AdBlue
® tank is completely empty -
w
hich is confirmed by the alert displays
and the impossibility of starting the
engine - you must add at least 3.8 litres
(so two 1.89 litre bottles). If any additive is split or splashed, wash
immediately with cold water or wipe
with a damp cloth.
If the additive has crystallised, clean it
off using a sponge and hot water.
Important:
in the event of a top-
up after a breakdown because of
a lack of additive , you must wait
around 5 minutes before switching
on the ignition, without opening the
driver's door, locking the vehicle,
introducing the key into the ignition
switch, or introducing the key of the
"Keyless Entr y and Star ting" system
into the passenger compartment .
Switch on the ignition, then, after
10 seconds, start the engine.
F
O
btain a bottle of AdBlue
®. After first
checking the use-by date, read carefully
the instructions on use on the label before
pouring the contents of the bottle into your
vehicle's AdBlue
® tank. F
A
fter emptying the bottle, wipe away any
spillage around the tank filler using a damp
cloth.
F
R
efit the blue cap to the tank and turn it a
6
th of a turn clockwise, to its stop.
F
R
efit the black plastic blanking plug,
clipping it in on the flap.
F
D
etach the cord from the parcel shelf
support and lower the boot floor.
Checks
Page 290 of 444

12 V battery
The battery is located under the bonnet.
For access to the (+) terminal:
F
r
elease the bonnet using the interior lever,
then the exterior safety catch,
F
r
aise the bonnet and secure it with its stay,
F
l
ift the plastic cover for access to
the
(+) terminal.
Access to the battery
After refitting the battery, the Stop & Start
system will only be active after a continuous
period of immobilisation of the vehicle,
a period which depends on the climatic
conditions and the state of charge of the
battery (up to about 8 hours).
The presence of this label, in particular
with the Stop & Start system, indicates
the use of a 12 V lead-acid battery with
special technology and specification;
the involvement of a CITROËN dealer
or a qualified workshop is essential
when replacing or disconnecting the
battery.
Procedure for starting the engine using another
battery or charging a discharged battery.
Page 292 of 444

Charging the battery using
a battery charger
F Disconnect the battery from the vehicle.
F F ollow the instructions for use provided by
the manufacturer of the charger.
F
C
onnect the battery starting with the
negative terminal (-).
F
C
heck that the terminals and connectors
are clean. If they are covered with sulphate
(whitish or greenish deposit), remove them
and clean them. With Stop & Start, the battery does not
have to be disconnected for charging.
Reinitialisation after
reconnection
After any reconnection of the battery, switch on
the ignition and wait at least one minute before
starting, to allow time for the initialisation of the
electronic systems.
By referring to the corresponding sections, you
should set or initialise the following systems
yourself:
-
o
ne-touch electric windows,
-
t
ime and date,
-
a
udio and navigation system settings.Check that no alert message or
warning lamp comes on after switching
on the ignition.
However, if minor problems persist
after carrying out these operations,
contact a CITROËN dealer or a
qualified workshop.
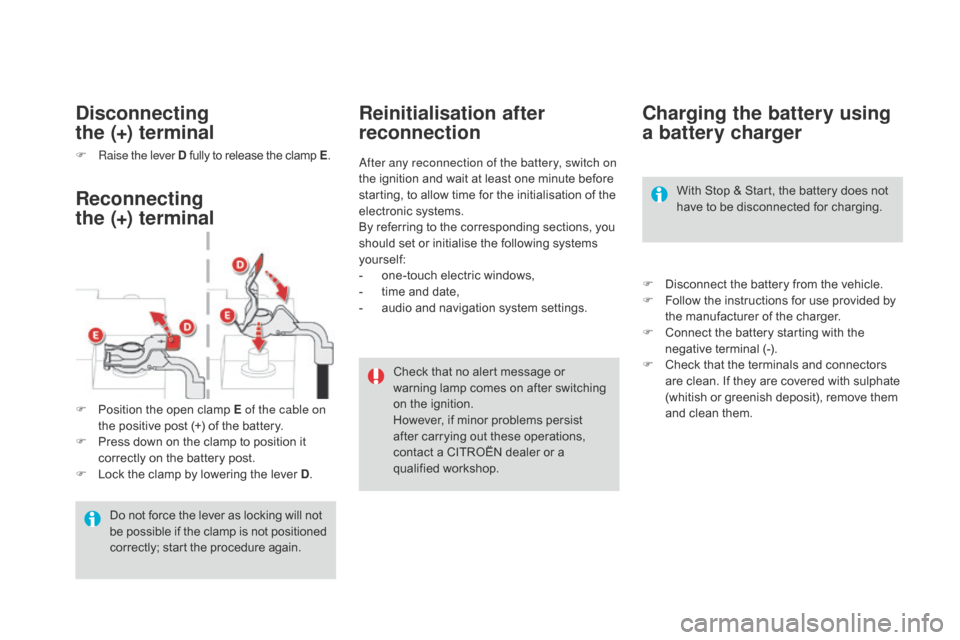
F
P
osition the open clamp E of the cable on
the positive post (+) of the battery.
F
P
ress down on the clamp to position it
correctly on the battery post.
F
L
ock the clamp by lowering the lever
d
.
Reconnecting
the (+) terminal
di
sconnecting
the (+) terminal
F Raise the lever d f ully to release the clamp E .
Do not force the lever as locking will not
be possible if the clamp is not positioned
correctly; start the procedure again.
Page 294 of 444

Energy economy modeSystem which manages the period of use of certain functions to conserve a sufficient level of
charge in the battery.
After the engine has stopped, you can still use functions such as the audio equipment, windscreen
wipers, dipped beam headlamps, courtesy lamps, etc. for a maximum combined period of
thirty
m
inutes.
This period may be greatly reduced if
the battery is not fully charged.
A flat battery prevents the engine from
starting (refer to the corresponding
paragraph).
If the telephone is being used at the
same time on the navigation system,
it will be interrupted after 10 minutes.
Switching to economy mode
Once this period has elapsed, a message
appears in the screen indicating that the
vehicle has switched to economy mode and the
active functions are put on standby.
Exiting economy mode
These functions are reactivated automatically
the next time the vehicle is driven.
F
I
n order to resume the use of these
functions immediately, start the engine and
let it run for a few minutes.
The time available to you will then be double
the period for which the engine is left running.
However, this period will always be between
five and thirty minutes.
Load reduction modeSystem which manages the use of certain
functions according to the level of charge
remaining in the battery.
When the vehicle is being driven, the load
reduction function temporarily deactivates
certain functions, such as the air conditioning,
the heated rear screen...
The deactivated functions are reactivated
automatically as soon as conditions permit.
Page 310 of 444

Petrol engines and gearboxes
Petrol engineV Ti 120PureTech 130 S&S THP 15 0
Gearbox Manual
(5 - speed) Manual
(6- speed) Automatic
(6- speed)
Model code:
NX... 5FS0
5FS0/1 HNYM/S
HNYM/1S
HNYM/2S 5FEA
Cubic capacity (cc) 1 5981 1991 598
Bore x stroke (mm) 77 x 85.875 x 90.577 x 85.8
Max power*: EU standard (kW) 889611 0
Max power engine speed (rpm) 6 0005 5006 050
Max torque: EU standard (Nm) 160230 240
Max torque engine speed (rpm) 4 2501 7501 400
Fuel UnleadedUnleadedUnleaded
Catalytic converter Ye sYe sYe s
Engine oil capacity (in litres) 4.253.54.25
.../S: model fitted with Stop & Start.
.../1: model fitted with low rolling resistance tyres.
.../2: model fitted with very low rolling resistance tyres.
* The maximum power corresponds to the value type-approved on a test bed, under conditions defined in European legislation (Directive 1999/99/EC).