check engine light CITROEN DS4 2023 Owners Manual
[x] Cancel search | Manufacturer: CITROEN, Model Year: 2023, Model line: DS4, Model: CITROEN DS4 2023Pages: 296, PDF Size: 9.91 MB
Page 13 of 296
11
Customisable colour
instrument panel – Type 2
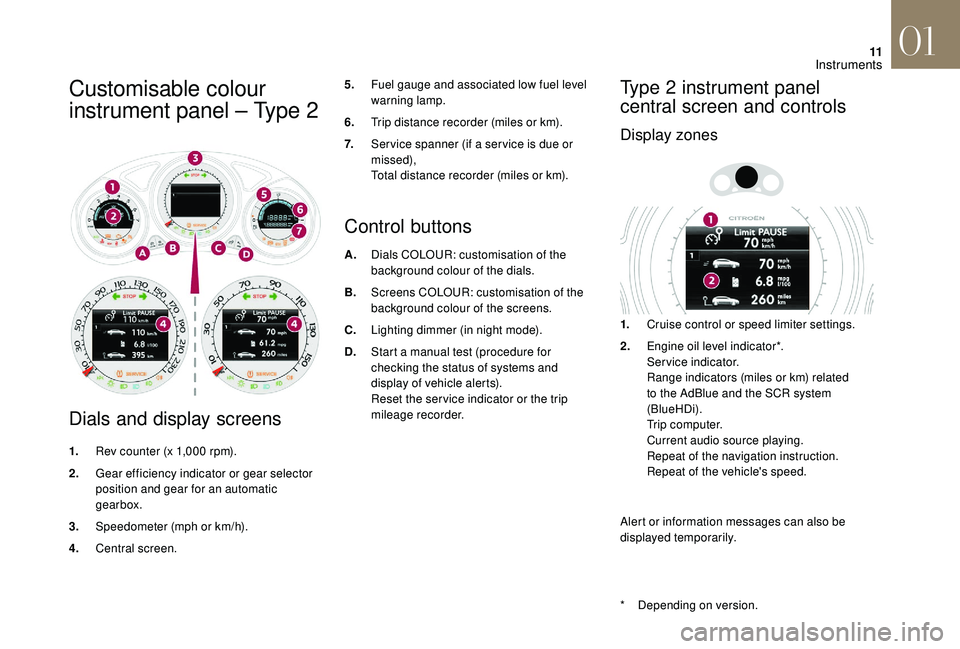
Dials and display screens
1.Rev counter (x 1,000 rpm).
2. Gear efficiency indicator or gear selector
position and gear for an automatic
gearbox.
3. Speedometer (mph or km/h).
4. Central screen.
Control buttons
A.Dials COLOUR: customisation of the
background colour of the dials.
B. Screens COLOUR: customisation of the
background colour of the screens.
C. Lighting dimmer (in night mode).
D. Start a manual test (procedure for
checking the status of systems and
display of vehicle alerts).
Reset the ser vice indicator or the trip
mileage recorder.
Type 2 instrument panel
central screen and controls
Display zones
5.Fuel gauge and associated low fuel level
warning lamp.
6. Trip distance recorder (miles or km).
7. Ser vice spanner (if a ser vice is due or
missed),
Total distance recorder (miles or km).
1.Cruise control or speed limiter settings.
2. Engine oil level indicator*.
Service indicator.
Range indicators (miles or km) related
to the AdBlue and the SCR system
(BlueHDi).
Trip computer.
Current audio source playing.
Repeat of the navigation instruction.
Repeat of the vehicle's speed.
Alert or information messages can also be
displayed temporarily.
*
D
epending on version.
01
Instruments
Page 26 of 296
24
Warning/indicator lampStateCause Action/Observations
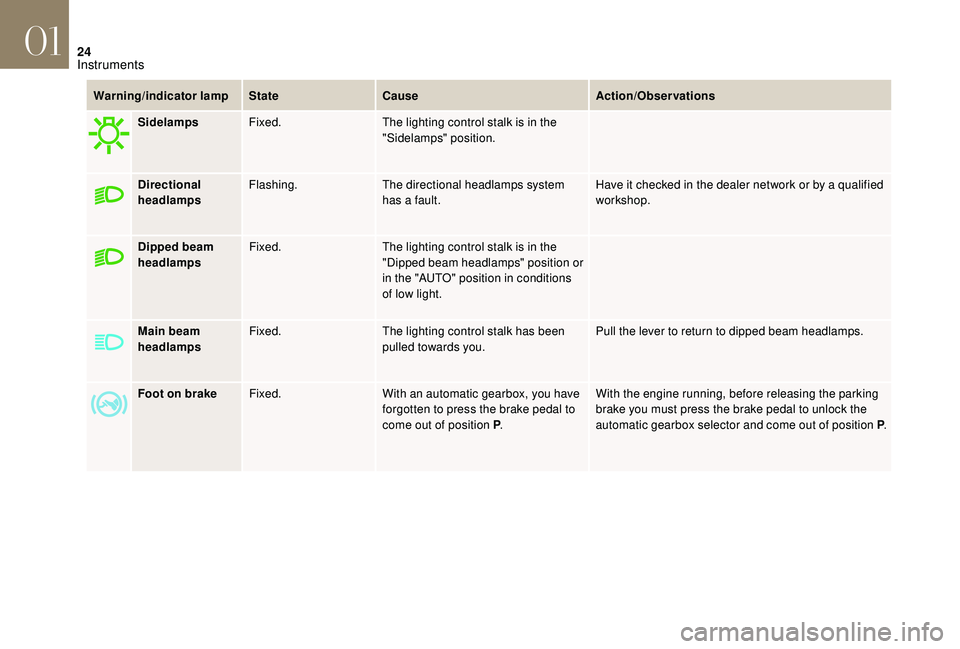
Sidelamps Fixed. The lighting control stalk is in the
"Sidelamps" position.
Directional
headlamps Flashing.
The directional headlamps system
has a fault. Have it checked in the dealer network or by a qualified
workshop.
Dipped beam
headlamps Fixed.
The lighting control stalk is in the
"Dipped beam headlamps" position or
in the "AUTO" position in conditions
of low light.
Main beam
headlamps Fixed.
The lighting control stalk has been
pulled towards you. Pull the lever to return to dipped beam headlamps.
Foot on brake Fixed. With an automatic gearbox, you have
forgotten to press the brake pedal to
come out of position P.With the engine running, before releasing the parking
brake you must press the brake pedal to unlock the
automatic gearbox selector and come out of position
P.
01
Instruments
Page 38 of 296
36
Manual test in the type 2
instrument panel central screen
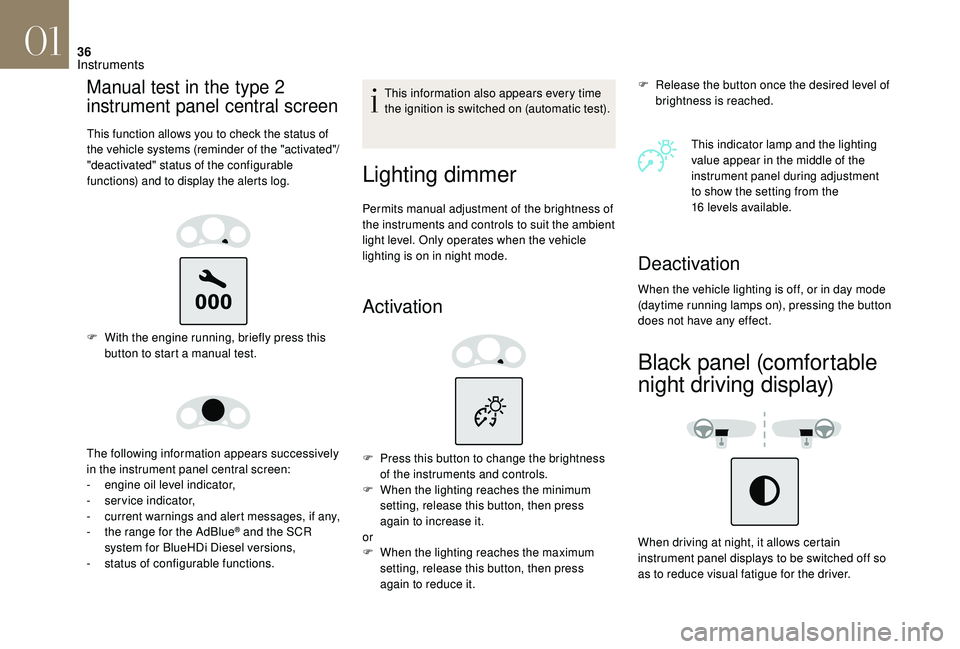
This function allows you to check the status of
the vehicle systems (reminder of the "activated"/
"deactivated" status of the configurable
functions) and to display the alerts log.
F With the engine running, briefly press this button to start a manual test.
The following information appears successively
in the instrument panel central screen:
-
e
ngine oil level indicator,
-
ser
vice indicator,
-
c
urrent warnings and alert messages, if any,
-
t
he range for the AdBlue
® and the SCR
system for BlueHDi Diesel versions,
-
s
tatus of configurable functions. This information also appears every time
the ignition is switched on (automatic test).
Lighting dimmer
Permits manual adjustment of the brightness of
the instruments and controls to suit the ambient
light level. Only operates when the vehicle
lighting is on in night mode.
Activation
F Release the button once the desired level of
brightness is reached.
This indicator lamp and the lighting
value appear in the middle of the
instrument panel during adjustment
to show the setting from the
16
levels available.
F
P
ress this button to change the brightness
of the instruments and controls.
F
W
hen the lighting reaches the minimum
setting, release this button, then press
again to increase it.
or
F
W
hen the lighting reaches the maximum
setting, release this button, then press
again to reduce it.
Deactivation
When the vehicle lighting is off, or in day mode
(daytime running lamps on), pressing the button
does not have any effect.
Black panel (comfortable
night driving display)
When driving at night, it allows certain
instrument panel displays to be switched off so
as to reduce visual fatigue for the driver.
01
Instruments
Page 102 of 296

100
Malfunction
If a fault occurs with the automatic rain sensitive
wipers, the wipers will operate in intermittent mode.
Contact the dealer network or a qualified workshop.
Do not cover the rain sensor, linked with
the sunshine sensor and located in the top
centre of the windscreen, behind the rear
view mirror.
When using an automatic car wash, switch
off the automatic rain sensitive wipers.
In winter, it is advisable to wait until the
windscreen is completely clear of ice before
activating the automatic rain sensitive wipers.
Windscreen and headlamp
wash
Front screenwashHeadlamp wash
To reduce the fluid consumption of the
headlamp wash, it operates only with
every seventh use of the screenwash or
every 25 miles (40 km) during a given
j o u r n ey.
Low screenwash/headlamp wash
fluid
level
Checking and topping up this fluid should be
done with the engine off.
The fluid level should be checked
regularly, particularly during winter.
For more information on Checking levels and,
in particular, the screenwash/headlamp wash,
refer to the corresponding section.
Special position of the
windscreen wipers
This position permits release of the windscreen
wiper blades.
It is used for cleaning or replacement of the
wiper blades. It can also be useful, in winter, to
release the wiper blades from the windscreen.
F
P
ull the windscreen wash control towards
you. The windscreen wash and then the
wipers come on for a preset time.
They operate by themselves when the dipped
and main beam headlamps are off or when the
vehicle is stationary. Associated with the screenwash, the headlamp
wash operates when the vehicle is moving and
the dipped or main beam headlamps are on
.
On vehicles fitted with headlamp washers, the
low level of this fluid is indicated by a gauge
located in the reser voir filler neck under the
bonnet. F
I
n the minute following ignition switch-off,
any operation of the wiper control stalk will
position the wiper blades vertically.
04
Lighting and visibility
Page 111 of 296
109
If these warning lamps come on,
accompanied by an audible signal
and a message, this indicates a
fault with the electronic brake force
distribution (EBFD).
When changing wheels (tyres and rims),
make sure that these are approved for
your vehicle.
Normal operation of the ABS system may
be indicated by slight vibration felt at the
brake pedal.
In case of emergency braking, press
ver y hard without releasing the
pressure at all.
After an impact, have these systems
checked in the dealer network or by a
qualified workshop.Anti-slip regulation (ASR)/
Dynamic stability control
(DSC)
Operation
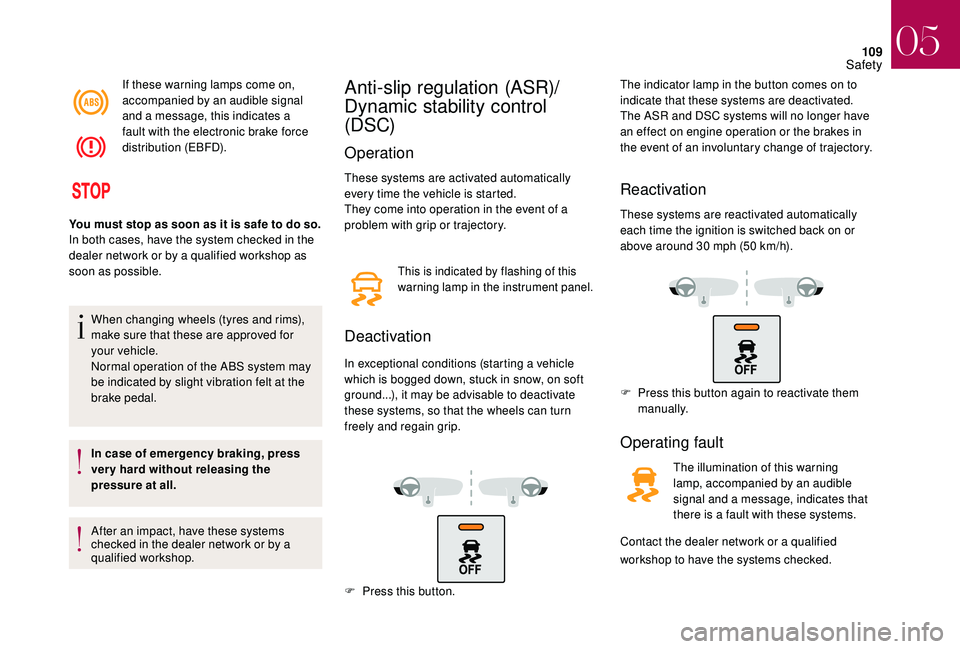
These systems are activated automatically
every time the vehicle is started.
They come into operation in the event of a
problem with grip or trajectory.
Deactivation
In exceptional conditions (starting a vehicle
which is bogged down, stuck in snow, on soft
ground...), it may be advisable to deactivate
these systems, so that the wheels can turn
freely and regain grip. The indicator lamp in the button comes on to
indicate that these systems are deactivated.
The ASR and DSC systems will no longer have
an effect on engine operation or the brakes in
the event of an involuntary change of trajectory.
Reactivation
These systems are reactivated automatically
each time the ignition is switched back on or
above around 30 mph (50 km/h).
F
P
ress this button again to reactivate them
manually.
Operating fault
The illumination of this warning
lamp, accompanied by an audible
signal and a message, indicates that
there is a fault with these systems.
Contact the dealer network or a qualified
You must stop as soon as it is safe to do so.
In both cases, have the system checked in the
dealer network or by a qualified workshop as
soon as possible.
This is indicated by flashing of this
warning lamp in the instrument panel.
workshop to have the systems checked.
F
P
ress this button.
05
Safety
Page 135 of 296
133
In case of towing
Driving with a trailer places greater
demands on the towing vehicle and
requires extra care from the driver.
Distribution of loads
F Distribute the load in the trailer so that the heaviest items are as close as possible to
the axle and the nose weight approaches
the maximum permitted without exceeding
it.
Air density decreases with altitude, thus
reducing engine performance. The maximum
towed load must be reduced by 10% for every
1,000 metres of altitude.
For more information on the Technical
data of your vehicle and particularly on
towable loads, refer to the corresponding
section.
If the exterior temperature is high, it is
recommended that the engine be allowed
to idle for 1 to 2 minutes after the vehicle
comes to a stop, to facilitate its cooling.
Side wind
F Take into account the increased sensitivity to wind.
Cooling
Towing a trailer on a slope increases the
temperature of the coolant.
As the fan is electrically controlled, its cooling
capacity is not dependent on the engine speed.
F
T
o lower the engine speed, reduce your
speed.
The maximum towed load on a long incline
depends on the gradient and the exterior
temperature.
In all cases, keep a check on the coolant
temperature.
F
I
f this warning lamp and the
STOP warning lamp come on,
stop the vehicle and switch off
the engine as soon as possible.
Braking
Towing a trailer increases the braking distance.
To avoid overheating of the brakes, the use of
engine braking is recommended.
Ty r e s
F Check the tyre pressures of the towing vehicle and of the trailer, observing the
recommended pressures.
Lighting
F Check the electrical lighting and signalling on the trailer and the headlamp beam height
of your vehicle.
For more information on Headlamp
adjustment , refer to the corresponding
section.
The rear parking sensors will be
deactivated automatically to avoid
the audible signal if a genuine DS
AUTOMOBILES towbar is used.
06
Driving
Page 185 of 296

183
Manual parking brake
If excessive travel or a loss of
effectiveness of this system is
noticed, the parking brake must
be checked, even between two
services.
This system must be checked in the dealer
network or by a qualified workshop.
Electric parking brake
This system does not require any
routine servicing. However, in the
event of a problem, have the system
checked in the dealer network or by
a qualified workshop.
For more information on the Electric
parking brake , refer to the corresponding
section.
Only use products recommended by DS
AUTOMOBILES or products of equivalent
quality and specification.
In order to optimise the operation of
components as important as those in
the braking system, DS AUTOMOBILES
selects and offers very specific products.
After washing the vehicle, dampness, or
in wintry conditions, ice can form on the
brake discs and pads: braking efficiency
may be reduced. Make light brake
applications to dry and defrost the brakes.
AdBlue® (BlueHDi
engines)
To respect the environment and ensure
compliance with the Euro 6 standard, without
adversely affecting the performance or
fuel consumption of Diesel engines, DS
AUTOMOBILES has taken the decision to
equip its vehicles with a system that associates
SCR (Selective Catalytic Reduction) with a
Diesel particle filter (DPF) for the treatment of
exhaust gases.
SCR system
Using a liquid called AdBlue® that contains
urea, a catalytic converter turns up to 85% of
the oxides of nitrogen (NOx) into nitrogen and
water, which are harmless to health and the
environment.
Brake pads
Brake wear depends on the style
of driving, particularly in the case
of vehicles used in town, over short
distances. It may be necessary to
have the condition of the brakes
checked, even between vehicle
services.
Unless there is a leak in the circuit, a drop in
the brake fluid level indicates that the brake
pads are worn.
Brake disc/drum wear
For information on checking brake
disc wear, contact the dealer
network or a qualified workshop.
07
Practical information
Page 188 of 296

186
Important: if your vehicle's AdBlue® tank
i
s completely empty – which is
confirmed by the alert messages and the
impossibility of starting the engine – you
must add at least 4 litres.
F
A
fter emptying the container or bottle, wipe
away any spillage around the tank filler
using a damp cloth. If any AdBlue
® additive is spilt or splashed,
wash immediately with cold water or wipe
with a damp cloth.
If the AdBlue
® has crystallised, clean it off
using a sponge and hot water.
F
R
efit the blue cap to the tank filler and turn it
a 6th of a turn clockwise, to its stop.
F
R
efit the black plastic blanking plug, clipping
it in on the flap.
F
R
efit the boot carpet and close the tailgate.
Important: in the event of a top-up after
a breakdown because of a lack of
AdBlue, you must wait around 5 minutes
before switching on the ignition, without
opening the driver’s door, unlocking
the vehicle, introducing the key into
the ignition switch, or introducing
the key of the "Keyless Entr y and
Star ting" system into the passenger
compartment .
Switch on the ignition, then wait for
10
seconds before starting the engine.
F
O
btain a container or bottle of AdBlue
®.
After first checking the use-by date, read
carefully the instructions on use on the label
before pouring the contents of the container
or bottle into your vehicle's AdBlue
® tank.
Advice on care and maintenance
Recommendations on the care and
maintenance of your vehicle are given in the
Maintenance and Warranty Guide.
Matt finish
If your vehicle is coated with a clear, matt
varnish, it is essential that you take the
following instructions into account to avoid
damaging the paint, due to an inappropriate
treatment. These instructions are also valid for
the alloy wheels coated in a clear, matt varnish.
Textured paint
The textured paint reacts to light with variations
of appearance and finish that emphasise the
car's lines and form. This paint coating has
particles that remain visible and create a
unique satin relief effect. Its lightly granulated
texture gives it a surprising feel.
07
Practical information
Page 211 of 296
209
12 V battery
Procedure for starting the engine using another
battery or charging a discharged battery.
General points
Lead-acid starter batteries
Batteries contain harmful substances
such as sulphuric acid and lead.
They must be disposed of in accordance
with regulations and must not, in any
circumstances, be discarded with
household waste.
Take used remote control batteries and
vehicle batteries to a special collection
point.
Protect your eyes and face before
handling the battery.
All operations on the battery must be
carried out in a well ventilated area and
away from naked flames and sources of
sparks, so as to avoid the risk of explosion
or fire.
Wash your hands afterwards. If your vehicle has an automatic gearbox,
do not try to start the engine by pushing
the vehicle.
Access to the battery
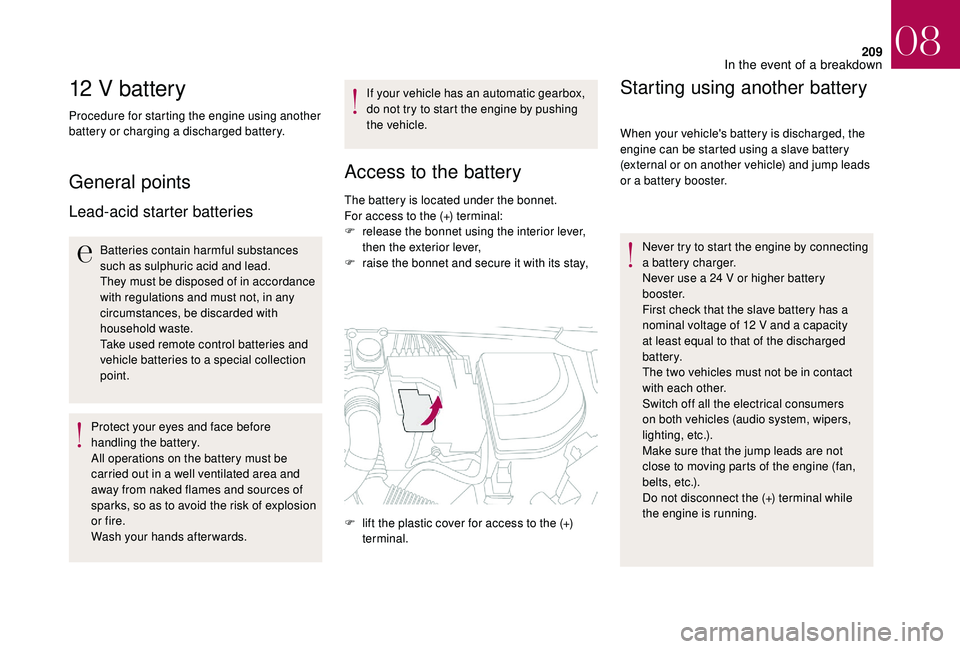
The battery is located under the bonnet.
For access to the (+) terminal:
F
r
elease the bonnet using the interior lever,
then the exterior lever,
F
r
aise the bonnet and secure it with its stay,
F
l
ift the plastic cover for access to the (+)
terminal.
Starting using another battery
When your vehicle's battery is discharged, the
engine can be started using a slave battery
(external or on another vehicle) and jump leads
or a battery booster.
Never try to start the engine by connecting
a battery charger.
Never use a 24 V or higher battery
b o o s t e r.
First check that the slave battery has a
nominal voltage of 12 V and a capacity
at least equal to that of the discharged
battery.
The two vehicles must not be in contact
with each other.
Switch off all the electrical consumers
on both vehicles (audio system, wipers,
lighting, etc.).
Make sure that the jump leads are not
close to moving parts of the engine (fan,
belts, etc.).
Do not disconnect the (+) terminal while
the engine is running.
08
In the event of a breakdown
Page 213 of 296
2 11
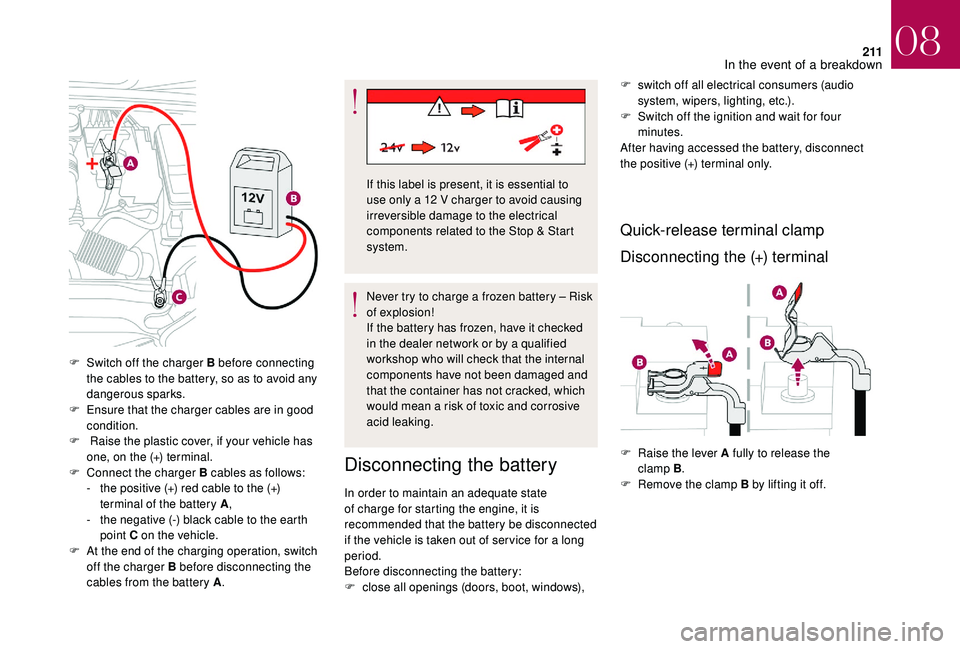
F Switch off the charger B before connecting the cables to the battery, so as to avoid any
dangerous sparks.
F
E
nsure that the charger cables are in good
condition.
F
R
aise the plastic cover, if your vehicle has
one, on the (+) terminal.
F
C
onnect the charger B cables as follows:
-
t
he positive (+) red cable to the (+)
terminal of the battery A ,
-
t
he negative (-) black cable to the earth
point C on the vehicle.
F
A
t the end of the charging operation, switch
off the charger B before disconnecting the
cables from the battery A . Never try to charge a frozen battery – Risk
of explosion!
If the battery has frozen, have it checked
in the dealer network or by a qualified
workshop who will check that the internal
components have not been damaged and
that the container has not cracked, which
would mean a risk of toxic and corrosive
acid leaking.
Disconnecting the battery
F switch off all electrical consumers (audio
system, wipers, lighting, etc.).
F
S
witch off the ignition and wait for four
minutes.
After having accessed the battery, disconnect
the positive (+) terminal only.
Quick-release terminal clamp
Disconnecting the (+) terminal
If this label is present, it is essential to
use only a 12 V charger to avoid causing
irreversible damage to the electrical
components related to the Stop & Start
system.
In order to maintain an adequate state
of charge for starting the engine, it is
recommended that the battery be disconnected
if the vehicle is taken out of ser vice for a long
period.
Before disconnecting the battery:
F
c
lose all openings (doors, boot, windows), F
Ra
ise the lever A fully to release the
clamp B .
F
R
emove the clamp B by lifting it off.
08
In the event of a breakdown