keyless Citroen DS4 RHD 2014.5 1.G User Guide
[x] Cancel search | Manufacturer: CITROEN, Model Year: 2014.5, Model line: DS4 RHD, Model: Citroen DS4 RHD 2014.5 1.GPages: 444, PDF Size: 12.99 MB
Page 85 of 444
83
Doors
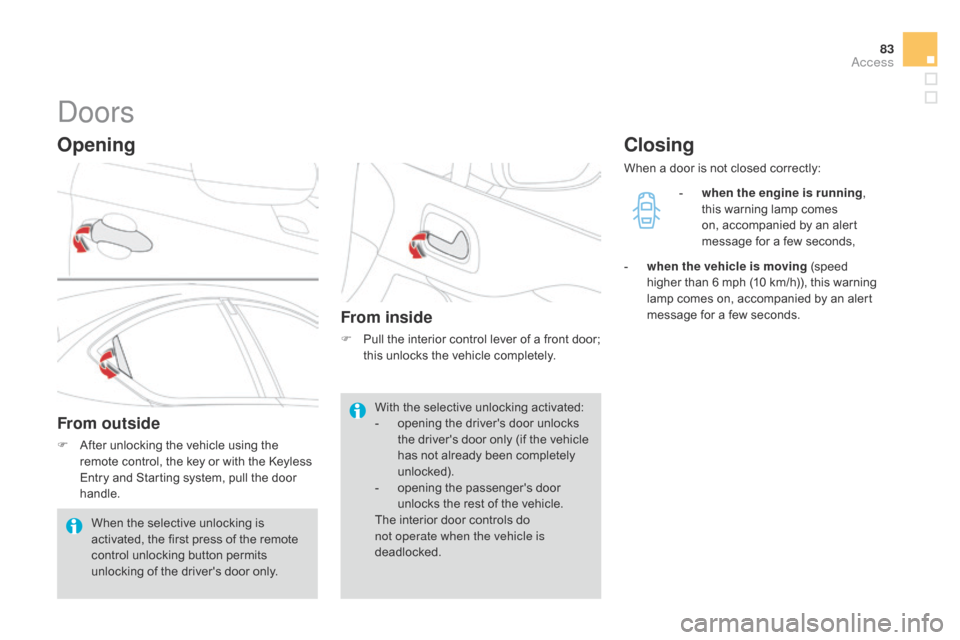
Opening
From outside
F After unlocking the vehicle using the remote control, the key or with the Keyless
Entry and Starting system, pull the door
handle.
From inside
F Pull the interior control lever of a front door; this unlocks the vehicle completely.
Closing
When a door is not closed correctly:
-
w
hen the engine is running ,
this warning lamp comes
on, accompanied by an alert
message for a few seconds,
-
w
hen the vehicle is moving (speed
higher than 6 mph (10 km/h)), this warning
lamp comes on, accompanied by an alert
message for a few seconds.
When the selective unlocking is
activated, the first press of the remote
control unlocking button permits
unlocking of the driver's door only. With the selective unlocking activated:
-
o
pening the driver's door unlocks
the driver's door only (if the vehicle
has not already been completely
unlocked).
-
o
pening the passenger's door
unlocks the rest of the vehicle.
The interior door controls do
not operate when the vehicle is
deadlocked.
Access
Page 87 of 444
85
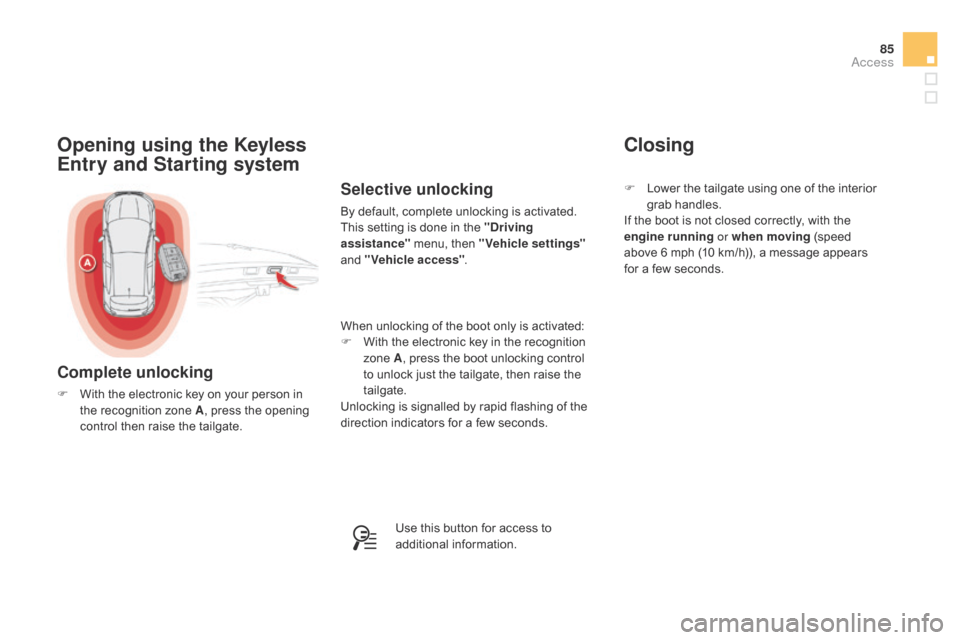
Opening using the Keyless
Entry and Starting system
Complete unlocking
F With the electronic key on your person in the recognition zone A , press the opening
control then raise the tailgate.
Selective unlocking
By default, complete unlocking is activated.
This setting is done in the "Driving
assistance" menu, then "Vehicle settings"
and "Vehicle access" .
When unlocking of the boot only is activated:
F
W
ith the electronic key in the recognition
zone A , press the boot unlocking control
to unlock just the tailgate, then raise the
tailgate.
Unlocking is signalled by rapid flashing of the
direction indicators for a few seconds.
Use this button for access to
additional information. F
L
ower the tailgate using one of the interior
grab handles.
If the boot is not closed correctly, with the
engine running or when moving (speed
above 6 mph (10 km/h)), a message appears
for a few seconds.
Closing
Access
Page 121 of 444
11 9
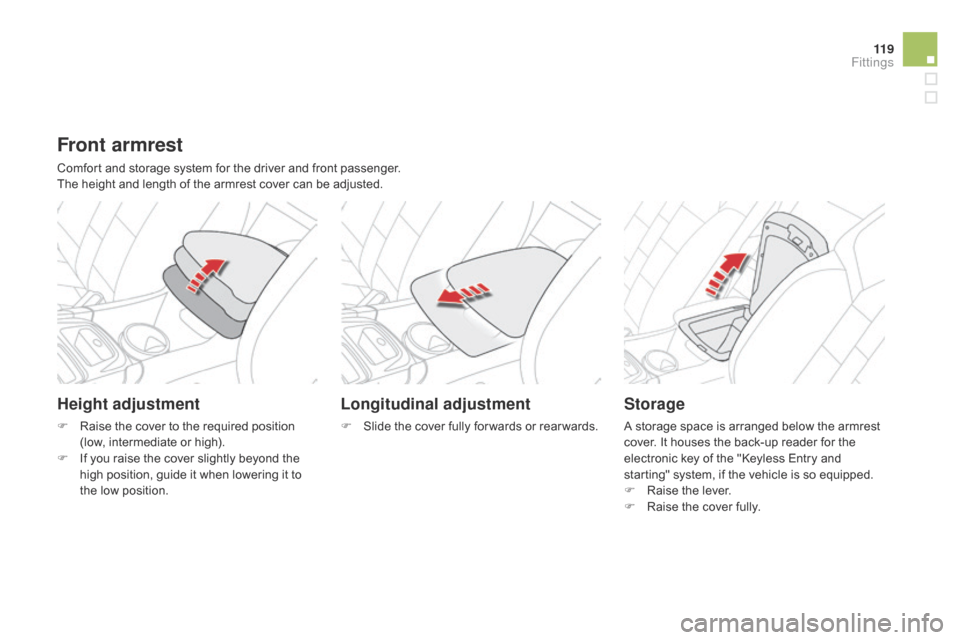
Front armrest
Comfort and storage system for the driver and front passenger.
The height and length of the armrest cover can be adjusted.
Height adjustment
F Raise the cover to the required position (low, intermediate or high).
F
I
f you raise the cover slightly beyond the
high position, guide it when lowering it to
the low position.
Longitudinal adjustment
F Slide the cover fully for wards or rear wards.
Storage
A storage space is arranged below the armrest
cover. It houses the back-up reader for the
electronic key of the "Keyless Entry and
starting" system, if the vehicle is so equipped.
F
Ra
ise the lever.
F
R
aise the cover fully.
Fittings
Page 122 of 444

Front armrest
Comfort and storage device for the driver and front passenger.
The length of the armrest cover can be adjusted.
Storage
There is a storage space below the cover of
the armrest. Depending on equipment, this can
contain the back-up reader for the electronic
key of the Keyless Entry and Starting system.
F
R
aise the cover fully.
Longitudinal adjustment
F To move for wards, raise the lever. The armrest slides for wards to its stop.
F
T
o stow it, slide it fully back and press
down to lock it.
Page 139 of 444

137
Welcome lighting
The remote switching on of the lighting makes your access to the vehicle easier in poor light. It is
activated depending on the ambient light level detected by the sunshine sensor.
Switching onSwitching off
F Press the open padlock on the
remote control or one of the front
door handles with the "Keyless
Entry and Starting" system.
The sidelamps and dipped beam headlamps,
as well as the side spotlamps, located under
the door mirrors, come on; your vehicle is also
unlocked. Activation or deactivation, as well as
the duration of the lighting duration
for the welcome lighting can be set
via the vehicle configuration menu.
Programming
The welcome lighting switches off automatically
after a programmed time, when the ignition is
switched on or on locking the vehicle.
Visibility
Page 194 of 444
Starting-switching off the engine
with the "Keyless Entry and Starting" system
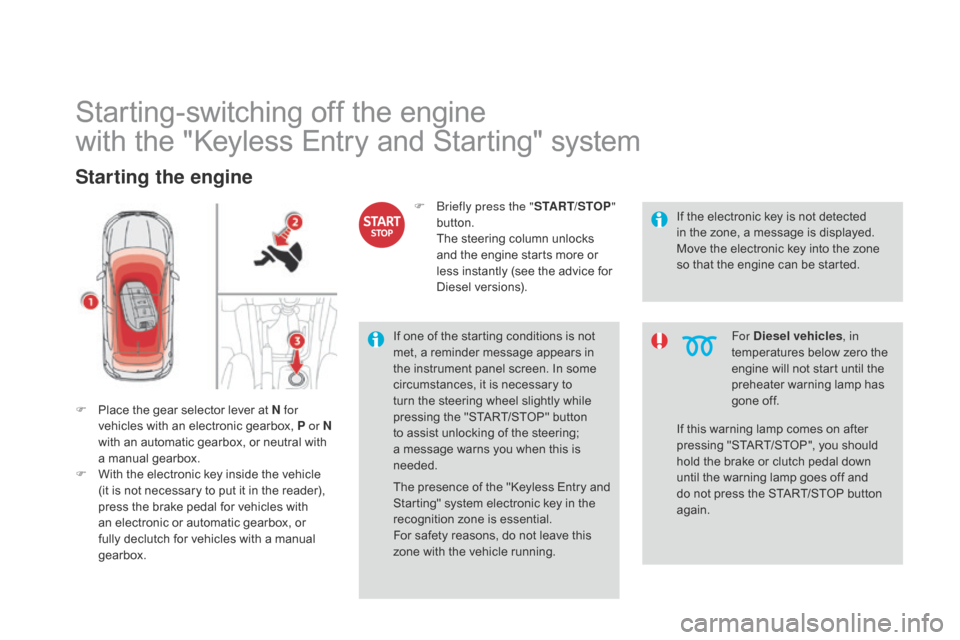
Starting the engine
F Place the gear selector lever at N for
vehicles with an electronic gearbox, P or N
with an automatic gearbox, or neutral with
a manual gearbox.
F
W
ith the electronic key inside the vehicle
(it is not necessary to put it in the reader),
press the brake pedal for vehicles with
an electronic or automatic gearbox, or
fully declutch for vehicles with a manual
gearbox. F
B
riefly press the "
START/STOP"
button.
T
he steering column unlocks
and the engine starts more or
less instantly (see the advice for
Diesel versions). If the electronic key is not detected
in the zone, a message is displayed.
Move the electronic key into the zone
so that the engine can be started.
If one of the starting conditions is not
met, a reminder message appears in
the instrument panel screen. In some
circumstances, it is necessary to
turn the steering wheel slightly while
pressing the "START/STOP" button
to assist unlocking of the steering;
a message warns you when this is
needed.
The presence of the "Keyless Entr y and
Starting" system electronic key in the
recognition zone is essential.
For safety reasons, do not leave this
zone with the vehicle running. For Diesel vehicles
, in
temperatures below zero the
engine will not start until the
preheater warning lamp has
gone off.
If this warning lamp comes on after
pressing "START/STOP", you should
hold the brake or clutch pedal down
until the warning lamp goes off and
do not press the START/STOP button
again.
Page 196 of 444

Emergency switch-off
In the event of an emergency only,
the engine can be switched of without
conditions. To do this, press and hold
the "START/STOP" button for about
3 seconds.
In this case the steering column locks as soon
as the vehicle stops.
Electronic key not
recognised
If the electronic key is no longer in the
recognition zone when driving or when you
(later) request switching off the engine,
a
message is displayed. F
P
ress and hold the " S TA R T/
STOP" button for about
3
seconds if you want to force
switching off the engine ( note
that restar ting will not be
possible without the key ).
Ignition on position
(without starting)
With the Keyless Entry and Starting key inside
the vehicle, pressing the "START/STOP"
button, with no action on the pedals , allows
the ignition to be switched on.
F
P
ress the "START/STOP" button,
the instrument panel comes on
but the engine does not start.
F
P
ress the button again to switch off the
ignition and so allow the vehicle to be
locked.
With the ignition on, the system
automatically goes into energy
economy mode when required to
maintain the state of charge of the
battery.
Page 237 of 444
235
Fuel tankCapacity of the tank: approximately 60 litres.
Low fuel level
When the low fuel level in the
tank is reached, this warning lamp
comes on in the instrument panel,
accompanied by an audible warning
Refuelling
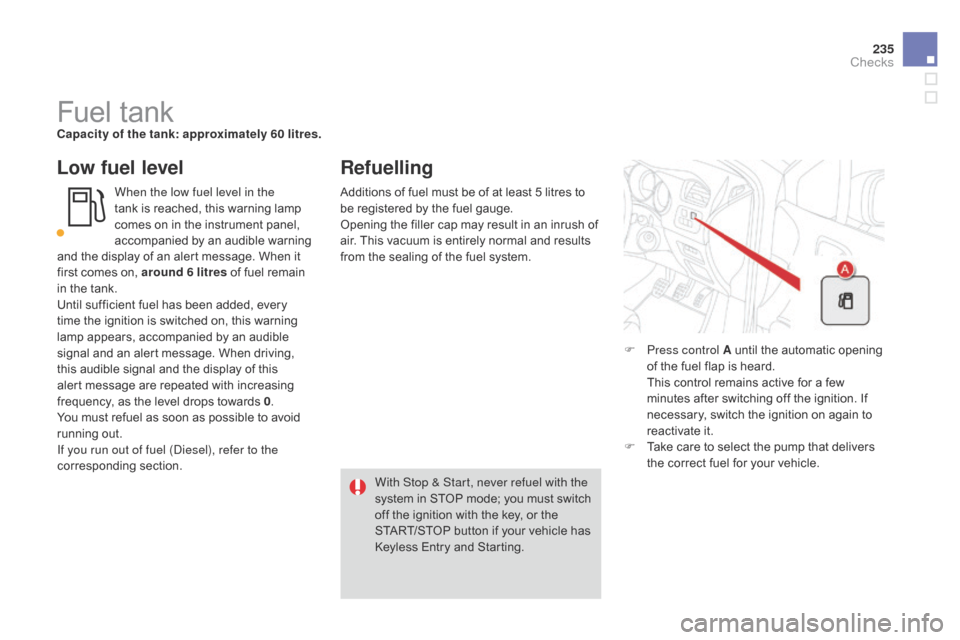
F Press control A until the automatic opening of the fuel flap is heard.
T
his control remains active for a few
minutes after switching off the ignition. If
necessary, switch the ignition on again to
reactivate it.
F
T
ake care to select the pump that delivers
the correct fuel for your vehicle.
With Stop & Start, never refuel with the
system in STOP mode; you must switch
off the ignition with the key, or the
START/STOP button if your vehicle has
Keyless Entry and Starting.
Additions of fuel must be of at least 5 litres to
be registered by the fuel gauge.
Opening the filler cap may result in an inrush of
air. This vacuum is entirely normal and results
from the sealing of the fuel system.
and the display of an alert message. When it
first comes on, around 6 litres of fuel remain
in the tank.
Until sufficient fuel has been added, every
time the ignition is switched on, this warning
lamp appears, accompanied by an audible
signal and an alert message. When driving,
this audible signal and the display of this
alert message are repeated with increasing
frequency, as the level drops towards 0
.
You must refuel as soon as possible to avoid
running out.
If you run out of fuel (Diesel), refer to the
corresponding section.
Checks
Page 261 of 444

259
Never dispose of AdBlue® additive
bottles in the household waste. Place
them in a special container provided
this purpose or take them to your
dealer.
Important: if your vehicle's
AdBlue
® tank is completely empty -
w
hich is confirmed by the alert displays
and the impossibility of starting the
engine - you must add at least 3.8 litres
(so two 1.89 litre bottles). If any additive is split or splashed, wash
immediately with cold water or wipe
with a damp cloth.
If the additive has crystallised, clean it
off using a sponge and hot water.
Important:
in the event of a top-
up after a breakdown because of
a lack of additive , you must wait
around 5 minutes before switching
on the ignition, without opening the
driver's door, locking the vehicle,
introducing the key into the ignition
switch, or introducing the key of the
"Keyless Entr y and Star ting" system
into the passenger compartment .
Switch on the ignition, then, after
10 seconds, start the engine.
F
O
btain a bottle of AdBlue
®. After first
checking the use-by date, read carefully
the instructions on use on the label before
pouring the contents of the bottle into your
vehicle's AdBlue
® tank. F
A
fter emptying the bottle, wipe away any
spillage around the tank filler using a damp
cloth.
F
R
efit the blue cap to the tank and turn it a
6
th of a turn clockwise, to its stop.
F
R
efit the black plastic blanking plug,
clipping it in on the flap.
F
D
etach the cord from the parcel shelf
support and lower the boot floor.
Checks
Page 436 of 444
Labels, identification .....................................3 21
Lamps, warning and indicator ...................21
-34
Level, AdBlue
® additive ........................... 2 8, 250
Level, brake fluid ........................................... 24
4
Level, power steering fluid
............................ 24
4
Levels and checks
..............................
...241-249
Lighting bulbs (replacement)
.................2
76 -283
Lighting control stalk
............................. 13
2, 13 5
Lighting dimmer
..............................
.... 18, 19, 41
Lighting, guide-me home
...................... 13
5, 13 6
Lighting, interior
.................................... 14
6, 147
Loading
..............................
..................... 14, 296
Load reduction mode
.................................... 29
4
Locating your vehicle
................................ 6
6, 72
Locking from the inside
................................... 77
L
ocking the boot.............................................. 84
Long objects, transporting
............................ 12
4
Low fuel level
..............................
............ 26, 235
Luggage retaining strap
................................ 12
5
Main beam .................................... 132, 277, 278
Maintenance .............................. .....................14
Map reading lamps
....................................... 14
6
Markings, identification
................................. 3
21
Massage function
...............................
..........10 6
Mat
.......
......................................................... 121
Menu
................................... 3
32, 334, 336, 350,
352, 354, 370, 380, 382
Jack ............................................................... 267
Jack cable ..................................................... 3
48
JACK socket
...............................
....116, 348, 411
Jukebox (playing)
.......................................... 3
49
Keeping children safe ............ 150 -166, 178, 181
Key ....... ...................................................... 62-76
Key, electronic
....................................6
9 -73, 192
Key in ignition warning
..................................19
1
Keyless Entry and Starting
........................6
9 -73
Key not recognised
....................................... 19
4
Key with remote control
..................... 6
2- 67, 195
Interior mood lighting
....................................
14
7
ISOFIX
...............
...........................................
163
ISOFIX mountings ......................................... 161Ignition on.............................................. 191, 19 4
Indicator lamps, status ...............................21
-34
Indicators, direction
...................... 1
70, 278, 281
Inflating accessories (using the kit)
..............26
6
Inflating tyres
..............................
............ 14, 320
Inputs for audio system
......... 1
16, 411, 344, 348
Instrument panel lighting
................................41
In
strument panels
...............................
.......18 -20
Instrument panel screen
....... 1
8, 19, 20, 39, 213
Intelligent Traction Control
............................ 17
3
Interior fittings
........................................ 11
4 , 115
Halogen headlamps
......................................
2
77
Hands-free kit
..............................
......... 384, 413
Hazard warning lamps
........................... 17
0, 171
Headlamp adjustment
................................... 13
8
Headlamps, directional
................. 1
38, 139, 277
Headlamp wash
............................................ 14
3
Head restraints, front
....................................
10
5
Head restraints, rear
.....................................
10
7
Heated seats
...............................
..................
105
Heating
................
...................................... 94, 95
Height and reach adjustment, steering wheel
..............................
..............
108
Hill start assist
...............................................
2
12
Hooks
...............................
.............................
126