warning light Citroen DS4 RHD 2015.5 1.G Owner's Manual
[x] Cancel search | Manufacturer: CITROEN, Model Year: 2015.5, Model line: DS4 RHD, Model: Citroen DS4 RHD 2015.5 1.GPages: 436, PDF Size: 10.13 MB
Page 12 of 436

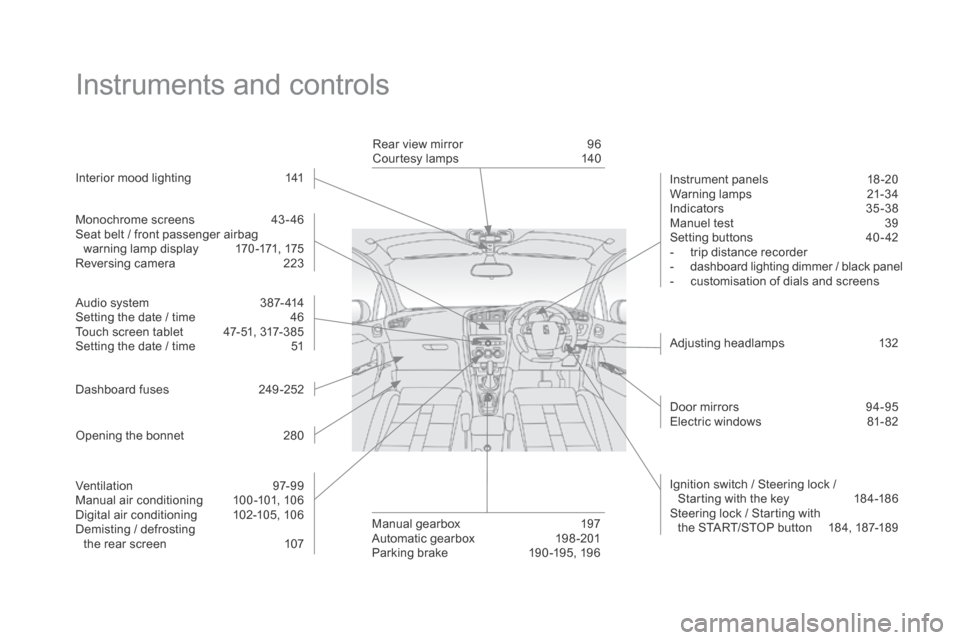
Instruments and controls
Monochrome screens 43-46
Seat belt / front passenger airbag warning lamp display
1
70 -171, 175
Reversing camera
2
23
Audio system
3
87- 414
Setting the date / time
4
6
Touch screen tablet
4
7-51, 317-385
Setting the date / time
5
1
Dashboard fuses
2
49 -252
Opening the bonnet
2
80Rear view mirror
9
6
Courtesy lamps
1
40
Adjusting headlamps
1
32
Manual gearbox
1
97
Automatic gearbox
1
98 -201
Parking brake
1
90 -195, 196
Interior mood lighting
1
41
Door mirrors
9
4-95
Electric windows
8
1- 82
Ignition switch / Steering lock /
Starting with the key
1
84-186
Steering lock / Starting with the START/STOP button
1
84, 187-189
Instrument panels
1
8 -20
Warning lamps
2
1-34
Indicators 35 -38
Manuel test 3 9
Setting buttons
4
0 - 42
-
t
rip distance recorder
-
d
ashboard lighting dimmer / black panel
-
c
ustomisation of dials and screens
Ventilation
9
7-99
Manual air conditioning
1
00 -101, 106
Digital air conditioning
1
02-105, 106
Demisting / defrosting the rear screen
1
07
Page 21 of 436

19
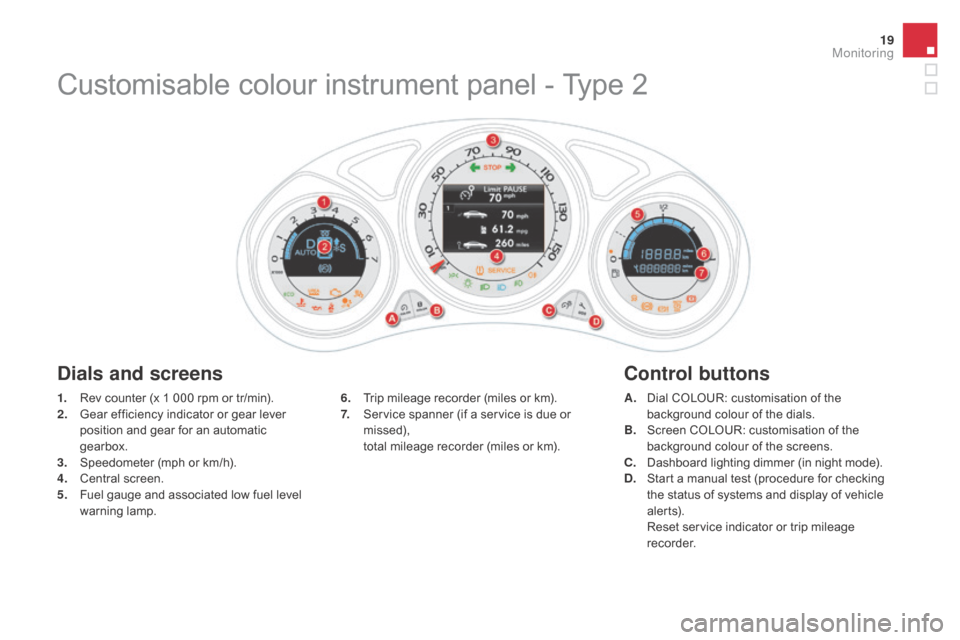
1. Rev counter (x 1 000 rpm or tr/min).
2. Gear efficiency indicator or gear lever
position and gear for an automatic
gearbox.
3.
S
peedometer (mph or km/h).
4.
C
entral screen.
5.
F
uel gauge and associated low fuel level
warning lamp.
dials and screens
6. Trip mileage recorder (miles or km).
7. S ervice spanner (if a service is due or
missed),
t
otal mileage recorder (miles or km).
Control buttons
Customisable colour instrument panel - Type 2
A. Dial COLOUR: customisation of the background colour of the dials.
B.
S
creen COLOUR: customisation of the
background colour of the screens.
C.
D
ashboard lighting dimmer (in night mode).
d
.
S
tart a manual test (procedure for checking
the status of systems and display of vehicle
a l e r t s).
R
eset service indicator or trip mileage
recorder.
Monitoring
Page 32 of 436

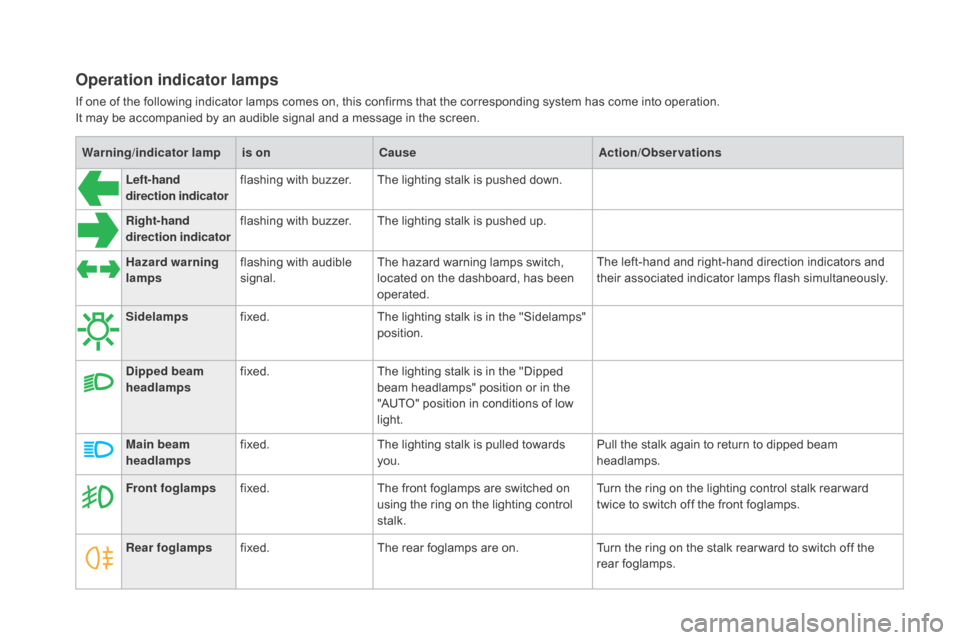
Warning/indicator lampis on Cause Action/Observations
Left-hand
direction indicator flashing with buzzer.
The lighting stalk is pushed down.
Right-hand
direction indicator flashing with buzzer.
The lighting stalk is pushed up.
Sidelamps fixed. The lighting stalk is in the "Sidelamps"
position.
di
pped beam
headlamps fixed.
The lighting stalk is in the "Dipped
beam headlamps" position or in the
"AUTO" position in conditions of low
light.
Main beam
headlamps fixed.
The lighting stalk is pulled towards
you. Pull the stalk again to return to dipped beam
headlamps.
Front foglamps fixed. The front foglamps are switched on
using the ring on the lighting control
stalk. Turn the ring on the lighting control stalk rear ward
twice to switch off the front foglamps.
Rear foglamps fixed. The rear foglamps are on. Turn the ring on the stalk rear ward to switch off the
rear foglamps.
Hazard warning
lamps
flashing with audible
signal. The hazard warning lamps switch,
located on the dashboard, has been
operated. The left-hand and right-hand direction indicators and
their associated indicator lamps flash simultaneously.
Operation indicator lamps
If one of the following indicator lamps comes on, this confirms that the corresponding system has come into operation.
It may be accompanied by an audible signal and a message in the screen.
Page 34 of 436

Lighting dimmerfixed. The lighting dimmer is making an
adjustment. You can adjust the level of illumination of the
instruments between 1 and 16.
Automatic wiping
fixed. The wiper control is pushed
downwards. Automatic front wiping is activated.
To deactivate automatic wiping, operate the control
stalk downwards or put the stalk into another position.
Warning
/indicator lampis on Cause Action/Observations
di
esel engine
pre-heating fixed.
The ignition switch is at the
2
nd position (Ignition on) or the
" START/STOP " starting button has
been pressed. Wait until the warning lamp goes off before starting.
Once it goes off, starting is immediate, on condition
that the brake pedal remains pressed with an
automatic gearbox, or the clutch pedal is pressed fully
down with a manual gearbox.
The period of illumination of the warning lamp is
determined by the ambient conditions (up to about
thirty seconds in severe winter conditions).
If the engine does not start, switch the ignition off and
then on, wait until the warning lamp goes off again,
then start the engine.
Page 35 of 436

33
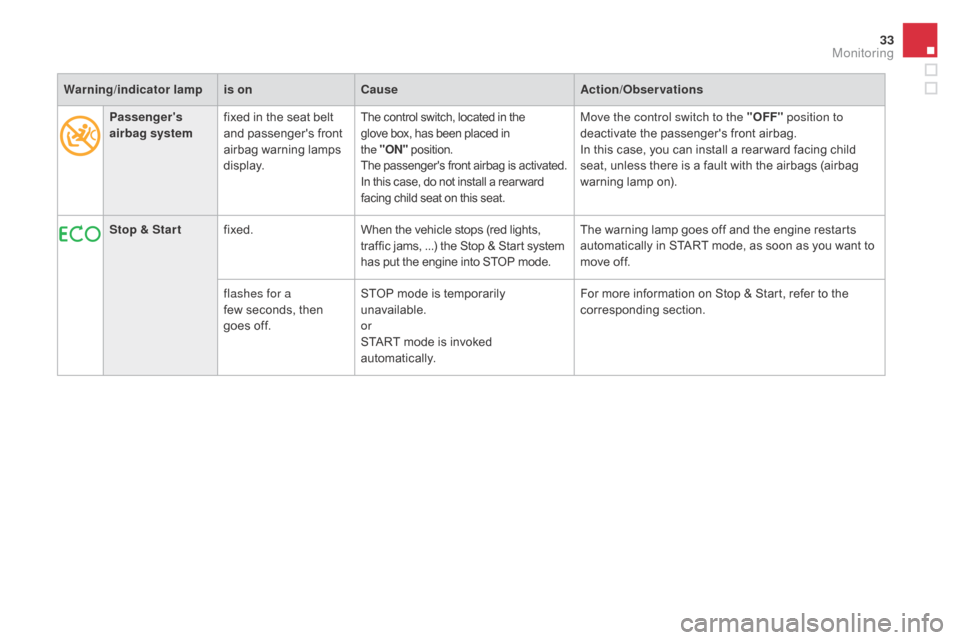
Passenger's
airbag systemfixed in the seat belt
and passenger's front
airbag warning lamps
display.The control switch, located in the
glove box, has been placed in
the
"On" p
osition.
The passenger's front airbag is activated.
In this case, do not install a rear ward
facing child seat on this seat.Move the control switch to the "OFF" position to
deactivate the passenger's front airbag.
In this case, you can install a rear ward facing child
seat, unless there is a fault with the airbags (airbag
warning lamp on).
Stop & Star t fixed. When the vehicle stops (red lights,
traffic jams,
...) the Stop & Start system
has put the engine into STOP mode. The warning lamp goes off and the engine restarts
automatically in START mode, as soon as you want to
move off.
flashes for a
few
seconds, then
goes off. STOP mode is temporarily
unavailable.
or
START mode is invoked
automatically. For more information on Stop & Start, refer to the
corresponding section.
Warning
/indicator lampis on Cause Action/Observations
Monitoring
Page 44 of 436

When driving at night, it allows certain
instrument panel displays to be switched off so
as to reduce visual fatigue for the the driver.
The essential driving information, such as
the vehicle speed, warning lamps, automatic
gearbox gear selected, cruise control or speed
limiter information, remains on in the instrument
panel.
Black panel (comfortable
night driving display)
F With the vehicle lighting on, press this button again to
activate the function.
F
P
ress this button again to
deactivate the function. In the instrument panel, you can change the
colour of its dials (button A
) independently from
that of the screens (button B ).
There are five colour variants, from white to
blue.
F
P
ress the appropriate button as many
times as needed to obtain the desired
c o l o u r.
Customising the instrument
panel colours
Touch screen tablet
You can returns to the current display
at any time by pressing the black
screen or one of the menu buttons.
In automatic illumination of headlamps
mode, the "Black panel" function is
automatically deactivated once the
ambient light level attains an adequate
level.
Page 131 of 436

129
Switching off the lighting
when switching off the ignition
When the ignition is switched off, all
of the lamps switch off immediately,
except for the dipped beam headlamps
if automatic guide-me-home lighting is
activated.The temporary illumination of the dipped beam
headlamps after the vehicle's ignition has been
switched off makes the driver's exit easier
when the light is poor.
Switching on
F With the ignition off, "flash" the headlamps using the lighting stalk.
F
A f
urther "headlamp flash" switches the
function off.
Switching off
The manual guide-me-home lighting switches
off automatically after a set time.
Manual guide-me-home
lighting
Switching on the lighting when
switching on the ignition
To reactivate the lighting control stalk,
turn the ring A to position "0" - lighting
off, then to the position of your choice.
When the driver's door is opened,
a
temporary audible signal warns you
that the vehicle's lighting is on.
They switch off automatically after a
period which depends on the state of
charge of the battery (entry to energy
economy mode).
Parking lamps
Side markers for the vehicle by illumination of
the sidelamps on the traffic side only.
F
D
epending on version, within one minute
of switching off the ignition, operate the
lighting control stalk up or down depending
on the traffic side (for example: when
parking on the left; lighting control stalk
upwards; the right hand sidelamps are on).
This is confirmed by an audible signal and
illumination of the corresponding direction
indicator warning lamp in the instrument panel.
To switch off the parking lamps, return the
lighting control stalk to the central position.
Visibility
Page 132 of 436

When a low level of ambient light is detected
by a sunshine sensor, the number plate
lamps,
s
idelamps and dipped beam headlamps
are switched on automatically, without any
action on the part of the driver. They can also
come on if rain is detected, at the same time as
automatic operation of the windscreen wipers.
As soon as the ambient light returns to a
sufficient level or after the windscreen wipers
are switched off, the lamps are switched off
automatically.
Activation
F Turn the ring to the "AUTO" position. The
activation of the function is accompanied
by the display of a message in the screen.
deactivation
F Turn the ring to another position. Deactivation of the function is accompanied
by the display of a message in the screen.
Automatic guide-me-home
lighting
Operating fault
In the event of a malfunction of the
sunshine sensor, the lighting comes
on, this warning lamp is displayed
in the instrument panel and/or a
message appears in the screen,
accompanied by an audible signal. In fog or snow, the sunshine sensor
may detect sufficient light. In this
case, the lighting will not come on
automatically.
Do not cover the sunshine sensor,
coupled with the rain sensor and
located in the centre of the windscreen
behind the rear view mirror; the
associated functions would no longer
be controlled.
When the automatic illumination of headlamps
function is activated (lighting control stalk in the
"
AUTO " position), under low ambient light the
dipped beam headlamps remain on when the
ignition is switched off.
Programming
Activation or deactivation, as well
as the duration of the guide-me-
home lighting, is set in the vehicle
configuration menu.
Contact a CITROËN dealer or a qualified
workshop.
Automatic illumination of headlamps
Page 135 of 436

133
Directional lighting
When the dipped or main beam headlamps
are on, this function, allows the light beams to
better follow the road.
The use of this function, coupled with the
xenon headlamps and the cornering lighting,
considerably improves the quality of your
lighting round bends.This function is inactive:
-
w
hen stationary or at low speeds,
-
w
hen reverse is engaged.
The system is activated by default.
with directional lighting
without directional lighting
Programming
The system is activated or
deactivated in the vehicle
configuration menu.
The state of the system stays in memory on
switching off the ignition.
Contact a CITROËN dealer or a qualified
workshop.
Operating fault
If a fault occurs, this warning lamp
flashes in the instrument panel,
accompanied by a message in the
screen.
Visibility
Page 166 of 436

Direction
indicators
F Left: lower the lighting stalk passing the
point of resistance.
F
R
ight: raise the lighting stalk passing the
point of resistance.Three flashes of the direction
indicators
F Press briefly upwards or downwards, without going beyond the point of resistance; the
direction indicators will flash 3 times.
Hazard warning lamps
Visual warning by means of the direction
indicators to alert other road users to a vehicle
breakdown, towing or accident.
F
P
ress this button, the direction indicators
flash.
They can operate with the ignition off.
If you forget to cancel the
direction indicators for more than
twenty
seconds, the volume of the
audible signal will increase if the speed
is above 40 mph (60 km/h). On versions fitted with LED direction indicators,
the line of LEDs is illuminated sequentially.
The brightness of the daytime runnning lamps
is reduced during sequential operation of the
direction indicators.