Activate Stop start Citroen DS5 2012 1.G Owner's Manual
[x] Cancel search | Manufacturer: CITROEN, Model Year: 2012, Model line: DS5, Model: Citroen DS5 2012 1.GPages: 348, PDF Size: 10.47 MB
Page 14 of 348
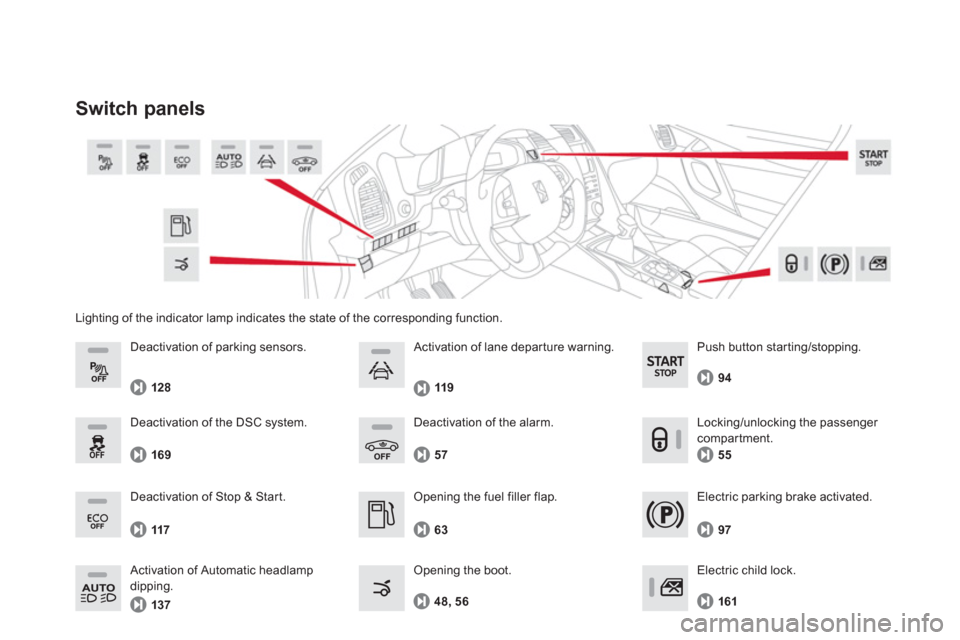
Lighting of the indicator lamp indicates the state of the corresponding function.
Switch panels
Opening the fuel filler flap.
Opening the boot. 63 57 D
eactivation of the alarm.
48, 56
Electric parking brake activated.
9
7
Push button star ting/stopping.
94
Deactivation o
f Stop & Start.
117
Deactivation of parking sensors.
128
El
ectric child lock.
161
Deactivation of the DSC system.
169
Activation of Automatic headlamp
dippin
g.
137
119
Activation of lane depar ture warning.
5
5
Locking/unlocking the passenger compartment.
Page 23 of 348
21Familiarisation
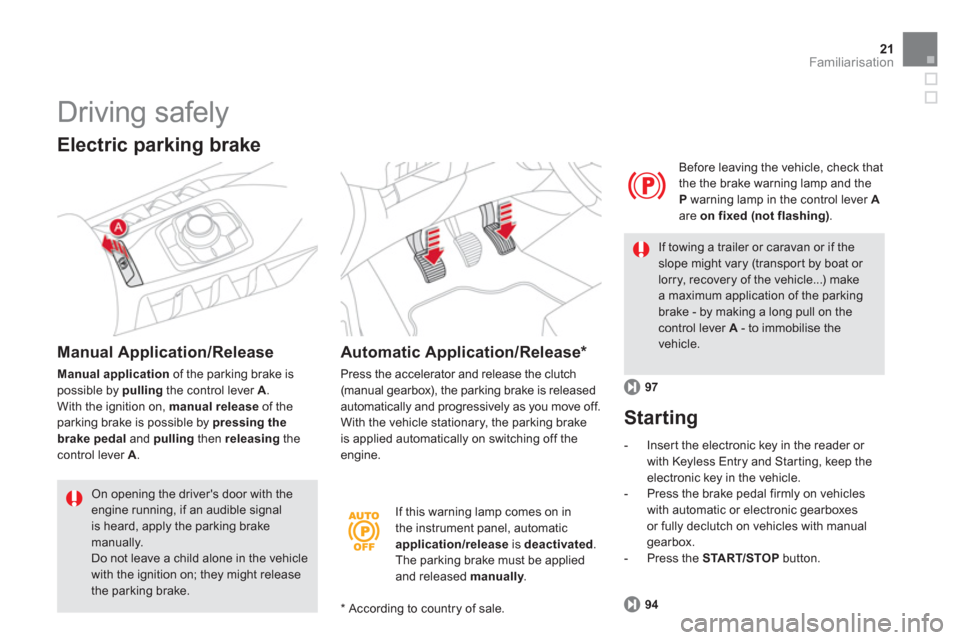
If this warning lamp comes on in
the instrument panel, automatic application/release is deactivated
.
The parking brake must be appliedand released manually.
y
Before leaving the vehicle, check that
the the brake warning lamp and theP warning lamp in the control lever Aare on fixed (not flashing).
97
If towing a trailer or caravan or if theslope might vary (transpor t by boat or lorry, recovery of the vehicle...) make a maximum application of the parking brake - by making a long pull on thecontrol lever A
- to immobilise thevehicle.
*
Accordin
g to country of sale.
Driving safely
Electric parking brake
Manual Application/Release
Manual application
of the parking brake is possible by pulling
the control lever A. With the ignition on, manual releaseof theparking brake is possible by pressing the brake pedal
and pulling
then releasing
the control lever A
.
On opening the driver's door with theengine running, if an audible signalis heard, apply the parking brake
manually. Do not leave a child alone in the vehicle with the ignition on; they might release the parking brake.
Automatic Application/Release *
Press the accelerator and release the clutch (manual gearbox), the parking brake is releasedautomatically and progressively as you move off.With the vehicle stationary, the parking brakeis applied automatically on switching off the
engine.
Starting
- Inser t the electronic key in the reader or
with Keyless Entry and Starting, keep the electronic key in the vehicle.
- Press the brake pedal firmly on vehicles
with automatic or electronic gearboxes
or
fully declutch on vehicles with manual
gearbox.
- Press the START/STOPbutton.
94
Page 25 of 348
23Familiarisation
Driving safely
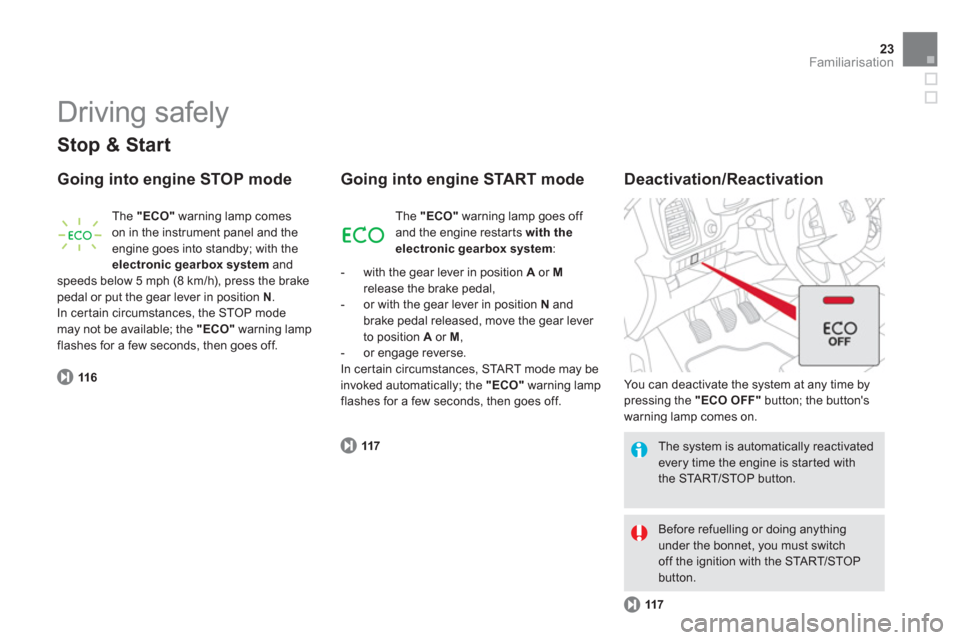
Stop & Start
Going into engine STOP mode
116
The "ECO"warning lamp comes
on in the instrument panel and the
en
gine goes into standby; with theelectronic gearbox system andspeeds below 5 mph (8 km/h), press the brakepedal or put the gear lever in position N.
In certain circumstances, the STOP modemay not be available; the "ECO"warning lamp flashes for a few seconds, then goes off.
Going into engine START mode
Deactivation/Reactivation
117
11
7
The system is automatically reactivated every time the engine is star ted withthe STA R T/STOP button.
Before refuelling or doing anything under the bonnet, you must switchoff the ignition with the START/STOP button. Th
e "ECO"
warning lamp goes off
and the engine restar ts with theelectronic gearbox system:
- with the
gear lever in position A
or Mrelease the brake pedal,
- or with the gear lever in position N
andbrake pedal released, move the gear lever
to position A or M ,
- or engage reverse.
In certain circumstances, STA R T m o d e m ay beinvoked automatically; the "ECO"
warning lampflashes for a few seconds, then goes off. You can deactivate the s
ystem at any time bypressing the "ECO OFF"
button; the button's
warning lamp comes on.
Page 33 of 348
31Monitoring
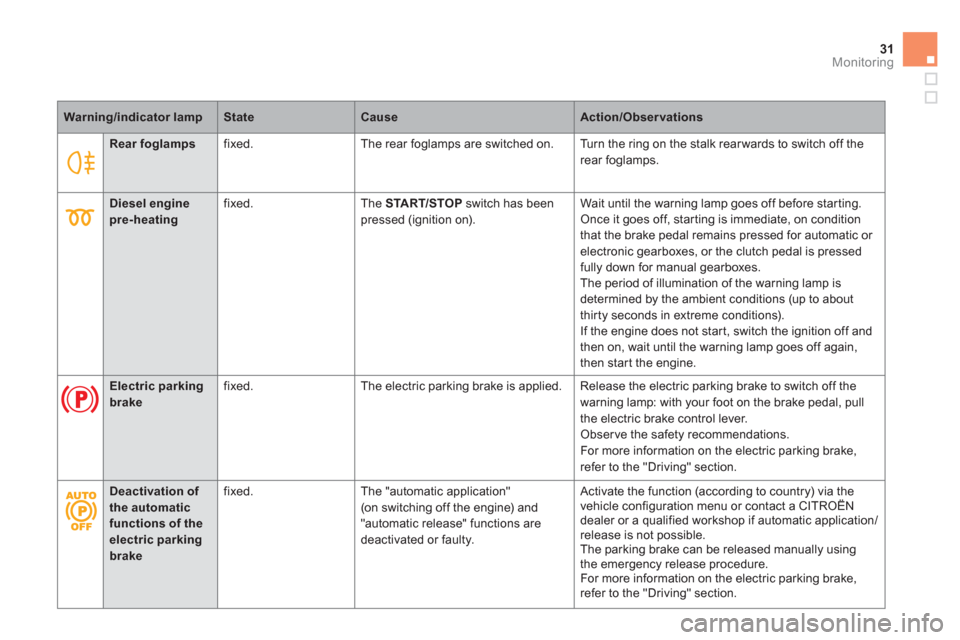
Rear foglamps
fixed. The rear foglamps are switched on. Turn the ring on the stalk rear wards to switch off the
rear foglamps.
Warning/indicator lampStateCauseAction/Observations
Diesel engine pre-heating fixed. The STA R T/STOP
switch has been pressed (ignition on). Wait until the warning lamp goes off before star ting.
Once it goes off, star ting is immediate, on condition
that the brake pedal remains pressed for automatic or electronic gearboxes, or the clutch pedal is pressed fully down for manual gearboxes.
The period of illumination of the warning lamp is
determined by the ambient conditions (up to about
thirty seconds in extreme conditions).
If the engine does not star t, switch the ignition off and
then on, wait until the warning lamp goes off again,
then start the engine.
Electric parking brake
fixed. The electric parking brake is applied. Release the electric parking brake to switch off the
warning lamp: with your foot on the brake pedal, pull
the electric brake control lever.
Obser ve the safety recommendations.
For more information on the electric parking brake,
refer to the "Driving" section.
Deactivation of the automatic functions of the electric parkingbrake
fixed. The "automatic application" (on switching off the engine) and
"automatic release" functions aredeactivated or faulty.
Activate the function (according to country) via the
vehicle configuration menu or contact a CITROËN
dealer or a qualified workshop if automatic application/
release is not possible.
The parkin
g brake can be released manually usingthe emergency release procedure.
For more information on the electric parking brake,
refer to the "Driving" section.
Page 34 of 348
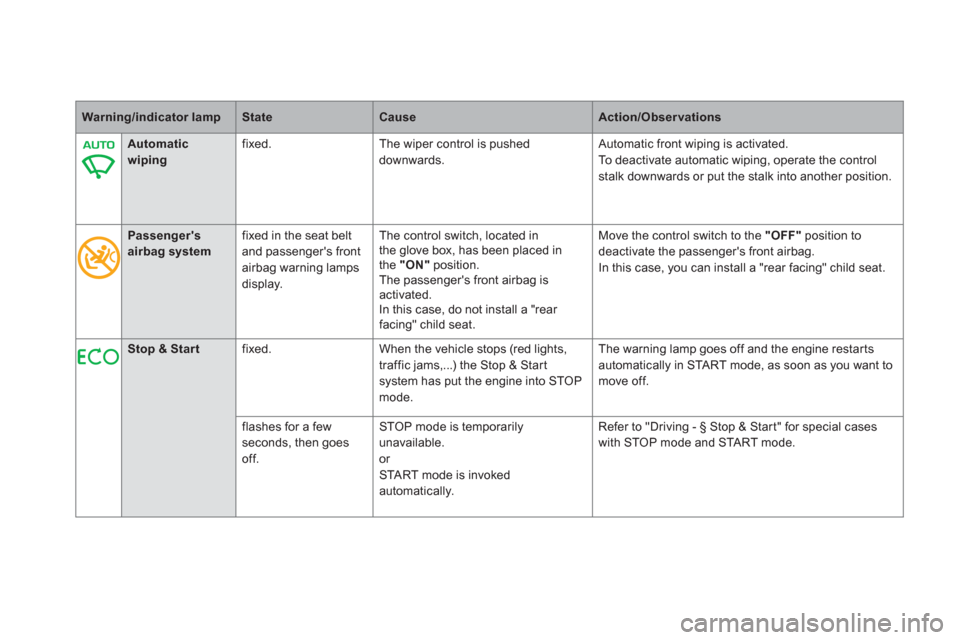
Warning/indicator lampStateCauseAction/Observations
Automatic
wiping
fixed. The wiper control is pushed
downwards.
Automatic front wiping is activated.
To deactivate automatic wipin
g, operate the controlstalk downwards or put the stalk into another position.
Passenger's airbag systemfixed in the seat beltand passenger's front airbag warning lamps
display.
The control switch, located in
the glove box, has been placed in
the "ON"
position.
The passenger's front airbag is activated.In this case, do not install a "rear facing" child seat.
Move the control switch to the "OFF"
position to
deactivate the passenger's front airbag.
In this case, you can install a "rear facing" child seat.
Stop & Startfixed. When the vehicle stops (red lights,
traffic jams,...) the Stop & Star tsystem has put the engine into STOPmode.The warnin
g lamp goes off and the engine restarts
automatically in START mode, as soon as you want tomove off.
fl
ashes for a few seconds, then goesoff. ST
OP mode is temporarily unavailable. or STA R T mode is invokedautomatically. Refer to "Drivin
g - § Stop & Star t" for special cases
with STOP mode and STA R T m o d e .
Page 51 of 348
Access
Unlocking the vehicle
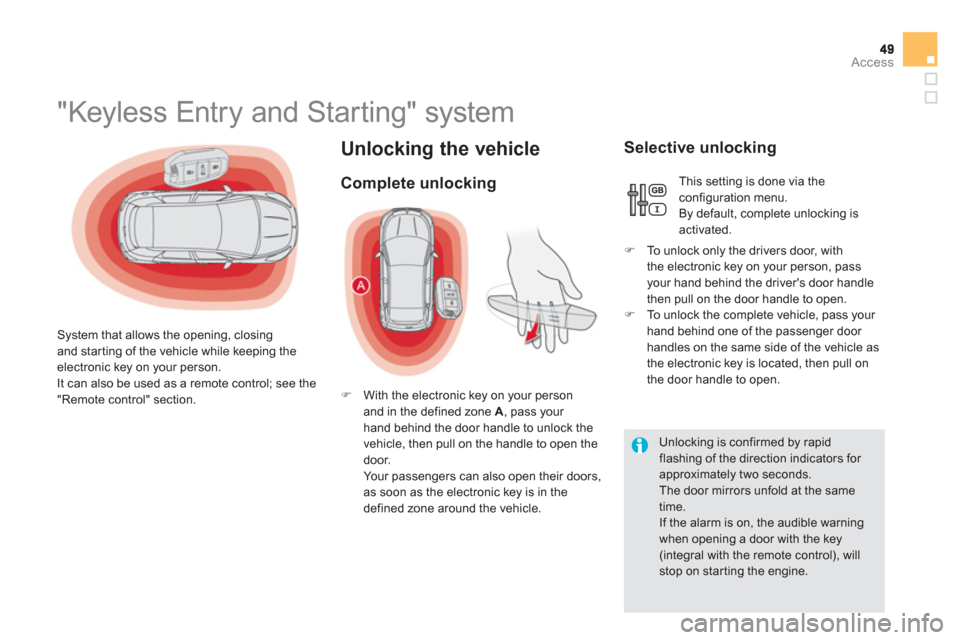
"Keyless Entry and Starting" system
System that allows the opening, closingand star ting of the vehicle while keeping theelectronic key on your person.
It can also be used as a remote control; see the"Remote control" section.
Complete unlocking
�)
With the electronic key on your personand in the defined zone A
, pass your hand behind the door handle to unlock thevehicle, then pull on the handle to open the door.
Yo u r p a s s e ngers can also open their doors,
as soon as the electronic key is in the defined zone around the vehicle.
Selective unlocking
This setting is done via the configuration menu.
By default, complete unlocking is activated.
�)
To unlock only the drivers door, withthe electronic key on your person, passyour hand behind the driver's door handle
then pull on the door handle to open.
�) To unlock the complete vehicle, pass your hand behind one of the passenger door handles on the same side of the vehicle asthe electronic key is located, then pull on
the door handle to open.
Unlocking is confirmed by rapidflashing of the direction indicators for approximately two seconds.
The door mirrors unfold at the sametime.
If the alarm is on, the audible warningwhen opening a door with the key(integral with the remote control), willstop on star ting the engine.
Page 53 of 348
51Access
Deadlocking
Deadlocking renders the exterior and
interior door controls inoperative. It also deactivates the manual centralcontrol button. Therefore, never leave anyone inside the vehicle when it is deadlocked.
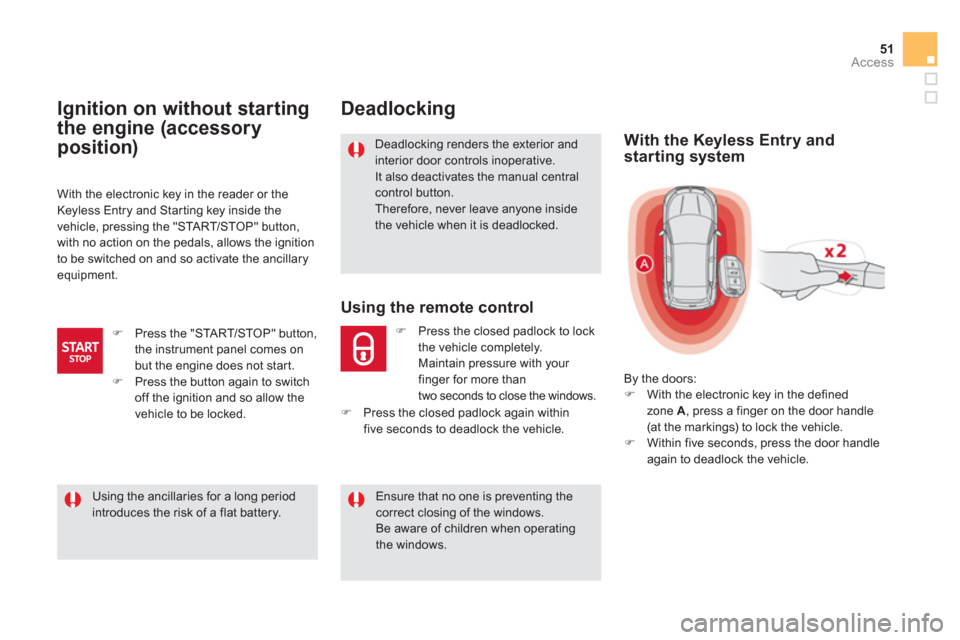
Using the remote control
�) Press the closed padlock to lock
the vehicle completely.
Maintain pressure with
your
finger for more than two seconds to close the windows.
With the electronic key in the reader or the
Keyless Entry and Starting key inside the
vehicle, pressin
g the "STA R T/STOP" button,
with no action on the pedals, allows the ignition
to be switched on and so activate the ancillary
equipment.
Ignition on without starting
the engine
(accessory
position)
�)
Press the "STA R T/STOP" button,
the instrument panel comes on
but the engine does not star t.�) Press the button again to switch
off the ignition and so allow the
vehicle to be locked.
Using the ancillaries for a long periodintroduces the risk of a flat battery.
With the Keyless Entry and
startin
g system
By the doors: �)
With the electronic key in the defined
zone A , press a finger on the door handle (at the markings) to lock the vehicle.
�)
Within five seconds, press the door handle
again to deadlock the vehicle.
Ensure that no one is preventing the correct closing of the windows. Be aware of children when operating
the windows.
�)
Press the closed padlock again within
five seconds to deadlock the vehicle.
Page 60 of 348
OFF
OFF
OFF
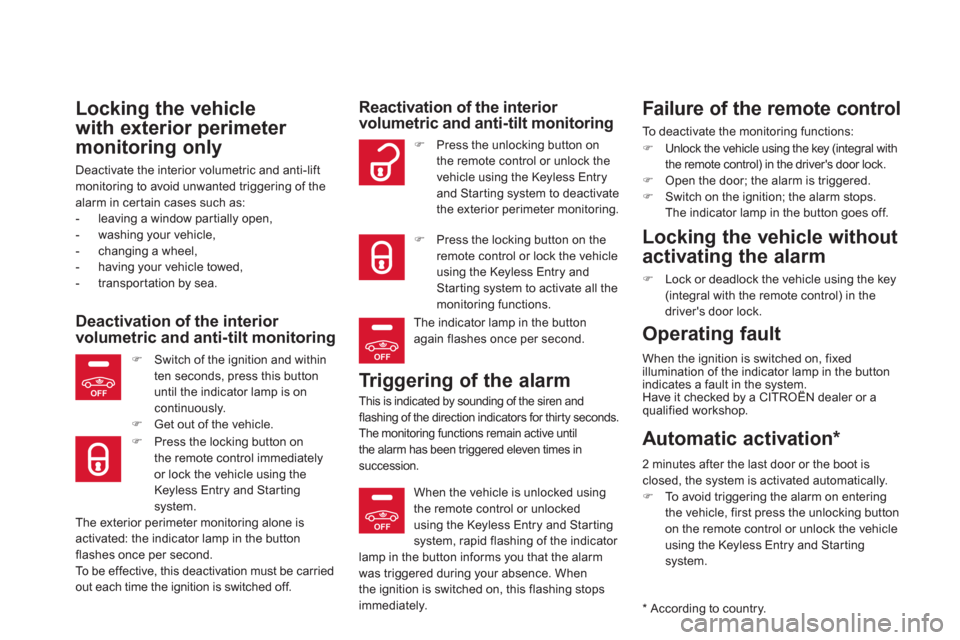
Locking the vehicle
w
ith exterior perimeter
monitoring only
Deactivate the interior volumetric and anti-liftmonitoring to avoid unwanted triggering of thealarm in certain cases such as:
- leaving a window par tially open,
- washing your vehicle,
- changing a wheel,
- having your vehicle towed,
- transportation by sea.
Deactivation of the interior volumetric and anti-tilt monitoring
�)
Switch of the ignition and within
ten seconds, press this button
until the indicator lamp is on
continuously.�) Get out of the vehicle.
�)
Press the locking button on
the remote control immediatelyor lock the vehicle using the Keyless Entry and Starting system.
The exterior perimeter monitorin
g alone is activated: the indicator lamp in the buttonflashes once per second.
To b e effective, this deactivation must be carried
out each time the ignition is switched off.
Reactivation of the interior volumetric and anti-tilt monitoring
Tr iggering of the alarm
This is indicated by sounding of the siren andflashing of the direction indicators for thirty seconds.
The monitoring functions remain active until
the alarm has been triggered eleven times in succession.
�)Press the unlocking button on
the remote control or unlock thevehicle using the Keyless Entry and Starting system to deactivate
the exterior perimeter monitoring.
�) Press the locking button on theremote control or lock the vehicle
using the Keyless Entry and Starting system to activate all the monitoring functions.
The indicator lamp in the button
again flashes once per second.
When the vehicle is unlocked usin
gthe remote control or unlockedusing the Keyless Entry and Starting
system, rapid flashing of the indicator lamp in the button informs you that the alarm
was triggered during your absence. When
the i
gnition is switched on, this flashing stops
immediately.
Failure of the remote control
To deactivate the monitoring functions:
�)Unlock the vehicle using the key (integral with
the remote control) in the driver's door lock. �)Open the door; the alarm is triggered.�)Switch on the ignition; the alarm stops.
The indicator lamp in the button goes off.
Locking the vehicle without
activating the alarm
�)Lock or deadlock the vehicle using the key(integral with the remote control) in the driver's door lock.
Operating fault
When the ignition is switched on, fixed
illumination of the indicator lamp in the button
indicates a fault in the s
ystem. Have it checked by a CITROËN dealer or a y
qualified workshop.
*
According to country.
Automatic activation *
2 minutes after the last door or the boot isclosed, the system is activated automatically. �)To avoid triggering the alarm on entering
the vehicle, first press the unlocking buttonon the remote control or unlock the vehicleusing the Keyless Entry and Star ting system.
Page 62 of 348
Safety anti-pinch
When the window rises and meets an obstacle, it stops and immediately partially lowers again.
In the event o
f unwanted opening of the
window on closing, press the switch until the
window opens completely, then pull the switch
immediatel
y until the window closes. Continue
to hold the switch for approximately one second after the window has closed.
The safety anti-pinch function is not active
during this operation.
Deactivating the rear window controls
Reinitialisation of
the electric windows
In the event of contact during operationof the windows, you must reverse the movement of the window. To do this,press the switch concerned.
When operating the passenger electricwindow switches, the driver mustensure that no one is preventing correct closing of the windows. The driver must ensure that the passengers use the electric windowscorrectly.
Be aware of children when operating the windows.
Be aware of passengers or other persons present when closing the
windows using the the electronic key or the "Access and Starting Hands Free"system. Followin
g reconnection of the battery, the
safety anti-pinch function must be reinitialised.The safety anti-pinch function is not active
during these operations:
- lower the window completely, then raise
it, it will rise in ste
ps of a few centimetreseach time the switch is pressed. Repeat
the operation until the window closes
completely,
- continue to press the switch for at least
one second after reaching this position,
window closed.
For the safety of your children, press switch 5to prevent operation of therear windows irrespective of their position.
The warnin
g lamp in the button comes on,accompanied by a message confirmingactivation. It remains on, as long as the child
lock is activated.
The interior controls for the rear doors are also deactivated. Opening the doors from the outside and
operation of the rear electric windows from the
driver's controls remain possible.
Page 65 of 348
63Access
Fuel tank Capacity of the tank: approximately 60 litres.
Additions of fuel must be of at least 5 litres to
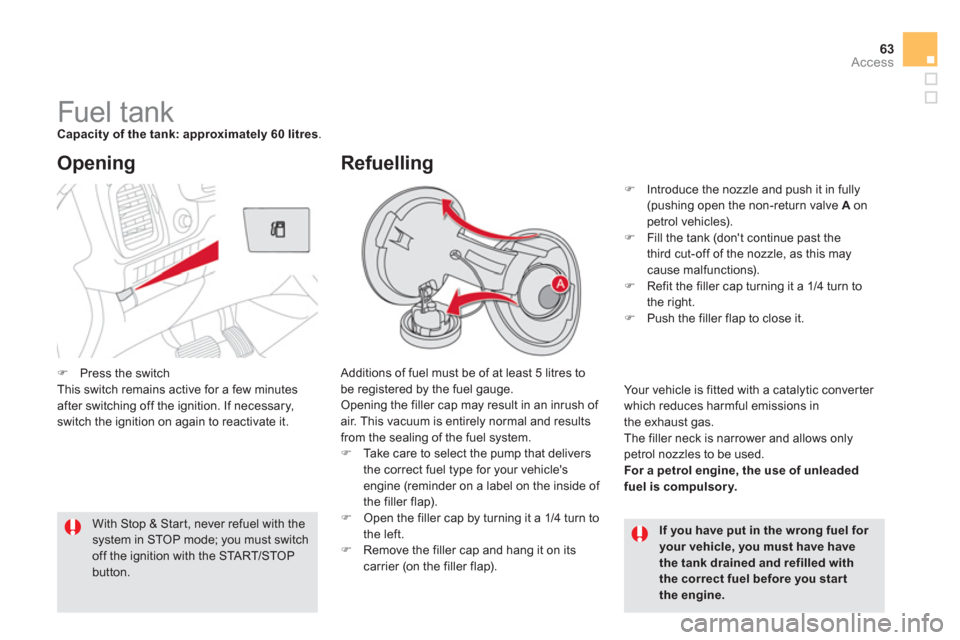
be registered by the fuel gauge.Opening the filler cap may result in an inrush of air. This vacuum is entirely normal and results from the sealing of the fuel system.�) Take care to select the pump that delivers
the correct fuel type for your vehicle'sengine (reminder on a label on the inside of
the filler flap).�) Open the filler cap by turning it a 1/4 turn to
the left. �) Remove the filler cap and hang it on its carrier (on the filler flap).
Opening
If you have put in the wrong fuel for your vehicle, you must have havethe tank drained and refilled with the correct fuel before you start the engine.
With Stop & Star t, never refuel with the system in STOP mode; you must switchoff the ignition with the START/STOP button.
Refuelling
�)
Introduce the nozzle and push it in fully(pushing open the non-return valve Aonpetrol vehicles). �)
Fill the tank (don't continue past the
third cut-off of the nozzle, as this may cause malfunctions).�) Refit the filler cap turning it a 1/4 turn to
the right. �) Push the filler flap to close it.
Your vehicle is
fitted with a catalytic converter
which reduces harmful emissions in
the exhaust gas.
The filler neck is narrower and allows only
petrol nozzles to be used.
For a petrol en
gine, the use of unleaded fuel iscompulsory.
�)Press the switch
This switch remains active for a few minutes
after switching off the ignition. If necessary, switch the ignition on again to reactivate it.