ECO mode Citroen DS5 2014 1.G Owner's Guide
[x] Cancel search | Manufacturer: CITROEN, Model Year: 2014, Model line: DS5, Model: Citroen DS5 2014 1.GPages: 372, PDF Size: 32.58 MB
Page 134 of 372
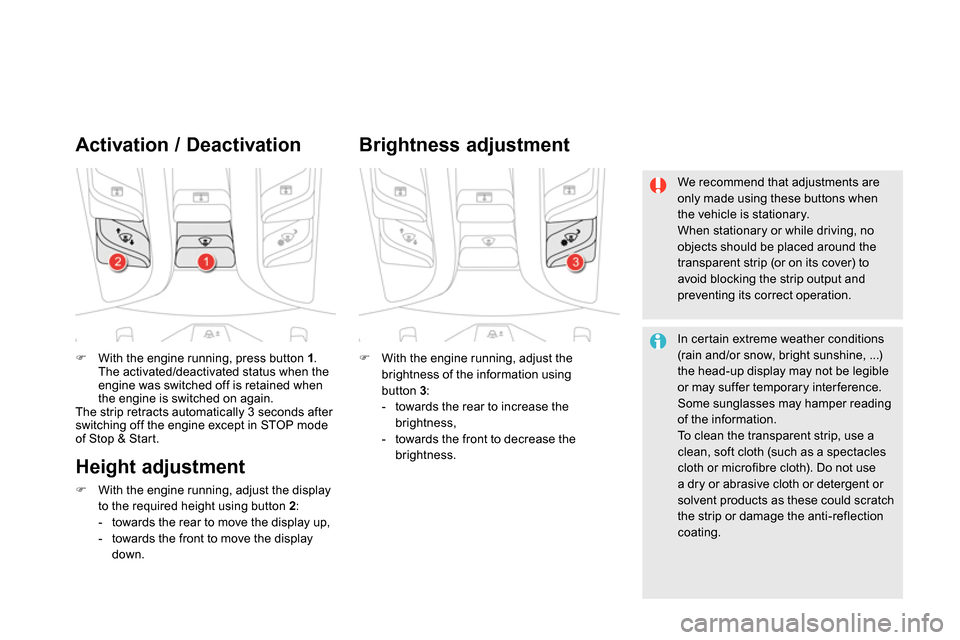
With the engine running, press button 1
.
The activated/deactivated status when the
engine was switched off is retained when
the engine is switched on again.
The strip retracts automatically 3 seconds after
switching off the engine except in STOP mode
of Stop & Start.
Activation / Deactivation
With the engine running, adjust the
brightness of the information using
button 3
:
- towards the rear to increase the
brightness,
- towards the front to decrease the
brightness.
Brightness adjustment
We recommend that adjustments are
only made using these buttons when
the vehicle is stationary.
When stationary or while driving, no
objects should be placed around the
transparent strip (or on its cover) to
avoid blocking the strip output and
preventing its correct operation.
In certain extreme weather conditions
(rain and/or snow, bright sunshine, ...)
the head-up display may not be legible
or may suffer temporary inter ference.
Some sunglasses may hamper reading
of the information.
To clean the transparent strip, use a
clean, soft cloth (such as a spectacles
cloth or microfibre cloth). Do not use
a dry or abrasive cloth or detergent or
solvent products as these could scratch
the strip or damage the anti-reflection
coating.
Height adjustment
With the engine running, adjust the display
to the required height using button 2
:
- towards the rear to move the display up,
- towards the front to move the display
down.
Page 138 of 372
The cruise control system cannot, in any
circumstances, replace the need to respect speed
limits, nor can it replace the need for vigilance and
responsibility on the part of the driver.
You are advised to keep your feet near the pedals
at all times.
Cruise control
System which automatically maintains the
speed of the vehicle at the value programmed
by the driver, without any action on the
accelerator pedal.
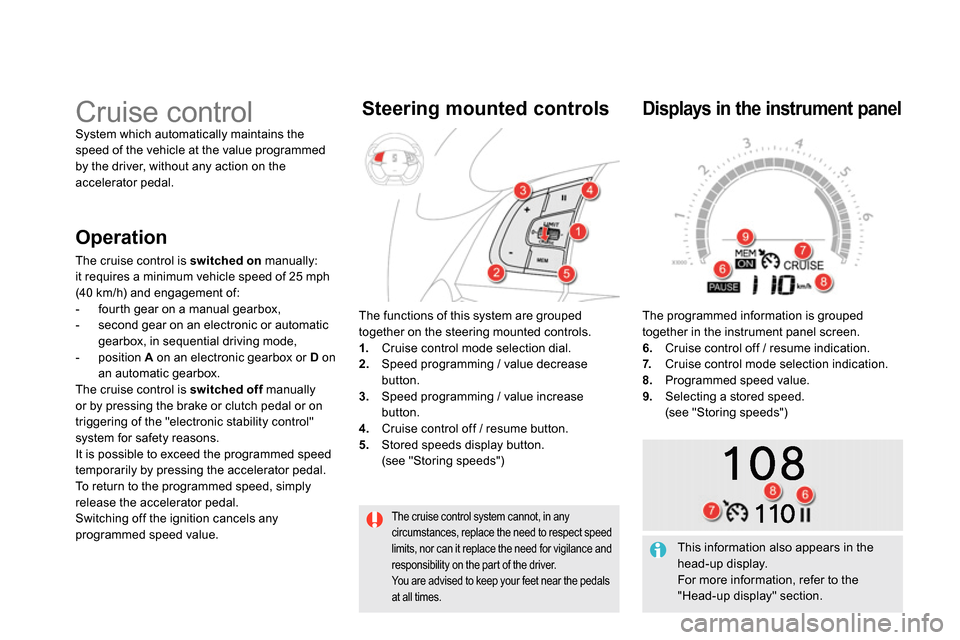
The functions of this system are grouped
together on the steering mounted controls.
1.
Cruise control mode selection dial.
2.
Speed programming / value decrease
button.
3.
Speed programming / value increase
button.
4.
Cruise control off / resume button.
5.
Stored speeds display button.
(see "Storing speeds")
Steering mounted controls
The programmed information is grouped
together in the instrument panel screen.
6.
Cruise control off / resume indication.
7.
Cruise control mode selection indication.
8.
Programmed speed value.
9.
Selecting a stored speed.
(see "Storing speeds")
Displays in the instrument panel
Operation
The cruise control is switched on
manually:
it requires a minimum vehicle speed of 25 mph
(40 km/h) and engagement of:
- fourth gear on a manual gearbox,
- second gear on an electronic or automatic
gearbox, in sequential driving mode,
- position A
on an electronic gearbox or D
on
an automatic gearbox.
The cruise control is switched off
manually
or by pressing the brake or clutch pedal or on
triggering of the "electronic stability control"
system for safety reasons.
It is possible to exceed the programmed speed
temporarily by pressing the accelerator pedal.
To return to the programmed speed, simply
release the accelerator pedal.
Switching off the ignition cancels any
programmed speed value.
This information also appears in the
head-up display.
For more information, refer to the
"Head-up display" section.
Page 148 of 372
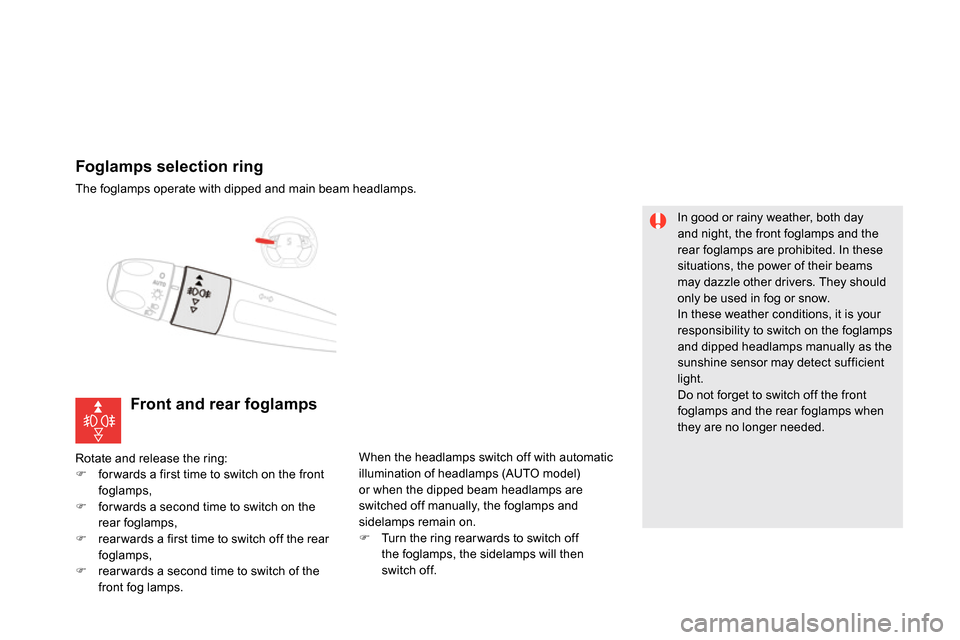
Foglamps selection ring
The foglamps operate with dipped and main beam headlamps.
Front and rear foglamps
Rotate and release the ring:
for wards a first time to switch on the front
foglamps,
for wards a second time to switch on the
rear foglamps,
rear wards a first time to switch off the rear
foglamps,
rear wards a second time to switch of the
front fog lamps. When the headlamps switch off with automatic
illumination of headlamps (AUTO model)
or when the dipped beam headlamps are
switched off manually, the foglamps and
sidelamps remain on.
Turn the ring rear wards to switch off
the foglamps, the sidelamps will then
switch off.
In good or rainy weather, both day
and night, the front foglamps and the
rear foglamps are prohibited. In these
situations, the power of their beams
may dazzle other drivers. They should
only be used in fog or snow.
In these weather conditions, it is your
responsibility to switch on the foglamps
and dipped headlamps manually as the
sunshine sensor may detect sufficient
light.
Do not forget to switch off the front
foglamps and the rear foglamps when
they are no longer needed.
Page 149 of 372

147Visibility
Lighting left on audible
signal
An audible signal when a front door
is opened warns the driver that the
vehicle's exterior lighting is on, with the
ignition off and in manual lighting mode.
In this case, switching off the lighting
stops the audible signal.
With the ignition off, if the dipped
headlamps remain on, the vehicle goes
into "ECO" mode to avoid discharging
the battery.
In some weather conditions (e.g. low
temperature or humidity), the presence
of misting on the internal sur face of the
glass of the headlamps and rear lamps
is normal; it disappears after the lamps
have been on for a few minutes.
The daytime running
lamps can be activated
and deactivated via the
configuration menu.
The lighting goes off when you switch
off the ignition, but you can always
switch it on again using the lighting
control stalk.
Daytime running lamps
(LEDs)
They come on when the engine is started.
Depending on the country of sale or where
required by regulations, they are used for:
- daytime running lamps in day mode and
sidelamps in night mode (they are brighter
when daytime running lamps),
or
- sidelamps in day and night mode.
Page 161 of 372
159Visibility
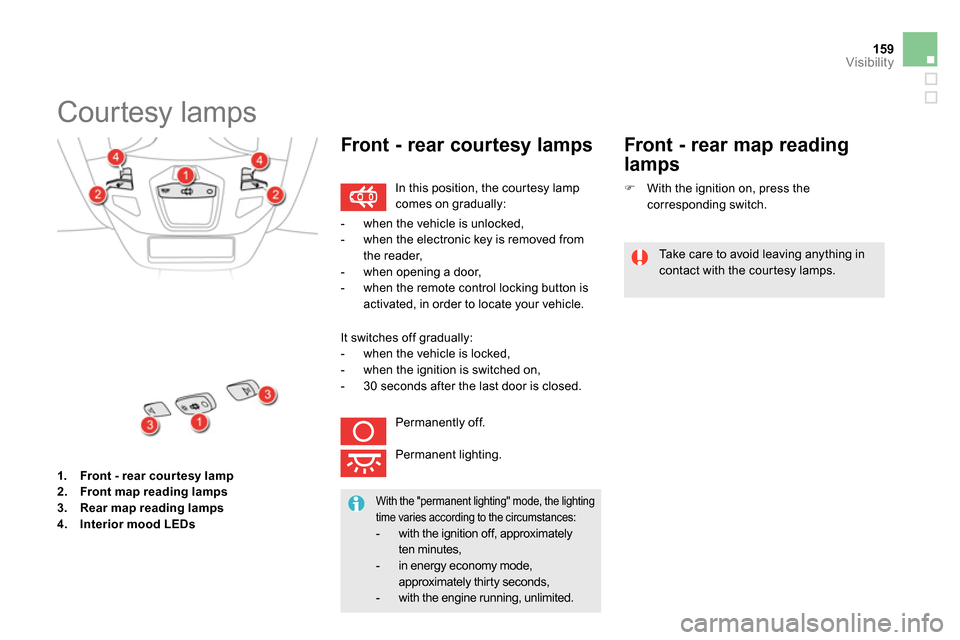
1.
Front - rear cour tesy lamp
2.
Front map reading lamp
s
3.
Rear map reading lamp
s
4.
Interior mood LEDs
Courtesy lamps
In this position, the courtesy lamp
comes on gradually:
Front - rear courtesy lamps
Take care to avoid leaving anything in
contact with the courtesy lamps.
With the "permanent lighting" mode, the lighting
time varies according to the circumstances:
- with the ignition off, approximately
ten minutes,
-
in energy economy mode,
approximately thir ty seconds,
-
with the engine running, unlimited.
- when the vehicle is unlocked,
- when the electronic key is removed from
the reader,
- when opening a door,
- when the remote control locking button is
activated, in order to locate your vehicle.
It switches off gradually:
- when the vehicle is locked,
- when the ignition is switched on,
- 30 seconds after the last door is closed.
Permanently off.
Permanent lighting.
Front - rear map reading
lamps
With the ignition on, press the
corresponding switch.
Page 214 of 372
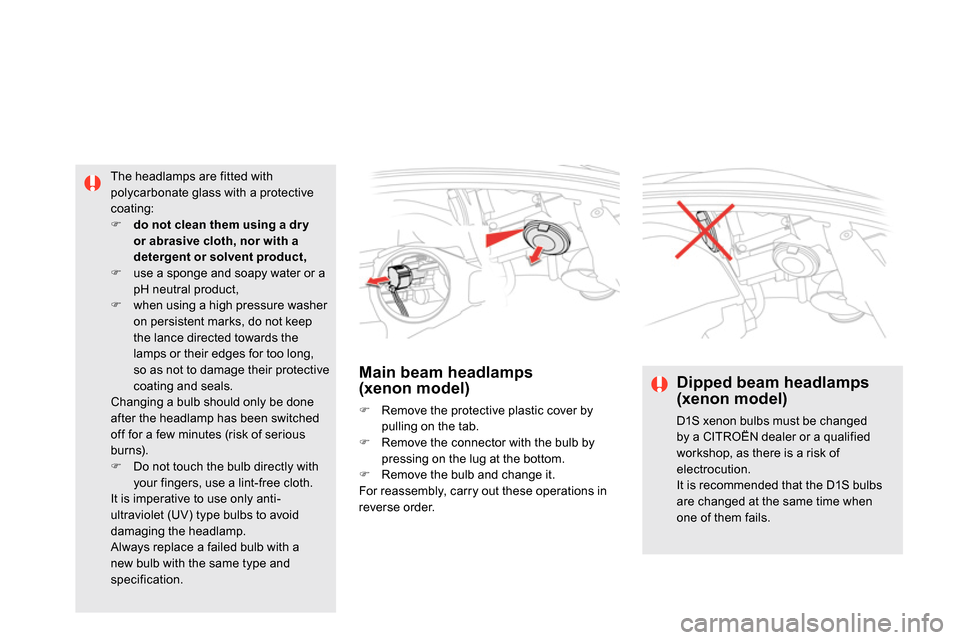
Main beam headlamps
(xenon model)
Remove the protective plastic cover by
pulling on the tab.
Remove the connector with the bulb by
pressing on the lug at the bottom.
Remove the bulb and change it.
For reassembly, carry out these operations in
reverse order.
The headlamps are fitted with
polycarbonate glass with a protective
coating:
do not clean them using a dr y
or abrasive cloth, nor with a
detergent or solvent product,
use a sponge and soapy water or a
pH neutral product,
when using a high pressure washer
on persistent marks, do not keep
the lance directed towards the
lamps or their edges for too long,
so as not to damage their protective
coating and seals.
Changing a bulb should only be done
after the headlamp has been switched
off for a few minutes (risk of serious
burns).
Do not touch the bulb directly with
your fingers, use a lint-free cloth.
It is imperative to use only anti-
ultraviolet (UV) type bulbs to avoid
damaging the headlamp.
Always replace a failed bulb with a
new bulb with the same type and
specification.
Dipped beam headlamps
(xenon model)
D1S xenon bulbs must be changed
by a CITROËN dealer or a qualified
workshop, as there is a risk of
electrocution.
It is recommended that the D1S bulbs
are changed at the same time when
one of them fails.
Page 227 of 372
225Practical information
Load reduction mode
System which manages the use of certain
functions according to the level of charge
remaining in the battery.
When the vehicle is being driven, the load
reduction function temporarily deactivates
certain functions, such as the air conditioning,
the heated rear screen...
The deactivated functions are reactivated
automatically as soon as conditions permit.
System which manages the duration of use of
certain functions to conser ve a sufficient level
of charge in the battery.
After the engine has stopped, you can
still use functions such as the audio and
telematics system, windscreen wipers, dipped
beam headlamps, courtesy lamps, etc. for
a maximum combined duration of about
forty minutes.
Energy economy mode
Switching to economy
mode
A message then appears in the instrument
panel screen indicating that the vehicle has
switched to economy mode and the active
functions are put on standby.
If a telephone call is being made at this time,
it will be maintained for around 10 minutes with
the Bluetooth hands-free system of your audio
system.
Exiting economy mode
These functions are reactivated automatically
next time the vehicle is driven.
In order to restore the use of these functions
immediately, start the engine and let it run:
- for less than ten minutes, to use the
equipment for approximately five minutes,
- for more than ten minutes, to use the
equipment for up to approximately
thirty minutes.
Let the engine run for the duration specified to
ensure that the battery charge is sufficient.
Do not repeatedly and continuously restart the
engine in order to charge the battery.
A flat battery prevents the engine from starting
(refer to the "Battery" section).
Page 239 of 372
237Checks
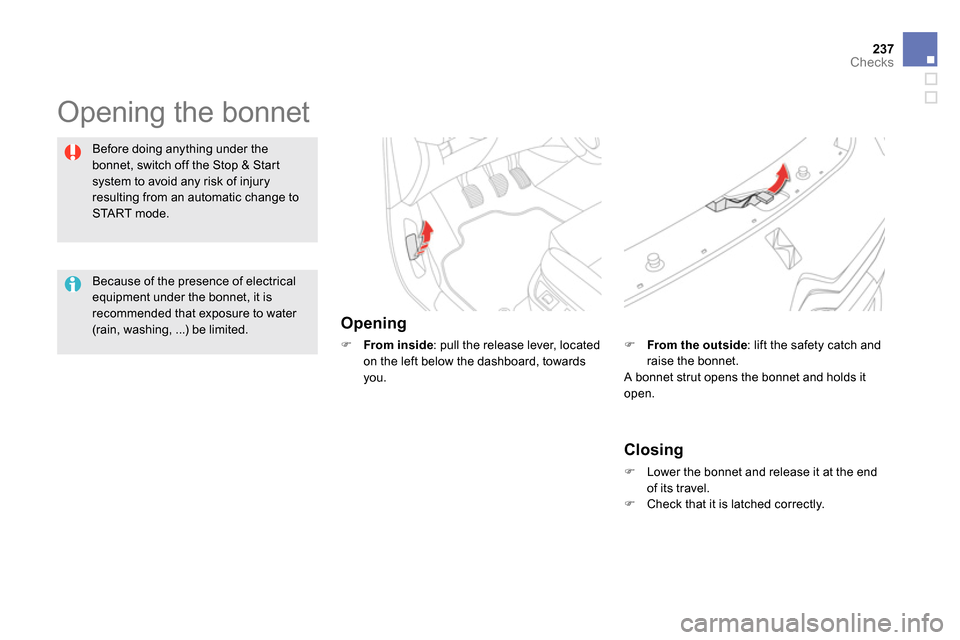
Opening the bonnet
Opening
From inside
: pull the release lever, located
on the left below the dashboard, towards
you.
Before doing anything under the
bonnet, switch off the Stop & Start
system to avoid any risk of injury
resulting from an automatic change to
START mode.
Closing
Lower the bonnet and release it at the end
of its travel.
Check that it is latched correctly.
From the outside
: lift the safety catch and
raise the bonnet.
A bonnet strut opens the bonnet and holds it
open.
Because of the presence of electrical
equipment under the bonnet, it is
recommended that exposure to water
(rain, washing, ...) be limited.
Page 253 of 372

251Te c h n i c a l d a t a
Petrol weights and towed loads (in kg)
Petrol engines
THP
1
55 hp
THP
15 0 hp
THP
160
hp
THP
200 hp
Gearbox
es
Automatic
(6-speed)
Automatic
(6-speed)
Automatic
(6-speed)
Manual
(6-speed)
Model codes
5FVA - A /1
5FEA
5FMA - Y - A /D
5FU8
- Unladen weight
1 420
1 497
1 495
1 430
- Kerb weight *
1 495
1 570
1 570
1 505
- Gross vehicle weight (GV W)
2 035
2 030
2 030
2 050
- Gross train weight (GTW)
on a 12 % gradient
3 335
2 830
2 830
2 800
- Braked trailer (within GTW limit)
on a 10 % or 12 % gradient
1 300
800
800
750
- Braked trailer ** (with load transfer within the
GTW limit)
1 500
800
800
1 050
- Unbraked trailer
74 5
74 5
74 5
750
- Recommended nose weight
75
75
75
75
*
The kerb weight is equal to the unladen weight + driver (75 kg).
**
The weight of the braked trailer can be increased, within the GTW limit, if the GV W of the towing vehicle is reduced by an equal amount; warning,
towing using a lightly loaded towing vehicle may have an adverse effect on its road holding.
The GTW and towed load values indicated are valid up to a maximum altitude of 1 000 metres; the towed load mentioned must be reduced by 10 % for
each additional 1 000 metres of altitude.
The speed of a towing vehicle must not exceed 60 mph (100 km/h) (comply with the legislation in force in your country).
High ambient temperatures may result in a reduction in the per formance of the vehicle to protect the engine; if the ambient temperature is above 37 °C,
limit the towed load.
Page 254 of 372

* The kerb weight is equal to the unladen weight + driver (75 kg).
Petrol engines
THP
155 hp
THP
200 hp
Gearboxes
Automatic
(6-speed)
Manual
(6-speed)
Model codes
5FVA - A /1
5FU8
- Unladen weight
1 540
1 572
- Kerb weight *
1 615
1 647
- Gross vehicle weight (GV W)
2 170
2 195
- Gross train weight (GTW)
on a 12% gradient
3 320
2 795
- Braked trailer (within the GTW limit)
on a 10% or 12% gradient
1 150
600
- Unbraked trailer
74 5
600
- Recommended nose weight
75
75
The GTW and towed load values indicated are valid up to a maximum altitude of 1 000 metres; the towed load mentioned must be reduced by 10 % for
each additional 1 000 metres of altitude.
The speed of a towing vehicle must not exceed 60 mph (100 km/h) (comply with the legislation in force in your country).
High ambient temperatures may result in a reduction in the per formance of the vehicle to protect the engine; if the ambient temperature is above 37 °C,
limit the towed load.
Petrol weights and towed loads (in kg) - Commercial versions