height adjustment CITROEN DS5 2018 Owners Manual
[x] Cancel search | Manufacturer: CITROEN, Model Year: 2018, Model line: DS5, Model: CITROEN DS5 2018Pages: 403, PDF Size: 15.62 MB
Page 10 of 403
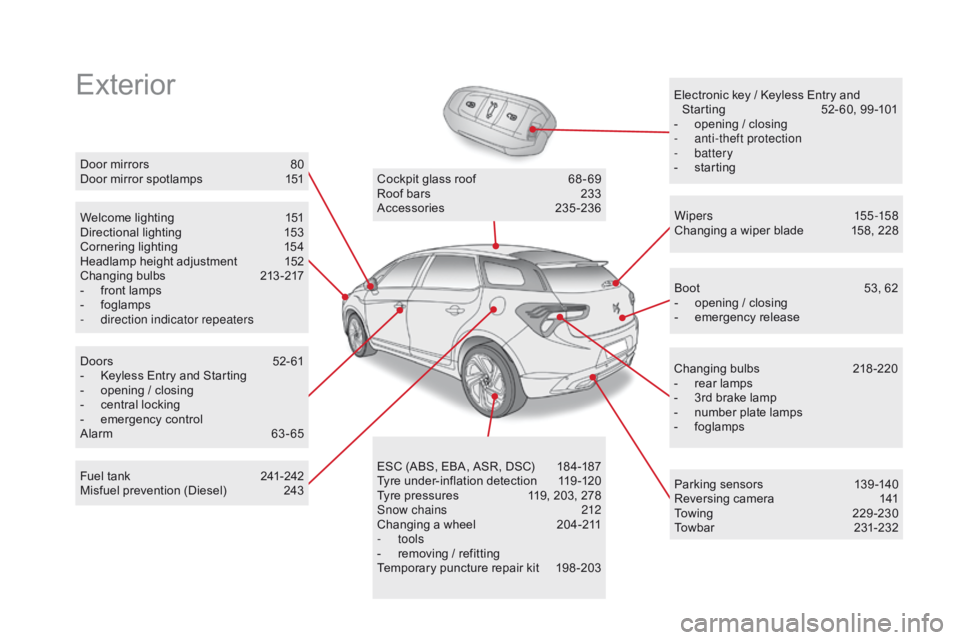
ExteriorElectronic key / Keyless Entry and Starting 5 2- 60, 99 -101
-
o
pening / closing
-
a
nti-theft protection
-
battery
-
s
tarting
Welcome lighting
1
51
Directional lighting
1
53
Cornering lighting
1
54
Headlamp height adjustment
1
52
Changing bulbs
2
13-217
-
f
ront lamps
-
fo
glamps
-
d
irection indicator repeaters Wipers
155 -15 8
Changing a wiper blade
1
58, 228
Doors
5
2- 61
-
K
eyless Entry and Starting
-
o
pening / closing
-
c
entral locking
-
em
ergency control
Alarm
6
3-65 Cockpit glass roof
6
8 - 69
Roof bars
2
33
Accessories
23
5-236
ESC (ABS, EBA, ASR, DSC)
1
84-187
Tyre under-inflation detection
1
19 -120
Tyre pressures
1
19, 203, 278
Snow chains
2
12
Changing a wheel
2
04-211
-
tools
-
r
emoving / refitting
Temporary puncture repair kit
1
98 -203 Boot
5
3, 62
-
o
pening / closing
-
em
ergency release
Changing bulbs
2
18-220
-
r
ear lamps
-
3
rd brake lamp
-
n
umber plate lamps
-
fo
glamps
Door mirrors
8
0
Door mirror spotlamps
1
51
Fuel tank
2
41-242
Misfuel prevention (Diesel)
2
43 Parking sensors
1
39 -140
Reversing camera
1
41
To w i n g
2
2 9 - 2 3 0
Towbar
23
1-232
DS5_en_Chap00b_vue-ensemble_ed01-2015
Page 14 of 403
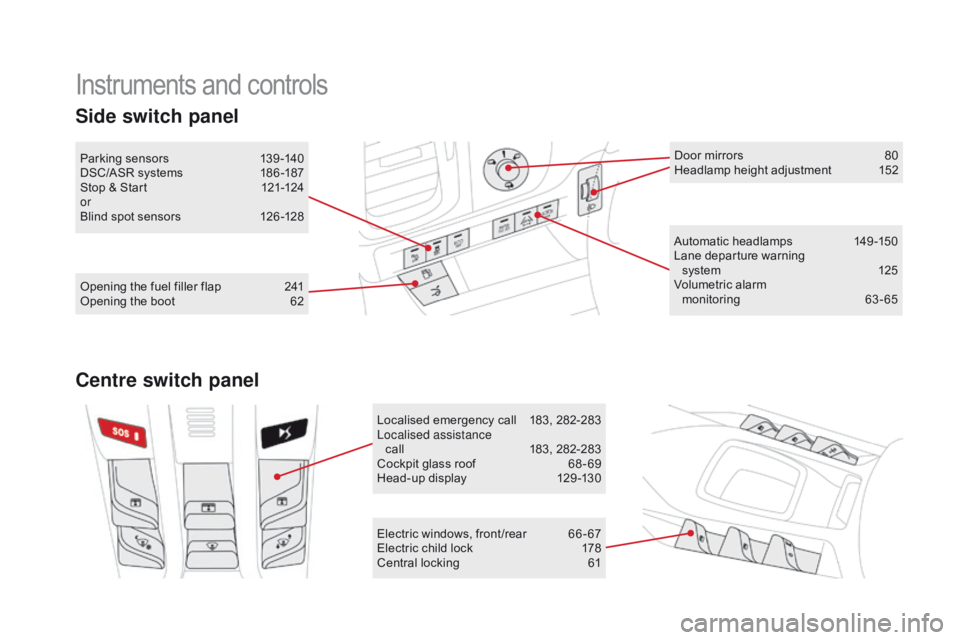
Instruments and controls
Automatic headlamps 149 -150
Lane departure warning system
1
25
Volumetric alarm monitoring
6
3-65
Electric windows, front /rear
6
6 - 67
Electric child lock
1
78
Central locking
6
1
Opening the fuel filler flap
2
41
Opening the boot
6
2
Parking sensors
1
39 -140
DSC/ASR systems
1
86 -187
Stop & Start
1
21-124
or
Blind spot sensors
1
26 -128
Side switch panel
Localised emergency call 1
83, 282-283
Localised assistance call
1
83, 282-283
Cockpit glass roof
6
8 - 69
Head-up display
1
29 -130Door mirrors
8
0
Headlamp height adjustment
1
52
centre switch panel
DS5_en_Chap00b_vue-ensemble_ed01-2015
Page 74 of 403
DS5_en_Chap03_confort_ed01-2015
Front seats
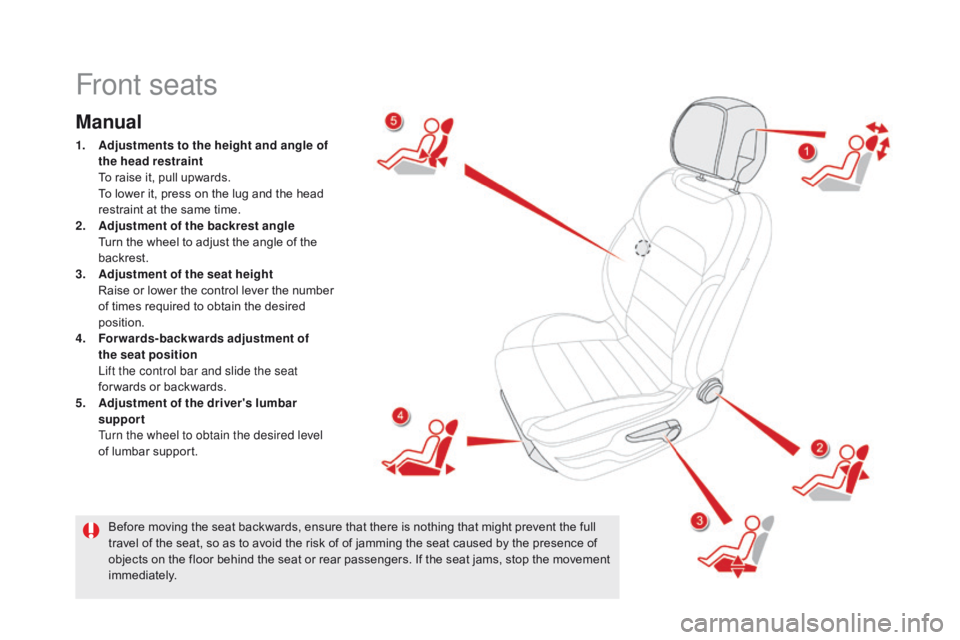
Manual
1. Adjustments to the height and angle of
the head restraint
T
o raise it, pull upwards.
T
o lower it, press on the lug and the head
restraint at the same time.
2.
A
djustment of the backrest angle
T
urn the wheel to adjust the angle of the
backrest.
3.
A
djustment of the seat height
R
aise or lower the control lever the number
of times required to obtain the desired
position.
4.
F
orwards-backwards adjustment of
the seat position
L
ift the control bar and slide the seat
for wards or backwards.
5.
A
djustment of the driver's lumbar
support
T
urn the wheel to obtain the desired level
of lumbar support.
Before moving the seat backwards, ensure that there is nothing that might prevent the full
travel of the seat, so as to avoid the risk of of jamming the seat caused by the presence of
objects on the floor behind the seat or rear passengers. If the seat jams, stop the movement
immediately.
Page 75 of 403
73
DS5_en_Chap03_confort_ed01-2015
Switch on the ignition or start the engine if the vehicle has gone into
economy mode.
The electric functions of the driver's seat are active for about 45 seconds
after opening the front door. They are deactivated about 45 seconds after
switching off the ignition and in economy mode.
To reactivate them, switch on the ignition.
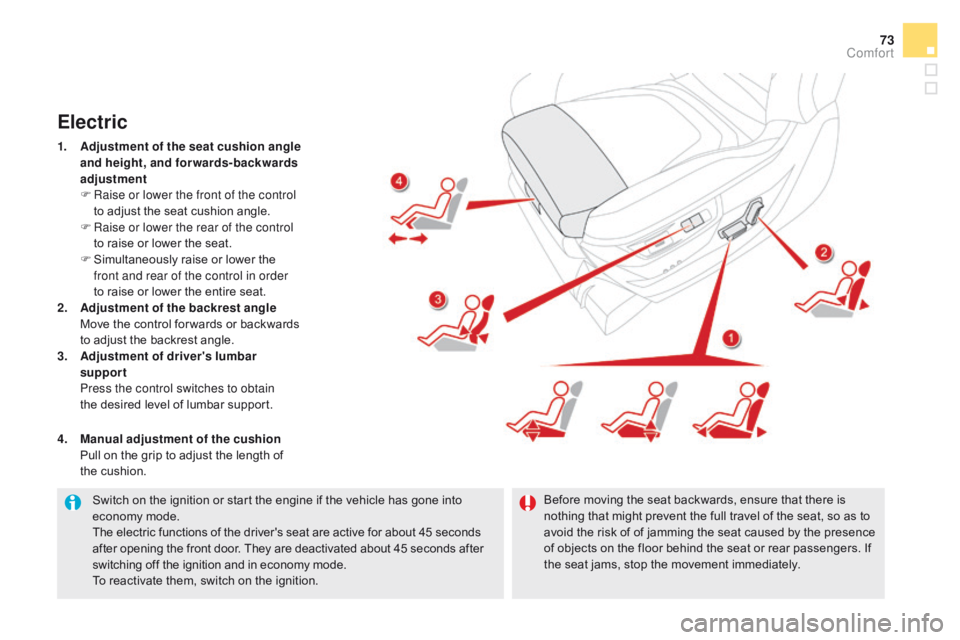
Electric
1. Adjustment of the seat cushion angle and height, and forwards-backwards
adjustment
F
R
aise or lower the front of the control
to
adjust the seat cushion angle.
F
R
aise or lower the rear of the control
to
raise or lower the seat.
F
S
imultaneously raise or lower the
front
and rear of the control in order
to
raise or lower the entire seat.
2.
A
djustment of the backrest angle
M
ove the control for wards or backwards
to
adjust the backrest angle.
3.
A
djustment of driver's lumbar
support
P
ress the control switches to obtain
the
desired level of lumbar support.
4.
M
anual adjustment of the cushion
P
ull on the grip to adjust the length of
the
cushion. Before moving the seat backwards, ensure that there is
nothing that might prevent the full travel of the seat, so as to
avoid the risk of of jamming the seat caused by the presence
of objects on the floor behind the seat or rear passengers. If
the seat jams, stop the movement immediately.
comfort
Page 77 of 403
75
DS5_en_Chap03_confort_ed01-2015
The head restraint is fitted with a frame
with notches which prevents it from
lowering; this is a safety device in case
of impact.
The adjustment is correct when the
upper edge of the head restraint is
level with the top of the head.
Never drive with the head restraints
removed; they must be in place and
adjusted correctly.
Head restraint height and
angle adjustment
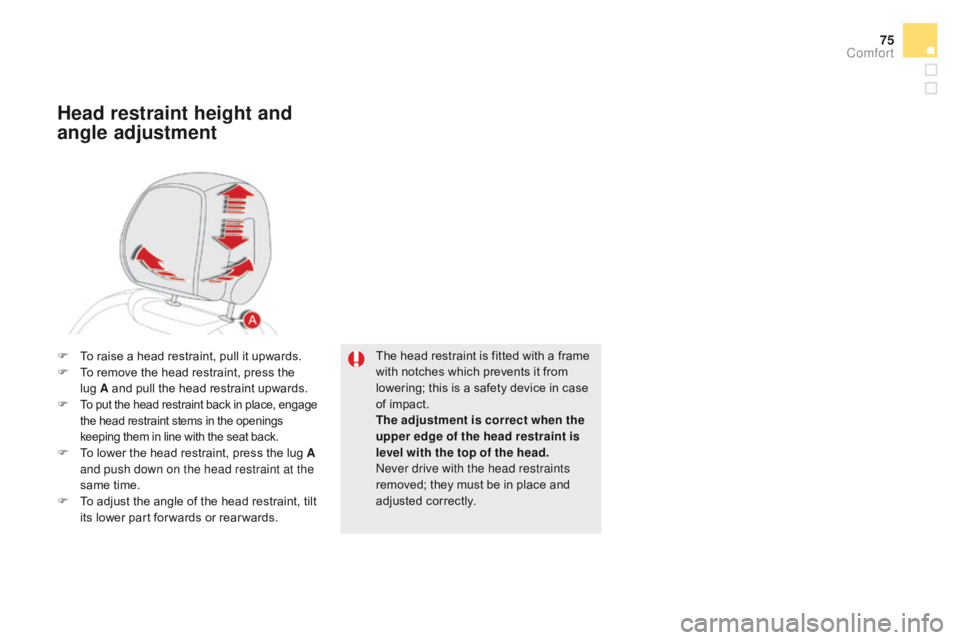
F To raise a head restraint, pull it upwards.
F T o remove the head restraint, press the
lug A and pull the head restraint upwards.
F
To put the head restraint back in place, engage
the head restraint stems in the openings
keeping them in line with the seat back.
F To lower the head restraint, press the lug A and push down on the head restraint at the
same time.
F
T
o adjust the angle of the head restraint, tilt
its lower part for wards or rear wards.
comfort
Page 83 of 403
81
DS5_en_Chap03_confort_ed01-2015
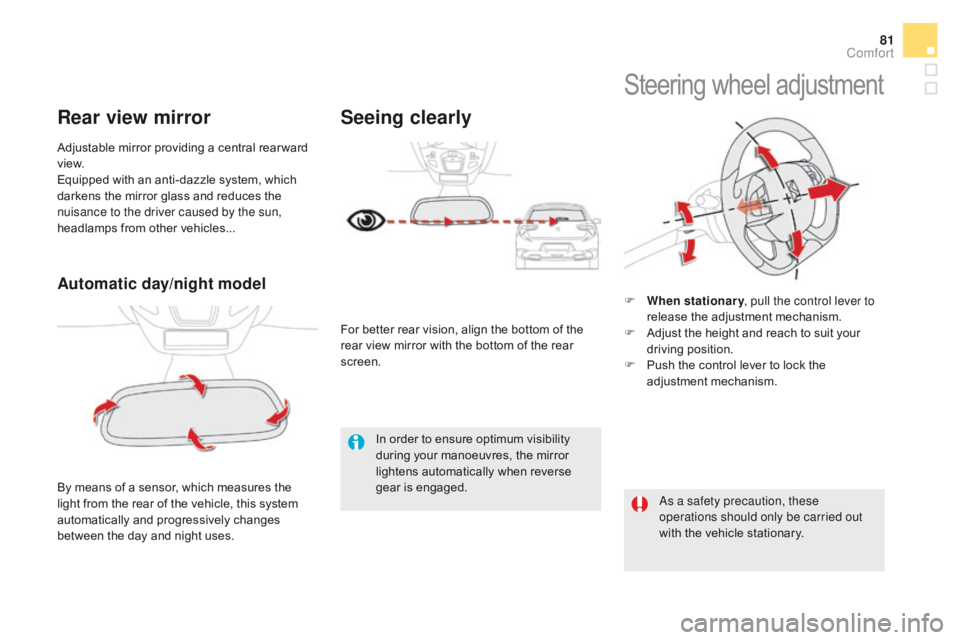
Automatic day/night model
By means of a sensor, which measures the
light from the rear of the vehicle, this system
automatically and progressively changes
between the day and night uses. Adjustable mirror providing a central rear ward
view.
Equipped with an anti-dazzle system, which
darkens the mirror glass and reduces the
nuisance to the driver caused by the sun,
headlamps from other vehicles...
Rear view mirror
In order to ensure optimum visibility
during your manoeuvres, the mirror
lightens automatically when reverse
gear is engaged.
Steering wheel adjustment
F When stationary, pull the control lever to
release the adjustment mechanism.
F
A
djust the height and reach to suit your
driving position.
F
P
ush the control lever to lock the
adjustment mechanism.
As a safety precaution, these
operations should only be carried out
with the vehicle stationary.
Seeing clearly
For better rear vision, align the bottom of the
rear view mirror with the bottom of the rear
screen.
comfort
Page 131 of 403
129
DS5_en_Chap04_conduite_ed01-2015
Head-up display
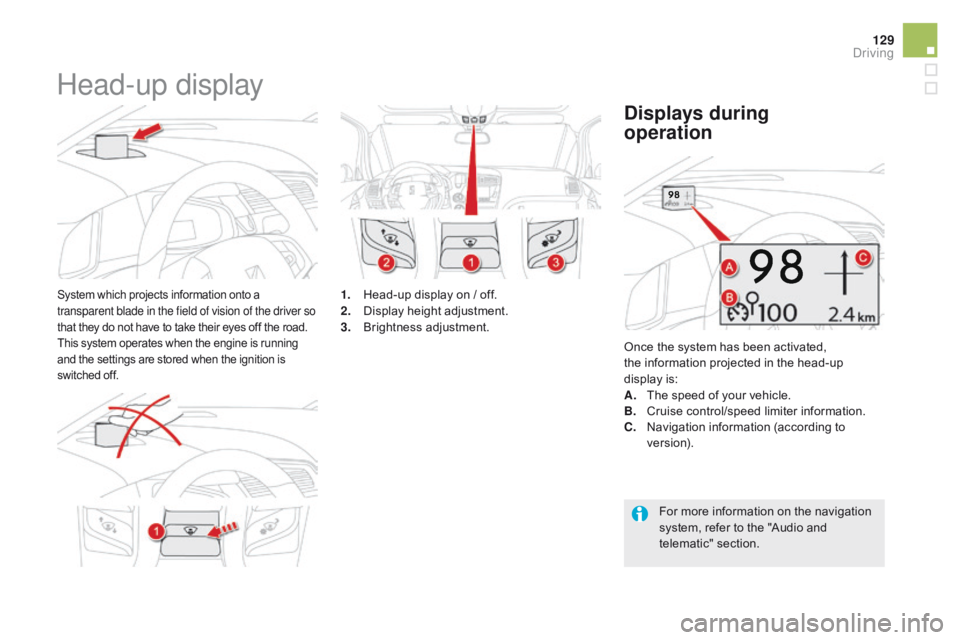
System which projects information onto a
transparent blade in the field of vision of the driver so
that they do not have to take their eyes off the road.
This system operates when the engine is running
and the settings are stored when the ignition is
switched off.1. Head-up display on / off.
2. Display height adjustment.
3.
Br
ightness adjustment. Once the system has been activated,
the information projected in the head-up
display is:
A.
T
he speed of your vehicle.
B.
C
ruise control/speed limiter information.
displays during
operation
c. Navigation information (according to
ve r s i o n).
For more information on the navigation
system, refer to the "Audio and
telematic" section.
driving
Page 132 of 403
DS5_en_Chap04_conduite_ed01-2015
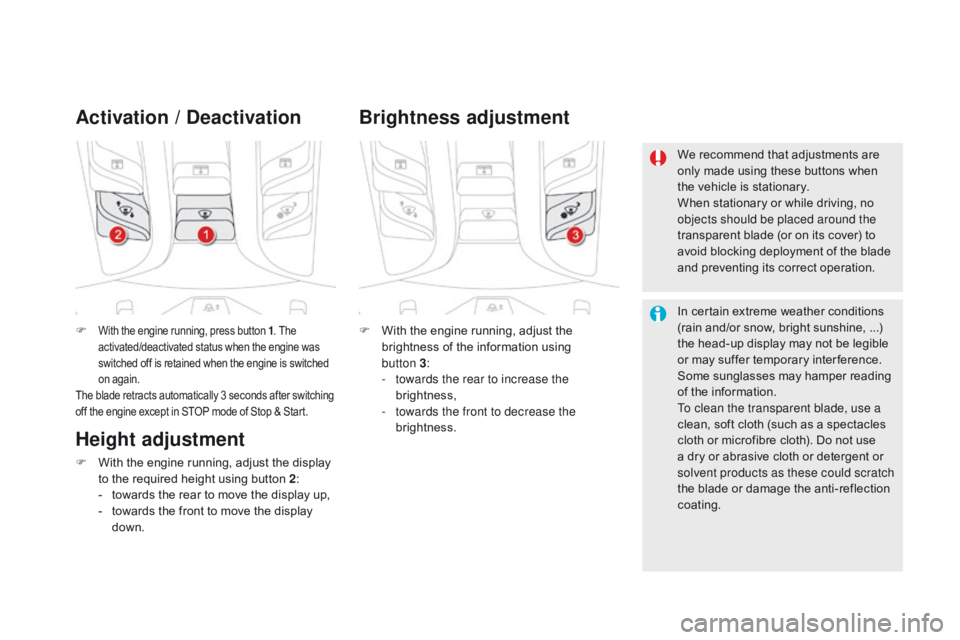
F With the engine running, press button 1. The
activated/deactivated status when the engine was
switched off is retained when the engine is switched
on again.
The blade retracts automatically 3 seconds after switching
off the engine except in STOP mode of Stop & Start.
Activation / de activation
F With the engine running, adjust the
brightness of the information using
button
3:
-
t
owards the rear to increase the
brightness,
-
t
owards the front to decrease the
brightness.
Brightness adjustment
We recommend that adjustments are
only made using these buttons when
the vehicle is stationary.
When stationary or while driving, no
objects should be placed around the
transparent blade (or on its cover) to
avoid blocking deployment of the blade
and preventing its correct operation.
In certain extreme weather conditions
(rain and/or snow, bright sunshine, ...)
the head-up display may not be legible
or may suffer temporary inter ference.
Some sunglasses may hamper reading
of the information.
To clean the transparent blade, use a
clean, soft cloth (such as a spectacles
cloth or microfibre cloth). Do not use
a dry or abrasive cloth or detergent or
solvent products as these could scratch
the blade or damage the anti-reflection
coating.
Height adjustment
F With the engine running, adjust the display to the required height using button 2 :
-
t
owards the rear to move the display up,
-
t
owards the front to move the display
down.
Page 154 of 403
DS5_en_Chap05_visibilite_ed01-2015
Manual adjustment
of halogen
headlampsAutomatic adjustment of xenon headlamps
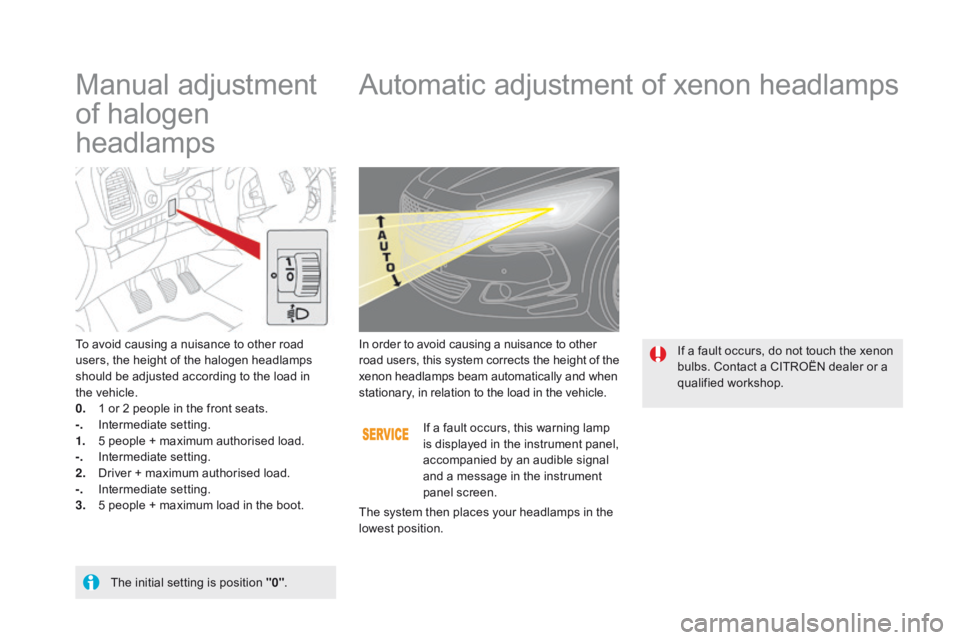
To avoid causing a nuisance to other road
users, the height of the halogen headlamps
should be adjusted according to the load in
the
vehicle.
0.
1 o
r 2 people in the front seats.
-.
I
ntermediate setting.
1.
5 p
eople + maximum authorised load.
-.
I
ntermediate setting.
2.
D
river + maximum authorised load.
-.
I
ntermediate setting.
3.
5 p
eople + maximum load in the boot.
The initial setting is position "0" .If a fault occurs, this warning lamp
is displayed in the instrument panel,
accompanied by an audible signal
and a message in the instrument
panel screen.
In order to avoid causing a nuisance to other
road users, this system corrects the height of the
xenon headlamps beam automatically and when
stationary, in relation to the load in the vehicle.
If a fault occurs, do not touch the xenon
bulbs. Contact a CITROËN dealer or a
qualified workshop.
The system then places your headlamps in the
lowest position.
Page 173 of 403
171
DS5_en_Chap06_securite-enfants_ed01-2015
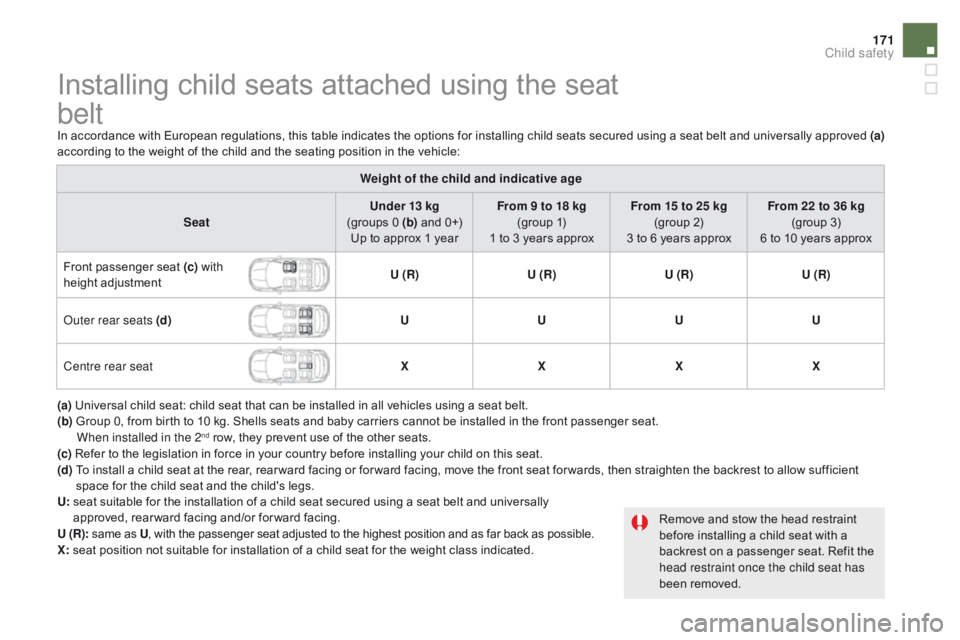
Installing child seats attached using the seat
belt
In accordance with European regulations, this table indicates the options for installing child seats secured using a seat belt and universally approved (a)
according to the weight of the child and the seating position in the vehicle:
Weight of the child and indicative age
Seat Under 13 kg
(groups 0 (b) and 0+)
Up to approx 1 year From 9 to 18 kg
(group 1)
1 to 3 years approx From 15 to 25 kg
(group 2)
3 to 6 years approx From 22 to 36 kg
(group 3)
6 to 10 years approx
Front passenger seat (c) with
height adjustment U (R)
U (R)U (R)U (R)
Outer rear seats (d) UUUU
Centre rear seat XXXX
(a) Universal child seat: child seat that can be installed in all vehicles using a seat belt.
(b) Group 0, from birth to 10 kg. Shells seats and baby carriers cannot be installed in the front passenger seat.
W
hen installed in the 2
nd row, they prevent use of the other seats.
(c) Refer to the legislation in force in your country before installing your child on this seat.
(d)
T
o install a child seat at the rear, rear ward facing or for ward facing, move the front seat for wards, then straighten the backrest to allow sufficient
space for the child seat and the child's legs.
Remove and stow the head restraint
before installing a child seat with a
backrest on a passenger seat. Refit the
head restraint once the child seat has
been removed.
U:
s
eat suitable for the installation of a child seat secured using a seat belt and universally
approved, rear ward facing and/or for ward facing.
U (R):
s
ame as U , with the passenger seat adjusted to the highest position and as far back as possible.
X: seat position not suitable for installation of a child seat for the weight class indicated.
child safety