ECO mode Citroen DS5 RHD 2014 1.G Owner's Manual
[x] Cancel search | Manufacturer: CITROEN, Model Year: 2014, Model line: DS5 RHD, Model: Citroen DS5 RHD 2014 1.GPages: 400, PDF Size: 37.32 MB
Page 3 of 400
CITROËN has a presence on every continent,
a complete product range,
bringing together technology and a permanent spirit of innovation,
for a modern and creative approach to mobility.
We thank you and congratulate you on your choice.
The "Familiarisation" section at the start of this
document is intended as a quick way of getting
to know your vehicle. Reading the detailed
sections is essential to make the most of your
vehicle, in complete safety.
Your vehicle is fitted with only some of the
equipment described in this document,
depending on the trim level, version and the
specifications for the country in which it is sold.
The fitting of electrical equipment or
accessories which are not recommended
by CITROËN may result in a failure of your
vehicle's electronic system. Please note this
specific warning and contact a CITROËN
dealer to be shown the recommended
equipment and accessories.
At the wheel of your new vehicle,
getting to know each system,
each control, each setting,
makes your trips, your journeys
more comfortable and more enjoyable.
Happy motoring!
We draw your attention to the following...
Page 6 of 400
005005006006007007008008SAFETY
PR ACTICAL
INFORMATION CHILD SAFETY VISIBILITY
14 4 Lighting controls
147 Daytime running lamps
14 8 Automatic illumination of
headlamps
14 9 Automatic headlamp dipping
152 Headlamp adjustment
15 3 Directional lighting
155 Wiper controls
157 Automatic rain sensitive
wipers
15 9 Courtesy lamps
160 Interior mood lighting164 Child seats
166 Deactivating the passenger's
front airbag
172 ISOFIX mountings
17 7 Child lock180 Direction indicators
181 Emergency or assistance
call
181 Horn
182 ESC system
186 Seat belts
189 Airbags196 Temporary puncture repair
kit
202 Changing a wheel
210 Snow chains
211 Changing a bulb
219 Changing a fuse
222 12 V battery
225 Energy economy mode
226 Changing a wiper blade
227 Towing the vehicle
228 Towing a trailer
230 Fitting roof bars
231 Accessories
Page 26 of 400
127
128 128
Driving safely
Stop & Start
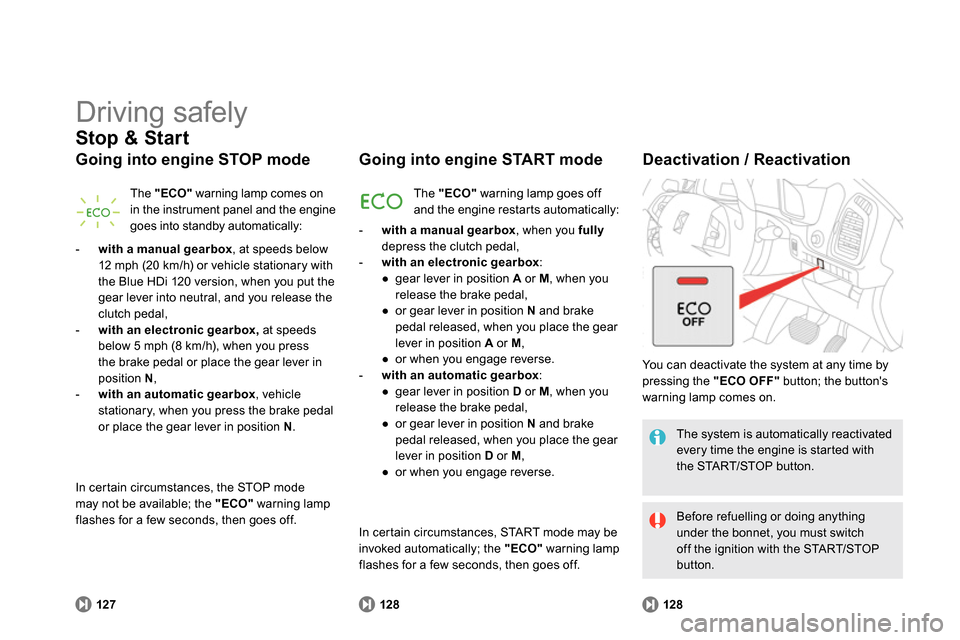
Going into engine STOP mode
The "ECO"
warning lamp comes on
in the instrument panel and the engine
goes into standby automatically:
Going into engine START mode
Deactivation / Reactivation
The system is automatically reactivated
every time the engine is started with
the START/STOP button.
Before refuelling or doing anything
under the bonnet, you must switch
off the ignition with the START/STOP
button.
The "ECO"
warning lamp goes off
and the engine restarts automatically:
- with a manual gearbox
, when you fully
depress the clutch pedal,
- with an electronic gearbox
:
●
gear lever in position A
or M
, when you
release the brake pedal,
●
or gear lever in position N
and brake
pedal released, when you place the gear
lever in position A
or M
,
●
or when you engage reverse.
- with
an
automatic gearbox
:
●
gear lever in position D
or M
, when you
release the brake pedal,
●
or gear lever in position N
and brake
pedal released, when you place the gear
lever in position D
or M
,
●
or when you engage reverse.
You can deactivate the system at any time by
pressing the "ECO OFF"
button; the button's
warning lamp comes on.
- with a manual gearbox
, at speeds below
12 mph (20 km/h) or vehicle stationary with
the Blue HDi 120 version, when you put the
gear lever into neutral, and you release the
clutch pedal,
- with an electronic gearbox,
at speeds
below 5 mph (8 km/h), when you press
the brake pedal or place the gear lever in
position N
,
-
with an automatic gearbox
, vehicle
stationary, when you press the brake pedal
or place the gear lever in position N
.
In certain circumstances, the STOP mode
may not be available; the "ECO"
warning lamp
flashes for a few seconds, then goes off.
In certain circumstances, START mode may be
invoked automatically; the "ECO"
warning lamp
flashes for a few seconds, then goes off.
Page 27 of 400
25Familiarisation
Eco-driving
Eco-driving is a range of everyday practices that allow the motorist to optimise their fuel consumption and CO2 emissions.
Optimise the use of your gearbox
With a manual gearbox, move off gently and change up without waiting.
During acceleration change up early.
With an automatic or electronic gearbox, give preference to automatic
mode and avoid pressing the accelerator pedal heavily or suddenly.
The gear efficiency indicator invites you engage the most suitable gear:
as soon as the indication is displayed in the instrument panel, follow it
straight away.
With an electronic or automatic gearbox, this indicator appears only in
manual mode.
Drive smoothly
Maintain a safe distance between vehicles, use engine braking rather
than the brake pedal, and press the accelerator progressively. These
practices contribute towards a reduction in fuel consumption and CO
2
emissions and also helps reduce the background traffic noise.
If your vehicle has cruise control, make use of the system at speeds
above 25 mph (40 km/h) when the traffic is flowing well.
Control the use of your electrical
equipment
Before moving off, if the passenger compartment is too warm, ventilate it
by opening the windows and air vents before using the air conditioning.
Above 30 mph (50 km/h), close the windows and leave the air vents
open.
Remember to make use of equipment that can help keep the
temperature in the passenger compartment down (sunroof and window
blinds...).
Switch off the air conditioning, unless it has automatic regulation, as
soon as the desired temperature is attained.
Switch off the demisting and defrosting controls, if not automatic.
Switch off the heated seat as soon as possible.
Switch off the headlamps and front foglamps when the level of light
does not require their use.
Avoid running the engine before moving off, particularly in winter; your
vehicle will warm up much faster while driving.
As a passenger, if you avoid connecting your multimedia devices
(film, music, video game...), you will contribute towards limiting the
consumption of electrical energy, and so of fuel.
Disconnect your portable devices before leaving the vehicle.
Page 33 of 400

31Monitoring
Indicator and warning lamps
When the engine is started, these same
warning lamps should go off.
If they remain on, before moving off, refer to the
information on the warning lamp concerned.
Associated warnings
The switching on of certain warning lamps may
be accompanied by an audible signal and a
message in the instrument panel screen.
The warning lamps may come on continuously
(fixed) or flash.
Certain warning lamps may come on in
one of two modes: fixed (continuous) or
flashing.
Only by relating the type of illumination
to the operation of the vehicle can it
be determined whether the situation is
normal or a fault has occurred.
Refer to the tables on the following
pages for more information.
Visual indicators informing the driver that a
system is in operation, switched off or has a
fault.
When the ignition is switched on
Certain warning lamps come on for a few
seconds in the instrument panel and/or
instrument panel screen when the vehicle's
ignition is switched on.
Page 36 of 400
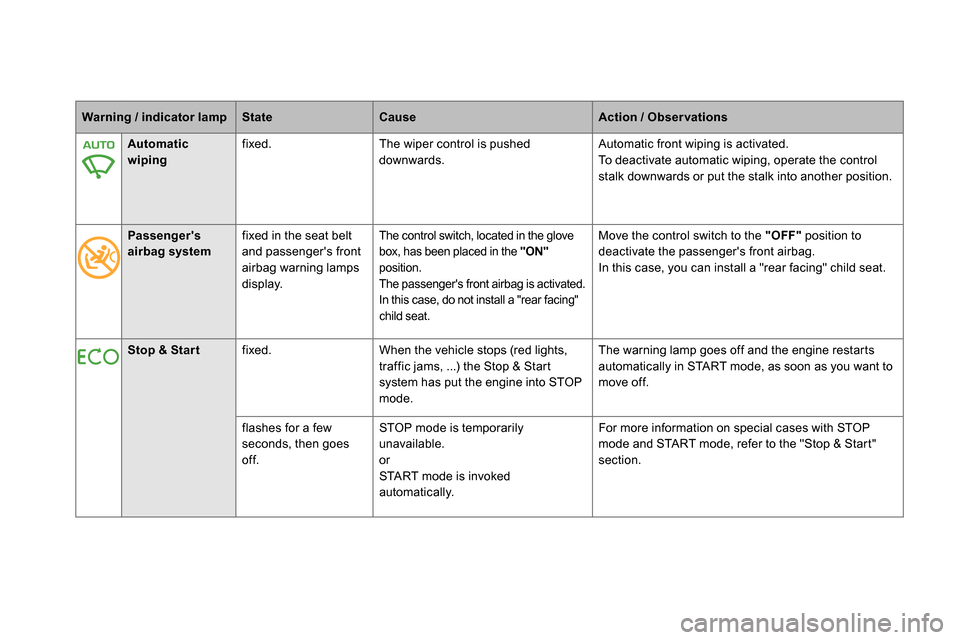
Warning / indicator lamp
State
Cause
Action / Observations
Automatic
wiping
fixed. The wiper control is pushed
downwards. Automatic front wiping is activated.
To deactivate automatic wiping, operate the control
stalk downwards or put the stalk into another position.
Passenger's
airbag system
fixed in the seat belt
and passenger's front
airbag warning lamps
display. The control switch, located in the glove
box, has been placed in the "ON"
position.
The passenger's front airbag is activated.
In this case, do not install a "rear facing"
child seat. Move the control switch to the "OFF"
position to
deactivate the passenger's front airbag.
In this case, you can install a "rear facing" child seat.
Stop & Start
fixed. When the vehicle stops (red lights,
traffic jams, ...) the Stop & Start
system has put the engine into STOP
mode. The warning lamp goes off and the engine restarts
automatically in START mode, as soon as you want to
move off.
flashes for a few
seconds, then goes
off. STOP mode is temporarily
unavailable.
or
START mode is invoked
automatically. For more information on special cases with STOP
mode and START mode, refer to the "Stop & Start"
section.
Page 48 of 400
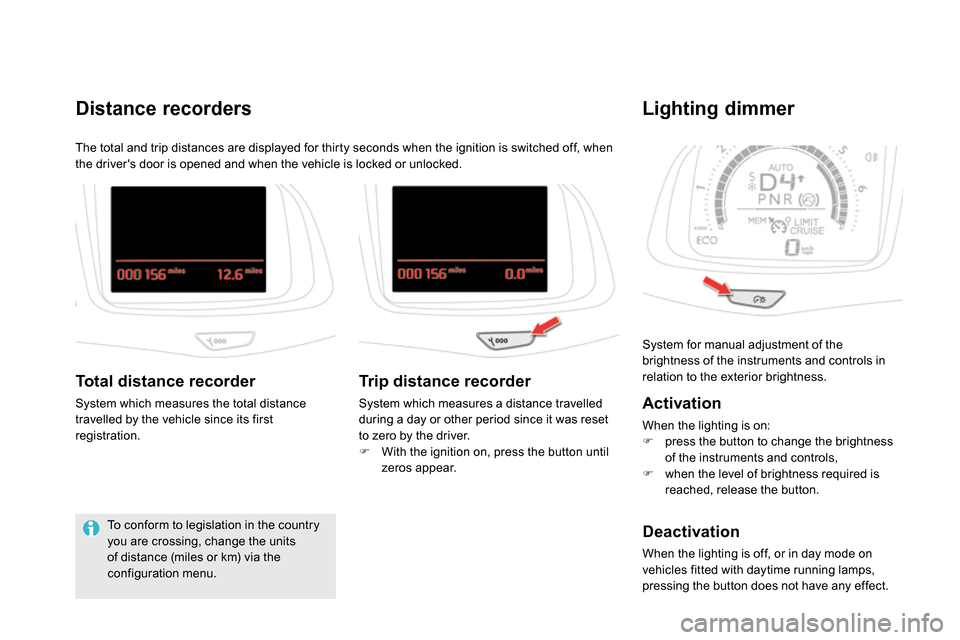
System for manual adjustment of the
brightness of the instruments and controls in
relation to the exterior brightness.
Lighting dimmer
Activation
When the lighting is on:
press the button to change the brightness
of the instruments and controls,
when the level of brightness required is
reached, release the button.
Deactivation
When the lighting is off, or in day mode on
vehicles fitted with daytime running lamps,
pressing the button does not have any effect.
The total and trip distances are displayed for thirty seconds when the ignition is switched off, when
the driver's door is opened and when the vehicle is locked or unlocked.
Distance recorders
Total distance recorder
System which measures the total distance
travelled by the vehicle since its first
registration.
To conform to legislation in the country
you are crossing, change the units
of distance (miles or km) via the
configuration menu.
Trip distance recorder
System which measures a distance travelled
during a day or other period since it was reset
to zero by the driver.
With the ignition on, press the button until
zeros appear.
Page 53 of 400
51Monitoring
If dashes are displayed continuously
while driving in place of the digits,
contact a CITROËN dealer or a
qualified workshop. This value may vary following a change
in the style of driving or the relief,
resulting in a significant change in the
current fuel consumption.
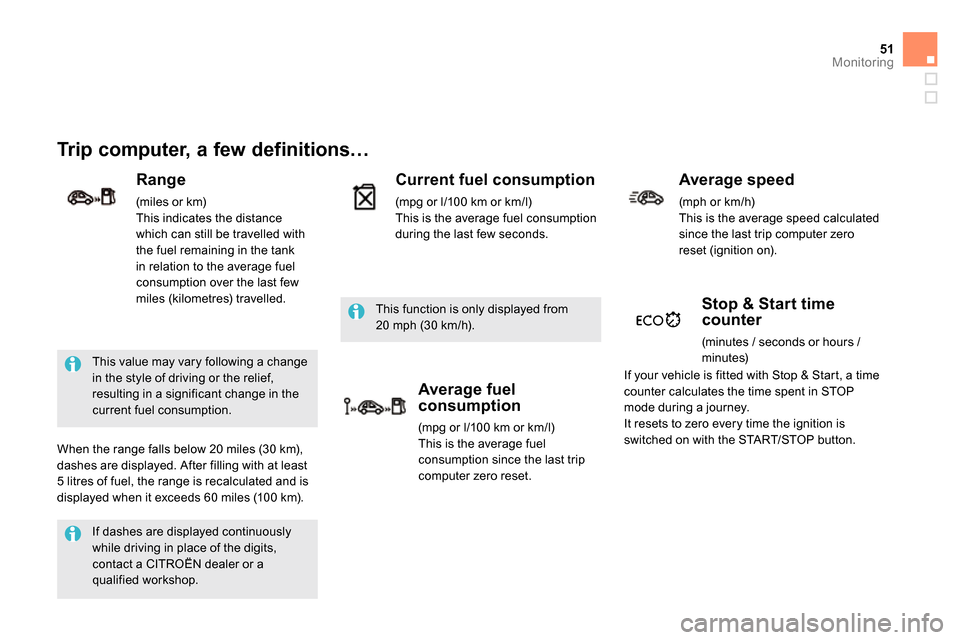
Trip computer, a few definitions…
Range
(miles or km)
This indicates the distance
which can still be travelled with
the fuel remaining in the tank
in relation to the average fuel
consumption over the last few
miles (kilometres) travelled.
When the range falls below 20 miles (30 km),
dashes are displayed. After filling with at least
5 litres of fuel, the range is recalculated and is
displayed when it exceeds 60 miles (100 km). This function is only displayed from
20 mph (30 km/h).
Current fuel consumption
(mpg or l/100 km or km/l)
This is the average fuel consumption
during the last few seconds.
Average fuel
consumption
(mpg or l/100 km or km/l)
This is the average fuel
consumption since the last trip
computer zero reset.
Average speed
(mph or km/h)
This is the average speed calculated
since the last trip computer zero
reset (ignition on).
Stop & Start time
counter
(minutes / seconds or hours /
minutes)
If your vehicle is fitted with Stop & Start, a time
counter calculates the time spent in STOP
mode during a journey.
It resets to zero every time the ignition is
switched on with the START/STOP button.
Page 73 of 400

71Access
Safety anti-pinch
If the blind stops and immediately opens again
during a closing manoeuvre:
operate the control until the blind is fully
open,
then operate the control until the blind is
fully closed.
The safety anti-pinch function is not
operational during these operations.
If the blind meets an obstacle during
operation, you must reverse the
movement of the blind. To do this, press
the control concerned.
When the driver operates the blind
control, they must ensure that no one is
preventing correct closing of the blind.
The driver must ensure that passengers
use the blind correctly.
Be aware of children when operating
the blind.
Reinitialisation
If power to the blind is cut off while it is moving,
the safety anti-pinch must be reinitialised:
operate the control until the blind is fully
closed,
continue to press for at least 3 seconds. A
slight movement of the blind will then be
noticeable, confirming the reinitialisation.
In automatic mode and at the end of its travel,
if the blind meets an obstacle while closing it
stops and moves back slightly.
Page 81 of 400

79Comfort
Switch on the ignition or start the engine if the vehicle has gone into
economy mode.
The electric functions of the driver's seat are active for about 45 seconds
after opening the front door. They are deactivated about 45 seconds after
switching off the ignition and in economy mode.
To reactivate them, switch on the ignition.
Electric
1.
Adjustment of the seat cushion angle
and height, and for wards-backwards
adjustment
Raise or lower the front of the control
to adjust the seat cushion angle.
Raise or lower the rear of the control
to raise or lower the seat.
Simultaneously raise or lower the
front and rear of the control in order
to raise or lower the entire seat.
2.
Adjustment of the backrest angle
Move the control for wards or backwards
to adjust the backrest angle.
3.
Adjustment of driver's lumbar
support
Press the control switches to obtain
the desired level of lumbar support.
4. Manual adjustment of the cushion
Pull on the grip to adjust the length of
the cushion.
Before moving the seat backwards, ensure that there is
nothing that might prevent the full travel of the seat, so as to
avoid the risk of of jamming the seat caused by the presence
of objects on the floor behind the seat or rear passengers. If
the seat jams, stop the movement immediately.