check engine Citroen DS5 RHD 2015 1.G Owner's Guide
[x] Cancel search | Manufacturer: CITROEN, Model Year: 2015, Model line: DS5 RHD, Model: Citroen DS5 RHD 2015 1.GPages: 396, PDF Size: 12.14 MB
Page 228 of 396

The batteries contain harmful substances
such as sulphuric acid and lead. They
must be disposed of in accordance
with regulations and must not, in any
circumstances, be discarded with
household waste.
Take used remote control batteries and
vehicle batteries to a special collection
point.
It is advisable to disconnect the
battery if the vehicle is to be left
unused for more than one month.
Do not push the vehicle to start the
engine if you have an electronic or
automatic gearbox.Protect your eyes and face before
handling the battery.
All operations on the battery must be
carried out in a well ventilated area
and away from naked flames and
sources of sparks, so as to avoid the
risk of explosion or fire.
Do not try to charge a frozen battery;
the battery must first be thawed
out to avoid the risk of explosion.
If the battery has been frozen,
before charging have it checked by
a CITROËN dealer or a qualified
workshop who will check that the
internal components have not been
damaged and the casing is not
cracked, which could cause a leak of
toxic and corrosive acid.
Do not reverse the polarity and use
only a 12 V charger.
Do not disconnect the terminals while
the engine is running.
Do not charge the batteries without
disconnecting the terminals first.
Wash your hands after wards.
Before disconnecting the battery
Wait 2 minutes after switching off the ignition
before disconnecting the battery.
Close the windows and the doors before
disconnecting the battery.
Following reconnection of the
battery
Following reconnection of the battery, switch on
the ignition and wait 1 minute before starting to
permit initialisation of the electronic systems.
However, if problems remain following this
operation, contact a CITROËN dealer or a
qualified workshop.
Referring to the corresponding section,
you must yourself reinitialise (depending on
version):
-
t
he remote control key,
-
t
he electric blind(s),
-
...
S
ome functions are not available if the
battery is not sufficiently charged.
Page 234 of 396

driving advice
distribution of loads
F Distribute the load in the trailer so that the heaviest items are as close as possible to
the axle and the nose weight approaches
the maximum permitted without
exceeding
it.
Air density decreases with altitude, thus
reducing engine per formance. Above
1
000 metres, the maximum towed load must
be reduced by 10
% for every 1 000 metres of
altitude.
Side wind
F Take into account the increased sensitivity to side wind.
cooling
Towing a trailer on a slope increases the
temperature of the coolant.
As the fan is electrically controlled, its cooling
capacity is not dependent on the engine speed.
F
T
o lower the engine speed, reduce your
speed.
The maximum towed load on a long incline
depends on the gradient and the ambient
temperature.
In all cases, keep a check on the coolant
temperature.
F
I
f the warning lamp and
the
STOP warning lamp come
on, stop the vehicle and switch
off the engine as soon as
possible.
Braking
Towing a trailer increases the braking distance.
To avoid overheating of the brakes on a long
mountain type of descent, the use of engine
braking is recommended.
Ty r e s
F Check the tyre pressures of the towing vehicle and of the trailer, observing the
recommended pressures.
Lighting
F Check the electrical lighting and signalling on the trailer.
Refer to the "Technical data" section for details
of the weights and towed loads which apply to
your vehicle.
The rear parking sensors will be
deactivated automatically if a genuine
CITROËN towbar is used.
Page 243 of 396
241
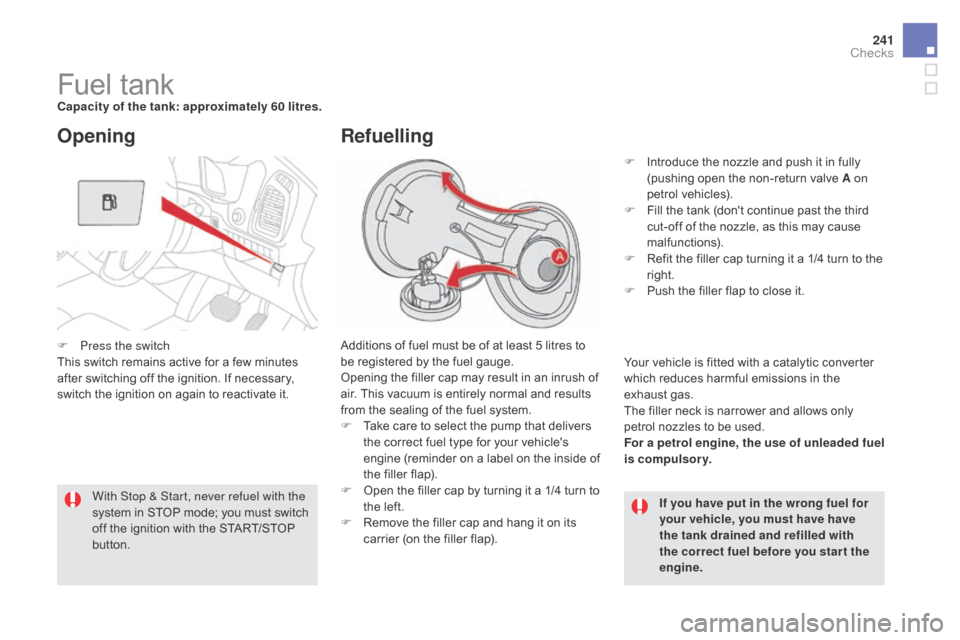
Fuel tankcapacity of the tank: approximately 60 litres.Additions of fuel must be of at least 5 litres to
be registered by the fuel gauge.
Opening the filler cap may result in an inrush of
air. This vacuum is entirely normal and results
from the sealing of the fuel system.
F
T
ake care to select the pump that delivers
the correct fuel type for your vehicle's
engine (reminder on a label on the inside of
the filler flap).
F
O
pen the filler cap by turning it a 1/4 turn to
the left.
F
R
emove the filler cap and hang it on its
carrier (on the filler flap).
Opening
If you have put in the wrong fuel for
your vehicle, you must have have
the tank drained and refilled with
the correct fuel before you star t the
engine.
With Stop & Start, never refuel with the
system in STOP mode; you must switch
off the ignition with the START/STOP
button.
Refuelling
F Introduce the nozzle and push it in fully
(pushing open the non-return valve A on
petrol vehicles).
F
F
ill the tank (don't continue past the third
cut-off of the nozzle, as this may cause
malfunctions).
F
R
efit the filler cap turning it a 1/4 turn to the
right.
F
P
ush the filler flap to close it.
Your vehicle is fitted with a catalytic converter
which reduces harmful emissions in the
exhaust gas.
The filler neck is narrower and allows only
petrol nozzles to be used.
For a petrol engine, the use of unleaded fuel
is compulsory.
F
P
ress the switch
This switch remains active for a few minutes
after switching off the ignition. If necessary,
switch the ignition on again to reactivate it.
checks
Page 245 of 396

243
It remains possible to use a fuel can to
fill the tank.
In order to ensure a good flow of fuel,
do not place the nozzle of the fuel can
in direct contact with the flap of the
misfuel prevention device and pour
s l ow l y.
Misfuel prevention (Diesel)*
Mechanical device which prevents filling the tank of a Diesel vehicle with petrol. It avoids the risk of
engine damage that can result from filling with the wrong fuel.
Located in the filler neck, the misfuel prevention device appears when the filler cap is removed.
When a petrol filler nozzle is introduced into the
fuel filler neck of your Diesel vehicle, it comes
into contact with the flap. The system remains
closed and prevents filling.
do n
ot persist but introduce a d
i
esel type
filler nozzle.
Operation
Travelling abroad
As Diesel fuel pump nozzles may
be different in other countries, the
presence of the misfuel prevention
device may make refuelling impossible.
Before travelling abroad, we
recommend that you check with the
CITROËN dealer network, whether your
vehicle is suitable for the fuel pumps in
the country in which you want to travel.
* According to country of sale.
checks
Page 247 of 396
245
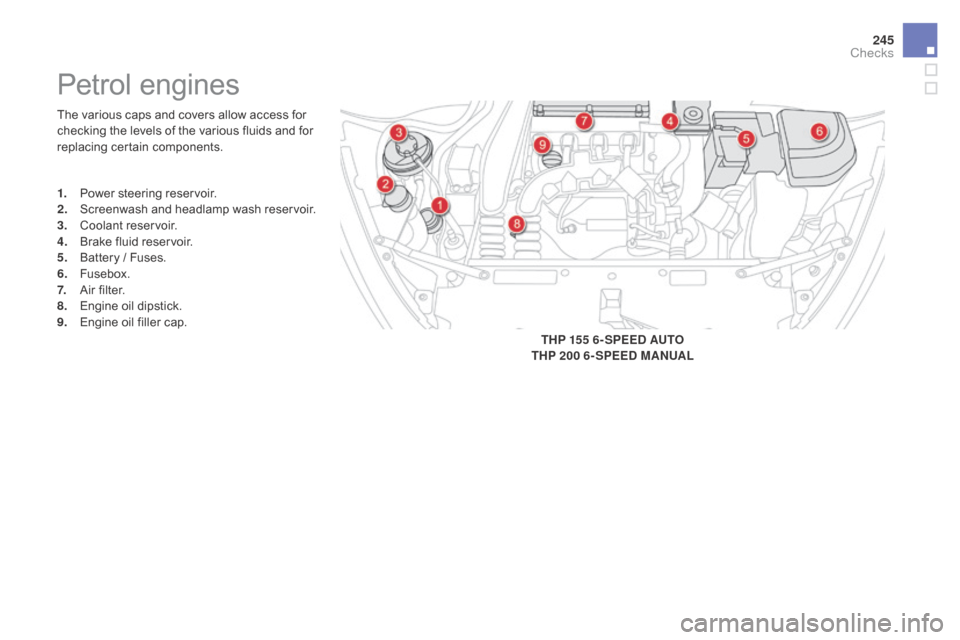
The various caps and covers allow access for
checking the levels of the various fluids and for
replacing certain components.
Petrol engines
1. Power steering reservoir.
2. Screenwash and headlamp wash reservoir.
3.
C
oolant reservoir.
4.
B
rake fluid reservoir.
5.
B
attery / Fuses.
6.
F
usebox.
7.
A
ir filter.
8.
E
ngine oil dipstick.
9.
E
ngine oil filler cap. THP 155 6- SPEE
d
AUTO
THP 200 6- SPEE
d
MA
nU
AL
checks
Page 248 of 396
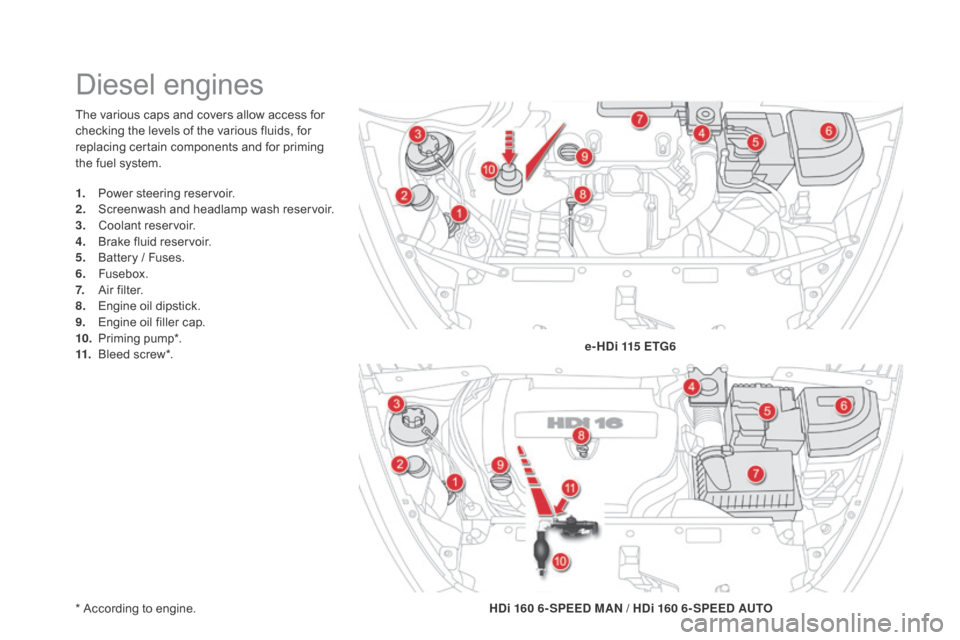
The various caps and covers allow access for
checking the levels of the various fluids, for
replacing certain components and for priming
the fuel system.
* According to engine.
Diesel engines
1. Power steering reservoir.
2. Screenwash and headlamp wash reservoir.
3.
C
oolant reservoir.
4.
B
rake fluid reservoir.
5.
B
attery / Fuses.
6.
F
usebox.
7.
A
ir filter.
8.
E
ngine oil dipstick.
9.
E
ngine oil filler cap.
10.
P
riming pump*.
11.
B
leed screw*. e- H
di 1
15 ET
g6
H
di 1
60 6- SPEE
d
MA
n
/ H
di 1
60 6- SPEE
d
AUTO
Page 249 of 396

247
On vehicles fitted with HDi engines, the fuel
system must be primed if you run out of fuel;
refer to the corresponding engine compartment
view.
Running out of fuel (Diesel)
If the tank on your vehicle is fitted with
a misfuel prevention device, refer to the
"Misfuel prevention (Diesel)" section.F
F
ill the fuel tank with at least five litres of
diesel.
F
O
pen the bonnet.
F
I
f necessary, unclip the styling cover for
access to the priming pump.
F
S
queeze and release the priming pump
repeatedly until resistance is felt (there
may be resistance at the first press).
F
O
perate the starter until the engine starts
(if the engine does not start at the first
attempt, wait around 15 seconds before
trying again).
F
I
f the engine does not start after a few
attempts, operate the priming pump again
then start the engine.
F
R
efit the styling cover and clip it in place.
F
C
lose the bonnet.
1.6 Hdi engine
F Fill the fuel tank with at least five litres of Diesel.
F
O
pen the bonnet.
F
I
f necessary, unclip the style cover for
access to the priming pump.
F
S
lacken the bleed screw.
F
S
queeze and release the priming pump
repeatedly until fuel appears in the
transparent pipe.
F
T
ighten the bleed screw.
F
O
perate the starter until the engine starts
(if the engine fails to start at the first
attempt, wait around 15 seconds before
trying again).
F
I
f the engine fails to start after a few
attempts, operate the priming pump again,
then the starter.
F
P
ut the style cover back in position and
clip it in place, ensuring that it has clipped
c o r r e c t l y.
F
C
lose the bonnet.
2.0 Hdi engine
If the engine does not start first time,
don't keep trying but start the procedure
again from the beginning.
BlueHdi 100 engine
F Fill the fuel tank with at least five litres of Diesel.
F
S
witch on the ignition (without starting the
engine).
F
W
ait around 6 seconds and switch off the
ignition.
F
R
epeat the operation 10 times.
F
O
perate the starter to run the engine.
checks
Page 250 of 396
Checking levels
Take care when working under the bonnet, as certain areas of the engine may be extremely hot (risk of burns) and the cooling fan could start at
any time (even with the ignition off).
Engine oil level
The check is carried out either when
the ignition is switched on using the
oil level indicator in the instrument
panel for vehicles so equipped, or
using the dipstick.
It is normal to top up the oil level between
two services (or oil changes). CITROËN
recommends that you check the level, and top
up if necessary, every 3 000 miles (5 000 kms). To ensure that the reading is correct,
your vehicle must be parked on a level
sur face with the engine having been off
for more than 30 minutes.
Check all of these levels regularly, in line with the manufacturer's service schedule. Top them up if necessary, unless other wise indicated.
If a level drops significantly, have the corresponding system checked by a CITROËN dealer or a qualified workshop.checking using the dipstick
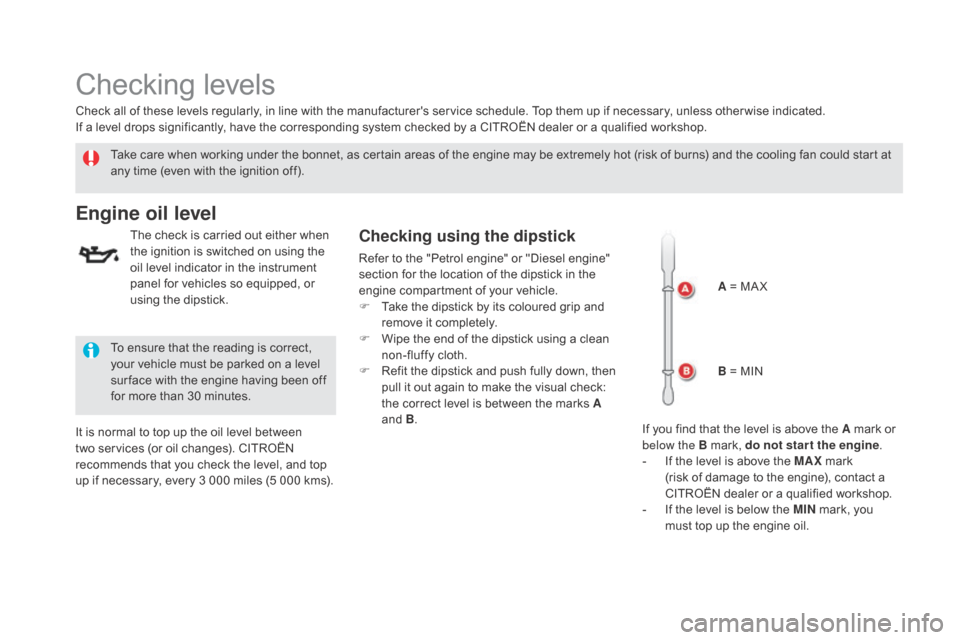
Refer to the "Petrol engine" or "Diesel engine"
section for the location of the dipstick in the
engine compartment of your vehicle.
F
T
ake the dipstick by its coloured grip and
remove it completely.
F
W
ipe the end of the dipstick using a clean
non-fluffy cloth.
F
R
efit the dipstick and push fully down, then
pull it out again to make the visual check:
the correct level is between the marks A
and B . A = MA X
B = MIN
If you find that the level is above the A mark or
below the B mark, do not star t the engine .
-
I
f the level is above the MAX mark
(risk of damage to the engine), contact a
CITROËN dealer or a qualified workshop.
-
I
f the level is below the MI n
m
ark, you
must top up the engine oil.
Page 251 of 396
249
Power steering
fluid level
The power steering fluid level should
be close to the "MA X" mark. With
the engine cold, unscrew the cap to
check the level. The brake fluid level should be close
to the "MA X" mark. If it is not, check
the brake pad wear.
Brake fluid level
Changing the fluid
Refer to the manufacturer's service schedule
for details of the interval for this operation.
Fluid specification
The brake fluid must conform to the
manufacturer's recommendations.
Oil grade
Before topping-up the oil or changing the oil,
check that the oil is the correct grade for your
engine and conforms to the manufacturer's
recommendations.
Topping up the engine oil level
Refer to the "Petrol engine" or "Diesel engine"
section for the location of the oil filler cap in the
engine compartment of your vehicle.
F
U
nscrew the oil filler cap to reveal the filler
aperture.
F
A
dd oil in small quantities, avoiding any
spills on engine components (risk of fire).
F
W
ait a few minutes before checking the
level again using the dipstick.
F
A
dd more oil if necessary.
F
A
fter checking the level, carefully refit the
oil filler cap and the dipstick in its tube.
After topping up the oil, the check when
switching on the ignition with the oil level
indicator in the instrument panel is not valid
during the 30 minutes after topping up.
Engine oil change
Refer to the manufacturer's service schedule
for details of the interval for this operation.
In order to maintain the reliability of the
engine and emission control system,
never use additives in the engine oil.
checks
Page 252 of 396
coolant level
The coolant level should be close
to the "MA X" mark but should never
exceed it.
Fluid specification
The coolant must conform to the
manufacturer's recommendations.In addition, as the cooling system is
pressurised, wait at least one hour after
switching off the engine before carrying
out any work.
To avoid any risk of scalding, unscrew
the cap by two turns to allow the
pressure to drop. When the pressure
has dropped, remove the cap and top
up the level.
When the engine is warm, the temperature of
the coolant is regulated by the fan.
The cooling fan may star t after switching
off the engine: take care with ar ticles and
clothing that might be caught by the fan
blades.
Specification of the fluid
To ensure optimum cleaning and to avoid
freezing, the fluid should never be topped up or
replaced by plain water.
In wintry conditions, the use of an ethyl alcohol
or methanol base fluid is recommended.
Screenwash / headlamp
wash level
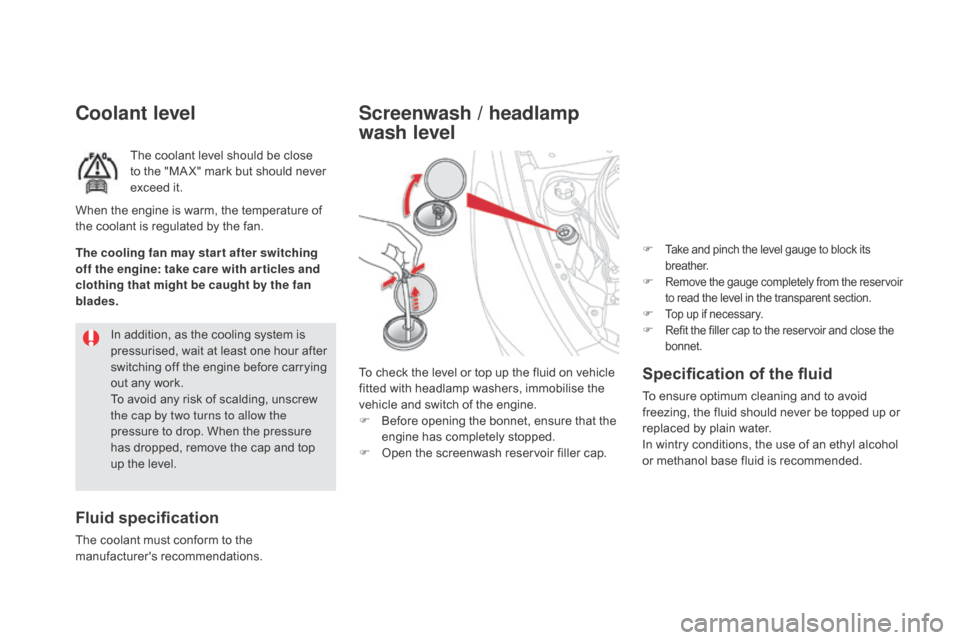
To check the level or top up the fluid on vehicle
fitted with headlamp washers, immobilise the
vehicle and switch of the engine.
F
B
efore opening the bonnet, ensure that the
engine has completely stopped.
F
O
pen the screenwash reservoir filler cap. F
Take and pinch the level gauge to block its
breather.
F Remove the gauge completely from the reservoir to read the level in the transparent section.
F Top up if necessary.F Refit the filler cap to the reservoir and close the bonnet.