parking brake CITROEN DS7 CROSSBACK 2017 User Guide
[x] Cancel search | Manufacturer: CITROEN, Model Year: 2017, Model line: DS7 CROSSBACK, Model: CITROEN DS7 CROSSBACK 2017Pages: 244, PDF Size: 6.87 MB
Page 102 of 244
100Driving06
The indicator lamp goes out to confirm the release
of the parking brake, accompanied by the display
of the message "Parking brake released".
The indicator lamp flashes in response to a
manual request to apply or release the brake.
In the event of a battery failure, the
electric parking brake will not operate.
As a safety measure, if the parking brake is not
applied, immobilise the vehicle by placing the
supplied chock against one of the wheels.
Contact a dealer or a qualified workshop.
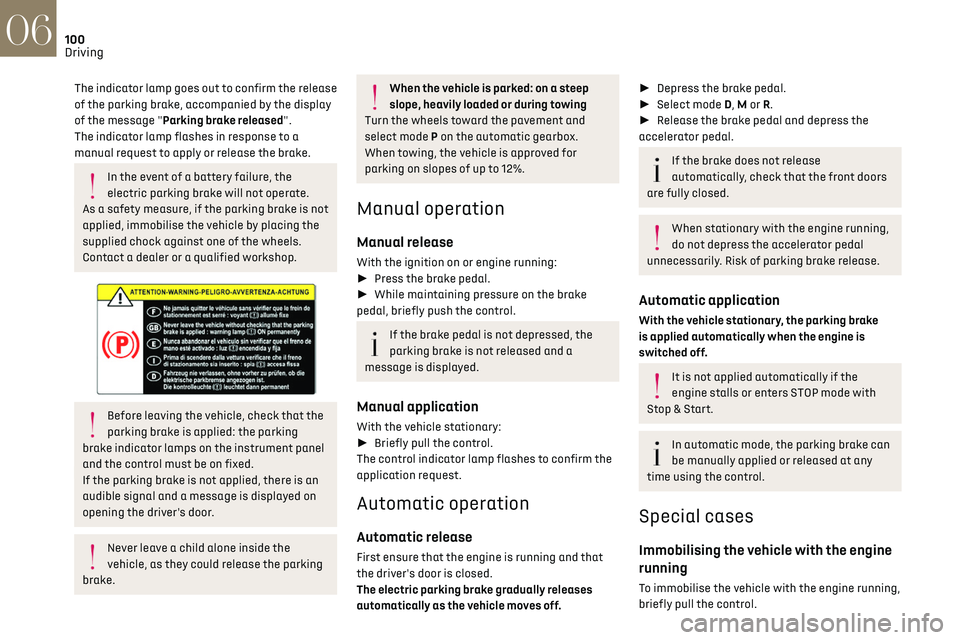
Before leaving the vehicle, check that the
parking brake is applied: the parking
brake indicator lamps on the instrument panel
and the control must be on fixed.
If the parking brake is not applied, there is an
audible signal and a message is displayed on
opening the driver's door.
Never leave a child alone inside the
vehicle, as they could release the parking
brake.
When the vehicle is parked: on a steep
slope, heavily loaded or during towing
Turn the wheels toward the pavement and
select mode P on the automatic gearbox.
When towing, the vehicle is approved for
parking on slopes of up to 12%.
Manual operation
Manual release
With the ignition on or engine running:
► Press the brake pedal.
► While maintaining pressure on the brake
pedal, briefly push the control.
If the brake pedal is not depressed, the
parking brake is not released and a
message is displayed.
Manual application
With the vehicle stationary:
► Briefly pull the control.
The control indicator lamp flashes to confirm the
application request.
Automatic operation
Automatic release
First ensure that the engine is running and that
the driver's door is closed.
The electric parking brake gradually releases
automatically as the vehicle moves off.
► Depress the brake pedal.
► Select mode D, M or R.
► Release the brake pedal and depress the
accelerator pedal.
If the brake does not release
automatically, check that the front doors
are fully closed.
When stationary with the engine running,
do not depress the accelerator pedal
unnecessarily. Risk of parking brake release.
Automatic application
With the vehicle stationary, the parking brake
is applied automatically when the engine is
switched off.
It is not applied automatically if the
engine stalls or enters STOP mode with
Stop & Start.
In automatic mode, the parking brake can
be manually applied or released at any
time using the control.
Special cases
Immobilising the vehicle with the engine
running
To immobilise the vehicle with the engine running,
briefly pull the control.
Page 103 of 244
101
Driving06
Parking the vehicle with the brake
released
In very cold conditions (ice), applying the
parking brake is not recommended.
To immobilise the vehicle, place the chock
against one of the wheels.
Mode P is automatically selected when
the ignition is switched off. The wheels
are blocked.
For more information on Free-wheeling, refer
to the corresponding section.
If you open the driver's door while mode N
is engaged, an audible signal will sound
and mode P will be engaged. The audible signal
stops when the driver's door is closed.
Deactivating automatic
operation
In some situations, for example when it is
extremely cold or when towing (e.g. caravan,
breakdown), it may be necessary to deactivate
automatic operation of the system.
► Start the engine.
► Use the control to apply the parking brake, if it
is released.
► Take your foot fully off the brake pedal.
► Keep the control pushed in the release
direction for 10 to a maximum of 15 seconds. ►
Release the control.
► Depress and hold the brake pedal.
► Pull the control in the application direction for
2 seconds.
This indicator lamp on the instrument
panel comes on to confirm deactivation of
the automatic functions.
► Release the control and the brake pedal.
From this point onwards, only the manual
functions, using the control, allow the parking
brake to be applied and released.
► Follow this procedure again to reactivate
automatic operation (confirmed by the indicator
lamp on the instrument panel going out).
Emergency braking
If depressing the brake pedal fails to provide
effective braking or in exceptional circumstances
(e.g. driver unwell, assisted driving), the vehicle
can be braked by sustained pulling on the electric
parking brake control. Braking continues for as
long as the control is kept pulled, and ceases
when the control is released.
The ABS and DSC systems stabilise the vehicle
during emergency braking.
If emergency braking malfunctions, the message
"Parking brake fault" will be displayed on the
instrument panel.
If the ABS and DSC systems
malfunction, indicated by lighting
one or both warning lamps on the instrument
panel, the vehicle’s stability is no longer ensured. ►
In this case, ensure the vehicle's stability by
successive and repeated "pull-release" actions on
the electric parking brake control until the vehicle
comes to a complete stop.
Automatic gearbox
Automatic 8-speed gearbox with a push selector.
It also offers a manual mode with gear changes
via control paddles located behind the steering
wheel.
Gearbox selector positions
P. Park
For parking the vehicle: the front wheels are
blocked.
R. Reverse gear
N. Neutral
For moving the vehicle with the ignition off, or
to allow it to free-wheel.
For more information on Changing to free-
wheeling, refer to the corresponding section.
D. Driving in automatic mode
The gearbox manages gear changes according
to the style of driving, the road profile and the
vehicle load.
M. Driving in manual mode
The driver changes gear using the steering-
mounted controls.
Page 105 of 244
103
Driving06
to change modes, an alert message is displayed
on the instrument panel.
Only appropriate mode change instructions are
validated.
With the engine running and the brakes
released, if R, D or M is selected, the
vehicle moves off, even without pressing the
accelerator pedal.
Never press the accelerator and brake
pedals at the same time. Risk of
damaging the gearbox!
If the battery is flat, you must place the chocks
supplied with the vehicle tools against one of
the wheels to immobilise the vehicle.
Unlocking the gearbox
– From mode P: ► Fully depress the brake pedal.
► Press the Unlock button.
► While continuing to press the brake pedal
and the Unlock button, select another mode.
–
F
rom neutral N, at a speed below 3 mph
(5 km/h): ► Fully depress the brake pedal.
► While continuing to depress the brake pedal,
select another mode.
Engaging reverse gear
► Slow down until you come to a stop.
► Depress the brake pedal, then press the
Unlock button.
► While continuing to press, select mode R.
Permanent manual mode
Entering the mode:
► With mode D initially selected.
► Press button M; the green indicator lamp in
the button comes on.
Exiting the mode:
► Push forwards once to return to D.
or
► Press button M; the indicator lamp in the
button goes off.
Switching off the ignition
To switch off the ignition, the vehicle must be
stationary.
Free-wheeling
For more information on Free-wheeling, refer to
the corresponding section.
If you open the driver's door while mode N
is engaged, an audible signal will sound. It
will stop when you close the driver's door
again.
Special aspects of automatic mode
The gearbox selects the gear that provides
optimal performance based on ambient
temperature, road profile, vehicle loading and
driving style.
For maximum acceleration, press the accelerator
fully down (kick-down). The gearbox changes down automatically or holds the selected gear
until the maximum engine speed is reached.
Steering mounted controls allow the driver to
temporarily select a gear, if the vehicle speed and
engine speed conditions permit.
Special aspects of manual mode
The gearbox only changes from one gear to
another if the vehicle speed and engine speed
conditions permit.
Starting the vehicle
From mode P:
►
Fully depress the brake pedal.
► Start the engine.
► Maintaining pressure on the brake pedal,
press the Unlock button.
► Push once or twice rearwards to select
the automatic mode D, or forwards to engage
reverse R.
From neutral N:
► Fully depress the brake pedal.
► Start the engine.
► Maintaining pressure on the brake pedal,
push rearwards to select the automatic mode D,
or forwards, while pressing the Unlock button to
engage reverse R.
Then, from D or R:
► Release the brake pedal.
► Accelerate gradually to automatically release
the electric parking brake.
The vehicle moves off immediately.
Page 106 of 244
104
Driving06
Never try to start the engine by pushing
the vehicle.
Switching the vehicle off
Regardless of the current gearbox mode, mode P
is immediately engaged automatically when the
ignition is switched off.
However, in mode N, mode P will be engaged after
a delay of 5 seconds (time to enable free-wheeling
mode).
Check that mode P has been engaged and
that the electric parking brake was applied
automatically; if not, apply it manually.
The corresponding indicator lamps on the
gear selector and the electric parking
brake control must be on, as well as the
indicator lamps on the instrument panel.
Gearbox malfunction
This warning lamp comes on, accompanied
by an audible signal and the display of a
message.
Visit a dealer or a qualified workshop.
Do not drive faster than 62 mph (100 km/h),
keeping to the speed limit.
Switching of the gearbox to back-up mode
Mode D locks in third gear.
The paddles on the steering wheel do not work
and mode M is no longer accessible.
You may feel a significant jolt on engaging reverse
gear. This will not damage the gearbox.
Selector malfunction
Minor malfunction
This warning lamp comes on, accompanied
by the display of a message and an audible
signal.
Drive carefully.
Visit a dealer or a qualified workshop.
In some cases, the selector indicator lamps may
no longer come on, but the gearbox state is still
displayed on the instrument panel.
Major malfunction
This warning lamp comes on, accompanied
by the display of a message.
You must stop the vehicle.
Stop as soon as it is safe to do so and
switch off the ignition.
Contact a dealer or a qualified workshop.
e-EAT8 electric automatic
gearbox (Rechargeable
hybrid)
Automatic 8-speed gearbox with a push selector
and regenerative braking function.
With the exception of manual mode and
regenerative braking, the operation is identical to
that of other EAT8 gearboxes. For more information on the Operation or the
Malfunctions of the EAT8 gearbox, refer to the
corresponding sections.
Gearbox selector positions
P.
Car park
For parking the vehicle: the front wheels are
blocked.
R. Reverse gear
N. Neutral
For moving the vehicle with the ignition
off: in certain car washing machines, when
towing the vehicle, etc.
D/B. Automatic forward gear (D) or automatic
forward gear with regenerative braking (B)
The gearbox manages gear changes
according to the style of driving, the road
profile and the vehicle load. With the
regenerative braking function activated,
the gearbox also controls braking when the
accelerator pedal is released.
Page 110 of 244
108
Driving06
E-TENSE 4X4 360
The electrical energy is used to
supplement the petrol engine or recharge the
traction battery, depending on the type of
driving.
This mode is optimised with specific settings
which make the most of the dynamic
performance of this vehicle (power steering,
accelerator pedal sensitivity, ESC).
Comfort
(Depending on equipment)
Combines Hybrid mode and Comfort mode of the
DS ACTIVE SCAN SUSPENSION function.
To favour flexible shock absorption improving
driving comfort on poor surfaces.
For more information on DS ACTIVE SCAN
SUSPENSION, refer to the corresponding
section.
4WD (4-wheel drive)
(Depending on version)
Improves the vehicle's grip at low and moderate
speeds by driving all 4 wheels continuously.
4WD mode (4-wheel drive) is especially suited
to driving on snow-covered roads and difficult
terrain (e.g. mud, sand) as well as ford crossings,
at moderate speed.
Depending on the driving conditions and the
battery charge level, 4WD mode may be 100%
electric.
If the system does not detect a situation of wheel
slipping or poor grip after 300 metres of driving, it
switches to Hybrid mode.
This mode will be even more effective if
the vehicle is fitted with suitable tyres,
such as winter tyres.
The grip can be improved up to 84 mph (135 km/h)
using the electric motors; above this speed, the
vehicle is driven by the front wheels only.
Hill start assist
This system keeps the vehicle briefly stationary
(for approximately 2 seconds) when making a hill
start, while you transfer your foot from the brake
pedal to the accelerator pedal.
The system is only active when:
–
The v
ehicle is completely stationary, with your
foot on the brake pedal.
–
Cert
ain slope conditions are met.
–
The driv
er’s door is closed.
Do not leave the vehicle while it is being
held temporarily by hill start assist.
If someone needs to get out of the vehicle with
the engine running, apply the parking brake
manually. Then check that the parking brake
indicator lamp and the P indicator lamp in the
electric parking brake control are on fixed.
The hill start assist function cannot be
deactivated. However, using the parking
brake to immobilise the vehicle interrupts its
operation.
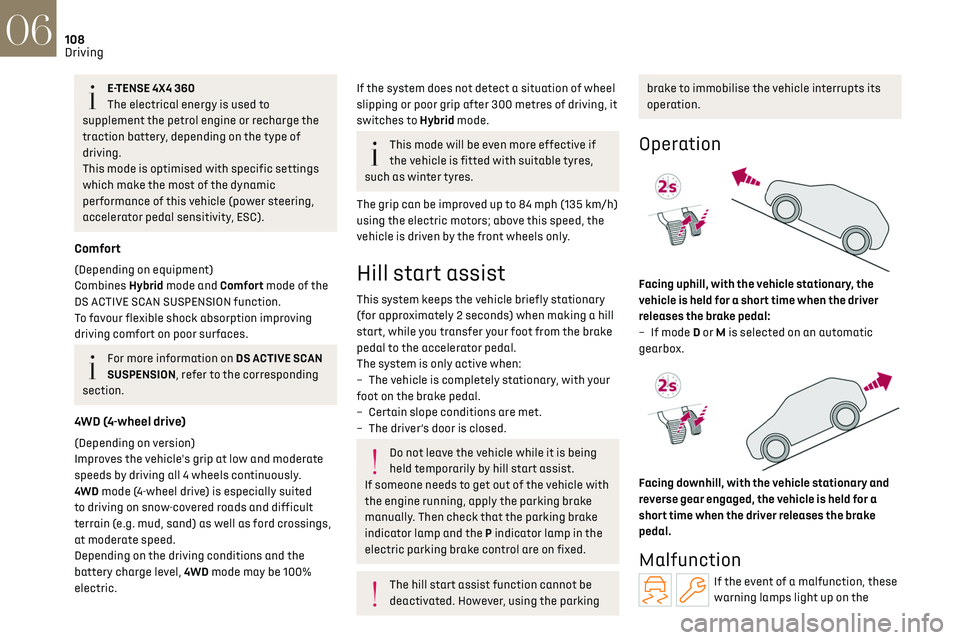
Operation
Facing uphill, with the vehicle stationary, the
vehicle is held for a short time when the driver
releases the brake pedal:
–
If mode
D or M is selected on an automatic
gearbox.
Facing downhill, with the vehicle stationary and
reverse gear engaged, the vehicle is held for a
short time when the driver releases the brake
pedal.
Malfunction
If the event of a malfunction, these
warning lamps light up on the
Page 112 of 244
110
Driving06
– The outside temperature must be between 0°C
and 35°C.
Putting the engine into standby (STOP
mode)
The engine automatically enters standby mode
as soon as the driver indicates their intention to
stop:
–
With an automatic gearbo
x, at speeds below
12 mph (20 km/h) on BlueHDi versions, or below
2 mph (3 km/h) on PureTech 130, 180 and 225
versions, when you depress the brake pedal or
place the gear selector in mode N.
Time counter
A time counter adds up the time spent in standby
during the journey. It is reset to zero every time
the ignition is switched on.
Special cases:
The engine will not go into standby if the
conditions for operation are not met and in the
following cases:
–
St
eep slope (ascending or descending).
–
Needed t
o maintain a comfortable temperature
in the passenger compartment.
–
Demisting activ
e.
In these cases, this indicator lamp flashes
for a few seconds, then goes off.
After the engine has restarted, STOP
mode is not available until the vehicle has
reached a speed of 5 mph (8 km/h).
During parking manoeuvres, STOP mode is
not available for a few seconds after
coming out of reverse gear or turning the
steering wheel.
Restarting the engine (START mode)
The engine automatically restarts as soon as the
driver indicates the intention of moving off again:
–
With the select
or in mode D or M: with the
brake pedal released.
–
With the select
or in mode N and the brake
pedal released: with the selector at D or M.
–
With the select
or in mode P and the brake pedal
depressed: with the selector at R, N, D or M.
–
With re
verse gear engaged.
Special cases
The engine will restart automatically if the
conditions for operation are met again and in the
following cases:
–
V
ehicle speed exceeds 2.5 mph (4 km/h) with
PureTech 130, 180 and 225 versions, or 16 mph
(25 km/h) with BlueHDi versions.
In these cases, this indicator lamp flashes
for a few seconds, then goes off.
Malfunctions
In the event of a fault with the system, this
warning lamp flashes for a few moments
on the instrument panel, then remains on,
accompanied by the display of a message.
Have it checked by a dealer or a qualified
workshop.
The vehicle stalls in STOP mode
All of the instrument panel warning lamps come
on if there is a fault.
► Switch off the ignition then start the engine
again with the "START/STOP" button.
12 V battery
The Stop & Start system requires a
12 V battery of specific technology and
specification.
All work must be carried out only by a dealer or
a qualified workshop.
Tyre under-inflation
detection
This system alerts the driver if one or more tyres
suffer a drop in pressure.
The alert is raised when the vehicle is moving, not
when stationary.
It compares the information given by the wheel
speed sensors with reference values, which must
be reinitialised every time the tyre pressures are
adjusted or a wheel changed.
It takes into account the last values stored
during the reinitialisation request. It is therefore
essential that the tyre pressure is correct during
the operation. This operation is the driver’s
responsibility.
Page 123 of 244
121
Driving06
The brake lamps come on if the vehicle is
slowed down by the system.
It can be dangerous to drive if the brake lamps
are not in perfect working order.
To do this, the system uses a camera fitted at the
top of the windscreen and, depending on version,
a radar fitted in the front bumper.
Primarily designed for driving on main
roads and motorways, this system only
works with moving vehicles driving in the same
direction as your vehicle.
If the driver activates the direction
indicator to overtake a slower vehicle,
cruise control may temporarily reduce the
distance to the target vehicle to facilitate
overtaking, without exceeding the speed
setting.
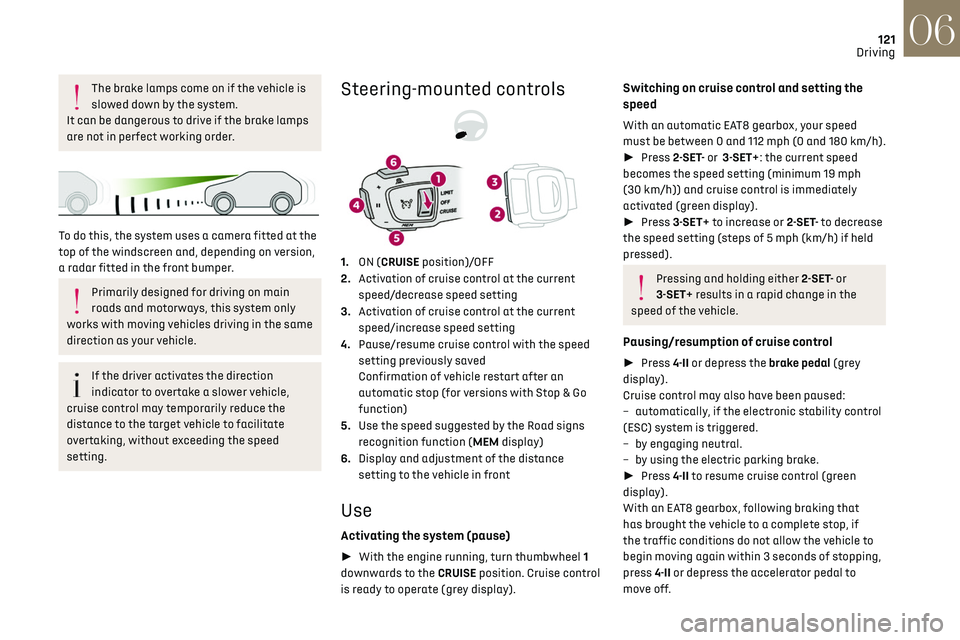
Steering-mounted controls
1. ON (CRUISE position)/OFF
2. Activation of cruise control at the current
speed/decrease speed setting
3. Activation of cruise control at the current
speed/increase speed setting
4. Pause/resume cruise control with the speed
setting previously saved
Confirmation of vehicle restart after an
automatic stop (for versions with Stop & Go
function)
5. Use the speed suggested by the Road signs
recognition function (MEM display)
6. Display and adjustment of the distance
setting to the vehicle in front
Use
Activating the system (pause)
► With the engine running, turn thumbwheel 1
downwards to the CRUISE position. Cruise control
is ready to operate (grey display).
Switching on cruise control and setting the
speed
With an automatic EAT8 gearbox, your speed
must be between 0 and 112 mph (0 and 180 km/h).
► Press 2-SET- or 3-SET+: the current speed
becomes the speed setting (minimum 19 mph
(30 km/h)) and cruise control is immediately
activated (green display).
► Press 3-SET+ to increase or 2-SET- to decrease
the speed setting (steps of 5 mph (km/h) if held
pressed).
Pressing and holding either 2-SET- or
3-SET+ results in a rapid change in the
speed of the vehicle.
Pausing/resumption of cruise control
► Press 4-II or depress the brake pedal (grey
display).
Cruise control may also have been paused:
–
aut
omatically, if the electronic stability control
(ESC) system is triggered.
–
b
y engaging neutral.
–
b
y using the electric parking brake.
► Press 4-II to resume cruise control (green
display).
With an EAT8 gearbox, following braking that
has brought the vehicle to a complete stop, if
the traffic conditions do not allow the vehicle to
begin moving again within 3 seconds of stopping,
press 4-II or depress the accelerator pedal to
move off.
Page 124 of 244
122
Driving06
If the driver takes no action after the vehicle
has been stopped, the electric parking brake is
applied automatically after about 5 minutes.
Cruise control remains active after
changing gear, regardless of the gearbox
type.
When the driver attempts to reactivate
cruise control after the function has been
paused, the message "Activation not possible,
unsuitable conditions" is displayed briefly if
reactivation is not possible (safety conditions
not met).
Changing the programmed speed setting with
the Road signs recognition function
► Press 5-MEM to accept the speed suggested
by the system on the instrument panel, then press
again to confirm.
To prevent sudden acceleration or
deceleration of the vehicle, select a speed
setting relatively close to the vehicle's current
speed.
Changing the inter-vehicle distance
► Press 6 to display the distance setting
thresholds ("Distant", "Normal", "Close"), then
press again to select a threshold.
After a few seconds, the option is accepted and
will be memorised when the ignition is switched
off.
Temporarily exceeding the speed setting
► Press the accelerator pedal fully. Distance
monitoring and cruise control are deactivated
while acceleration is maintained. "Cruise control
on hold" is displayed.
Deactivating the system
► Turn thumbwheel 1 upwards to the OFF
position.
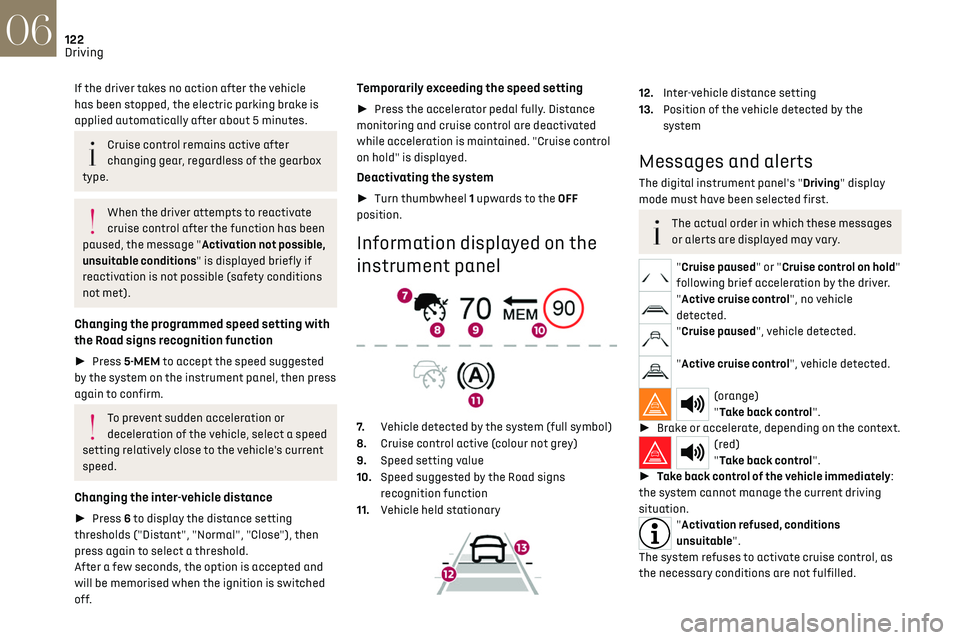
Information displayed on the
instrument panel
7. Vehicle detected by the system (full symbol)
8. Cruise control active (colour not grey)
9. Speed setting value
10. Speed suggested by the Road signs
recognition function
11. Vehicle held stationary
12.Inter-vehicle distance setting
13. Position of the vehicle detected by the
system
Messages and alerts
The digital instrument panel's "Driving" display
mode must have been selected first.
The actual order in which these messages
or alerts are displayed may vary.
"Cruise paused" or "Cruise control on hold"
following brief acceleration by the driver.
"Active cruise control", no vehicle
detected.
"Cruise paused", vehicle detected.
"Active cruise control", vehicle detected.
(orange)
"Take back control".
► Brake or accelerate, depending on the context.
(red)
"Take back control".
► Take back control of the vehicle immediately:
the system cannot manage the current driving
situation.
"Activation refused, conditions
unsuitable".
The system refuses to activate cruise control, as
the necessary conditions are not fulfilled.
Page 158 of 244
156
Practical information07
If using accessories attached to the
towing device (e.g. bicycle carriers, tow
boxes):
–
Comply with the maximum authorised no
se
weight.
–
Do no
t transport more than 4 conventional
bicycles or 2 electric bicycles.
When loading bicycles onto a bicycle carrier
on a towball, be sure to place the heaviest
bicycles as close as possible to the vehicle.
Observe the legislation in force in the
country where you are driving.
Vehicle equipped with motorised tailgate
with hands-free function (Hands-Free
Tailgate Access)
To avoid unintentionally opening the motorised
tailgate when operating the towing device:
–
Deactiv
ate this function in advance in the
vehicle's configuration application.
–
O
r remove the electronic key from the
recognition zone, with the tailgate closed.
Rechargeable hybrid vehicles
A rechargeable hybrid vehicle with 20"
wheels (R20) cannot be fitted with a towing
device.
It is therefore not possible to tow a trailer or
caravan.
Towing device with
retractable ball joint
When this towing device is not in use, it is folded
away underneath the rear bumper.
No tools are required to install or stow it.
Before any operation, the vehicle must be
stationary with the parking brake applied.
The area close to the exhaust pipe may reach a
high temperature: risk of burns!
Vehicle equipped with motorised tailgate
with hands-free function (Hands-Free
Tailgate Access)
To avoid unintentional opening of the tailgate,
follow the recommendations on the Towing
device by referring to the corresponding
section.
Unlocking handle
The towball is locked in either the storage
position or the usage position.
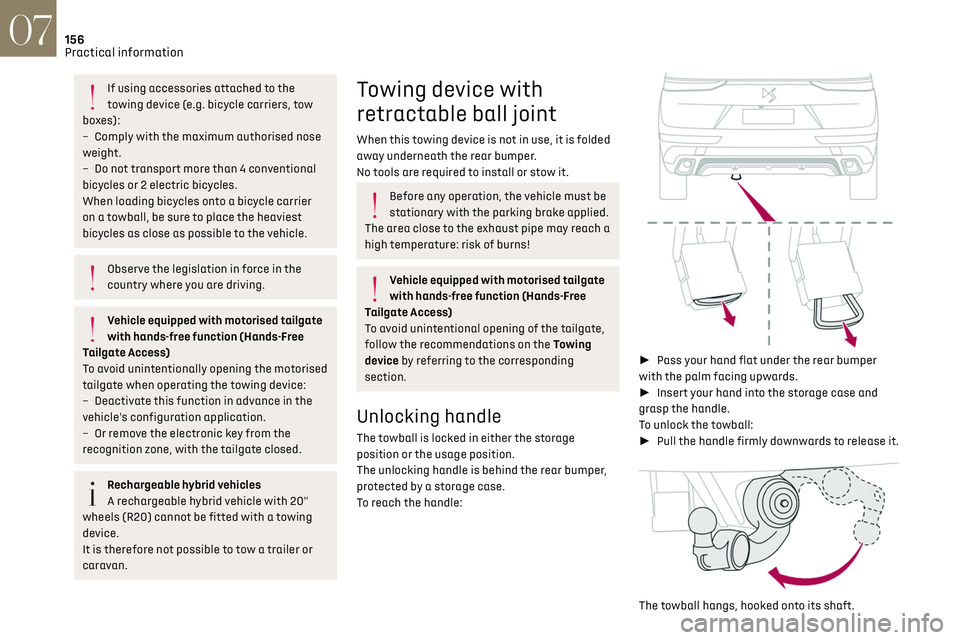
The unlocking handle is behind the rear bumper,
protected by a storage case.
To reach the handle:
► Pass your hand flat under the rear bumper
with the palm facing upwards.
► Insert your hand into the storage case and
grasp the handle.
To unlock the towball:
► Pull the handle firmly downwards to release it.
The towball hangs, hooked onto its shaft.
Page 161 of 244
159
Practical information07
For more information, contact a dealer or a
qualified workshop.
Installation tips
► To fit the snow chains during a journey, stop
the vehicle on a flat surface at the side of the
road.
► Apply the parking brake and position any
wheel chocks under the wheels to prevent
movement of the vehicle.
► Fit the snow chains following the instructions
provided by the manufacturer.
► Move off gently and drive for a few moments,
without exceeding 31 mph (50 km/h).
► Stop the vehicle and check that the snow
chains are correctly tightened.
It is strongly recommended that you
practise fitting the snow chains on a level
and dry surface before setting off.
Avoid driving with snow chains on roads
that have been cleared of snow to avoid
damaging the vehicle's tyres and the road
surface. If the vehicle is fitted with alloy
wheels, check that no part of the chain or its
fixings is in contact with the wheel rim.
Rechargeable hybrid vehicles
The use of snow chains is only authorised
on the front wheels.
The driving mode selector must be on the 4WD
position (depending on version).
Energy economy mode
This system manages the duration of use of
certain functions, in order to conserve a sufficient
level of charge in the battery with the ignition off.
After switching off the engine and for a maximum
cumulative period of around 30 minutes, you can
continue to use functions such as the audio and
telematics system, dipped beam headlamps or
courtesy lamps.
Selecting the mode
A confirmation message is displayed when
energy economy mode is entered, and the active
functions are placed on standby.
If a telephone call is in progress at the
time, it will be maintained for around 10
minutes via the audio system’s hands-free
system.
Exiting the mode
These functions are automatically reactivated the
next time the vehicle is used.
To restore the use of these functions immediately,
start the engine and let it run:
–
For le
ss than 10 minutes, to use the equipment
for approximately 5 minutes.
–
For more than 10 minut
es, to use the equipment
for approximately 30 minutes.
Let the engine run for the specified duration to
ensure that the battery charge is sufficient.
To recharge the battery, avoid repeatedly or
continuously restarting the engine.
A flat battery prevents the engine from
starting.
For more information on the 12 V battery, refer
to the corresponding section.
Load reduction mode
This system manages the use of certain functions
according to the level of charge remaining in the
battery.
When the vehicle is being driven, the load
reduction function temporarily deactivates
certain functions, such as the air conditioning
and the heated rear screen.
The deactivated functions are reactivated
automatically as soon as conditions permit.
Bonnet
Stop & Start
Before doing anything under the bonnet,
you must switch off the ignition to avoid any
risk of the engine restarting automatically.
Take care with objects or clothing that could
be caught in the blades of the cooling fan