stop start CITROEN DS7 CROSSBACK 2019 Owner's Guide
[x] Cancel search | Manufacturer: CITROEN, Model Year: 2019, Model line: DS7 CROSSBACK, Model: CITROEN DS7 CROSSBACK 2019Pages: 244, PDF Size: 6.87 MB
Page 115 of 244
113
Driving06
In the presence of areas in shade, or in
conditions of bright sunlight or inadequate
lighting, the image may be darkened and with
lower contrast.
Obstacles may appear further away than they
actually are.
Sensors
The operation of the sensors, as well as
any associated functions, may be disrupted by
noise pollution such as that emitted by noisy
vehicles and machinery (e.g. lorries, pneumatic
drills), by the accumulation of snow or dead
leaves on the road or in the event of damaged
bumpers and mirrors.
When reverse gear is engaged, an audible
signal (long beep) indicates that the sensors
may be dirty.
A front or rear impact to the vehicle can
upset the sensors’ settings, which is not
always detected by the system: distance
measurements may be distorted.
The sensors do not systematically detect
obstacles that are too low (pavements, studs)
or too thin (trees, posts, wire fences).
Certain obstacles located in the sensors’ blind
spots may not be detected or may no longer be
detected during the manoeuvre.
Certain materials (fabrics) absorb sound
waves: pedestrians may not be detected.
Maintenance
Clean the bumpers and door mirrors and
the field of vision of the cameras regularly.
When washing your vehicle at high pressure,
direct the spray from at least 30 cm away from
the radar, sensors and cameras.
Mats/Pedal trims
The use of mats or pedal trims not
approved by the Manufacturer may interfere
with the operation of the speed limiter or
cruise control.
To avoid any risk of jamming the pedals:
–
Ensure tha
t the mat is secured correctly.
–
Ne
ver fit one mat on top of another.
Units of speed
Ensure that the units of speed displayed
on the instrument panel (mph or km/h) are
those for the country you are driving in.
If this is not the case, when the vehicle is
stationary, set the display to the required
units of speed so that it complies with what is
authorised locally.
In case of doubt, contact a dealer or a qualified
workshop.
Shortcuts for driving aids
The full list of available driving aids can be found
in the Functions tab. Driving aids can be accessed directly to quickly
activate/deactivate them.
By default, driving aids are already stored in the
Shortcuts tab (e.g. Stop & Start, Lane keeping
assist).
Other driving aids can be added or deleted from
this tab.
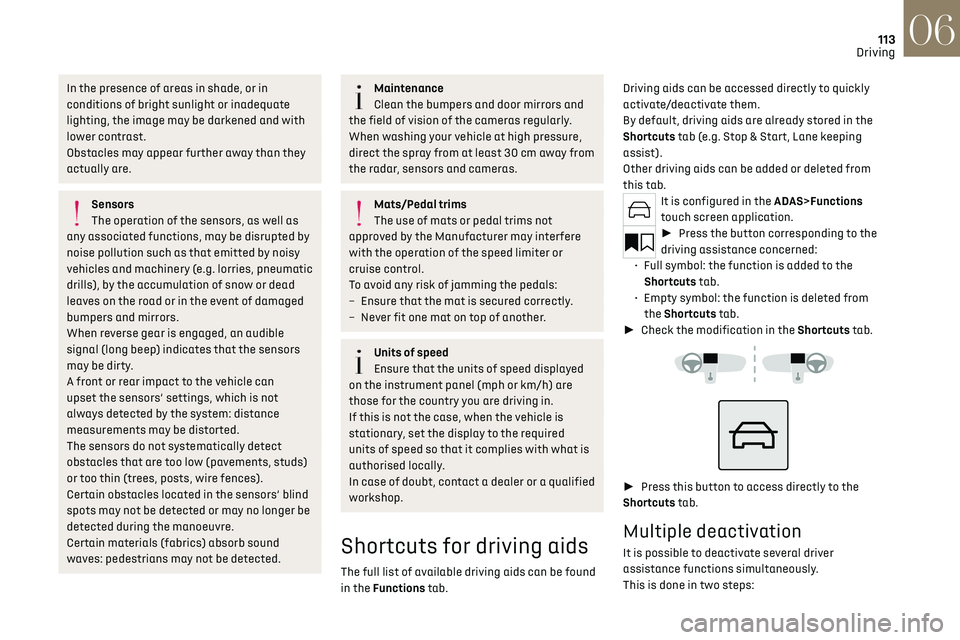
It is configured in the ADAS>Functions
touch screen application.
►
Press the button corresponding to the
driving assistance concerned:
•
Full s
ymbol: the function is added to the
Shortcuts tab.
•
Empty s
ymbol: the function is deleted from
the Shortcuts tab.
► Check the modification in the Shortcuts tab.
► Press this button to access directly to the
Shortcuts tab.
Multiple deactivation
It is possible to deactivate several driver
assistance functions simultaneously.
This is done in two steps:
Page 116 of 244
114
Driving06
– First of all, the selection of all the functions
that you want to deactivate.
–
Sec
ondly, the simultaneous deactivation of all
these functions.
Selection of functions
► Press this button on the dashboard to
display the ADAS tabs.
► Select the Functions tab.
► Press this button to display the list of
available functions.
► Select the functions to deactivate (e.g. Stop
& Start, Lane Keeping Assist, Automatic Braking
System (Active Safety Brake)).
► Press this button to return to the
previous page.
The functions to deactivate are saved in the
system.
Deactivation of these functions
► Press and hold this button on
the dashboard.
All previously selected functions are deactivated
until the vehicle is next restarted (confirmed by an
audible signal).
Road signs recognition
For more information, refer to the General
recommendations on the use of driving
and manoeuvring aids.
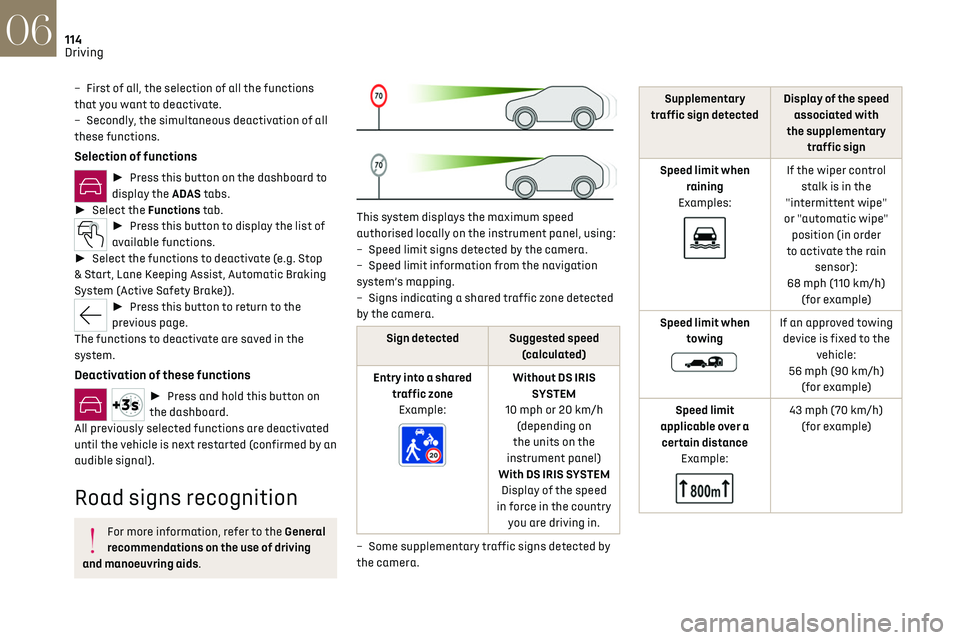
This system displays the maximum speed
authorised locally on the instrument panel, using:
–
Speed limit signs det
ected by the camera.
–
Speed limit in
formation from the navigation
system’s mapping.
–
Signs indic
ating a shared traffic zone detected
by the camera.
Sign detected Suggested speed (calculated)
Entry into a shared traffic zoneExample:
Without DS IRIS SYSTEM
10 mph or 20 km/h (depending on
the units on the
instrument panel)
With DS IRIS SYSTEM Display of the speed
in force in the country you are driving in.
–
Some supplemen
tary traffic signs detected by
the camera.
Supplementary
traffic sign detected Display of the speed
associated with
the supplementary traffic sign
Speed limit when raining
Examples:
If the wiper control stalk is in the
"intermittent wipe"
or "automatic wipe" position (in order
to activate the rain sensor):
68 mph (110 km/h) (for example)
Speed limit when towing
If an approved towing device is fixed to the vehicle:
56 mph (90 km/h) (for example)
Speed limit
applicable over a certain distance Example:
43 mph (70 km/h) (for example)
Page 121 of 244
119
Driving06
Programmable cruise
control
For more information, refer to the General
recommendations on the use of driving
and manoeuvring aids and the Specific
recommendations on cruise control.
This system automatically maintains the
vehicle’s speed at the value programmed
by the driver (speed setting), without the use of
the accelerator pedal.
Cruise control is switched on manually.
It requires a minimum vehicle speed of 25 mph
(40 km/h).
With an automatic gearbox, mode D or second
gear or higher in mode M must be engaged.
Cruise control remains active after
changing gear on engines fitted with the
Stop & Start function.
Switching off the ignition cancels any
speed setting.
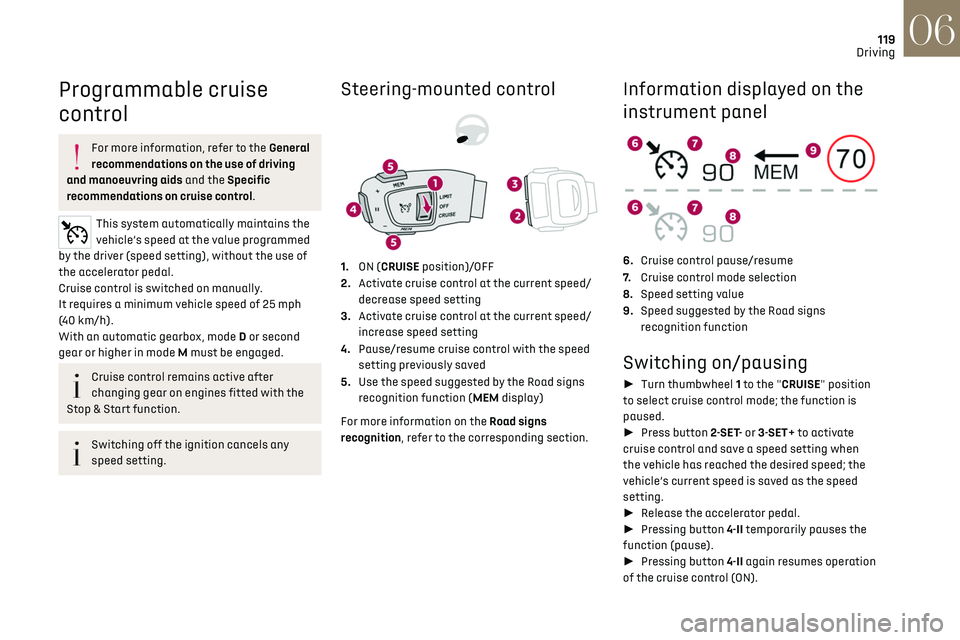
Steering-mounted control
1. ON (CRUISE position)/OFF
2. Activate cruise control at the current speed/
decrease speed setting
3. Activate cruise control at the current speed/
increase speed setting
4. Pause/resume cruise control with the speed
setting previously saved
5. Use the speed suggested by the Road signs
recognition function (MEM display)
For more information on the Road signs
recognition, refer to the corresponding section.
Information displayed on the
instrument panel
6. Cruise control pause/resume
7. Cruise control mode selection
8. Speed setting value
9. Speed suggested by the Road signs
recognition function
Switching on/pausing
► Turn thumbwheel 1 to the "CRUISE" position
to select cruise control mode; the function is
paused.
► Press button 2-SET- or 3-SET+ to activate
cruise control and save a speed setting when
the vehicle has reached the desired speed; the
vehicle’s current speed is saved as the speed
setting.
► Release the accelerator pedal.
► Pressing button 4-II temporarily pauses the
function (pause).
► Pressing button 4-II again resumes operation
of the cruise control (ON).
Page 122 of 244
120
Driving06
Cruise control can also be paused
temporarily:
–
b
y pressing the brake pedal.
–
aut
omatically, if the electronic stability
control (ESC) system is triggered.
Changing the cruise speed
setting
The cruise control must be active.
To change the cruise speed setting, based on the
vehicle’s current speed:
► For steps of +/- 1 mph (1 km/h), briefly
press 2-SET- or 3-SET+ repeatedly.
► For steps of +/- 5 mph (5 km/h), press and
hold 2-SET- or 3-SET+.
Pressing and holding 2-SET- or 3-SET+
results in a rapid change in the speed of
the vehicle.
As a precaution, we recommend setting a
cruise speed fairly close to the current
speed of your vehicle, to avoid any sudden
acceleration or deceleration of the vehicle.
To change the cruise speed setting using the
speed suggested by the Road signs recognition
function displayed on the instrument panel:
► Press 5-MEM once; a message is displayed,
confirming the memorisation request.
► Press 5-MEM again to save the suggested
speed.
The new speed setting value is displayed on the
instrument panel.
Switching off
► Turn the thumbwheel 1 to the "OFF" position:
the cruise control information disappears from
the screen.
Malfunction
In the event of a malfunction, dashes are
displayed flashing and then fixed instead of the
speed setting.
Have it checked by a dealer or a qualified
workshop.
DS DRIVE ASSIST
This system automatically adjusts the speed
and corrects the trajectory of the vehicle, using
Adaptive cruise control with Stop&Go function in
conjunction with Lane Positioning Assist.
These two functions must be activated and in
operation.
For more information on Adaptive cruise
control and Lane Positioning Assist, refer to the
corresponding sections.
The system assists the driver by acting on
the steering, acceleration and braking
within the physical limits and capacities of the
vehicle. Certain road infrastructure elements
or vehicles in the surroundings may not be
properly seen or may be poorly interpreted by
the camera and radar, resulting in an
unexpected change in direction, a lack of
steering correction and/or inappropriate
management of acceleration or braking.
Primarily designed for driving on main
roads and motorways, this system only
works with moving vehicles driving in the same
direction as your vehicle.
Adaptive cruise control
For more information, refer to the General
recommendations on the use of driving
and manoeuvring aids and the Specific
recommendations of cruise control.
This system automatically maintains the vehicle
speed at a value set by the driver (speed setting),
while respecting a safety distance from the
vehicle in front (target vehicle) previously set by
the driver. The system automatically manages the
acceleration and deceleration of the vehicle.
With the Stop function, the system manages
braking until the vehicle comes to a complete
stop.
With the Stop & Go function, the system manages
braking until the vehicle comes to a complete stop
and restarts the vehicle.
Page 123 of 244
121
Driving06
The brake lamps come on if the vehicle is
slowed down by the system.
It can be dangerous to drive if the brake lamps
are not in perfect working order.
To do this, the system uses a camera fitted at the
top of the windscreen and, depending on version,
a radar fitted in the front bumper.
Primarily designed for driving on main
roads and motorways, this system only
works with moving vehicles driving in the same
direction as your vehicle.
If the driver activates the direction
indicator to overtake a slower vehicle,
cruise control may temporarily reduce the
distance to the target vehicle to facilitate
overtaking, without exceeding the speed
setting.
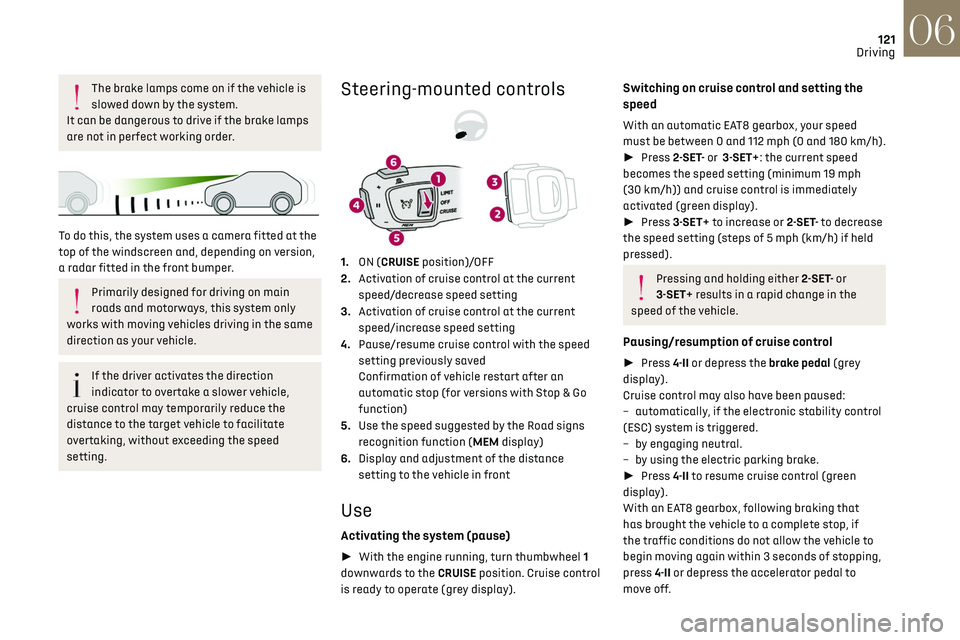
Steering-mounted controls
1. ON (CRUISE position)/OFF
2. Activation of cruise control at the current
speed/decrease speed setting
3. Activation of cruise control at the current
speed/increase speed setting
4. Pause/resume cruise control with the speed
setting previously saved
Confirmation of vehicle restart after an
automatic stop (for versions with Stop & Go
function)
5. Use the speed suggested by the Road signs
recognition function (MEM display)
6. Display and adjustment of the distance
setting to the vehicle in front
Use
Activating the system (pause)
► With the engine running, turn thumbwheel 1
downwards to the CRUISE position. Cruise control
is ready to operate (grey display).
Switching on cruise control and setting the
speed
With an automatic EAT8 gearbox, your speed
must be between 0 and 112 mph (0 and 180 km/h).
► Press 2-SET- or 3-SET+: the current speed
becomes the speed setting (minimum 19 mph
(30 km/h)) and cruise control is immediately
activated (green display).
► Press 3-SET+ to increase or 2-SET- to decrease
the speed setting (steps of 5 mph (km/h) if held
pressed).
Pressing and holding either 2-SET- or
3-SET+ results in a rapid change in the
speed of the vehicle.
Pausing/resumption of cruise control
► Press 4-II or depress the brake pedal (grey
display).
Cruise control may also have been paused:
–
aut
omatically, if the electronic stability control
(ESC) system is triggered.
–
b
y engaging neutral.
–
b
y using the electric parking brake.
► Press 4-II to resume cruise control (green
display).
With an EAT8 gearbox, following braking that
has brought the vehicle to a complete stop, if
the traffic conditions do not allow the vehicle to
begin moving again within 3 seconds of stopping,
press 4-II or depress the accelerator pedal to
move off.
Page 133 of 244
131
Driving06
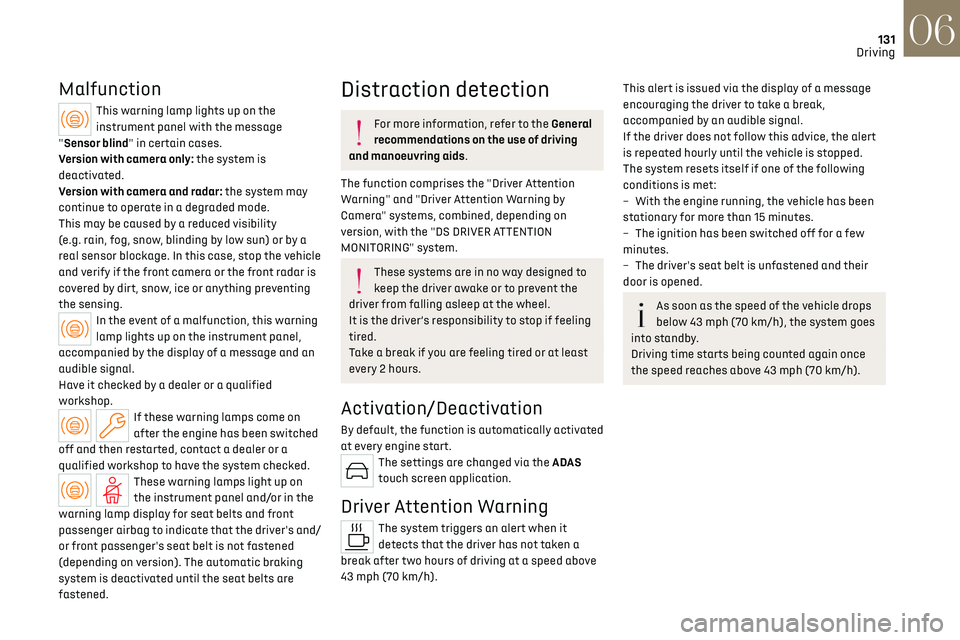
Malfunction
This warning lamp lights up on the
instrument panel with the message
"Sensor blind" in certain cases.
Version with camera only: the system is
deactivated.
Version with camera and radar: the system may
continue to operate in a degraded mode.
This may be caused by a reduced visibility
(e.g. rain, fog, snow, blinding by low sun) or by a
real sensor blockage. In this case, stop the vehicle
and verify if the front camera or the front radar is
covered by dirt, snow, ice or anything preventing
the sensing.
In the event of a malfunction, this warning
lamp lights up on the instrument panel,
accompanied by the display of a message and an
audible signal.
Have it checked by a dealer or a qualified
workshop.
If these warning lamps come on
after the engine has been switched
off and then restarted, contact a dealer or a
qualified workshop to have the system checked.
These warning lamps light up on
the instrument panel and/or in the
warning lamp display for seat belts and front
passenger airbag to indicate that the driver's and/
or front passenger's seat belt is not fastened
(depending on version). The automatic braking
system is deactivated until the seat belts are
fastened.
Distraction detection
For more information, refer to the General
recommendations on the use of driving
and manoeuvring aids.
The function comprises the "Driver Attention
Warning" and "Driver Attention Warning by
Camera" systems, combined, depending on
version, with the "DS DRIVER ATTENTION
MONITORING" system.
These systems are in no way designed to
keep the driver awake or to prevent the
driver from falling asleep at the wheel.
It is the driver’s responsibility to stop if feeling
tired.
Take a break if you are feeling tired or at least
every 2 hours.
Activation/Deactivation
By default, the function is automatically activated
at every engine start.
The settings are changed via the ADAS
touch screen application.
Driver Attention Warning
The system triggers an alert when it
detects that the driver has not taken a
break after two hours of driving at a speed above
43 mph (70 km/h).
This alert is issued via the display of a message
encouraging the driver to take a break,
accompanied by an audible signal.
If the driver does not follow this advice, the alert
is repeated hourly until the vehicle is stopped.
The system resets itself if one of the following
conditions is met:
–
With the engine running, the v
ehicle has been
stationary for more than 15 minutes.
–
The ignition has been s
witched off for a few
minutes.
–
The driv
er's seat belt is unfastened and their
door is opened.
As soon as the speed of the vehicle drops
below 43 mph (70 km/h), the system goes
into standby.
Driving time starts being counted again once
the speed reaches above 43 mph (70 km/h).
Page 139 of 244
137
Driving06
or other objects; they may hamper correct
operation of the system.
Parking sensors
For more information, refer to the General
recommendations on the use of driving
and manoeuvring aids.
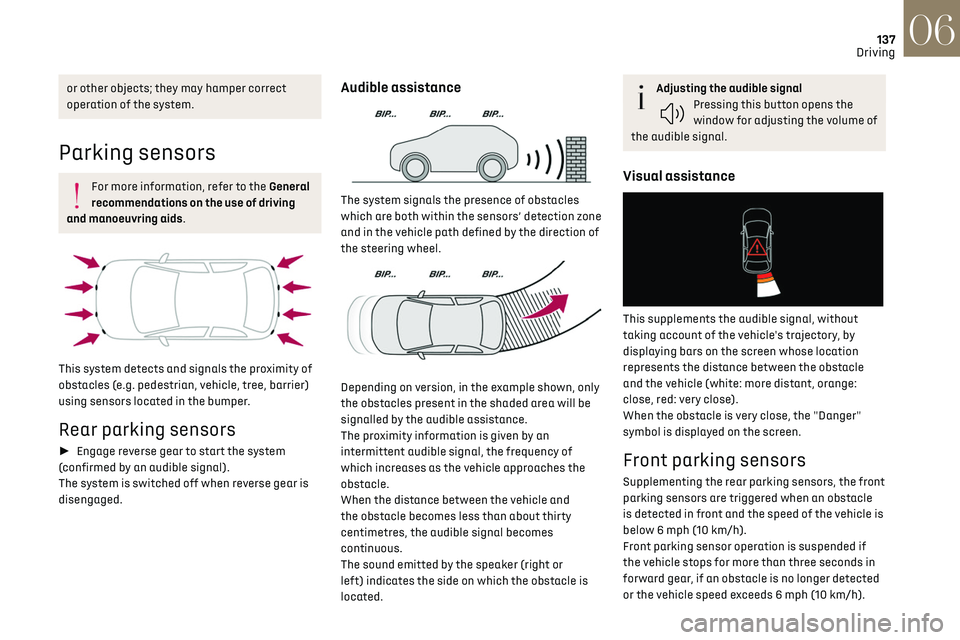
This system detects and signals the proximity of
obstacles (e.g. pedestrian, vehicle, tree, barrier)
using sensors located in the bumper.
Rear parking sensors
► Engage reverse gear to start the system
(confirmed by an audible signal).
The system is switched off when reverse gear is
disengaged.
Audible assistance
The system signals the presence of obstacles
which are both within the sensors’ detection zone
and in the vehicle path defined by the direction of
the steering wheel.
Depending on version, in the example shown, only
the obstacles present in the shaded area will be
signalled by the audible assistance.
The proximity information is given by an
intermittent audible signal, the frequency of
which increases as the vehicle approaches the
obstacle.
When the distance between the vehicle and
the obstacle becomes less than about thirty
centimetres, the audible signal becomes
continuous.
The sound emitted by the speaker (right or
left) indicates the side on which the obstacle is
located.
Adjusting the audible signalPressing this button opens the
window for adjusting the volume of
the audible signal.
Visual assistance
This supplements the audible signal, without
taking account of the vehicle's trajectory, by
displaying bars on the screen whose location
represents the distance between the obstacle
and the vehicle (white: more distant, orange:
close, red: very close).
When the obstacle is very close, the "Danger"
symbol is displayed on the screen.
Front parking sensors
Supplementing the rear parking sensors, the front
parking sensors are triggered when an obstacle
is detected in front and the speed of the vehicle is
below 6 mph (10 km/h).
Front parking sensor operation is suspended if
the vehicle stops for more than three seconds in
forward gear, if an obstacle is no longer detected
or the vehicle speed exceeds 6 mph (10 km/h).
Page 145 of 244
143
Practical information07
TAILOR-MADE
LUBRICANTS
FOR HAUTE
COUTURE CARS
* 1L & 5L produced in Europe
Partner\f \fince the brand’\f creation in \b015, DS automobile\f &
TotalEnergie\f \fhare common value\f : excellence, performance and
know-how. TotalEnergie\f equip\f DS vehicle\f with Quartz lubricant\f
from their fir\ft filling in the factory to approved maintenance
network\f to guarantee them optimal performance on a daily ba\fi\f.
Tailor-made for DS vehicle\f, Quartz lubricant\f make them even more
efficient, more fuel efficient and more environmentally friendly.
TotalEnergie\f and DS, official partner\f in\t automotive excellence !
Keep your engine younger for longer \
!
Quartz Ineo Xtra Fir\ft 0W-\b0 i\f a very high performance lubricant
re\fulting from the joint work of the DS Automobile\f and
TotalEnergie\f R&D team\f. It\f innovative technology extend\f your
engine’\f life while reaching \fignificant fuel \faving\f and thu\f
limiting CO
\b emi\f\fion\f. The product i\f now available in new
packaging* made of 50% recycled material and 100% rec\tyclable.
Compatibility of fuels
Petrol fuels conforming to the EN228 standard
containing up to 5% and 10% ethanol respectively.
Diesel fuels conforming to the EN590, EN16734
and EN16709 standards and containing up to
7%, 10%, 20% and 30% fatty acid methyl ester
respectively. The use of B20 or B30 fuels, even
occasionally, imposes special maintenance
conditions referred to as "Arduous conditions".
Paraffinic Diesel fuel conforming to the EN15940
standard.
The use of any other type of (bio)fuel
(e.g. pure or diluted vegetable or animal
oils, domestic fuel) is strictly prohibited - risk
of damaging the engine and fuel system!
The only fuel additives authorised for use
are those that meet the B715001 (petrol)
or B715000 (Diesel) standards.
Diesel at low temperature
At temperatures below 0 °C (+32 °F), the
formation of paraffins in summer-type Diesel
fuels could prevent the engine from operating correctly. In these temperature conditions, use
winter-type Diesel fuel and keep the fuel tank
more than 50 % full.
At temperatures below -15 °C (+5 °F) to avoid
problems starting, it is best to park the vehicle
under shelter (heated garage).
Travelling abroad
Certain fuels could damage your vehicle’s engine.
In certain countries, the use of a particular fuel
may be required (specific octane rating, specific
trade name, etc.) to ensure correct operation of
the engine.
For all additional information, consult a dealer.
Refuelling
Fuel tank capacity: approximately 55
litres (Diesel), 62 litres (Petrol) or 43 litres
(Rechargeable hybrid).
Reserve level: approximately 6 litres.
Low fuel level
When the low fuel level is reached, this
warning lamp lights up on the instrument
panel, accompanied by the display of a message
and an audible signal. When it first comes on,
about 6 litres of fuel remain.
Until sufficient fuel is added, this warning lamp
appears every time the ignition is switched on,
accompanied by the message and the audible
signal. When driving, this message and audible
signal are repeated with increasing frequency as
the fuel level drops towards 0.
You must refuel as soon as possible to avoid
running out of fuel.
For more information on Running out of fuel
(Diesel), refer to the corresponding section.
A small arrow by the warning lamp
indicates which side of the vehicle the
fuel filler flap is located on.
Stop & Start
Never refuel with the engine in STOP
mode; you must switch off the ignition.
Refuelling
Any addition of fuel must be in quantities of at
least 10 litres, in order to be registered by the fuel
gauge.
Opening the filler flap may create a noise caused
by an inrush of air. This vacuum is entirely normal,
resulting from the sealing of the fuel system.
To refuel in complete safety:
► Always switch off the engine.
Page 155 of 244
153
Practical information07
Charging the traction
battery (Rechargeable
hybrid)
For a full charge, follow the charging
procedure without interrupting it, until it stops
automatically. Charging may be performed either
immediately (by default) or deferred.
Deferred charging is set via the touch
screen or the MyDS App application.
When the vehicle is connected, the following
information is displayed on the instrument panel:
–
Traction ba
ttery charge status (%).
–
R
emaining range (miles or km).
–
Estima
ted charging time (calculation may take
a few seconds).
–
C
harging speed (miles or km gained per hour).
After the instrument panel has been put into
standby mode, this information can be displayed
again by unlocking the vehicle or opening a door.
It is also possible to monitor the charging
progress using the MyDS App application.
For more information on Remotely
operable additional functions, refer to the
corresponding section.
Low charging / Driving
Driving when the charge level of the
traction battery is too low can lead to the
vehicle breaking down and can lead to
accidents or serious injuries. ALWAYS make
sure the traction battery has a sufficient
charge level.
Low charging / Parking
If the outside temperature is negative,
it is recommended not to park your vehicle
outside for several hours at a low charging
(less than 20%).
Vehicle in storage for more than 1 month
In the event of a long period of non-use
of the vehicle (beyond 4 weeks) without the
possibility of charging when restarting, the
self-discharge may make it impossible to
restart if the traction battery charge level is a
low or very low, especially at negative ambient
temperatures. ALWAYS make sure that the
traction battery has a charge between 20%
and 40% if you do not plan to use your vehicle
for several weeks.
Do not connect the charging cable.
Always park the vehicle in a place with
temperatures between -10°C and 30°C
(parking in a place with extreme temperatures
can damage the traction battery).
Refer to the Accessory battery (Rechargeable
hybrid) section for the battery disconnection
procedure.
Precautions
Rechargeable hybrid vehicles have
been developed in accordance with the
recommendations for maximum electromagnetic
field limits established by the ICNIRP
(International Commission on Non-Ionizing
Radiation Protection - 1998 Guidelines).
Wearers of pacemakers or equivalent
devices should consult a doctor to enquire
about any applicable precautionary measures, or
contact the manufacturer of their implanted
electronic medical device to check that it is
guaranteed to operate in an environment
compliant with the ICNIRP guidelines.
If in doubt, during charging, do not remain inside
or near the vehicle, near the charging cable or the
charging unit, even for a short time.
Before charging
Depending on the context:
► Have a professional check that the
electrical system to be used complies with
applicable standards and is compatible with
the vehicle.
► Have a professional electrician install
a dedicated domestic power socket or
accelerated charging unit (Wallbox)
compatible with the vehicle.
Use the charging cable supplied with the
vehicle.
For more information, contact a dealer or a
qualified workshop.
During charging
As a safety measure, the engine will not
start if the charging cable is plugged into
Page 156 of 244
154
Practical information07
the connector on the vehicle. A warning is
displayed on the instrument panel.
While charging is in progress, unlocking the
vehicle will cause the charging to stop.
If no action is taken on one of the openings
(door or boot) or on the charging nozzle, the
vehicle will lock again after 30 seconds and
charging will resume automatically.
Never work under the bonnet:
–
Some areas remain v
ery hot, even an hour
after charging ends - risk of burns!
–
The fan ma
y start at any time - risk of cuts or
strangulation!
After charging
Check that the charging flap is closed.
Do not leave the cable connected to the
domestic power socket - risk of short-circuit
or electrocution in the event of contact with or
immersion in water!
Charging procedure
Connection
► Before charging, check that the gear selector
is in mode P and the ignition is off, otherwise
charging is impossible.
► Press on the rear of the charging flap to open
it and check that there are no foreign bodies on
the vehicle's charging connector.
The light guides in the flap come on white.
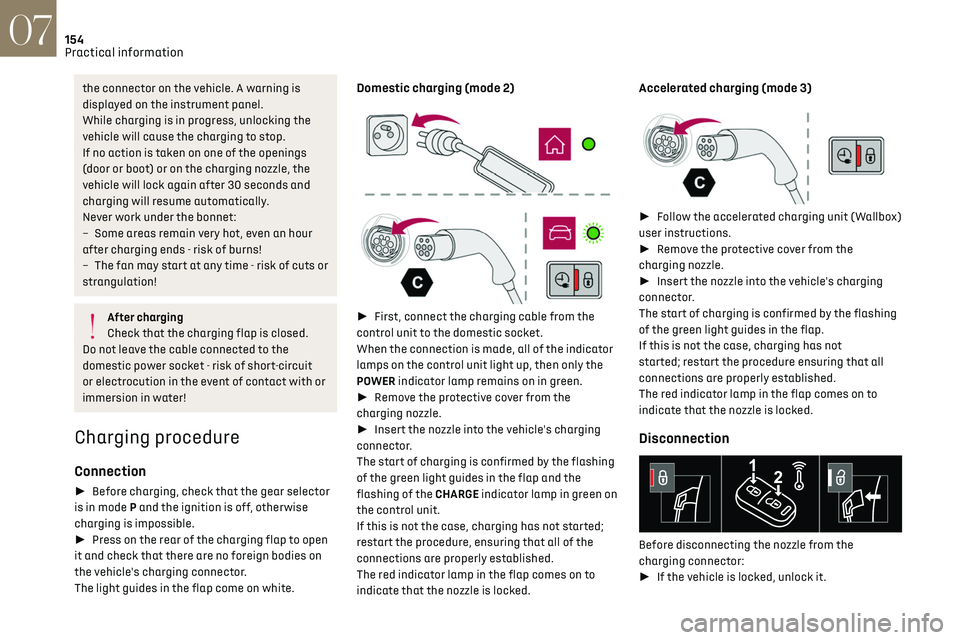
Domestic charging (mode 2)
► First, connect the charging cable from the
control unit to the domestic socket.
When the connection is made, all of the indicator
lamps on the control unit light up, then only the
POWER indicator lamp remains on in green.
► Remove the protective cover from the
charging nozzle.
► Insert the nozzle into the vehicle's charging
connector.
The start of charging is confirmed by the flashing
of the green light guides in the flap and the
flashing of the CHARGE indicator lamp in green on
the control unit.
If this is not the case, charging has not started;
restart the procedure, ensuring that all of the
connections are properly established.
The red indicator lamp in the flap comes on to
indicate that the nozzle is locked.
Accelerated charging (mode 3)
► Follow the accelerated charging unit (Wallbox)
user instructions.
► Remove the protective cover from the
charging nozzle.
► Insert the nozzle into the vehicle's charging
connector.
The start of charging is confirmed by the flashing
of the green light guides in the flap.
If this is not the case, charging has not
started; restart the procedure ensuring that all
connections are properly established.
The red indicator lamp in the flap comes on to
indicate that the nozzle is locked.
Disconnection
Before disconnecting the nozzle from the
charging connector:
► If the vehicle is locked, unlock it.