Page 23 CITROEN DS7 CROSSBACK 2019 Owners Manual
[x] Cancel search | Manufacturer: CITROEN, Model Year: 2019, Model line: DS7 CROSSBACK, Model: CITROEN DS7 CROSSBACK 2019Pages: 244, PDF Size: 6.87 MB
Page 12 of 244
10
Dashboard instruments01
Driver information
Instrument panel
The instrument panel displays all the information
the driver needs about the status of the vehicle's
various systems.
This information appears in the form of warning
and indicator lamps and messages.
The instrument panel is in the form of a fully
digital screen.
Digital instrument panel
This digital instrument panel can be personalised.
Depending on the display page selected, certain
information does not appear or is displayed
differently.
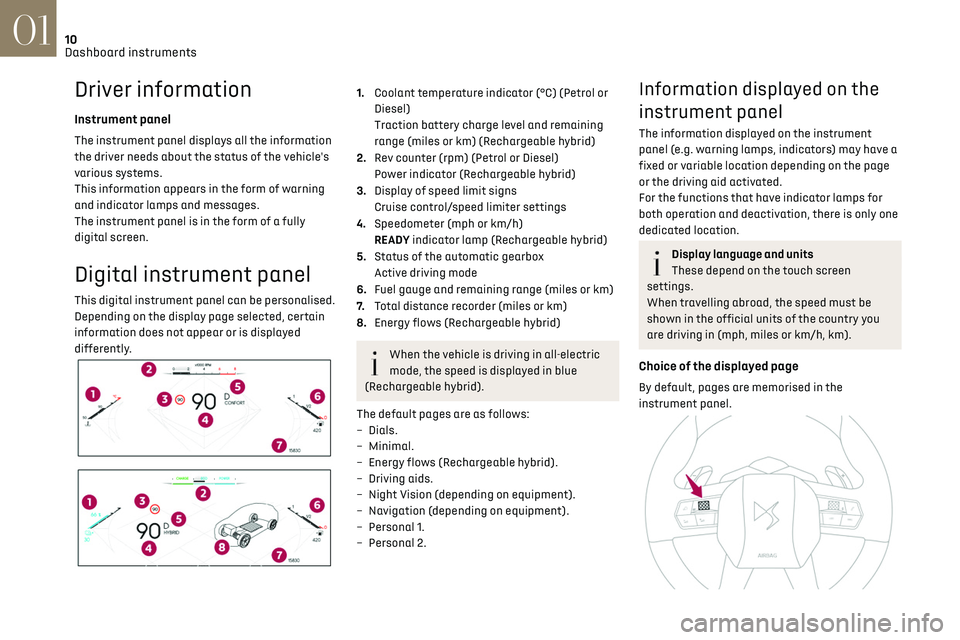
1.Coolant temperature indicator (°C) (Petrol or
Diesel)
Traction battery charge level and remaining
range (miles or km) (Rechargeable hybrid)
2. Rev counter (rpm) (Petrol or Diesel)
Power indicator (Rechargeable hybrid)
3. Display of speed limit signs
Cruise control/speed limiter settings
4. Speedometer (mph or km/h)
READY indicator lamp (Rechargeable hybrid)
5. Status of the automatic gearbox
Active driving mode
6. Fuel gauge and remaining range (miles or km)
7. Total distance recorder (miles or km)
8. Energy flows (Rechargeable hybrid)
When the vehicle is driving in all-electric
mode, the speed is displayed in blue
(Rechargeable hybrid).
The default pages are as follows:
–
Dials.
–
Minimal.
–
Energy flo
ws (Rechargeable hybrid).
–
D
riving aids.
–
Nigh
t Vision (depending on equipment).
–
Na
vigation (depending on equipment).
–
Personal 1
.
–
Personal 2.
Information displayed on the
instrument panel
The information displayed on the instrument
panel (e.g. warning lamps, indicators) may have a
fixed or variable location depending on the page
or the driving aid activated.
For the functions that have indicator lamps for
both operation and deactivation, there is only one
dedicated location.
Display language and units
These depend on the touch screen
settings.
When travelling abroad, the speed must be
shown in the official units of the country you
are driving in (mph, miles or km/h, km).
Choice of the displayed page
By default, pages are memorised in the
instrument panel.
Page 13 of 244
11
Dashboard instruments01
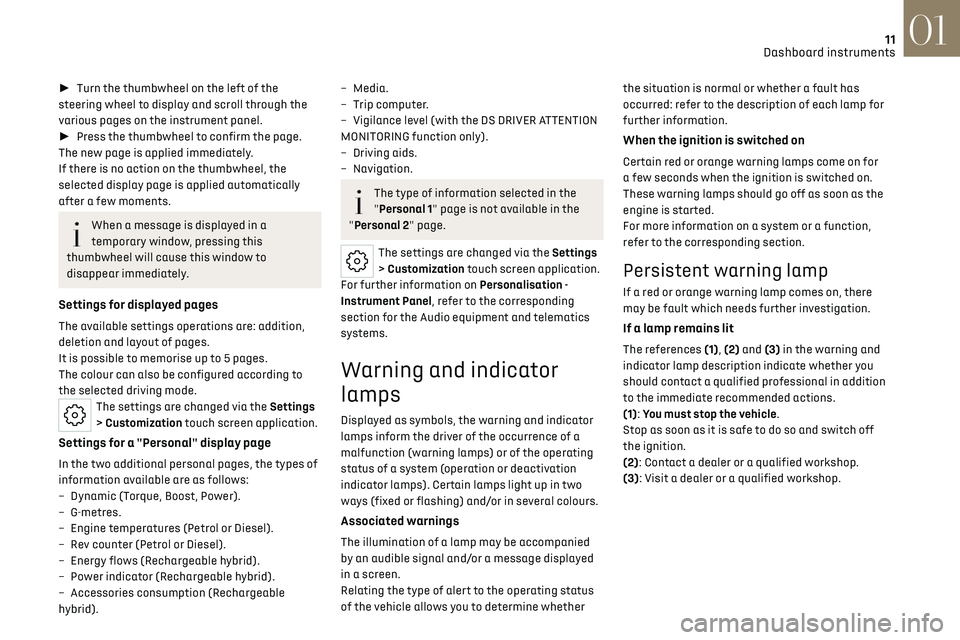
► Turn the thumbwheel on the left of the
steering wheel to display and scroll through the
various pages on the instrument panel.
► Press the thumbwheel to confirm the page.
The new page is applied immediately.
If there is no action on the thumbwheel, the
selected display page is applied automatically
after a few moments.
When a message is displayed in a
temporary window, pressing this
thumbwheel will cause this window to
disappear immediately.
Settings for displayed pages
The available settings operations are: addition,
deletion and layout of pages.
It is possible to memorise up to 5 pages.
The colour can also be configured according to
the selected driving mode.
The settings are changed via the Settings
> Customization touch screen application.
Settings for a "Personal" display page
In the two additional personal pages, the types of
information available are as follows:
–
Dynamic (T
orque, Boost, Power).
–
G-metres.
–
Engine t
emperatures (Petrol or Diesel).
–
R
ev counter (Petrol or Diesel).
–
Energy flo
ws (Rechargeable hybrid).
–
Po
wer indicator (Rechargeable hybrid).
–
Ac
cessories consumption (Rechargeable
hybrid).
– Media.
– Trip c omputer.
–
Vigilanc
e level (with the DS DRIVER ATTENTION
MONITORING function only).
–
D
riving aids.
–
Navigation.
The type of information selected in the
"Personal 1" page is not available in the
"Personal 2" page.
The settings are changed via the Settings
> Customization touch screen application.
For further information on Personalisation -
Instrument Panel, refer to the corresponding
section for the Audio equipment and telematics
systems.
Warning and indicator
lamps
Displayed as symbols, the warning and indicator
lamps inform the driver of the occurrence of a
malfunction (warning lamps) or of the operating
status of a system (operation or deactivation
indicator lamps). Certain lamps light up in two
ways (fixed or flashing) and/or in several colours.
Associated warnings
The illumination of a lamp may be accompanied
by an audible signal and/or a message displayed
in a screen.
Relating the type of alert to the operating status
of the vehicle allows you to determine whether the situation is normal or whether a fault has
occurred: refer to the description of each lamp for
further information.
When the ignition is switched on
Certain red or orange warning lamps come on for
a few seconds when the ignition is switched on.
These warning lamps should go off as soon as the
engine is started.
For more information on a system or a function,
refer to the corresponding section.
Persistent warning lamp
If a red or orange warning lamp comes on, there
may be fault which needs further investigation.
If a lamp remains lit
The references (1), (2) and (3) in the warning and
indicator lamp description indicate whether you
should contact a qualified professional in addition
to the immediate recommended actions.
(1): You must stop the vehicle.
Stop as soon as it is safe to do so and switch off
the ignition.
(2): Contact a dealer or a qualified workshop.
(3): Visit a dealer or a qualified workshop.
Page 25 of 244
23
Dashboard instruments01
The time counter is reset each time the ignition is
switched on.
Clock
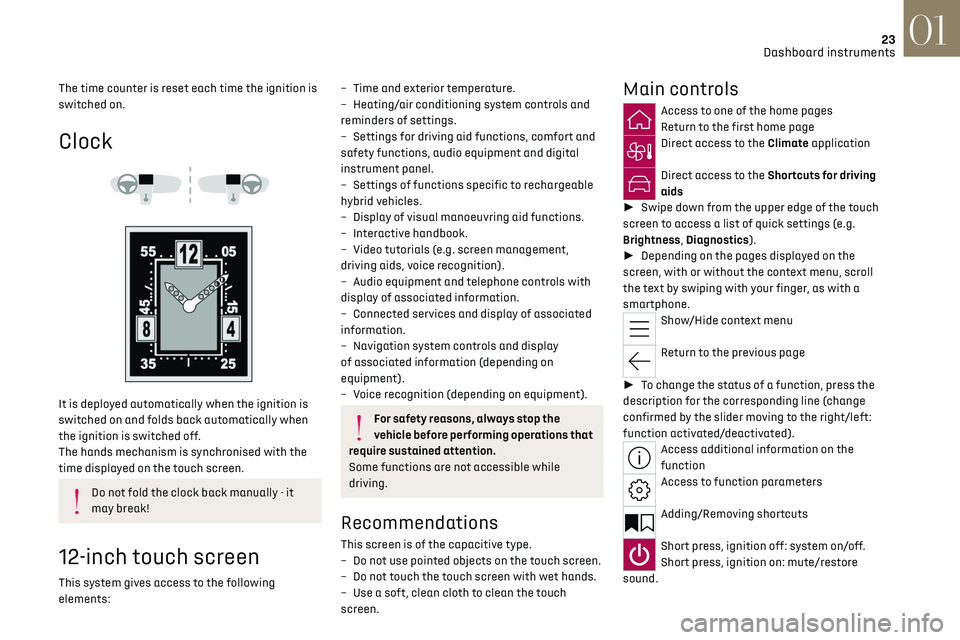
It is deployed automatically when the ignition is
switched on and folds back automatically when
the ignition is switched off.
The hands mechanism is synchronised with the
time displayed on the touch screen.
Do not fold the clock back manually - it
may break!
12-inch touch screen
This system gives access to the following
elements:
– Time and e xterior temperature.
– Hea ting/air conditioning system controls and
reminders of settings.
–
Settings for driving aid functions, c
omfort and
safety functions, audio equipment and digital
instrument panel.
–
Settings o
f functions specific to rechargeable
hybrid vehicles.
–
Displa
y of visual manoeuvring aid functions.
–
In
teractive handbook.
–
Video t
utorials (e.g. screen management,
driving aids, voice recognition).
–
Audio equipmen
t and telephone controls with
display of associated information.
–
Connect
ed services and display of associated
information.
–
Na
vigation system controls and display
of associated information (depending on
equipment).
–
V
oice recognition (depending on equipment).
For safety reasons, always stop the
vehicle before performing operations that
require sustained attention.
Some functions are not accessible while
driving.
Recommendations
This screen is of the capacitive type.
– Do no t use pointed objects on the touch screen.
–
Do no
t touch the touch screen with wet hands.
–
U
se a soft, clean cloth to clean the touch
screen.
Main controls
Access to one of the home pages
Return to the first home page
Direct access to the Climate application
Direct access to the Shortcuts for driving
aids
► Swipe down from the upper edge of the touch
screen to access a list of quick settings (e.g.
Brightness, Diagnostics).
► Depending on the pages displayed on the
screen, with or without the context menu, scroll
the text by swiping with your finger, as with a
smartphone.
Show/Hide context menu
Return to the previous page
► To change the status of a function, press the
description for the corresponding line (change
confirmed by the slider moving to the right/left:
function activated/deactivated).
Access additional information on the
function
Access to function parameters
Adding/Removing shortcuts
Short press, ignition off: system on/off.
Short press, ignition on: mute/restore
sound.
Page 26 of 244
24
Dashboard instruments01
Long press, ignition on: start standby mode (mute
sound, screens and clock display off).
Volume adjustment.
Applications
Press this button to access the
applications wall.
From any page, press the touch screen
with three fingers to display the
applications wall.
To obtain information about the other
applications not listed here, refer to the sections
describing the audio and telematic systems.
ADAS
Activation/Deactivation and configuration
of the driving aid functions.
Climate
Settings for temperature, air flow, etc.
For more information on Dual-zone automatic air
conditioning, refer to the corresponding section.
Seats
Activation/Deactivation and configuration
of the seat comfort functions (heating, ventilation
and massages).
For more information on the Heated and/or
ventilated seats or on the Multi-point massages,
refer to the corresponding section.
Settings
Main settings for the audio system, touch
screen and digital instrument panel. Activation/Deactivation and configuration of
the exterior lighting, vehicle access and safety
functions.
Energy
Access to the rechargeable hybrid system
features (energy flow, consumption statistics,
deferred charging, e
- SAVE function).
Energy application
Energy Flow
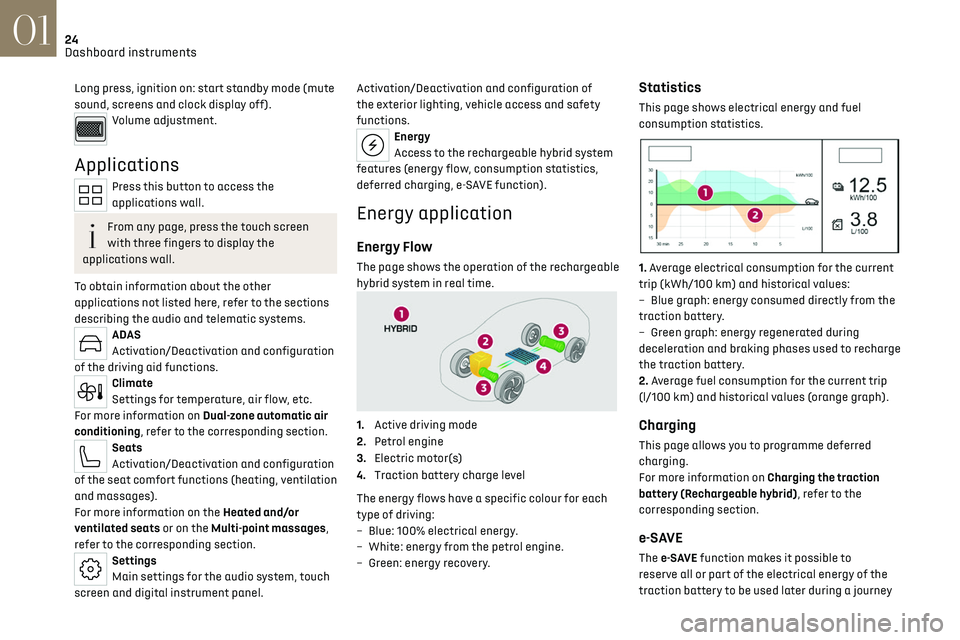
The page shows the operation of the rechargeable
hybrid system in real time.
1.Active driving mode
2. Petrol engine
3. Electric motor(s)
4. Traction battery charge level
The energy flows have a specific colour for each
type of driving:
–
Blue
: 100% electrical energy.
–
Whit
e: energy from the petrol engine.
–
G
reen: energy recovery.
Statistics
This page shows electrical energy and fuel
consumption statistics.
1. Average electrical consumption for the current
trip (kWh/100 km) and historical values:
–
Blue graph
: energy consumed directly from the
traction battery.
–
G
reen graph: energy regenerated during
deceleration and braking phases used to recharge
the traction battery.
2. Average fuel consumption for the current trip
(l/100 km) and historical values (orange graph).
Charging
This page allows you to programme deferred
charging.
For more information on Charging the traction
battery (Rechargeable hybrid), refer to the
corresponding section.
e-SAVE
The e-SAVE function makes it possible to
re serve all or part of the electrical energy of the
traction battery to be used later during a journey
Page 47 of 244
45
Ease of use and comfort03
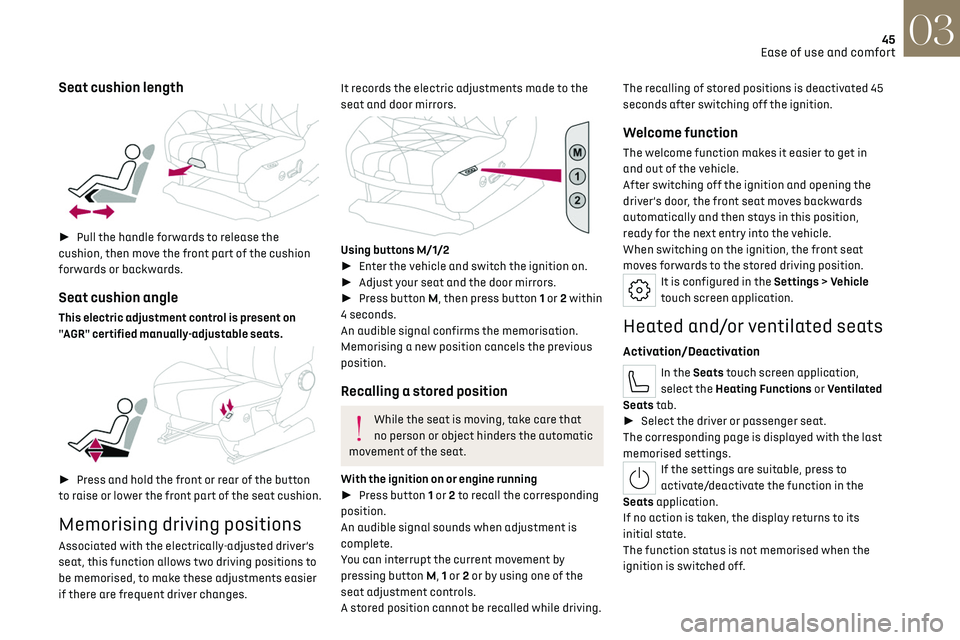
Seat cushion length
► Pull the handle forwards to release the
cushion, then move the front part of the cushion
forwards or backwards.
Seat cushion angle
This electric adjustment control is present on
"AGR" certified manually-adjustable seats.
► Press and hold the front or rear of the button
to raise or lower the front part of the seat cushion.
Memorising driving positions
Associated with the electrically-adjusted driver’s
seat, this function allows two driving positions to
be memorised, to make these adjustments easier
if there are frequent driver changes.
It records the electric adjustments made to the
seat and door mirrors.
Using buttons M/1/2
► Enter the vehicle and switch the ignition on.
► Adjust your seat and the door mirrors.
► Press button M, then press button 1 or 2 within
4 seconds.
An audible signal confirms the memorisation.
Memorising a new position cancels the previous
position.
Recalling a stored position
While the seat is moving, take care that
no person or object hinders the automatic
movement of the seat.
With the ignition on or engine running
► Press button 1 or 2 to recall the corresponding
position.
An audible signal sounds when adjustment is
complete.
You can interrupt the current movement by
pressing button M, 1 or 2 or by using one of the
seat adjustment controls.
A stored position cannot be recalled while driving. The recalling of stored positions is deactivated 45
seconds after switching off the ignition.
Welcome function
The welcome function makes it easier to get in
and out of the vehicle.
After switching off the ignition and opening the
driver’s door, the front seat moves backwards
automatically and then stays in this position,
ready for the next entry into the vehicle.
When switching on the ignition, the front seat
moves forwards to the stored driving position.
It is configured in the Settings > Vehicle
touch screen application.
Heated and/or ventilated seats
Activation/Deactivation
In the Seats touch screen application,
select the Heating Functions or Ventilated
Seats tab.
► Select the driver or passenger seat.
The corresponding page is displayed with the last
memorised settings.
If the settings are suitable, press to
activate/deactivate the function in the
Seats application.
If no action is taken, the display returns to its
initial state.
The function status is not memorised when the
ignition is switched off.
Page 48 of 244
46
Ease of use and comfort03
Changing settings
► In the Heating Functions or Ventilated Seats
page, select the relevant seat.
► Select an intensity from the three preset
levels: "1" (Low), "2" (Normal) or "3" (High).
The settings are memorised when the ignition is
switched off.
Do not use the function when the seat is
not occupied.
Reduce the heating intensity as soon as
possible.
When the seat and passenger compartment
have reached a satisfactory temperature,
switch the function off; reducing electrical
consumption in turn decreases energy
consumption.
Prolonged use of heated seats is not
recommended for people with sensitive
skin.
There is a risk of burns for people whose
perception of heat is impaired (e.g. illness,
taking medication).
To keep the heated pad intact and to prevent a
short circuit:
–
Do no
t place heavy or sharp objects on the
seat.
–
Do no
t kneel or stand on the seat.
–
Do no
t spill liquids onto the seat.
–
Ne
ver use the heating function if the seat
is damp.
Multipoint massage
System with a choice of type of massage and
adjustment of its intensity.
This system operates with the engine running, as
well as in STOP mode of the Stop & Start.
Activation/Deactivation
In the Seats touch screen application,
select the Massage tab.
► Select the driver or passenger seat.
The corresponding page is displayed with the last
memorised settings.
If the settings are suitable, press to
activate/deactivate the function in the
Seats application.
If no action is taken, the display returns to its
initial state.
The function status is not memorised when the
ignition is switched off.
Changing settings
► In the Massage page, select the seat
concerned.
► Select a massage intensity from the three
preset levels: "1" (Low), "2" (Normal) or "3"
(High).
► Select another type of massage from those
offered.
The modifications are taken into account
immediately and memorised when the ignition is
switched off.
Once activated, the system starts a one hour
massage cycle, made up of sequences of 6
minutes of massage followed by 3 minutes at
rest.
The system stops automatically at the end of the
cycle.
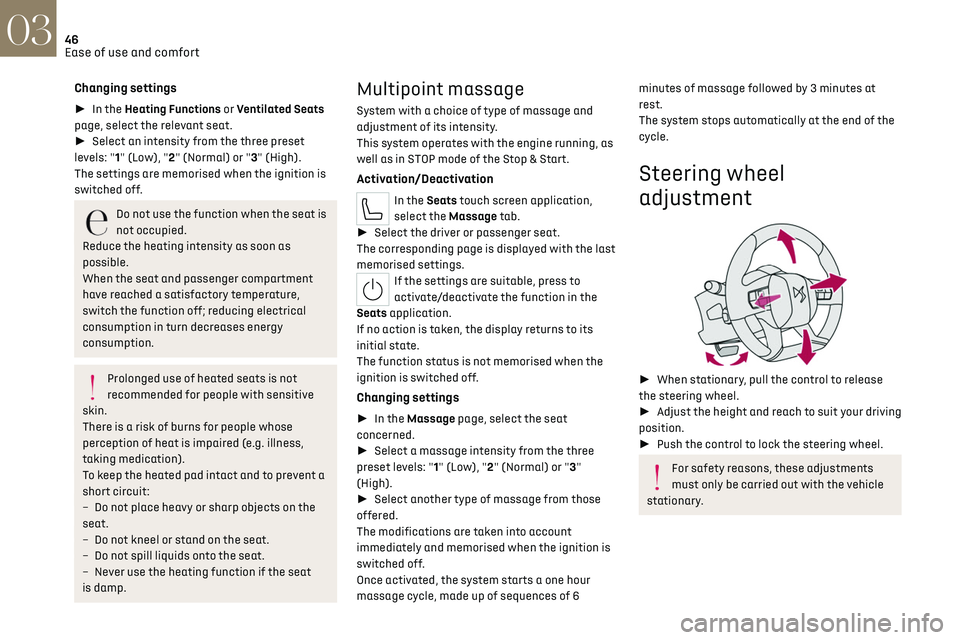
Steering wheel
adjustment
► When stationary, pull the control to release
the steering wheel.
► Adjust the height and reach to suit your driving
position.
► Push the control to lock the steering wheel.
For safety reasons, these adjustments
must only be carried out with the vehicle
stationary.
Page 53 of 244
51
Ease of use and comfort03
activated, for a period which depends on the
battery charge.
This function does not include the air conditioning
system.
Dual-zone automatic air
conditioning
This system automatically controls the activation
of the air conditioning system, regulating the
temperature, air flow and air distribution inside
the passenger compartment.
This system works with the engine running, but
access to the ventilation and its controls remains
possible with the ignition on.
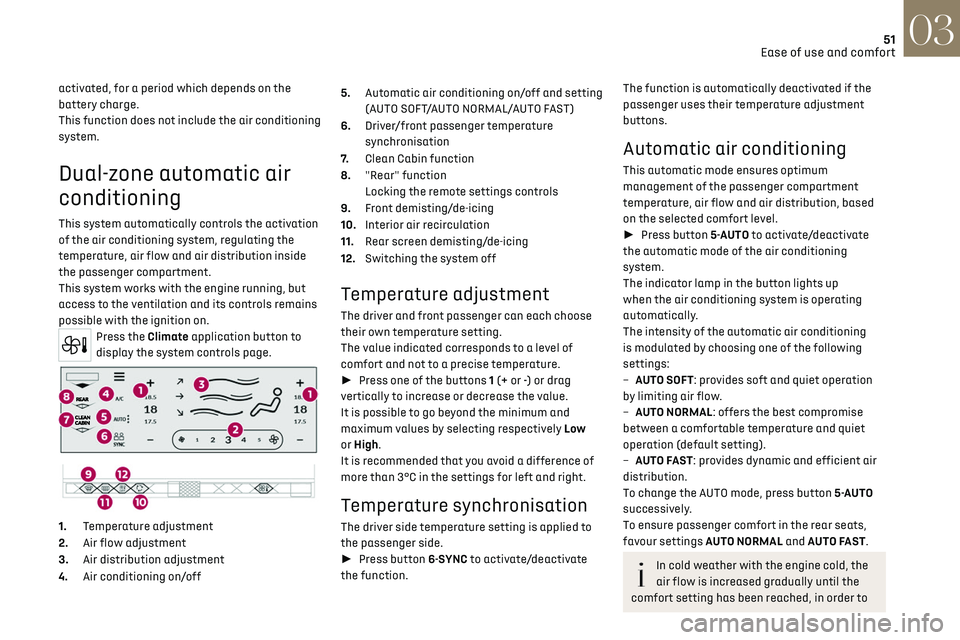
Press the Climate application button to
display the system controls page.
1. Temperature adjustment
2. Air flow adjustment
3. Air distribution adjustment
4. Air conditioning on/off 5.
Automatic air conditioning on/off and setting
(AUTO SOFT/AUTO NORMAL/AUTO FAST)
6. Driver/front passenger temperature
synchronisation
7. Clean Cabin function
8. "Rear" function
Locking the remote settings controls
9. Front demisting/de-icing
10. Interior air recirculation
11. Rear screen demisting/de-icing
12. Switching the system off
Temperature adjustment
The driver and front passenger can each choose
their own temperature setting.
The value indicated corresponds to a level of
comfort and not to a precise temperature.
► Press one of the buttons 1 (+ or -) or drag
vertically to increase or decrease the value.
It is possible to go beyond the minimum and
maximum values by selecting respectively Low
or High.
It is recommended that you avoid a difference of
more than 3°C in the settings for left and right.
Temperature synchronisation
The driver side temperature setting is applied to
the passenger side.
► Press button 6-SYNC to activate/deactivate
the function.
The function is automatically deactivated if the
passenger uses their temperature adjustment
buttons.
Automatic air conditioning
This automatic mode ensures optimum
management of the passenger compartment
temperature, air flow and air distribution, based
on the selected comfort level.
► Press button 5-AUTO to activate/deactivate
the automatic mode of the air conditioning
system.
The indicator lamp in the button lights up
when the air conditioning system is operating
automatically.
The intensity of the automatic air conditioning
is modulated by choosing one of the following
settings:
–
A
UTO SOFT: provides soft and quiet operation
by limiting air flow.
–
A
UTO NORMAL: offers the best compromise
between a comfortable temperature and quiet
operation (default setting).
–
A
UTO FAST: provides dynamic and efficient air
distribution.
To change the AUTO mode, press button 5-AUTO
successively.
To ensure passenger comfort in the rear seats,
favour settings AUTO NORMAL and AUTO FAST.
In cold weather with the engine cold, the
air flow is increased gradually until the
comfort setting has been reached, in order to
Page 116 of 244
114
Driving06
– First of all, the selection of all the functions
that you want to deactivate.
–
Sec
ondly, the simultaneous deactivation of all
these functions.
Selection of functions
► Press this button on the dashboard to
display the ADAS tabs.
► Select the Functions tab.
► Press this button to display the list of
available functions.
► Select the functions to deactivate (e.g. Stop
& Start, Lane Keeping Assist, Automatic Braking
System (Active Safety Brake)).
► Press this button to return to the
previous page.
The functions to deactivate are saved in the
system.
Deactivation of these functions
► Press and hold this button on
the dashboard.
All previously selected functions are deactivated
until the vehicle is next restarted (confirmed by an
audible signal).
Road signs recognition
For more information, refer to the General
recommendations on the use of driving
and manoeuvring aids.
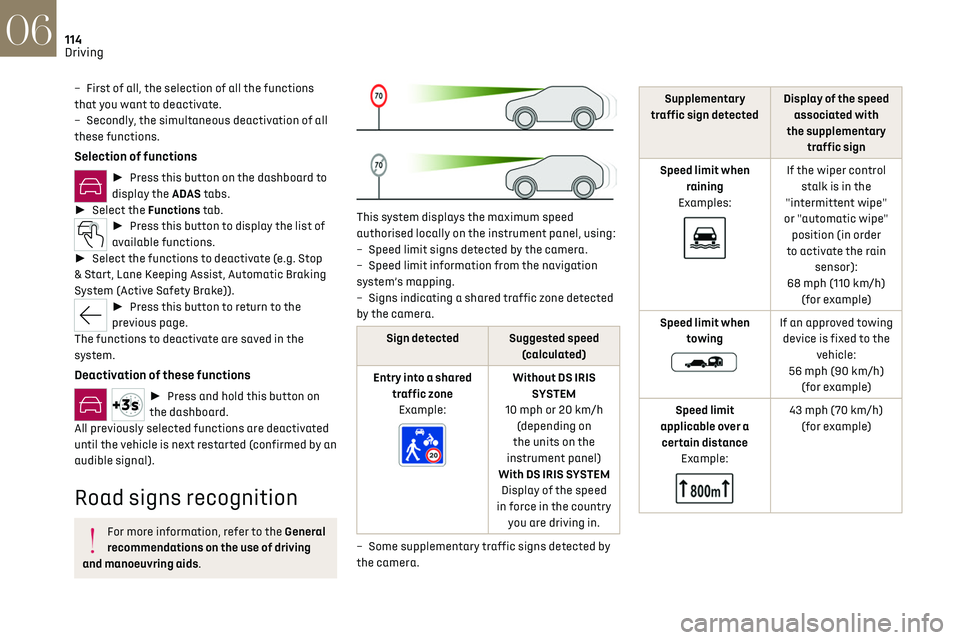
This system displays the maximum speed
authorised locally on the instrument panel, using:
–
Speed limit signs det
ected by the camera.
–
Speed limit in
formation from the navigation
system’s mapping.
–
Signs indic
ating a shared traffic zone detected
by the camera.
Sign detected Suggested speed (calculated)
Entry into a shared traffic zoneExample:
Without DS IRIS SYSTEM
10 mph or 20 km/h (depending on
the units on the
instrument panel)
With DS IRIS SYSTEM Display of the speed
in force in the country you are driving in.
–
Some supplemen
tary traffic signs detected by
the camera.
Supplementary
traffic sign detected Display of the speed
associated with
the supplementary traffic sign
Speed limit when raining
Examples:
If the wiper control stalk is in the
"intermittent wipe"
or "automatic wipe" position (in order
to activate the rain sensor):
68 mph (110 km/h) (for example)
Speed limit when towing
If an approved towing device is fixed to the vehicle:
56 mph (90 km/h) (for example)
Speed limit
applicable over a certain distance Example:
43 mph (70 km/h) (for example)
Page 197 of 244
195DS IRIS SYSTEM - 12" touch screen Infotainment system10
– Time.
– Q uick access to the Mirror Screen® functions
(associated with a connected smartphone).
Swipe down from the upper edge of the touch
screen to access the notifications centre and
display a list of quick settings :Guest, Privacy
Settings, Brightness, My Devices, night mode, etc.
Principles
► Use this button (HOME) to display the
most recent home page used; a second
press displays the first home page, then press the
virtual buttons displayed on the touch screen.
Scroll through the home pages by sliding
your finger along the screen to the right or
to the left.
Principle of movement in the system
Depending on the pages displayed on the screen,
scroll through the text or the menu (on the left
side of the screen) by sliding your finger, as with
a smartphone.
Touch buttons
Display/hide the context menu.
Return to the previous page.
► To change the status of a function, press the
description for the corresponding line (change
confirmed by the slider moving to the right/left:
function activated/deactivated).
Access to additional information about the
function.
Access to a function’s settings.
Add/delete shortcuts.
Configuring profiles
Press the "Settings" application.
In the list, select the "Profile" tab.
The screen displays a "Guest" profile built
into the system and allows you to create and
personalise several new profiles with or without
an associated mobile device.
The "Guest" profile has a default display
with the possibility of adding to it and/or
returning it to its initial configuration. This profile
is built into the system and cannot be deleted.
Each profile created can be associated
with a mobile device of your choice
connected via Bluetooth
®; the Bluetooth® function
of the mobile device must first be activated. This
association allows the system to detect your
presence in the vehicle when it starts and to
propose the activation of your personalised
profile.
The connected mobile device serves as an access
key to the profile and restores the last value of the
associated Private Mode.
If a profile is not connected to the mobile device,
the last profile used will be highlighted.
Select "Create Profile", then follow the
procedure.
Creating a new profile allows you to personalise: –
Language
, units, Privacy Settings.
–
Screen c
onfiguration, appearance, SMART
TOUCH (depending on equipment).
–
Audio settings, fa
vourite radio stations.
–
Ligh
ting, interior ambience (refer to the "Ease
of use and comfort" section).
–
Na
vigation history, favourite points of interest
(POIs), navigation settings.
–
Some driving aids and the list o
f favourites.
To delete a profile, select it from the list of
profiles then press the bin.
Privacy Settings
"Privacy Settings" management is associated
with each profile. This function is used with:
a "Guest" profile configured by default in "Sharing
Data and Location" mode,
or
a profile to be created in the system, with or
without connection to a mobile device.
If there is no connection to a mobile device, the
mode value will be set to "Sharing Data and
Location" mode.
The connected mobile device serves as an access
key to personal information. First activate the
Bluetooth
® function on the mobile device. The last
saved mode value will be restored.
"Sharing Data and Location"
This mode allows the vehicle to externally
transmit all the personal data needed for each
valid available connected service.
Page 199 of 244
197DS IRIS SYSTEM - 12" touch screen Infotainment system10
connected service will be carried out remotely,
in particular using "Over the Air" technology.
To do this, a secure connection via radio
network is established between the vehicle
and the Manufacturer's device management
server each time the ignition is switched on,
when a mobile telephone network is available.
Depending on the vehicle's equipment,
the connection configuration must be set
to "Connected vehicle" to enable to the
connection to the radio network.
Irrespective of a valid subscription to a
connected service, the remote management
of devices relating to or connected with
the security of devices, and the updating of
software and firmware, will be carried out
when necessary in order to comply with a legal
requirement applicable to the Manufacturer
(e.g. the applicable law in terms of product
liability, the regulations governing e-call) or
when necessary to protect the respective
vital interests of the vehicle's users and
passengers.
The establishment of a secure connection via
radio network and the corresponding remote
updates are not affected by the privacy
settings and are intended to be carried out
after being initialised by the user in response
to a related notification.
The system can notify the receipt of an update
when it is connected to an exterior Wi-Fi network
or a mobile telephone network.Large updates are downloaded only via the Wi-Fi
network.
The availability of an update is notified on the
screen at the end of the journey with an option
of immediate installation or postponement of
installation.
The installation time is variable and can take
several minutes with a maximum of about 30
minutes. A notification will give an estimate of the
duration and a description of the update.
Update information is available through the
"Settings" application.
Press the "Settings" application.
In the list, select the "Updates" tab.
This button allows you to change the
authorisation for automatic downloading
of updates via an exterior Wi-Fi network.
For safety reasons and because it
requires sustained attention on the part
of the driver, the installation must be carried
out with the ignition on but without starting
the engine.
The installation cannot be carried out in the
following cases:
–
engine running.
–
emergenc
y call in progress.
–
insufficien
t battery level.
–
when charging for electric v
ehicles.
If an update has failed or has expired, contact a
dealer or a qualified workshop.
The Manufacturer does not charge for the
use of this service.
However, the use of Wi-Fi and/or mobile
telephone networks by your smartphone may
incur extra charges if you exceed the data
allowance included in your contract.
Any associated costs will be billed to you by
your mobile telephone operator.
Personalisation
Press and hold the screen from one of the
system's home pages.
Or
Press the "Settings" application.
In the list, select the "Customization" tab.
Press the "Displays" field.
A page divided into 2 parts is displayed.
Press the HOME button at any time to leave this
page.
Personalising the screen
Press the pencil in the "Customize
Touchscreen" part.
A representation of the organisation of the
different home page (HOME) Widgets is
displayed.
A Widget is a reduced window of an
application or service.