door lock CITROEN DS7 CROSSBACK 2020 Owner's Guide
[x] Cancel search | Manufacturer: CITROEN, Model Year: 2020, Model line: DS7 CROSSBACK, Model: CITROEN DS7 CROSSBACK 2020Pages: 244, PDF Size: 6.87 MB
Page 169 of 244

167
Practical information07
Never leave the vehicle unattended with
the vehicle into free-wheeling mode.
/
Release procedure
► With the vehicle stationary and the engine
running, select mode N and switch off the engine.
Within 5 seconds:
► Switch on the ignition.
► While depressing the brake pedal, move the
push selector forwards or backwards to confirm
mode N.
► While depressing the brake pedal, press the
control to release the parking brake.
► Release the brake pedal, switch off the
ignition.
If the 5-second time limit is exceeded, the
gearbox engages mode P; it is then
necessary to restart the procedure.
Reverting to normal operation
► While depressing the brake pedal, restart the
engine and select mode P.
Keyless Entry and Start
You must not depress the brake pedal
while switching the ignition on again, then
switching it off. If you do, the engine will start,
requiring you to restart the procedure.
Advice on care and
maintenance
General recommendations
Observe the following recommendations to avoid
damaging the vehicle.
Exterior
Never use a high-pressure jet wash in the
engine compartment - risk of damaging
the electrical components!
Do not wash the vehicle in bright sunshine or
extremely cold conditions.
When washing the vehicle in an automatic
roller-brush car wash, be sure to lock the
doors and, depending on version, move the
electronic key away and deactivate the
"hands-free" function (Hands-Free Tailgate
Access).
When using a pressure washer, keep the jet
nozzle at a minimum distance of 30 cm from
the vehicle (particularly when cleaning areas
containing chipped paint, sensors or seals).
Promptly clean up any stains containing
chemicals liable to damage the vehicle's
paintwork (including tree resin, bird droppings,
insect secretions, pollen and tar).
Depending on the environment, clean the
vehicle frequently to remove salty deposits
(in coastal areas), soot (in industrial areas)
and mud/salts (in wet or cold areas). These
substances can be highly corrosive.
Contact a dealer or a qualified workshop for
advice on removing stubborn stains requiring
special products (such as tar or insect
removers).
Preferably, have paint touch-ups performed by
a dealer or a qualified workshop.
Interior
When washing the vehicle, never use a
water hose or high-pressure jet to clean
the interior.
Liquids carried in cups or other open
containers can spill, presenting a risk of
damage to the instruments and controls and
the controls located on the centre console. Be
vigilant!
To clean instrument panels, touch screens
or other displays, wipe gently with a soft,
dry cloth. Do not use products (e.g. alcohol,
disinfectant) or soapy water directly on these
surfaces - risk of damage!
Page 185 of 244

183
In the event of a breakdown08
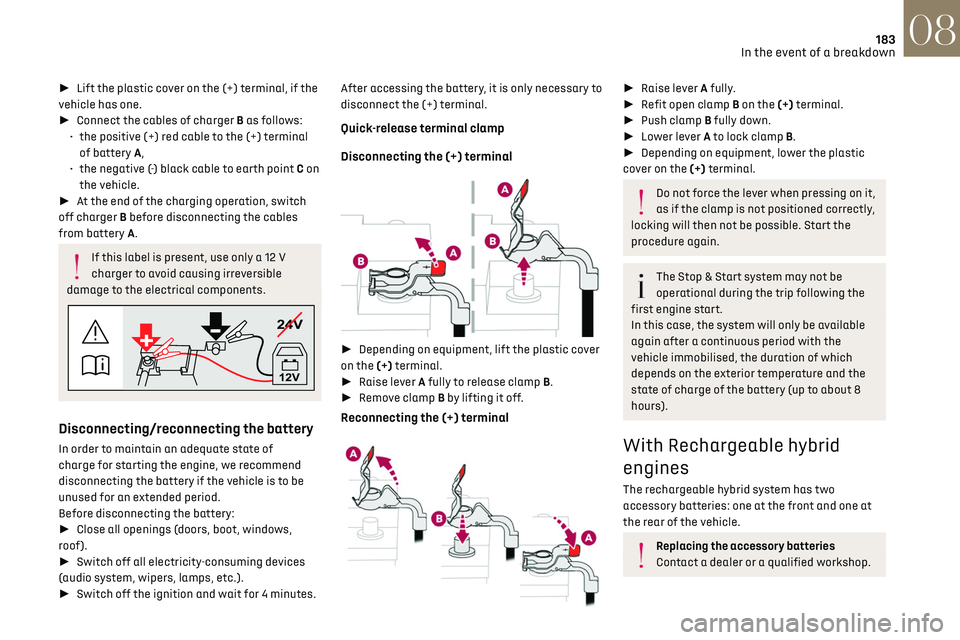
► Lift the plastic cover on the (+) terminal, if the
vehicle has one.
► Connect the cables of charger B as follows:
•
the po
sitive (+) red cable to the (+) terminal
of battery A,
•
the nega
tive (-) black cable to earth point C on
the vehicle.
► At the end of the charging operation, switch
off charger B before disconnecting the cables
from battery A.
If this label is present, use only a 12 V
charger to avoid causing irreversible
damage to the electrical components.
24V
12V
Disconnecting/reconnecting the battery
In order to maintain an adequate state of
charge for starting the engine, we recommend
disconnecting the battery if the vehicle is to be
unused for an extended period.
Before disconnecting the battery:
► Close all openings (doors, boot, windows,
roof).
► Switch off all electricity-consuming devices
(audio system, wipers, lamps, etc.).
► Switch off the ignition and wait for 4 minutes. After accessing the battery, it is only necessary to
disconnect the (+) terminal.
Quick-release terminal clamp
Disconnecting the (+) terminal
►
Depending on equipment, lift the plastic cover
on the (+) terminal.
► Raise lever A fully to release clamp B.
► Remove clamp B by lifting it off.
Reconnecting the (+) terminal
► Raise lever A fully.
► Refit open clamp B on the (+) terminal.
► Push clamp B fully down.
► Lower lever A to lock clamp B.
► Depending on equipment, lower the plastic
cover on the (+) terminal.
Do not force the lever when pressing on it,
as if the clamp is not positioned correctly,
locking will then not be possible. Start the
procedure again.
The Stop & Start system may not be
operational during the trip following the
first engine start.
In this case, the system will only be available
again after a continuous period with the
vehicle immobilised, the duration of which
depends on the exterior temperature and the
state of charge of the battery (up to about 8
hours).
With Rechargeable hybrid
engines
The rechargeable hybrid system has two
accessory batteries: one at the front and one at
the rear of the vehicle.
Replacing the accessory batteries
Contact a dealer or a qualified workshop.
Page 187 of 244

185
In the event of a breakdown08
► Switch off charger B before connecting
the cables to the battery, so as to avoid any
dangerous sparks.
► Ensure that the charger cables are in good
condition.
► Lift the plastic cover on the (+) terminal, if the
vehicle has one.
► Connect the cables of charger B as follows:
•
Po
sitive (+) red cable to the (+) terminal on
battery A.
•
Nega
tive (-) black cable to earth point C on the
vehicle.
► At the end of the charging operation, switch
off charger B before disconnecting the cables
from battery A.
Disconnecting/reconnecting the
accessory batteries
Procedure for disconnecting/reconnecting the
accessory batteries in the event of long-term
immobilisation of the vehicle.
Before disconnecting the accessory batteries:
► Open the driver's door and boot.
► Close all other doors.
► Switch off all electrical consumers (audio
system, wipers, lamps, etc.).
► Switch off the ignition and wait for the READY
indicator lamp to go out.
► Observe a waiting time of 4 minutes.
Never reverse the order of the steps for
disconnecting and reconnecting the
accessory batteries - risk of irreversible
damage!
Disconnection
Rear battery:
► Disconnect the (-) terminal using the black
quick-release connector.
Front battery:
► Disconnect the (+) terminal by disconnecting
the red quick-release clamp: •
Raise le
ver A fully to release clamp B.
•
R
emove clamp B by lifting it off.
Reconnection
Front battery:
► Connect the (+) terminal by connecting the
red quick-release clamp: •
Raise le
ver A fully.
•
R
efit open clamp B on the (+) terminal.
•
Push clamp
B fully down.
•
Lo
wer lever A to lock clamp B.
Rear battery:
► Connect the (-) terminal using the black quick-
release connector.
Following reconnection
After reconnecting the battery, turn on the
ignition and wait 1 minute before starting the
engine, to enable the electronic systems to
initialise.
If minor problems nevertheless persist following
this operation, contact a dealer or a qualified
workshop.
Page 216 of 244

214Alphabetical index
Charging connector
(Rechargeable hybrid)
146, 153–154
Charging flap
(Rechargeable hybrid)
146, 153–154
Charging the traction battery
(Rechargeable hybrid)
20, 145, 153–154
CHECK
21
Checking the engine oil level
18
Checking the levels
161–162
Checking tyre pressures (using the kit)
172, 174
Checks
161, 163–165
Checks, routine
163–164
Child lock
95
Children
83, 89–91, 94
Children (safety)
95
Child seats
83, 86–89
Child seats, conventional
88–89
Child seats, i-Size
94
Child seats, ISOFIX
90–92
Cigar lighter
56
Cleaning (advice)
146, 167–169
Clock
23
Closing the boot
29, 33
Closing the doors
29, 32
Collision Risk Alert
128–129
Comfort mode
108
Configuration, vehicle
10, 24
Connection, Bluetooth
202
Connectivity
207
Consumptions
24
Container, AdBlue®
165–166
Control, emergency boot release
33Control, emergency door 30–31
Control, heated seats
46
Controls, steering mounted
101–103
Control stalk, lighting
63–64
Control stalk, wipers
72–74
Control unit
147–149, 154
Courtesy lamp, front
59
Courtesy lamps
59
Cruise control
116, 118–120
Cruise control, adaptive
120
Cruise control, adaptive with Stop function
116
Cruise control by speed limit recognition
116
Cup holder
56
D
Date (setting) 208
Daytime running lamps
64, 179
Deactivating the passenger airbag
84, 87–88
Deadlocking
27, 29
Deferred charging
24, 155
Deferred charging
(Rechargeable hybrid)
24–25, 146, 153
Defrosting
47, 53
Defrosting, front
53
Defrosting, rear screen
54
Demisting
47, 53
Demisting, front
53
Demisting, rear
54
Diagnosis, vehicle
21
Dials and gauges 10
Digital instrument panel
10
Dimensions
193
Dipstick
18, 161
Direction indicators (turn signals)
64, 179
Display screen, instrument panel
10
Domestic charging
149
Domestic charging (Rechargeable hybrid)
154
Door pockets
56
Doors
32
Driver’s attention warning
131–132
Driving
42–43, 96–97
Driving aids camera (warnings)
112
Driving aid shortcuts
113
Driving aids (recommendations)
112
Driving economically
8
Driving modes
106
Driving positions (storing)
45
DS Drive Assist
120
Dynamic stability control (DSC)
80
E
EBFD 79
Eco-driving (advice)
8
ECO mode
106
Electric automatic gearbox
(Rechargeable hybrid)
104
Electronic brake force distribution (EBFD)
79
Emergency braking assistance (EBA)
80
Page 218 of 244

216Alphabetical index
Indicator, AdBlue® range 19
Indicator, coolant temperature
19
Indicator, engine oil level
18
Indicators, direction
64
Indicator, service
17
Inflating tyres
164, 193
Inflating tyres and accessories
(using the kit)
172, 174
Information, vehicle
10, 210
Infrared camera
70, 112
Instrument panel
10, 22, 113
ISOFIX mountings
90
J
Jack 171–172, 175
Jump starting
181
K
Key 26–27, 30–31
Key, electronic
28–29
Keyless Entry and Starting
26, 28–29, 97–98
Key not recognised
99
Key with remote control
26, 97
Kit, hands-free
202
Kit, puncture repair
171–172
Kit, temporary puncture repair
171–174
Klaxon
77
L
Labels, identification 193
Lamps, parking
64
Lamps, rear
179
Lane assist
120, 124–126
Lane keeping assist
133
Leather (care)
169
LEDs - Light-emitting diodes
64, 178–179
Level, AdBlue®
163
Level, brake fluid
162
Level, Diesel additive
163
Level, engine coolant
19, 162
Level, engine oil
18, 161
Levels and checks
161–162
Level, screenwash fluid
73, 162
Light-emitting diodes - LEDs
64, 178–179
Lighting, boot
62
Lighting dimmer
21
Lighting, directional
69
Lighting, exterior
63, 66
Lighting, guide-me home
65–66
Lighting, interior
59
Lighting, mood
59
Lighting, welcome
65–66
Loading
61, 157–158
Load reduction mode
159
Load space cover
60
Locating your vehicle
27
Locking
27, 29
Locking from the inside
30
Locking the doors 30
Log, alerts
21
Long objects, transporting
60
M
Mains socket (domestic network) 147–148
Maintenance (advice)
146, 167
Maintenance, routine
113, 163–165
Manoeuvring aids (recommendations)
112
Map reading lamps
59
Markings, identification
193
Massage function
46
Massage, multi-point
46
Mat
59, 113
Menu, shortcuts
24
Mirror, rear view
47
Mirrors, door
47, 54, 135
Mirror, vanity
56
Misfuel prevention
144
Mobile application
24–25, 54, 153, 155
Motor, electric
107, 145, 192
Motorised tailgate
33–34
Mountings, ISOFIX
90
N
Net, high load retaining 61
Night vision
70
Page 221 of 244

219Alphabetical index
U
Under-inflation (detection) 110
Unlocking
26, 28
Unlocking from the inside
30
Unlocking the boot
26, 28
Unlocking the doors
30
Unlocking the tailgate
26, 28
Updating the time
208
V
Vehicle data recording and privacy 210
Ventilation
49–50
Visibility
53
W
Wallbox (Rechargeable hybrid) 147–148, 154
Warning and indicator lamps
11
Warning lamp, driver's seat
belt not fastened
82
Warning lamp, READY
160
Warning lamps
11
Warning lamp, seat belts
82
Warnings and indicators
11–12
Washing
113
Washing (advice)
146, 167–168
Weights
189
Welcome function
45
Welcome lighting 66
Wheel, spare
164, 171–172, 175
Window controls
39
Windscreen, heated
54
Wiper blades (changing)
73–74
Wiper, rear
73
Wipers
72, 74
Wipers, automatic rain sensitive
74
Wipers, windscreen
72, 74