check engine light CITROEN DS7 CROSSBACK 2020 Owners Manual
[x] Cancel search | Manufacturer: CITROEN, Model Year: 2020, Model line: DS7 CROSSBACK, Model: CITROEN DS7 CROSSBACK 2020Pages: 244, PDF Size: 6.87 MB
Page 20 of 244
18
Dashboard instruments01
The value indicated is calculated
according to the distance covered and the
time elapsed since the last service.
The alert may also be triggered close to a due
date.
Service spannerOn temporarily when the ignition is
switched on.
Between 620 and 1,860 miles (1,000 and 3,000
km) remain before the next service is due.
Fixed, when the ignition is switched on.
The next service is due in less than 620
miles (1,000 km).
Have your vehicle serviced very soon.
Service spanner flashingFlashing then fixed, when the
ignition is switched on.
(With BlueHDi Diesel engines, associated with the
Service warning lamp.)
The servicing interval has been exceeded.
Have your vehicle serviced as soon as possible.
Resetting the service indicator
The service indicator must be reset after each
service.
If you have serviced your vehicle yourself:
► Switch the ignition off.
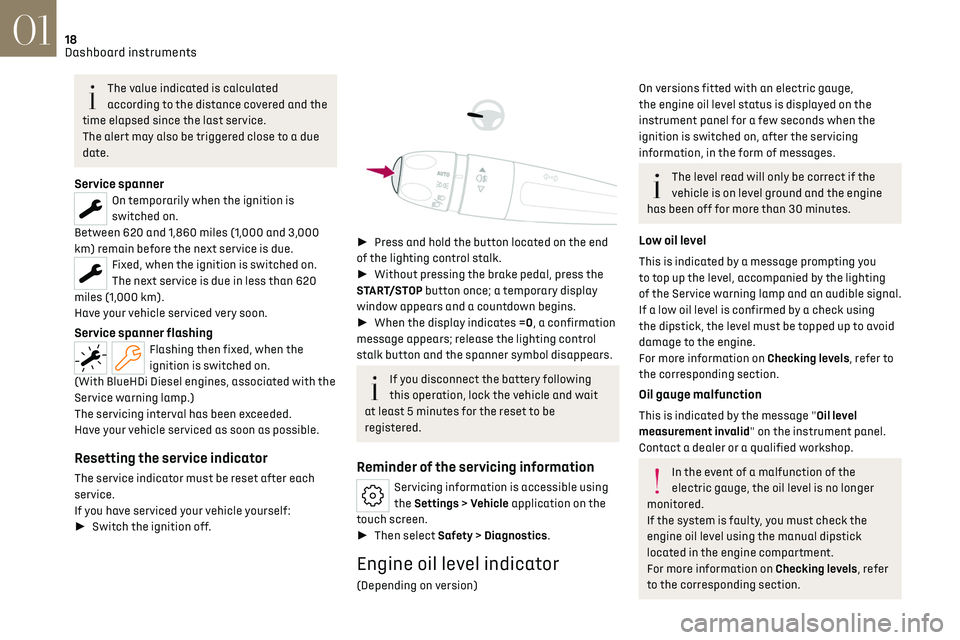
► Press and hold the button located on the end
of the lighting control stalk.
► Without pressing the brake pedal, press the
START/STOP button once; a temporary display
window appears and a countdown begins.
► When the display indicates =0, a confirmation
message appears; release the lighting control
stalk button and the spanner symbol disappears.
If you disconnect the battery following
this operation, lock the vehicle and wait
at least 5 minutes for the reset to be
registered.
Reminder of the servicing information
Servicing information is accessible using
the Settings > Vehicle application on the
touch screen.
► Then select Safety > Diagnostics.
Engine oil level indicator
(Depending on version)
On versions fitted with an electric gauge,
the engine oil level status is displayed on the
instrument panel for a few seconds when the
ignition is switched on, after the servicing
information, in the form of messages.
The level read will only be correct if the
vehicle is on level ground and the engine
has been off for more than 30 minutes.
Low oil level
This is indicated by a message prompting you
to top up the level, accompanied by the lighting
of the Service warning lamp and an audible signal.
If a low oil level is confirmed by a check using
the dipstick, the level must be topped up to avoid
damage to the engine.
For more information on Checking levels, refer to
the corresponding section.
Oil gauge malfunction
This is indicated by the message "Oil level
measurement invalid" on the instrument panel.
Contact a dealer or a qualified workshop.
In the event of a malfunction of the
electric gauge, the oil level is no longer
monitored.
If the system is faulty, you must check the
engine oil level using the manual dipstick
located in the engine compartment.
For more information on Checking levels, refer
to the corresponding section.
Page 21 of 244
19
Dashboard instruments01
Coolant temperature indicator
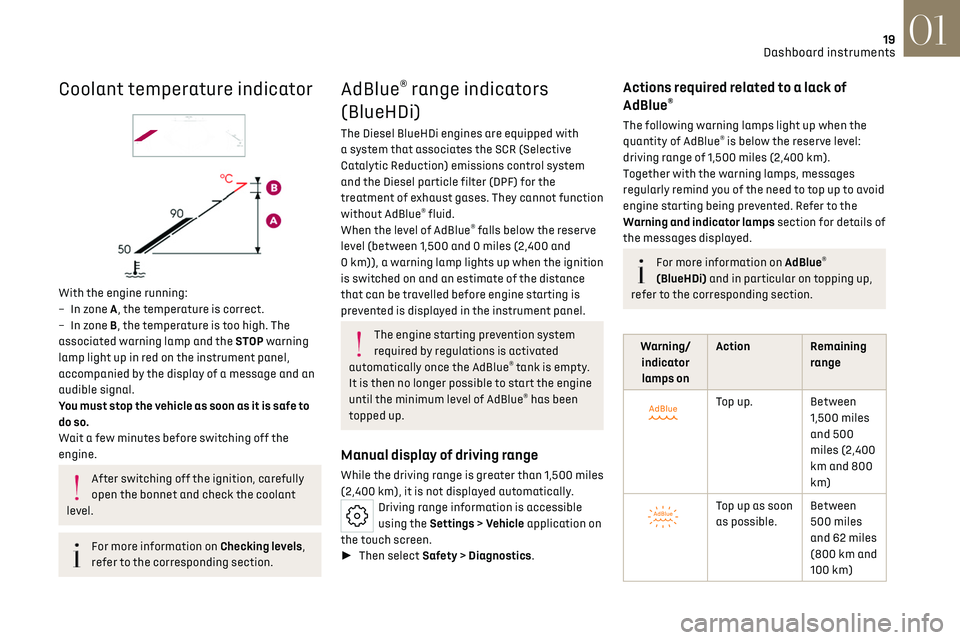
With the engine running:
–
In z one A, the temperature is correct.
–
In z
one B, the temperature is too high. The
associated warning lamp and the STOP warning
lamp light up in red on the instrument panel,
accompanied by the display of a message and an
audible signal.
You must stop the vehicle as soon as it is safe to
do so.
Wait a few minutes before switching off the
engine.
After switching off the ignition, carefully
open the bonnet and check the coolant
level.
For more information on Checking levels,
refer to the corresponding section.
AdBlue® range indicators
(BlueHDi)
The Diesel BlueHDi engines are equipped with
a system that associates the SCR (Selective
Catalytic Reduction) emissions control system
and the Diesel particle filter (DPF) for the
treatment of exhaust gases. They cannot function
without AdBlue
® fluid.
When the level of AdBlue® falls below the reserve
level (between 1,500 and 0 miles (2,400 and
0 km)), a warning lamp lights up when the ignition
is switched on and an estimate of the distance
that can be travelled before engine starting is
prevented is displayed in the instrument panel.
The engine starting prevention system
required by regulations is activated
automatically once the AdBlue
® tank is empty.
It is then no longer possible to start the engine
until the minimum level of AdBlue
® has been
topped up.
Manual display of driving range
While the driving range is greater than 1,500 miles
(2,400 km), it is not displayed automatically.
Driving range information is accessible
using the Settings > Vehicle application on
the touch screen.
► Then select Safety > Diagnostics.
Actions required related to a lack of
AdBlue®
The following warning lamps light up when the
quantity of AdBlue® is below the reserve level:
driving range of 1,500 miles (2,400 km).
Together with the warning lamps, messages
regularly remind you of the need to top up to avoid
engine starting being prevented. Refer to the
Warning and indicator lamps section for details of
the messages displayed.
For more information on AdBlue®
(BlueHDi) and in particular on topping up,
refer to the corresponding section.
Warning/ indicator lamps on Action Remaining
range
Top up. Between 1,500 miles
and 500
miles (2,400
km and 800
km)
Top up as soon
as possible.Between
500 miles
and 62 miles
(800 km and
100 km)
Page 23 of 244
21
Dashboard instruments01
POWER High power demand, using the
combined capabilities of the petrol
engine and the electric motor(s)
(depending on version).
The slider is located in this zone during
more dynamic driving phases when
high levels of performance are being
demanded.
ECO Optimal use of energy (internal combustion or electric).
The slider is located in this zone when
driving under electric power and when
optimal use is being made of the petrol
engine, both accessible by adopting a
suitable driving style.
A symbol indicates the threshold at
which the petrol engine will restart.
The driver can therefore moderate
their acceleration to remain in electric
driving mode.
CHARGE Energy recovery for partly recharging the traction battery.
The slider is located in this zone during
deceleration: taking your foot off the
accelerator pedal or braking.Charge level indicator
(Rechargeable hybrid)
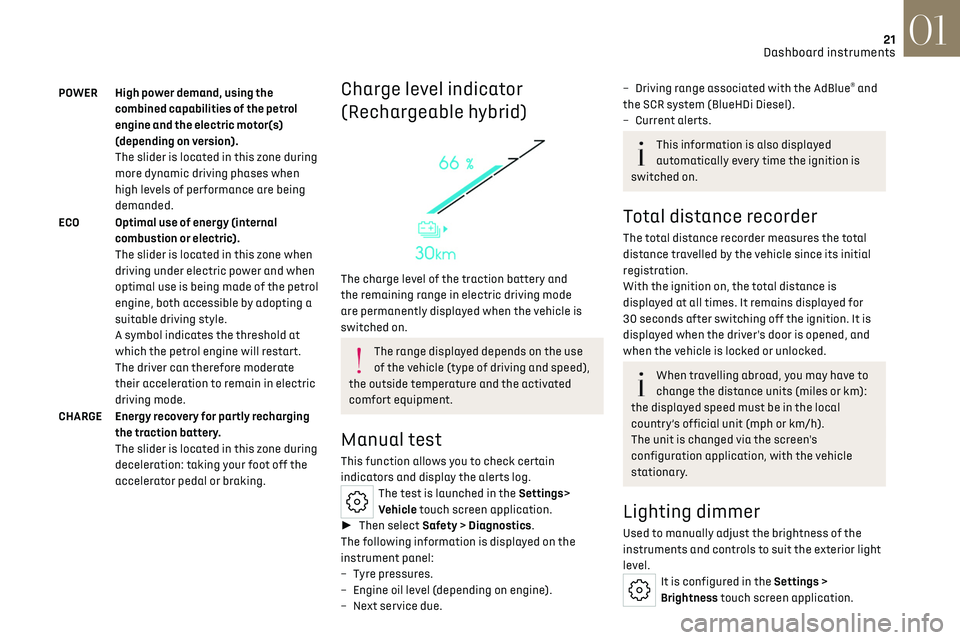
The charge level of the traction battery and
the remaining range in electric driving mode
are permanently displayed when the vehicle is
switched on.
The range displayed depends on the use
of the vehicle (type of driving and speed),
the outside temperature and the activated
comfort equipment.
Manual test
This function allows you to check certain
indicators and display the alerts log.
The test is launched in the Settings>
Vehicle touch screen application.
► Then select Safety > Diagnostics.
The following information is displayed on the
instrument panel:
–
Tyre pre
ssures.
–
Engine oil le
vel (depending on engine).
–
Ne
xt service due.
– Driving range associated with the AdBlue® and
the SCR system (BlueHDi Diesel).
–
Curren
t alerts.
This information is also displayed
automatically every time the ignition is
switched on.
Total distance recorder
The total distance recorder measures the total
distance travelled by the vehicle since its initial
registration.
With the ignition on, the total distance is
displayed at all times. It remains displayed for
30 seconds after switching off the ignition. It is
displayed when the driver's door is opened, and
when the vehicle is locked or unlocked.
When travelling abroad, you may have to
change the distance units (miles or km):
the displayed speed must be in the local
country’s official unit (mph or km/h).
The unit is changed via the screen's
configuration application, with the vehicle
stationary.
Lighting dimmer
Used to manually adjust the brightness of the
instruments and controls to suit the exterior light
level.
It is configured in the Settings >
Brightness touch screen application.
Page 59 of 244
57
Ease of use and comfort03
When the USB socket is used, the portable
device charges automatically.
While charging, a message is displayed if the
power drawn by the portable device exceeds
the current supplied by the vehicle.
For more information about how to use this
equipment, refer to the sections describing the
audio and telematics systems.
Storage compartment
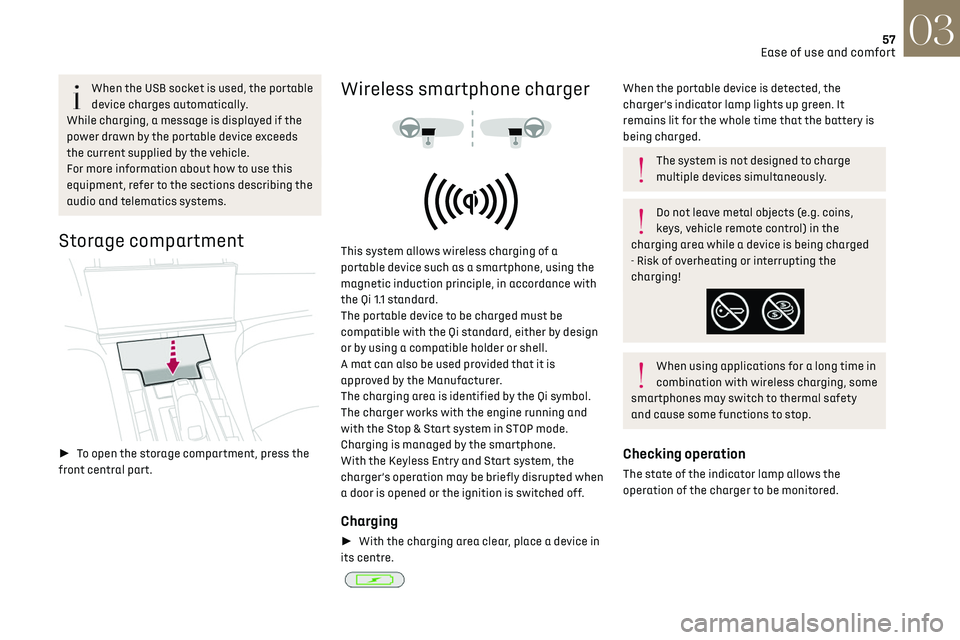
► To open the storage compartment, press the
front central part.
Wireless smartphone charger
This system allows wireless charging of a
portable device such as a smartphone, using the
magnetic induction principle, in accordance with
the Qi 1.1 standard.
The portable device to be charged must be
compatible with the Qi standard, either by design
or by using a compatible holder or shell.
A mat can also be used provided that it is
approved by the Manufacturer.
The charging area is identified by the Qi symbol.
The charger works with the engine running and
with the Stop & Start system in STOP mode.
Charging is managed by the smartphone.
With the Keyless Entry and Start system, the
charger’s operation may be briefly disrupted when
a door is opened or the ignition is switched off.
Charging
► With the charging area clear, place a device in
its centre.
When the portable device is detected, the
charger’s indicator lamp lights up green. It
remains lit for the whole time that the battery is
being charged.
The system is not designed to charge
multiple devices simultaneously.
Do not leave metal objects (e.g. coins,
keys, vehicle remote control) in the
charging area while a device is being charged
- Risk of overheating or interrupting the
charging!
When using applications for a long time in
combination with wireless charging, some
smartphones may switch to thermal safety
and cause some functions to stop.
Checking operation
The state of the indicator lamp allows the
operation of the charger to be monitored.
Page 82 of 244
80
Safety05
accompanied by a message and an audible signal,
indicates an EBFD malfunction.
You must stop the vehicle.
Stop as soon as it is safe to do so and switch off
the ignition.
Contact a dealer or a qualified workshop.
When changing wheels (tyres and rims),
ensure that these are approved for your
vehicle.
After an impact
Have it checked by a dealer or a qualified
workshop.
Emergency braking assistance
(EBA)
This system reduces the emergency stopping
distance, by optimising the braking pressure.
It is triggered in relation to the speed at which
the brake pedal is depressed. The effect of this is
a reduction in the resistance of the pedal and an
increase in braking efficiency.
Anti-slip regulation (ASR) /
Dynamic stability control (DSC)
Anti-slip regulation (or traction control) optimises
traction by using engine braking and by applying
the brakes on the driving wheels to avoid one
or more wheels spinning. It also enhances the
vehicle's directional stability.
If there is a difference between the vehicle’s
trajectory and the path desired by the driver, the
dynamic stability control system automatically
uses engine braking and the brakes on one or
more wheels to return the vehicle to the desired
path, within the limits of the laws of physics.
These systems are activated automatically every
time the vehicle is started.
These systems are activated in the event
of a problem with grip or trajectory
(confirmed by this warning lamp flashing on the
instrument panel).
E-TENSE 4X4 360
The dynamic stability control is optimised
to be able to react later on this vehicle.
Deactivation/Reactivation
In exceptional conditions (e.g. moving a vehicle
that is bogged down in mud, stuck in snow, on
loose soil), it may prove useful to deactivate the
DSC/ASR systems, so that the wheels can move
freely and regain grip.
Reactivate the system as soon as the level of grip
permits.
The ASR system is deactivated/
reactivated in the ADAS touch screen
application.
Deactivation/reactivation of the ASR
system is indicated by this indicator lamp
on the instrument panel coming on/going out and
the display of a message.
The ASR system is automatically reactivated
every time the ignition is switched off or at
speeds over 31 mph (50 km/h)
Reactivation is manual below 31 mph (50 km/h).
Malfunction
In the event of a malfunction, this warning
lamp lights up on the instrument panel,
accompanied by the display of a message and an
audible signal.
Have it checked by a dealer or a qualified
workshop.
ASR/DSC
These systems enhance safety during
normal driving, but should not encourage the
driver to take extra risks or drive at high speed.
It is in conditions of reduced grip (rain, snow,
ice) that the risk of loss of grip increases. It
is therefore important for your safety to keep
these systems activated in all conditions, and
particularly in difficult conditions.
Correct operation of these systems depends
on compliance with the manufacturer's
recommendations relating to the wheels (tyres
and rims), braking and electronic components,
as well as the assembly and repair procedures
provided by dealers.
In order to ensure that these systems remain
effective in wintry conditions, the use of snow
or all-season tyres is recommended. All four
wheels must be fitted with tyres approved for
your vehicle.
Page 83 of 244
81
Safety05
All tyre specifications are listed on the
tyre/paint label. For more information
on Identification markings, refer to the
corresponding section.
Trailer stability assist (TSA)
When towing, this system reduces the risk of the
vehicle or trailer snaking.
Operation
The system is activated automatically when the
ignition is switched on.
The electronic stability control system (ESC) must
not have any faults.
The vehicle speed must be between 37 and 99
mph (60 and 160 km/h).
If the system detects that the trailer is
snaking, it applies the brakes to stabilise
the trailer and reduces engine power, if necessary,
to slow the vehicle (indicated by the flashing of
this warning lamp on the instrument panel and
the brake lamps coming on).
For information on weights and towed loads, refer
to the Engine technical data and towed loads
section or your vehicle’s registration certificate.
To ensure safe driving with a Towing device, refer
to the corresponding section.
Malfunction
If a fault occurs, this warning lamp lights
up on the instrument panel, accompanied
by a message and an audible signal.
To continue towing a trailer, reduce speed and
drive carefully!
Have it checked by a dealer or a qualified
workshop.
The trailer stability control system
provides an extra safety feature under
normal driving conditions, when following the
recommendations for use of trailers and
current legislation in force in your country. It
must not encourage the driver to take extra
risks, such as using a trailer in unsuitable
conditions of operation (e.g. excessive load,
exceeded nose weight, worn or under-inflated
tyres, faulty braking system) or driving at
excessive speed.
In certain cases, the system may not detect
trailer snaking, particularly with a light trailer.
When driving on slippery or poor surfaces, the
system may not be able to prevent sudden
trailer snaking.
Seat belts
Inertia reel
The seat belts are equipped with an inertia
reel which allows the strap length to adjust
automatically to the shape of the user. The seat
belt returns to its storage automatically when it
is not used.
The inertia reels are fitted with a device which
automatically locks the strap in the event of a
collision, emergency braking or if the vehicle rolls
over. It can be released by pulling the strap firmly
and then releasing it so that it reels in slightly.
Pyrotechnic pretensioning
This system improves safety in the event of a
frontal or side impact.
Depending on the severity of the impact, the
pyrotechnic pretensioning system instantly
tightens the seat belts against the body of the
occupants.
The pyrotechnic pretensioning seat belts are
enabled when the ignition is on.
Force limiting system
This system reduces the pressure of the seat belt
on the chest of the occupant, thus improving their
protection.
In the event of an impact
Depending on the nature and seriousness
of the impacts, the pyrotechnic device may
trigger before and independently of airbag
deployment. Deployment of the pretensioners
is accompanied by a slight discharge of
harmless smoke and a noise, due to the
activation of the pyrotechnic cartridge
incorporated in the system.
In all cases, the airbag warning lamp comes
on.
Following an impact, have the seat belt system
checked, and if necessary replaced, by a dealer
or a qualified workshop.
Page 84 of 244

82
Safety05
Front seat belts
The front seat belts are fitted with a pyrotechnic
pretensioning system and a force limiting system.
Height adjustment
► To adjust the height of the anchorage point,
squeeze control A and slide it to the notch desired.
Rear seat belts
Each of the rear seats has a three-point seat belt
with inertia reel.
The outer seats are fitted with a pyrotechnic
pretensioning and force limiting system.
For the centre seat, the buckle is held horizontally
by an elastic strap if the centre seat belt is not
being used.
Fastening
► Pull the strap, then insert the tongue into the
buckle.
► Check that the seat belt is fastened correctly
by pulling on the strap.
Unfastening
► Press the red button on the buckle.
► Guide the seat belt as it is reeled in.
Seat belt not fastened/
unfastened alerts
Not fastened/unfastened warning lamp
It comes on in red on both the instrument panel
and the front passenger airbag and seat belts warning lamps display, once the system detects
that a seat belt is not fastened or has been
unfastened.
Seat belts not fastened/unfastened identification
indicator lamp
The red indicator lamps on the display indicate
the location of the seat belts which are not
fastened or have been unfastened.
Not fastened at the front
When the ignition is switched on, the warning
lamp and the corresponding indicator lamps light
up if the driver and/or the front passenger have
not fastened their seat belts.
At a speed greater than 12 mph (20 km/h),
these warning lamps flash, accompanied by an
increasing audible signal for approximately two
minutes. After two minutes, these warning lamps
remain on as long as the front seatbelts are not
fastened.
Not fastened at the rear
When the ignition is switched on, with the
engine running or the vehicle moving at a speed
below 12 mph (20 km/h), the warning lamp and
the corresponding indicator lamps light up for
1 minute, if one or more rear seat belts are not
fastened.
Unfastened
After the ignition is switched on, the warning
lamp and the corresponding indicator lamps light
up if the driver and/or one or more passengers
unfasten their seat belts.
Page 98 of 244
96Driving06
Driving recommendations
► Observe the driving regulations and remain
vigilant whatever the traffic conditions.
► Monitor your environment and keep your
hands on the wheel to be able to react to anything
that may happen any time.
► Drive smoothly, anticipate the need for braking
and maintain a longer safety distance, especially
in bad weather.
► Stop the vehicle before performing operations
that require sustained attention (e.g. settings).
► During long trips, take a break every 2 hours.
Important!
Never leave the engine running in a closed
space without sufficient ventilation.
Internal combustion engines emit toxic
exhaust gases such as carbon monoxide.
Danger of poisoning and death!
In very severe wintry conditions
(temperature below -23°C), let the engine
run for 4 minutes before moving off, to ensure
the correct operation and durability of the
mechanical components of your vehicle
(engine and gearbox).
Never drive with the parking brake
applied. Risk of overheating and
damaging the braking system!
Never park the vehicle and never leave the
engine running on a flammable surface
(e.g. dry grass, dead leaves).The vehicle
exhaust system is very hot, even several
minutes after the engine stops. Risk of fire!
Never drive on surfaces covered with
vegetation (e.g. tall grass, accumulated
dead leaves, crops, debris) such as a field, a
country lane overgrown with bushes or a
grassy verge.
This vegetation could come into contact with
the vehicle's exhaust system or other systems
which are very hot. Risk of fire!
Make sure you do not leave any item in the
passenger compartment which could act
like a magnifying glass under the effect of the
sun's rays and cause a fire. Risk of fire or
damage to interior surfaces!
Never leave the vehicle unattended, with
the engine running. If you have to leave
your vehicle with the engine running, apply the
parking brake and put the automatic gearbox
into position N or P.
Never leave children inside the vehicle
unsupervised.
E-TENSE 4X4 360
Repeated hard braking in this vehicle
can generate loud banging noises which are
completely normal.
Continue driving but with lighter braking so
that the braking system can cool down.
The performance of the braking system
remains unaffected.
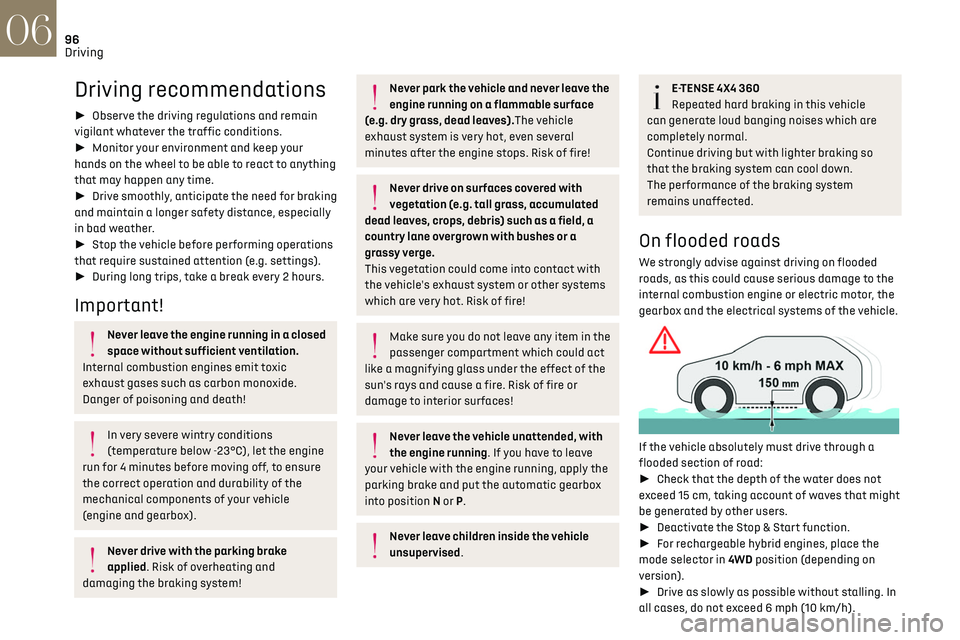
On flooded roads
We strongly advise against driving on flooded
roads, as this could cause serious damage to the
internal combustion engine or electric motor, the
gearbox and the electrical systems of the vehicle.
If the vehicle absolutely must drive through a
flooded section of road:
► Check that the depth of the water does not
exceed 15 cm, taking account of waves that might
be generated by other users.
► Deactivate the Stop & Start function.
► For rechargeable hybrid engines, place the
mode selector in 4WD position (depending on
version).
► Drive as slowly as possible without stalling. In
all cases, do not exceed 6 mph (10 km/h).
Page 99 of 244
97Driving06
► Do not stop and do not switch off the engine.
On leaving the flooded road, as soon as safety
conditions allow, make several light brake
applications to dry the brake discs and pads.
If in doubt about the state of your vehicle, contact
a dealer or a qualified workshop.
Towing
Driving with a trailer places greater
demands on the towing vehicle and
particular care must be taken.
Do not exceed the maximum towable
weights.
At altitude: reduce the maximum load by 10%
per 1,000 metres of altitude; the lower air
density at high altitudes decreases engine
performance.
New vehicle: do not tow a trailer until the
vehicle has driven at least 620 miles
(1,000 kilometres).
If the outside temperature is high, let the
engine idle for 1 to 2 minutes after the
vehicle comes to a stop, to help it to cool.
Before setting off
Nose weight
► Distribute the load in the trailer so that the
heaviest items are as close as possible to the axle
and the nose weight (at the point where it joins
your vehicle) approaches the maximum permitted
without exceeding it.
Tyres
► Check the tyre pressures of the towing vehicle
and of the trailer, observing the recommended
pressures.
Lighting
► Check the electrical signalling on the trailer
and the headlamp beam height of your vehicle.
If a genuine towing device is used, the
rear parking sensors will be deactivated
automatically to avoid the audible signal.
When driving
Cooling
Towing a trailer uphill causes the coolant
temperature to increase. The maximum towable
load depends on the gradient and the exterior
temperature. The fan’s cooling capacity does not
increase with engine speed.
► Reduce speed and lower the engine speed to
limit the amount of heating produced.
► Pay constant attention to the coolant
temperature.
If this warning lamp and the STOP
warning lamp come on, stop the
vehicle and switch off the engine as soon as
possible.
Brakes
Using the engine brake is recommended to limit
the overheating of the brakes. Braking distances
are increased when towing a trailer.
Side wind
Bear in mind that the vehicle will be more
susceptible to wind when towing.
Anti-theft protection
Electronic immobiliser
The keys contain a code, which must be
recognised by the vehicle before starting is
possible.
If the system malfunctions, indicated by the
display of a message, the engine will not start.
Contact a dealer.
Starting/switching off the
engine
The electronic key must be present in the
passenger compartment.
If the electronic key is not detected, a message
is displayed.
Page 108 of 244

106
Driving06
The system uses a computer and sensors, which
determine the optimal level of shock absorption
to be applied to each shock absorber.
The system is also associated with a camera,
located at the top of the windscreen, constantly
monitoring the road condition. Based on the
information transmitted by the camera, the
system anticipates possible road defects.
The operation of the system depends on the
driving mode selected (depending on equipment).
For more information on the Driving modes,
please refer to the corresponding section.
Malfunction
In the event of a malfunction, this warning
lamp lights up on the instrument panel.
Have it checked by a dealer or a qualified
workshop.
Driving modes
The driving modes available depend on the engine
and equipment of the vehicle.
Driving modes are selected using the following
control:
► Press the control to display the modes on the
instrument panel.
► Press the control again to change mode.
The selected mode is activated immediately.
With petrol / Diesel engines
Whenever the ignition is switched on, Normal
driving mode is selected by default.
Eco
To reduce fuel consumption by optimising the
operation of the heating and air conditioning and,
depending on version, accelerator, automatic
gearbox, gear shift indicator.
Free-wheeling in Eco mode: depending on version,
with the EAT8 gearbox, switching into "free-
wheeling" is encouraged to slow the vehicle down
without using engine braking. You can save fuel
by taking your foot gradually and fully off the
accelerator pedal in anticipation of slowing down.
Comfort
To achieve more comfortable driving on poor
road surfaces, over speed humps and sleeping
policemen or on long journeys. In this mode, DS
ACTIVE SCAN SUSPENSION utilises additional
information coming from the multifunction
camera (early detection of road type and road
surface condition).
Normal
To restore the default settings.
Sport
To obtain more dynamic driving with action on the
power steering, DS ACTIVE SCAN SUSPENSION,
accelerator and gear changes (with an automatic
gearbox), acoustic ambience of the engine and
the possibility of displaying the vehicle’s dynamic
settings on the instrument panel.
Manual
Permanent Manual mode with an automatic
gearbox.
This manual mode is accessed via the button M of
the push selector.
To change gears manually using the control
paddles on the steering wheel.
For more information on Automatic gearbox
(EAT8), refer to the corresponding section.