clock CITROEN DS7 CROSSBACK 2020 Owners Manual
[x] Cancel search | Manufacturer: CITROEN, Model Year: 2020, Model line: DS7 CROSSBACK, Model: CITROEN DS7 CROSSBACK 2020Pages: 244, PDF Size: 6.87 MB
Page 4 of 244
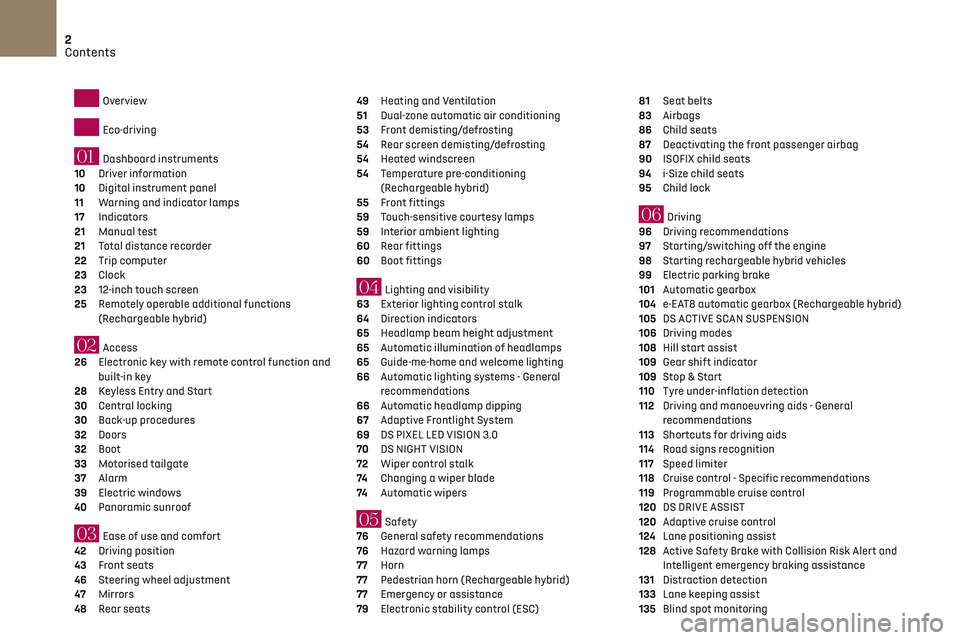
2
Contents
Overview
Eco-driving
01 Dashboard instruments
10 Driver information
10 Digital instrument panel
11 Warning and indicator lamps
17 Indicators
21 Manual test
21 Total distance recorder
22 Trip computer
23 Clock
23 12-inch touch screen
25 Remotely operable additional functions
(Rechargeable hybrid)
02 Access
26 Electronic key with remote control function and
built-in key
28
Keyless Entry and Start
30 Central locking
30 Back-up procedures
32 Doors
32 Boot
33 Motorised tailgate
37 Alarm
39 Electric windows
40 Panoramic sunroof
03 Ease of use and comfort
42 Driving position
43 Front seats
46 Steering wheel adjustment
47 Mirrors
48 Rear seats
49 Heating and Ventilation
51 Dual-zone automatic air conditioning
53 Front demisting/defrosting
54 Rear screen demisting/defrosting
54 Heated windscreen
54 Temperature pre-conditioning
(Rechargeable hybrid)
55
Front fittings
59 Touch-sensitive courtesy lamps
59 Interior ambient lighting
60 Rear fittings
60 Boot fittings
04 Lighting and visibility
63 Exterior lighting control stalk
64 Direction indicators
65 Headlamp beam height adjustment
65 Automatic illumination of headlamps
65 Guide-me-home and welcome lighting
66 Automatic lighting systems - General
recommendations
66
Automatic headlamp dipping
67 Adaptive Frontlight System
69 DS PIXEL LED VISION 3.0
70 DS NIGHT VISION
72 Wiper control stalk
74 Changing a wiper blade
74 Automatic wipers
05 Safety
76 General safety recommendations
76 Hazard warning lamps
77 Horn
77 Pedestrian horn (Rechargeable hybrid)
77 Emergency or assistance
79 Electronic stability control (ESC)
81 Seat belts
83 Airbags
86 Child seats
87 Deactivating the front passenger airbag
90 ISOFIX child seats
94 i-Size child seats
95 Child lock
06 Driving
96 Driving recommendations
97 Starting/switching off the engine
98 Starting rechargeable hybrid vehicles
99 Electric parking brake
101 Automatic gearbox
104 e-EAT8 automatic gearbox (Rechargeable hybrid)
105 DS ACTIVE SCAN SUSPENSION
106 Driving modes
108 Hill start assist
109 Gear shift indicator
109 Stop & Start
110 Tyre under-inflation detection
112 Driving and manoeuvring aids - General
recommendations
113
Shortcuts for driving aids
114 Road signs recognition
117 Speed limiter
118 Cruise control - Specific recommendations
119 Programmable cruise control
120 DS DRIVE ASSIST
120 Adaptive cruise control
124 Lane positioning assist
128 Active Safety Brake with Collision Risk Alert and
Intelligent emergency braking assistance
131
Distraction detection
133 Lane keeping assist
135 Blind spot monitoring
Page 6 of 244
4
Overview
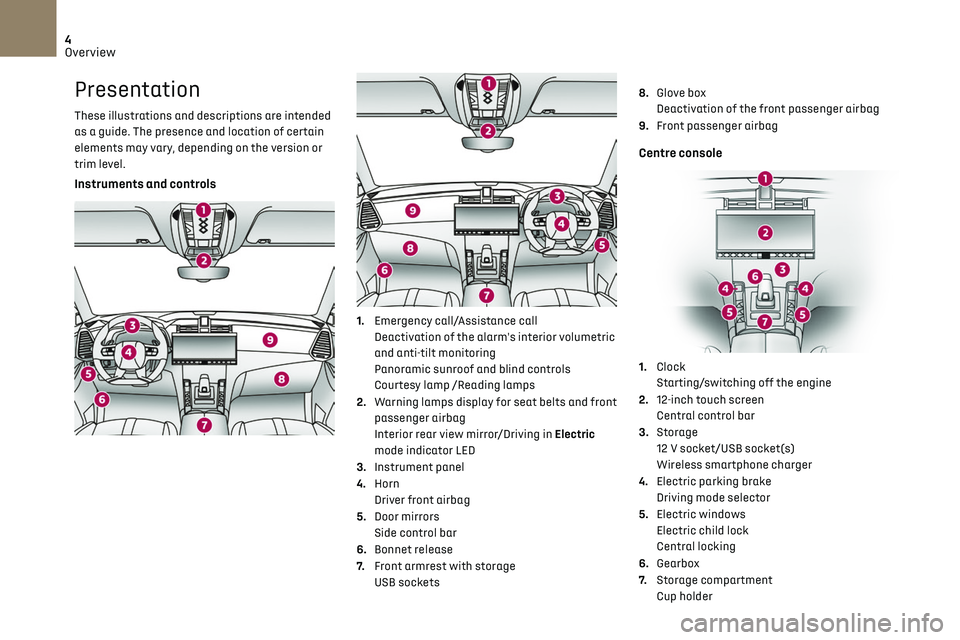
Presentation
These illustrations and descriptions are intended
as a guide. The presence and location of certain
elements may vary, depending on the version or
trim level.
Instruments and controls
1. Emergency call/Assistance call
Deactivation of the alarm's interior volumetric
and anti-tilt monitoring
Panoramic sunroof and blind controls
Courtesy lamp /Reading lamps
2. Warning lamps display for seat belts and front
passenger airbag
Interior rear view mirror/Driving in Electric
mode indicator LED
3. Instrument panel
4. Horn
Driver front airbag
5. Door mirrors
Side control bar
6. Bonnet release
7. Front armrest with storage
USB sockets 8.
Glove box
Deactivation of the front passenger airbag
9. Front passenger airbag
Centre console
1.Clock
Starting/switching off the engine
2. 12-inch touch screen
Central control bar
3. Storage
12 V socket/USB socket(s)
Wireless smartphone charger
4. Electric parking brake
Driving mode selector
5. Electric windows
Electric child lock
Central locking
6. Gearbox
7. Storage compartment
Cup holder
Page 25 of 244
23
Dashboard instruments01
The time counter is reset each time the ignition is
switched on.
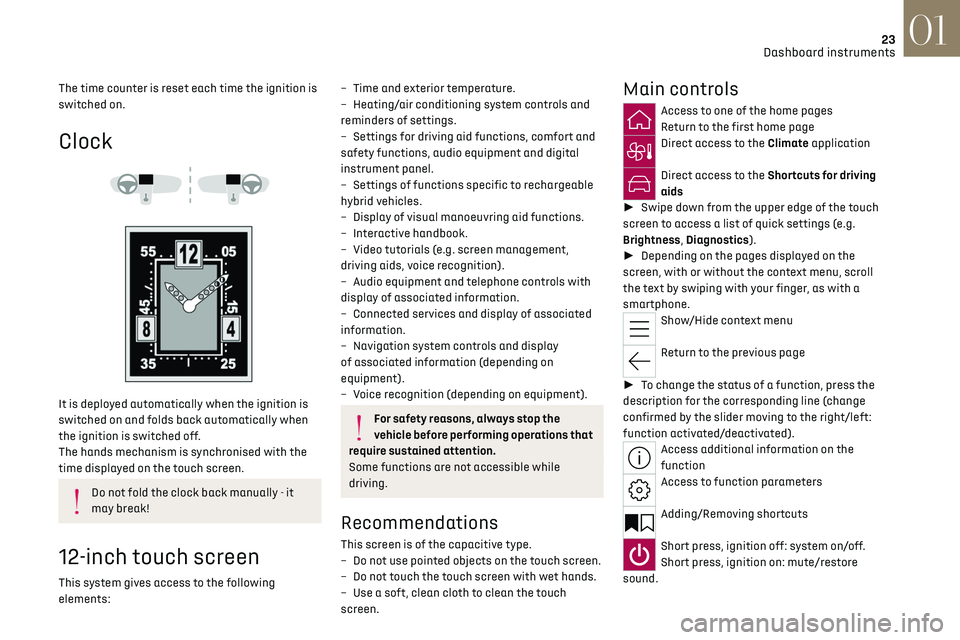
Clock
It is deployed automatically when the ignition is
switched on and folds back automatically when
the ignition is switched off.
The hands mechanism is synchronised with the
time displayed on the touch screen.
Do not fold the clock back manually - it
may break!
12-inch touch screen
This system gives access to the following
elements:
– Time and e xterior temperature.
– Hea ting/air conditioning system controls and
reminders of settings.
–
Settings for driving aid functions, c
omfort and
safety functions, audio equipment and digital
instrument panel.
–
Settings o
f functions specific to rechargeable
hybrid vehicles.
–
Displa
y of visual manoeuvring aid functions.
–
In
teractive handbook.
–
Video t
utorials (e.g. screen management,
driving aids, voice recognition).
–
Audio equipmen
t and telephone controls with
display of associated information.
–
Connect
ed services and display of associated
information.
–
Na
vigation system controls and display
of associated information (depending on
equipment).
–
V
oice recognition (depending on equipment).
For safety reasons, always stop the
vehicle before performing operations that
require sustained attention.
Some functions are not accessible while
driving.
Recommendations
This screen is of the capacitive type.
– Do no t use pointed objects on the touch screen.
–
Do no
t touch the touch screen with wet hands.
–
U
se a soft, clean cloth to clean the touch
screen.
Main controls
Access to one of the home pages
Return to the first home page
Direct access to the Climate application
Direct access to the Shortcuts for driving
aids
► Swipe down from the upper edge of the touch
screen to access a list of quick settings (e.g.
Brightness, Diagnostics).
► Depending on the pages displayed on the
screen, with or without the context menu, scroll
the text by swiping with your finger, as with a
smartphone.
Show/Hide context menu
Return to the previous page
► To change the status of a function, press the
description for the corresponding line (change
confirmed by the slider moving to the right/left:
function activated/deactivated).
Access additional information on the
function
Access to function parameters
Adding/Removing shortcuts
Short press, ignition off: system on/off.
Short press, ignition on: mute/restore
sound.
Page 26 of 244
24
Dashboard instruments01
Long press, ignition on: start standby mode (mute
sound, screens and clock display off).
Volume adjustment.
Applications
Press this button to access the
applications wall.
From any page, press the touch screen
with three fingers to display the
applications wall.
To obtain information about the other
applications not listed here, refer to the sections
describing the audio and telematic systems.
ADAS
Activation/Deactivation and configuration
of the driving aid functions.
Climate
Settings for temperature, air flow, etc.
For more information on Dual-zone automatic air
conditioning, refer to the corresponding section.
Seats
Activation/Deactivation and configuration
of the seat comfort functions (heating, ventilation
and massages).
For more information on the Heated and/or
ventilated seats or on the Multi-point massages,
refer to the corresponding section.
Settings
Main settings for the audio system, touch
screen and digital instrument panel. Activation/Deactivation and configuration of
the exterior lighting, vehicle access and safety
functions.
Energy
Access to the rechargeable hybrid system
features (energy flow, consumption statistics,
deferred charging, e
- SAVE function).
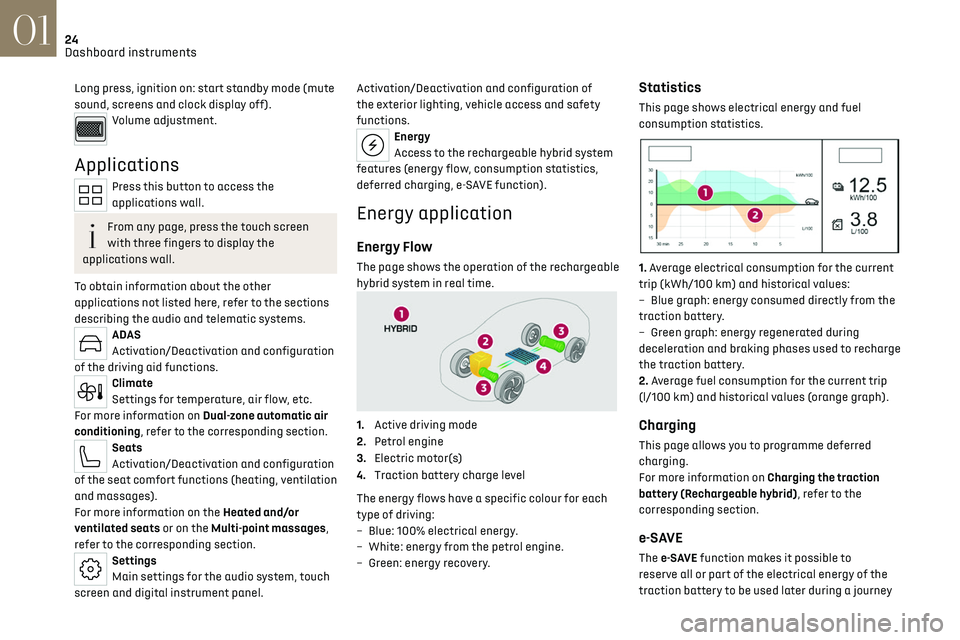
Energy application
Energy Flow
The page shows the operation of the rechargeable
hybrid system in real time.
1.Active driving mode
2. Petrol engine
3. Electric motor(s)
4. Traction battery charge level
The energy flows have a specific colour for each
type of driving:
–
Blue
: 100% electrical energy.
–
Whit
e: energy from the petrol engine.
–
G
reen: energy recovery.
Statistics
This page shows electrical energy and fuel
consumption statistics.
1. Average electrical consumption for the current
trip (kWh/100 km) and historical values:
–
Blue graph
: energy consumed directly from the
traction battery.
–
G
reen graph: energy regenerated during
deceleration and braking phases used to recharge
the traction battery.
2. Average fuel consumption for the current trip
(l/100 km) and historical values (orange graph).
Charging
This page allows you to programme deferred
charging.
For more information on Charging the traction
battery (Rechargeable hybrid), refer to the
corresponding section.
e-SAVE
The e-SAVE function makes it possible to
re serve all or part of the electrical energy of the
traction battery to be used later during a journey
Page 117 of 244

115
Driving06
Supplementary
traffic sign detected Display of the speed
associated with
the supplementary traffic sign
Speed limit for
vehicles with a gross vehicle weight or
gross train weight
less than 3.5 tonnes
56 mph (90 km/h) (for example)
Speed limit in case of snow
Example:
If the outside
temperature is below 3°C:
19 mph (30 km/h) (for example)
with a "snowflake" symbol
Speed limit at certain times of the day Example:
19 mph (30 km/h) (for example)
with a "clock" symbol
Navigation mapping should be regularly
updated in order to receive accurate
speed limit information from the system.
The units for the speed limit (mph or
km/h) depend on the country you are
driving in.
This should be taken into account to ensure
you observe the speed limit.
For the system to work properly when
changing countries, the speed unit of the
instrument panel must match that of the
country you are driving in.
Automatic sign reading is a driving aid
system and does not always display the
correct speed limits.
The speed limit signs present on the road
always take priority over those displayed by
the system.
The system is designed to detect signs that
conform to the Vienna Convention on road
signs.
Specific speed limits, such as those for
heavy goods vehicles, are not displayed.
The display of the speed limit on the
instrument panel is updated when passing
a speed limit sign intended for cars (light
vehicles).
Activation/Deactivation
By default, the system is automatically activated
at every engine start.
It is configured in the ADAS touch screen
application.
Information displayed on the
instrument panel
1. Detected speed limit indication
or
2. End of speed limit indication
The system is active but is not detecting speed
limit information.
On detecting speed limit information, the system
displays the value.
For a suggested maximum speed, the first time
that the vehicle exceeds it by more than 3 mph
(5 km/h) (e.g. 59 mph (95 km/h)), the speed is
displayed and flashes for 10 seconds (depending
on version).
Page 168 of 244
166
Practical information07
Never store AdBlue® containers in your
vehicle.
Precautions for use
AdBlue® is a urea-based solution. This fluid is non-
flammable, colourless and odourless (when kept
in a cool place).
In the event of contact with the skin, wash the
affected area with soap and running water. In the
event of contact with the eyes, immediately rinse
the eyes with large amounts of water or with an
eye wash solution for at least 15 minutes. Seek
medical attention if you feel a persistent burning
sensation or irritation.
If swallowed, immediately wash out the mouth
with clean water and then drink plenty of water.
In certain conditions (high temperature, for
example), the risk of release of ammonia cannot
be excluded: do not inhale the fluid. Ammonia
vapours have an irritant effect on mucous
membranes (eyes, nose and throat).
Store AdBlue® out of the reach of children,
in its original container.
Procedure
Before starting the top-up procedure, ensure that
the vehicle is parked on a flat and level surface.
In wintry conditions, ensure that the temperature
of the vehicle is above -11°C. Otherwise the
AdBlue
® may be frozen and so cannot be poured
into the tank. Park the vehicle in a warmer area
for a few hours to allow the top-up to be carried
out.
Never pour the AdBlue® into the Diesel fuel
tank.
If any AdBlue® is splashed, or if there are
any spillages on the bodywork, rinse
immediately with cold water or wipe with a
damp cloth.
If the fluid has crystallised, clean it off using a
sponge and hot water.
Important: in the event of a top-up after an
AdBlue breakdown, you must wait about
5 minutes before switching on the ignition,
without opening the driver's door, unlocking
the vehicle or bringing the electronic key into
the passenger compartment.
Switch on the ignition, then wait for 10
seconds before starting the engine.
► Press the "START/STOP" button to switch off
the engine.
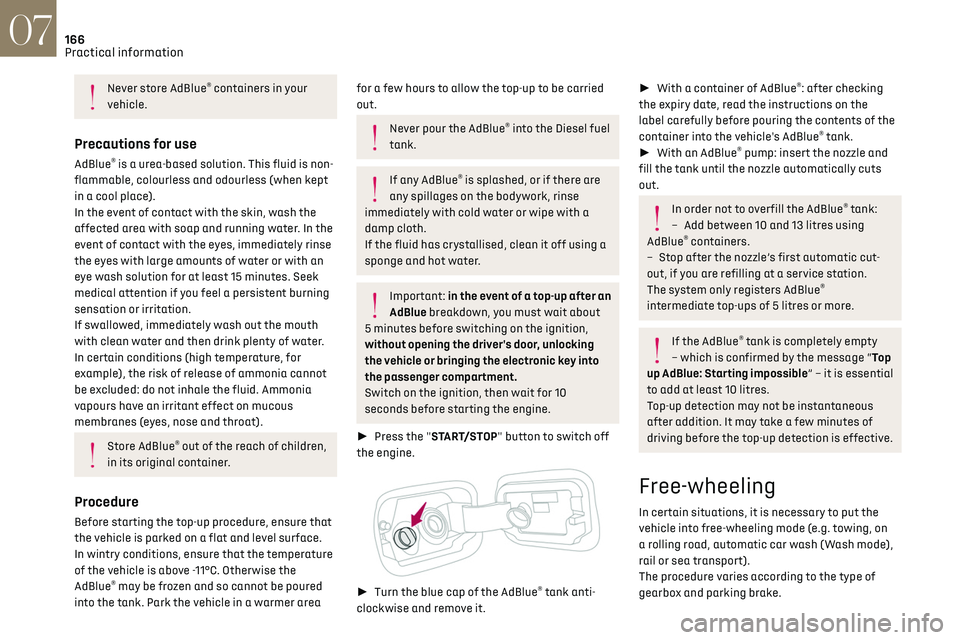
► Turn the blue cap of the AdBlue® tank anti-
clockwise and remove it.
► With a container of AdBlue®: after checking
the expiry date, read the instructions on the
label carefully before pouring the contents of the
container into the vehicle's AdBlue
® tank.
► With an AdBlue® pump: insert the nozzle and
fill the tank until the nozzle automatically cuts
out.
In order not to overfill the AdBlue® tank:
–
Add betw
een 10 and 13 litres using
AdBlue
® containers.
–
St
op after the nozzle’s first automatic cut-
out, if you are refilling at a service station.
The system only registers AdBlue
®
intermediate top-ups of 5 litres or more.
If the AdBlue® tank is completely empty
– which is confirmed by the message “Top
up AdBlue: Starting impossible” – it is essential
to add at least 10 litres.
Top-up detection may not be instantaneous
after addition. It may take a few minutes of
driving before the top-up detection is effective.
Free-wheeling
In certain situations, it is necessary to put the
vehicle into free-wheeling mode (e.g. towing, on
a rolling road, automatic car wash (Wash mode),
rail or sea transport).
The procedure varies according to the type of
gearbox and parking brake.
Page 182 of 244

180
In the event of a breakdown08
► Using the opening tool, unclip the cover of
the access flap on the rear screw thread of the
towing eye, then pull it towards you.
► Insert the screwdriver head diagonally in the
cylindrical guide until you reach the lamp unit
fixing bolt.
► Slacken the bolt by about 10 turns then pull
the lamp unit to release it from the bumper.
► Disconnect the harness.
For each lamp:
► Turn the bulb holder a quarter turn anti-
clockwise and remove it.
► Remove the bulb and replace it.
Fuses
Changing a fuse
All work must be carried out only by a
dealer or a qualified workshop.
The replacement of a fuse by a third party
could cause a serious malfunction of the
vehicle.
Installing electrical accessories
The vehicle's electrical system is
designed to operate with standard or optional
equipment.
Before fitting other electrical equipment or
accessories to your vehicle, contact a dealer or
a qualified workshop.
The Manufacturer accepts no
responsibility for the cost incurred in
repairing the vehicle or for rectifying
malfunctions resulting from the installation of
accessories not supplied or not approved by it
and not installed in accordance with its
specifications, in particular when the
combined power consumption of all of the
additional equipment connected exceeds 10
milliamperes.
Page 196 of 244
194DS IRIS SYSTEM - 12" touch screen Infotainment system10
DS IRIS SYSTEM - 12" touch
screen Infotainment
system
GPS navigation - Applications
- Multimedia audio system -
Bluetooth
® telephone
The functions and settings described vary
according to the version and
configuration of the vehicle, and according to
the country of sale.
For safety reasons and because they
require continued attention on the part of
the driver, the following operations must be
carried out with the vehicle stationary and the
ignition on:
–
Pairing the smartphone with the s
ystem via
Bluetooth
®.
–
U
sing the smartphone.
–
Connecting t
o Mirror Screen (Apple
®CarPlay®
or Android Auto).
–
C
hanging the system settings and
configuration.
The message Energy economy mode is
displayed when the system is about to go
into standby.
For more information on Energy economy
mode, refer to the "Practical information"
section.
Warning
Navigation is a driving aid. It cannot
replace the driver. All guidance instructions
should be carefully checked by the user.
By using the navigation, you accept the
following terms and conditions:
https://www.tomtom.com/en_gb/legal/
eula-automotive/?388448
First steps
The system starts when the ignition is
switched on.
Short press, ignition off: system on/off.
Short press, ignition on: mute/restore sound.
Long press, ignition on: start standby mode (mute
sound, screens and clock display off).
► Increase or decrease the volume using the
knob or the "plus" or "minus" buttons (depending
on equipment).
Information
This system gives access to the following
elements: –
Audio equipmen
t and telephone controls with
display of associated information.
–
Connect
ed services and display of associated
information.
–
Na
vigation system controls and display
of associated information (depending on
equipment).
–
V
oice recognition (depending on equipment).
–
Time and outside t
emperature.
–
Hea
ting/air conditioning system controls and
reminders of settings.
–
Settings for driving aid functions, c
omfort
and safety functions, extended head-up display
(depending on equipment and version), audio
equipment and digital instrument panel.
–
Settings for functions specific t
o rechargeable
hybrid vehicles.
–
Displa
y of visual manoeuvring aid functions.
–
In
teractive handbook.
–
Video t
utorials (e.g. screen management,
driving aids, voice recognition).
Upper banner
Certain information is displayed permanently in
the upper banner of the touch screen:
–
O
utside temperature from the vehicle's sensors
(associated with a blue symbol if there is a risk
of ice).
–
T
emperature setting reminder for the air
conditioning on the driver's and passenger sides.
–
C
harge level of the connected smartphone.
–
Sy
stem connection status (Bluetooth
®, Wi-Fi,
mobile telephone network).
Page 216 of 244

214Alphabetical index
Charging connector
(Rechargeable hybrid)
146, 153–154
Charging flap
(Rechargeable hybrid)
146, 153–154
Charging the traction battery
(Rechargeable hybrid)
20, 145, 153–154
CHECK
21
Checking the engine oil level
18
Checking the levels
161–162
Checking tyre pressures (using the kit)
172, 174
Checks
161, 163–165
Checks, routine
163–164
Child lock
95
Children
83, 89–91, 94
Children (safety)
95
Child seats
83, 86–89
Child seats, conventional
88–89
Child seats, i-Size
94
Child seats, ISOFIX
90–92
Cigar lighter
56
Cleaning (advice)
146, 167–169
Clock
23
Closing the boot
29, 33
Closing the doors
29, 32
Collision Risk Alert
128–129
Comfort mode
108
Configuration, vehicle
10, 24
Connection, Bluetooth
202
Connectivity
207
Consumptions
24
Container, AdBlue®
165–166
Control, emergency boot release
33Control, emergency door 30–31
Control, heated seats
46
Controls, steering mounted
101–103
Control stalk, lighting
63–64
Control stalk, wipers
72–74
Control unit
147–149, 154
Courtesy lamp, front
59
Courtesy lamps
59
Cruise control
116, 118–120
Cruise control, adaptive
120
Cruise control, adaptive with Stop function
116
Cruise control by speed limit recognition
116
Cup holder
56
D
Date (setting) 208
Daytime running lamps
64, 179
Deactivating the passenger airbag
84, 87–88
Deadlocking
27, 29
Deferred charging
24, 155
Deferred charging
(Rechargeable hybrid)
24–25, 146, 153
Defrosting
47, 53
Defrosting, front
53
Defrosting, rear screen
54
Demisting
47, 53
Demisting, front
53
Demisting, rear
54
Diagnosis, vehicle
21
Dials and gauges 10
Digital instrument panel
10
Dimensions
193
Dipstick
18, 161
Direction indicators (turn signals)
64, 179
Display screen, instrument panel
10
Domestic charging
149
Domestic charging (Rechargeable hybrid)
154
Door pockets
56
Doors
32
Driver’s attention warning
131–132
Driving
42–43, 96–97
Driving aids camera (warnings)
112
Driving aid shortcuts
113
Driving aids (recommendations)
112
Driving economically
8
Driving modes
106
Driving positions (storing)
45
DS Drive Assist
120
Dynamic stability control (DSC)
80
E
EBFD 79
Eco-driving (advice)
8
ECO mode
106
Electric automatic gearbox
(Rechargeable hybrid)
104
Electronic brake force distribution (EBFD)
79
Emergency braking assistance (EBA)
80