remote control CITROEN DS7 CROSSBACK 2021 User Guide
[x] Cancel search | Manufacturer: CITROEN, Model Year: 2021, Model line: DS7 CROSSBACK, Model: CITROEN DS7 CROSSBACK 2021Pages: 244, PDF Size: 6.87 MB
Page 53 of 244
51
Ease of use and comfort03
activated, for a period which depends on the
battery charge.
This function does not include the air conditioning
system.
Dual-zone automatic air
conditioning
This system automatically controls the activation
of the air conditioning system, regulating the
temperature, air flow and air distribution inside
the passenger compartment.
This system works with the engine running, but
access to the ventilation and its controls remains
possible with the ignition on.
Press the Climate application button to
display the system controls page.
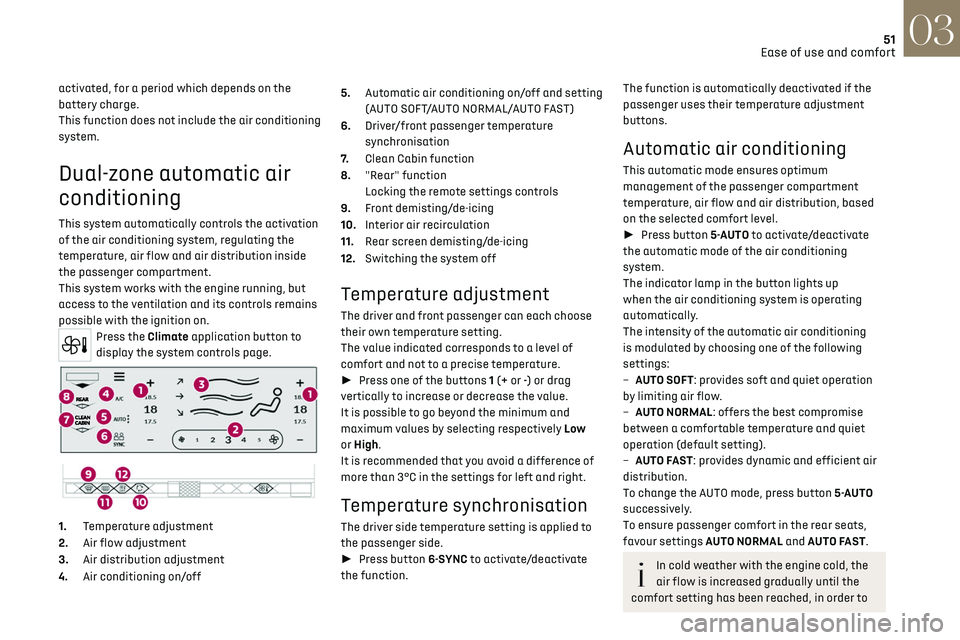
1. Temperature adjustment
2. Air flow adjustment
3. Air distribution adjustment
4. Air conditioning on/off 5.
Automatic air conditioning on/off and setting
(AUTO SOFT/AUTO NORMAL/AUTO FAST)
6. Driver/front passenger temperature
synchronisation
7. Clean Cabin function
8. "Rear" function
Locking the remote settings controls
9. Front demisting/de-icing
10. Interior air recirculation
11. Rear screen demisting/de-icing
12. Switching the system off
Temperature adjustment
The driver and front passenger can each choose
their own temperature setting.
The value indicated corresponds to a level of
comfort and not to a precise temperature.
► Press one of the buttons 1 (+ or -) or drag
vertically to increase or decrease the value.
It is possible to go beyond the minimum and
maximum values by selecting respectively Low
or High.
It is recommended that you avoid a difference of
more than 3°C in the settings for left and right.
Temperature synchronisation
The driver side temperature setting is applied to
the passenger side.
► Press button 6-SYNC to activate/deactivate
the function.
The function is automatically deactivated if the
passenger uses their temperature adjustment
buttons.
Automatic air conditioning
This automatic mode ensures optimum
management of the passenger compartment
temperature, air flow and air distribution, based
on the selected comfort level.
► Press button 5-AUTO to activate/deactivate
the automatic mode of the air conditioning
system.
The indicator lamp in the button lights up
when the air conditioning system is operating
automatically.
The intensity of the automatic air conditioning
is modulated by choosing one of the following
settings:
–
A
UTO SOFT: provides soft and quiet operation
by limiting air flow.
–
A
UTO NORMAL: offers the best compromise
between a comfortable temperature and quiet
operation (default setting).
–
A
UTO FAST: provides dynamic and efficient air
distribution.
To change the AUTO mode, press button 5-AUTO
successively.
To ensure passenger comfort in the rear seats,
favour settings AUTO NORMAL and AUTO FAST.
In cold weather with the engine cold, the
air flow is increased gradually until the
comfort setting has been reached, in order to
Page 55 of 244

53
Ease of use and comfort03
Air conditioning does not operate when
the air flow is deactivated.
To obtain cool air more quickly, enable interior
air recirculation for a brief period. Then return
to the intake of exterior air.
Switching off the air conditioning may result in
some discomfort (humidity or misting).
"Rear" function
Activating the function switches on the blower in
the rear air vents.
► In the Climate touch screen
application, select the Rear tab.
► Press the line "Activate rear climate" to
activate/deactivate the function.
Remote settings controls
With the "Rear" function activated and the
remote settings controls unlocked, the rear
passengers can take control of the main air
conditioning system settings using the touch
control panel located at the rear of the centre
console. The settings displayed on the screen are
modified accordingly.
1. Adjusting the air flow
2. Automatic Comfort programme
3. Adjusting the temperature
Locking the remote settings controls
It is possible to prevent the rear passengers from
accessing these settings.
► In the Climate touch screen
application, select the Rear tab.
► Press the line "Lock rear climate controls" to
lock/unlock the remote settings controls.
A padlock appears on the rear air conditioning
screen.
Switching off the air
conditioning system
► Press button 12-OFF.
Its indicator lamp lights up and all the other
indicator lamps of the air conditioning system
go off.
This action deactivates all of the functions of the
air conditioning system.
The temperature is no longer regulated. A slight
flow of air can still be felt, due to the forward
movement of the vehicle.
Interior air recirculation
The intake of exterior air prevents the formation
of mist on the windscreen and side windows.
Recirculating the interior air isolates the
passenger compartment from outside odours
and fumes and allows the desired passenger
compartment temperature to be achieved more
rapidly.
► Press this button to activate/
deactivate the function (confirmed by the
illumination/extinction of the indicator lamp).
This function is activated automatically
when the front screenwash is used or
reverse gear is engaged.
Front
demisting/defrosting
This mode allows the windscreen and side
windows to be demisted or defrosted as quickly
as possible.
► Press this button to activate/
deactivate the mode (confirmed by the
illumination/extinction of the indicator lamp).
The mode automatically manages the air
conditioning, air flow, air intake and distributes
ventilation optimally to the windscreen and side
windows.
The air flow can be changed manually without
deactivating this mode.
With Stop & Start, when demisting has
been activated, STOP mode is not
available.
Page 59 of 244

57
Ease of use and comfort03
When the USB socket is used, the portable
device charges automatically.
While charging, a message is displayed if the
power drawn by the portable device exceeds
the current supplied by the vehicle.
For more information about how to use this
equipment, refer to the sections describing the
audio and telematics systems.
Storage compartment
► To open the storage compartment, press the
front central part.
Wireless smartphone charger
This system allows wireless charging of a
portable device such as a smartphone, using the
magnetic induction principle, in accordance with
the Qi 1.1 standard.
The portable device to be charged must be
compatible with the Qi standard, either by design
or by using a compatible holder or shell.
A mat can also be used provided that it is
approved by the Manufacturer.
The charging area is identified by the Qi symbol.
The charger works with the engine running and
with the Stop & Start system in STOP mode.
Charging is managed by the smartphone.
With the Keyless Entry and Start system, the
charger’s operation may be briefly disrupted when
a door is opened or the ignition is switched off.
Charging
► With the charging area clear, place a device in
its centre.
When the portable device is detected, the
charger’s indicator lamp lights up green. It
remains lit for the whole time that the battery is
being charged.
The system is not designed to charge
multiple devices simultaneously.
Do not leave metal objects (e.g. coins,
keys, vehicle remote control) in the
charging area while a device is being charged
- Risk of overheating or interrupting the
charging!
When using applications for a long time in
combination with wireless charging, some
smartphones may switch to thermal safety
and cause some functions to stop.
Checking operation
The state of the indicator lamp allows the
operation of the charger to be monitored.
Page 65 of 244

63
Lighting and visibility04
Exterior lighting control
stalk
Main lighting
Automatic illumination of lamps/daytime
running lamps
Sidelamps only
Dipped or main beam headlamps
Remote rear lamps
When the vehicle's lamps are on,
opening the tailgate automatically switches
illumination from the brake lamps, sidelamps
and direction indicator lamps to the lamps
located in the rear bumper, to maintain the
safety of the vehicle.
Headlamp dipping
► Pull the lighting control stalk to switch
between dipped and main beam headlamps.
In "AUTO" and sidelamps mode, pull the lighting
control stalk to switch the main beam headlamps
on directly ("headlamp flash").
Display
Illumination of the corresponding indicator
lamp on the instrument panel confirms that the
selected lighting is on.
A fault with a lamp is signalled by the
permanent illumination of this warning
lamp, accompanied by the display of a message
and an audible signal.
Rear foglamps
They only work if the dipped or main beam
headlamps are on.
► Rotate the ring forwards/backwards to turn
them on/off.
When the lighting is switched off automatically
("AUTO" position) the foglamps and the dipped
beam headlamps remain on.
When the rear foglamps are activated, the "fog"
mode of the Adaptive Frontlight System function
can be activated at the front.
For more information on the Adaptive Frontlight
System, refer to the corresponding section.
Switching on the foglamps is prohibited in
clear weather or in rain, both day and
night. In these situations, the power of their
beams may dazzle other drivers. They must
only be used in fog or falling snow (rules may
vary depending on country).
Do not forget to switch off the foglamps when
they are no longer necessary.
Switching off of the lighting when the
ignition is switched off
When the ignition is switched off, all of the
lamps turn off immediately, except for the
dipped beam headlamps if automatic guide-
me-home lighting is activated.
Page 68 of 244

66
Lighting and visibility04
dipped beam headlamps come on automatically
when the ignition is switched off.
You can activate/deactivate and adjust
the duration of the guide-me-home lighting
in the Settings > Vehicle touch screen application.
Manual
► With the ignition off, pull the lighting control
stalk toward you ("headlamp flash") to activate/
deactivate the function.
Manual guide-me-home lighting goes off
automatically after a period of time.
Welcome lighting
When the vehicle is unlocked in low light
conditions and the "Automatic illumination of
headlamps" function is activated, this system
automatically switches on:
–
O
n the outside, sidelamps, dipped beam
headlamps and door mirror spotlamps.
–
Inside
, courtesy lamps and footwell lighting.
You can activate/deactivate and adjust
the duration of the welcome lighting in the
Settings > Vehicle touch screen application.
Door mirror spotlamps
These spotlamps facilitate access to the vehicle
by lighting the ground near the front doors.
The spotlamps come on automatically:
–
when the v
ehicle is unlocked.
–
when a door is opened.
–
when a reque
st to locate the vehicle is received
from the remote control.
They also come on with the welcome lighting and
guide-me-home lighting functions.
They go off automatically after 30 seconds.
Automatic lighting
systems - General
recommendations
The automatic lighting systems use a detection
camera, located at the top of the windscreen.
Operating limits
The system may be disrupted or not work
correctly:
–
When visibility c
onditions are poor
(e.g. snowfall, heavy rain).
–
If the windscreen is dirty
, misted-up or
masked (e.g. sticker) in front of the camera.
–
If the v
ehicle is facing highly reflective signs
or safety barrier reflectors.
The system is not able to detect:
– R oad users that do not have their own
lighting, such as pedestrians.
–
V
ehicles with hidden lighting (e.g. travelling
behind a safety barrier on the motorway).
–
V
ehicles at the top or bottom of a steep
slope, on winding roads, on crossroads.
Maintenance
Clean the windscreen regularly,
particularly the area in front of the camera.
The internal surface of the windscreen can
also become misted around the camera.
In humid and cold weather, demist the
windscreen regularly.
Do not allow snow to accumulate on the
bonnet or roof of the vehicle as this could
obstruct the camera.
Automatic headlamp
dipping
For more information, refer to the General
recommendations for automatic lighting
systems.
With the ring of the lighting control stalk in the
"AUTO" position and the function activated on the
touch screen, this system automatically switches
between dipped and main beam headlamps,
Page 101 of 244

99Driving06
Switching on the ignition
without starting the engine
With the electronic key in the passenger
compartment, pressing the "START/STOP" button,
without depressing any of the pedals, allows the
ignition to be switched on without starting the
engine.
► Press this button again to switch off the
ignition and allow the vehicle to be locked.
Key not detected
Back-up starting
A back-up reader is fitted to the steering column,
to enable the engine to be started if the system
fails to detect the key in the recognition zone, or if
the battery in the electronic key is flat.
► Place and hold the remote control against the
back-up reader.
► Select mode P on the automatic gearbox, then
depress the brake pedal. ►
Press the "START/STOP" button.
The engine starts.
Back-up switch-off
If the electronic key is not detected or is no longer
in the recognition zone, a message appears in the
instrument panel when closing a door or trying to
switch off the engine.
► To confirm the instruction to switch off the
engine, press the "START/STOP" button for
approximately 5 seconds.
In the event of a fault with the electronic key,
contact a dealer or a qualified workshop.
Emergency switch-off
In case of emergency only, the engine can be
switched off without conditions (even when
driving).
► Press the "START/STOP" button for about
5 seconds. In this case, the steering column locks as soon as
the vehicle stops.
Electric parking brake
In automatic mode, this system applies the
parking brake when the engine is switched off
and releases it when the vehicle moves off.
At any time, with the engine running:
► To apply the parking brake, briefly pull the
control.
► To release it, briefly push the control while
pressing the brake pedal.
Automatic mode is activated by default.
This automatic operation can be deactivated in
certain situations.
Indicator lamp
This indicator lamp comes on both on the
instrument panel and on the control to
confirm that the parking brake has been applied,
accompanied by display of the message "Parking
brake applied".
Page 152 of 244
150
Practical information07
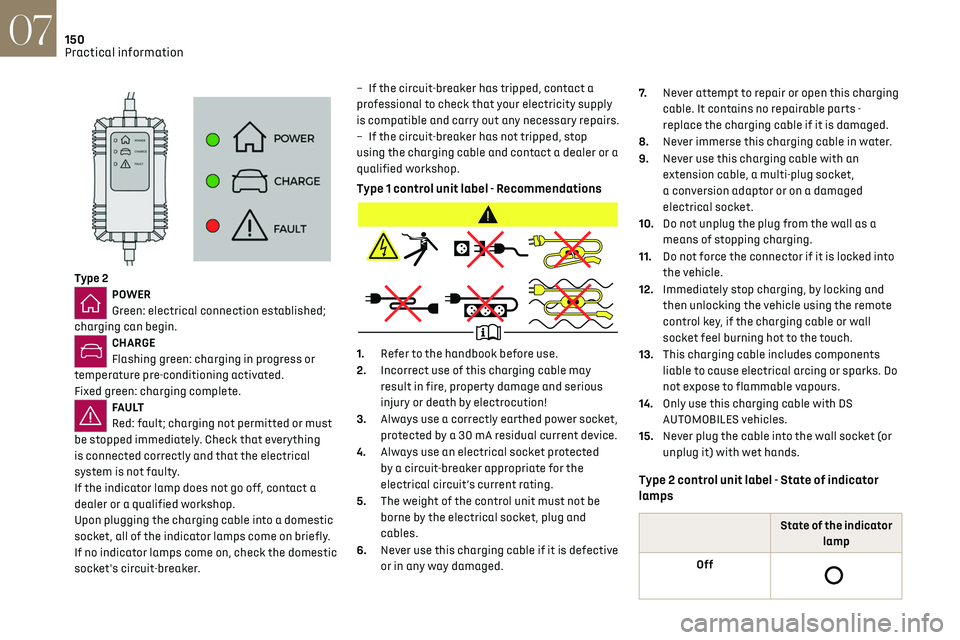
Type 2POWER
Green: electrical connection established;
charging can begin.
CHARGE
Flashing green: charging in progress or
temperature pre-conditioning activated.
Fixed green: charging complete.
FA U LT
Red: fault; charging not permitted or must
be stopped immediately. Check that everything
is connected correctly and that the electrical
system is not faulty.
If the indicator lamp does not go off, contact a
dealer or a qualified workshop.
Upon plugging the charging cable into a domestic
socket, all of the indicator lamps come on briefly.
If no indicator lamps come on, check the domestic
socket's circuit-breaker. –
If the circ
uit-breaker has tripped, contact a
professional to check that your electricity supply
is compatible and carry out any necessary repairs.
–
If the circ
uit-breaker has not tripped, stop
using the charging cable and contact a dealer or a
qualified workshop.
Type 1 control unit label - Recommendations
1. Refer to the handbook before use.
2. Incorrect use of this charging cable may
result in fire, property damage and serious
injury or death by electrocution!
3. Always use a correctly earthed power socket,
protected by a 30 mA residual current device.
4. Always use an electrical socket protected
by a circuit-breaker appropriate for the
electrical circuit’s current rating.
5. The weight of the control unit must not be
borne by the electrical socket, plug and
cables.
6. Never use this charging cable if it is defective
or in any way damaged. 7.
Never attempt to repair or open this charging
cable. It contains no repairable parts -
replace the charging cable if it is damaged.
8. Never immerse this charging cable in water.
9. Never use this charging cable with an
extension cable, a multi-plug socket,
a conversion adaptor or on a damaged
electrical socket.
10. Do not unplug the plug from the wall as a
means of stopping charging.
11. Do not force the connector if it is locked into
the vehicle.
12. Immediately stop charging, by locking and
then unlocking the vehicle using the remote
control key, if the charging cable or wall
socket feel burning hot to the touch.
13. This charging cable includes components
liable to cause electrical arcing or sparks. Do
not expose to flammable vapours.
14. Only use this charging cable with DS
AUTOMOBILES vehicles.
15. Never plug the cable into the wall socket (or
unplug it) with wet hands.
Type 2 control unit label - State of indicator
lamps
State of the indicator
lamp
Off
Page 154 of 244
152
Practical information07
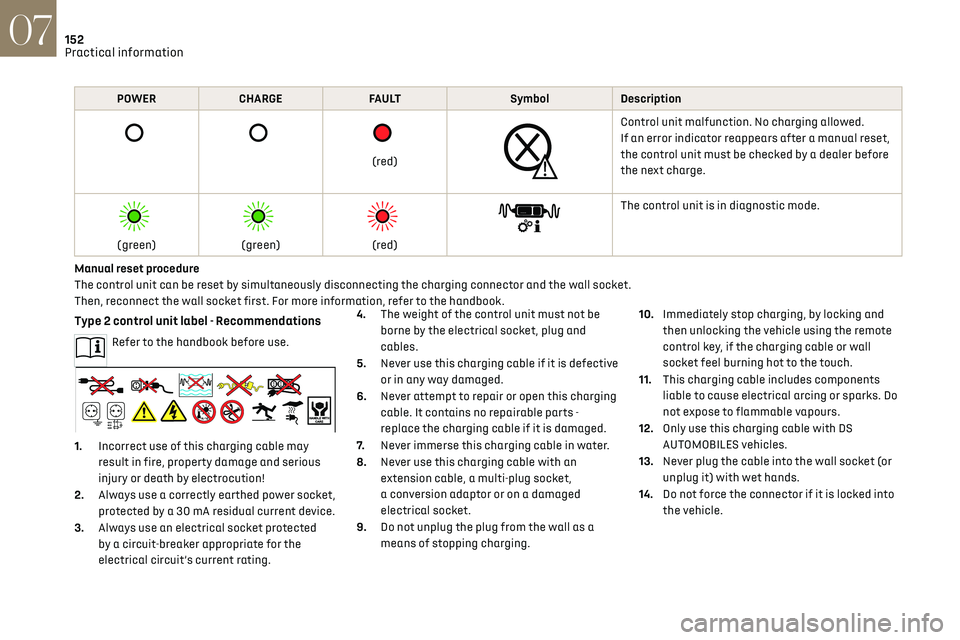
POWERCHARGE FA U LT SymbolDescription
(red)
Control unit malfunction. No charging allowed.
If an error indicator reappears after a manual reset,
the control unit must be checked by a dealer before
the next charge.
(green)
(green)
(red)
The control unit is in diagnostic mode.
Manual reset procedure
The control unit can be reset by simultaneously disconnecting the charging connector and the wall socket.
Then, reconnect the wall socket first. For more information, refer to the handbook.
Type 2 control unit label - Recommendations
Refer to the handbook before use.
1. Incorrect use of this charging cable may
result in fire, property damage and serious
injury or death by electrocution!
2. Always use a correctly earthed power socket,
protected by a 30 mA residual current device.
3. Always use an electrical socket protected
by a circuit-breaker appropriate for the
electrical circuit’s current rating. 4.
The weight of the control unit must not be
borne by the electrical socket, plug and
cables.
5. Never use this charging cable if it is defective
or in any way damaged.
6. Never attempt to repair or open this charging
cable. It contains no repairable parts -
replace the charging cable if it is damaged.
7. Never immerse this charging cable in water.
8. Never use this charging cable with an
extension cable, a multi-plug socket,
a conversion adaptor or on a damaged
electrical socket.
9. Do not unplug the plug from the wall as a
means of stopping charging. 10.
Immediately stop charging, by locking and
then unlocking the vehicle using the remote
control key, if the charging cable or wall
socket feel burning hot to the touch.
11. This charging cable includes components
liable to cause electrical arcing or sparks. Do
not expose to flammable vapours.
12. Only use this charging cable with DS
AUTOMOBILES vehicles.
13. Never plug the cable into the wall socket (or
unplug it) with wet hands.
14. Do not force the connector if it is locked into
the vehicle.
Page 157 of 244
155
Practical information07
► If the vehicle is unlocked, lock it and then
unlock it.
If selective unlocking of the doors is
activated, press the unlocking button on
the remote control twice to disconnect the
nozzle.
The red indicator lamp in the flap goes out to
confirm that the nozzle is unlocked.
► Within 30 seconds, remove the charging
nozzle.
Domestic charging (mode 2)
The end of charging is confirmed when the
green CHARGE indicator lamp on the control unit
comes on fixed and the green light guides in the
flap come on fixed.
► After disconnection, replace the protective
cover over the nozzle and close the charging flap.
► Disconnect the control unit's charging cable
from the domestic socket.
Accelerated charging (mode 3)
The end of charging is confirmed by the
accelerated charging unit (Wallbox) and when the
green light guides in the flap come on fixed.
► After disconnection, replace the nozzle on to
the charging unit and close the charging flap.
Deferred charging
By default, the deferred charging start time is set
to be around midnight. Depending on equipment, this time can be
changed.
Settings
►
In the Energy touch screen application,
select the Charging tab.
► Set the charging start time.
► Press OK.
The setting is saved in the system.
You can also programme the deferred
charging function using a smartphone, via
the MyDS App application.
For more information on Remotely operable
additional functions, refer to the corresponding
section.
Activation
► After programming the deferred charging,
connect the vehicle to the desired charging
equipment.
► Press this button in the flap within one
minute to activate the deferred charging
(confirmed by the light guides coming on in blue).
Towing device
Load distribution
► Distribute the load in the trailer so that
the heaviest items are as close as possible to
the axle, and the nose weight approaches the
maximum permitted without exceeding it.
Air density decreases with altitude, thus reducing
engine performance. The maximum towable
load must be reduced by 10% per 1,000 metres of
altitude.
Use genuine towing devices and wiring
harnesses approved by the Manufacturer.
We recommend having them fitted by a dealer
or a qualified workshop.
If not fitted by a dealer, they must still be
fitted in accordance with the Manufacturer's
instructions.
Important: if the vehicle has a motorised
tailgate and Hands-Free Tailgate Access
function, and a towing device has been fitted
outside the dealer network, it is essential to
visit a dealer or a qualified workshop to have
the detection system recalibrated - risk of
malfunction of the Hands-Free Tailgate Access
function.
Certain driving or manoeuvring aid functions
are automatically deactivated while an
approved towing system is in use.
For more information about driving with a
towing device fitted to a trailer and associated
with the Trailer stability assist, refer to the
corresponding section.
Comply with the maximum authorised
towable weight, as indicated on your
vehicle's registration certificate, on the
manufacturer's label and in the Technical data
section of this guide.
Page 163 of 244
161
Practical information07
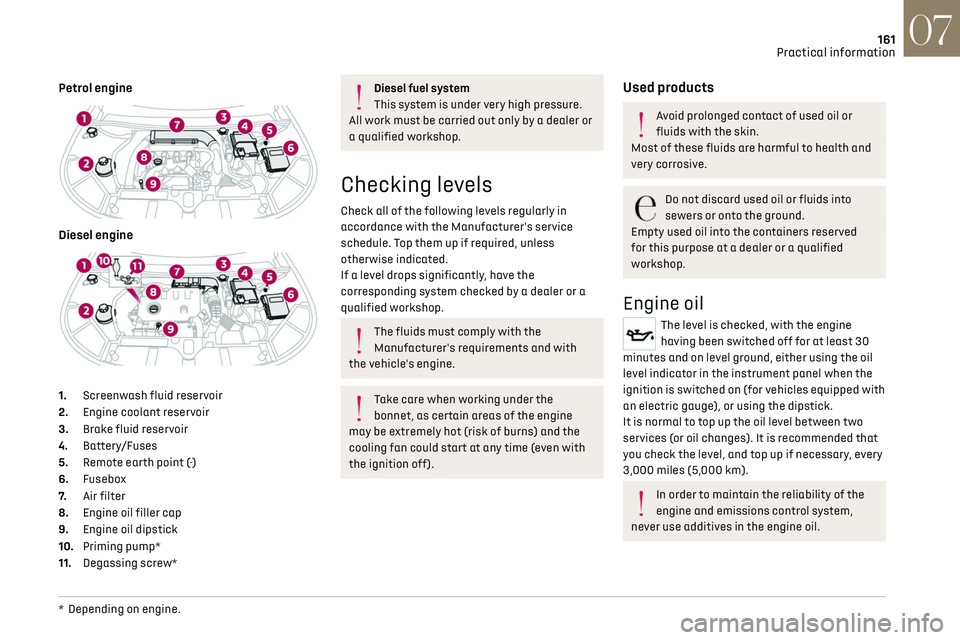
Petrol engine
Diesel engine
1. Screenwash fluid reservoir
2. Engine coolant reservoir
3. Brake fluid reservoir
4. Battery/Fuses
5. Remote earth point (-)
6. Fusebox
7. Air filter
8. Engine oil filler cap
9. Engine oil dipstick
10. Priming pump*
11. Degassing screw*
* Depending on engine .
Diesel fuel system
This system is under very high pressure.
All work must be carried out only by a dealer or
a qualified workshop.
Checking levels
Check all of the following levels regularly in
accordance with the Manufacturer's service
schedule. Top them up if required, unless
otherwise indicated.
If a level drops significantly, have the
corresponding system checked by a dealer or a
qualified workshop.
The fluids must comply with the
Manufacturer's requirements and with
the vehicle's engine.
Take care when working under the
bonnet, as certain areas of the engine
may be extremely hot (risk of burns) and the
cooling fan could start at any time (even with
the ignition off).
Used products
Avoid prolonged contact of used oil or
fluids with the skin.
Most of these fluids are harmful to health and
very corrosive.
Do not discard used oil or fluids into
sewers or onto the ground.
Empty used oil into the containers reserved
for this purpose at a dealer or a qualified
workshop.
Engine oil
The level is checked, with the engine
having been switched off for at least 30
minutes and on level ground, either using the oil
level indicator in the instrument panel when the
ignition is switched on (for vehicles equipped with
an electric gauge), or using the dipstick.
It is normal to top up the oil level between two
services (or oil changes). It is recommended that
you check the level, and top up if necessary, every
3,000 miles (5,000 km).
In order to maintain the reliability of the
engine and emissions control system,
never use additives in the engine oil.