charging CITROEN DS7 CROSSBACK 2022 User Guide
[x] Cancel search | Manufacturer: CITROEN, Model Year: 2022, Model line: DS7 CROSSBACK, Model: CITROEN DS7 CROSSBACK 2022Pages: 244, PDF Size: 6.87 MB
Page 64 of 244
62
Ease of use and comfort03
The connection of an electrical device not
approved by the Manufacturer, such as a
USB charger, may adversely affect the
operation of vehicle electrical systems,
causing faults such as poor radio reception or
interference with displays in the screens.
2-position boot floor
(Depending on version)
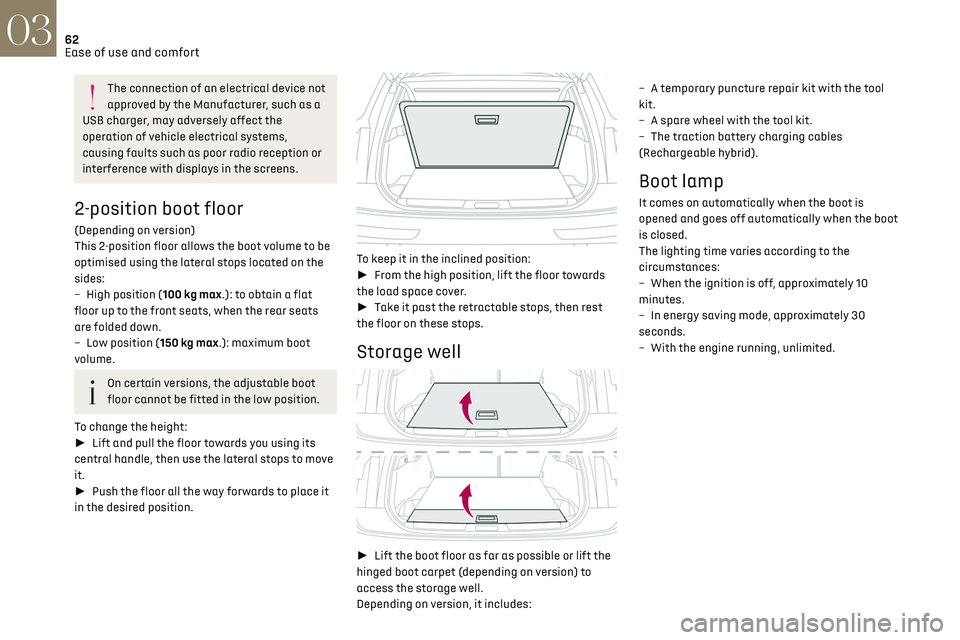
This 2-position floor allows the boot volume to be
optimised using the lateral stops located on the
sides:
–
High po
sition (100 kg max.): to obtain a flat
floor up to the front seats, when the rear seats
are folded down.
–
Lo
w position (150 kg max.): maximum boot
volume.
On certain versions, the adjustable boot
floor cannot be fitted in the low position.
To change the height:
► Lift and pull the floor towards you using its
central handle, then use the lateral stops to move
it.
► Push the floor all the way forwards to place it
in the desired position.
To keep it in the inclined position:
► From the high position, lift the floor towards
the load space cover.
► Take it past the retractable stops, then rest
the floor on these stops.
Storage well
► Lift the boot floor as far as possible or lift the
hinged boot carpet (depending on version) to
access the storage well.
Depending on version, it includes: –
A t
emporary puncture repair kit with the tool
kit.
–
A spare wheel with the t
ool kit.
–
The traction ba
ttery charging cables
(Rechargeable hybrid).
Boot lamp
It comes on automatically when the boot is
opened and goes off automatically when the boot
is closed.
The lighting time varies according to the
circumstances:
–
When the ignition is o
ff, approximately 10
minutes.
–
In energy sa
ving mode, approximately 30
seconds.
–
With the engine running, unlimit
ed.
Page 87 of 244
85
Safety05
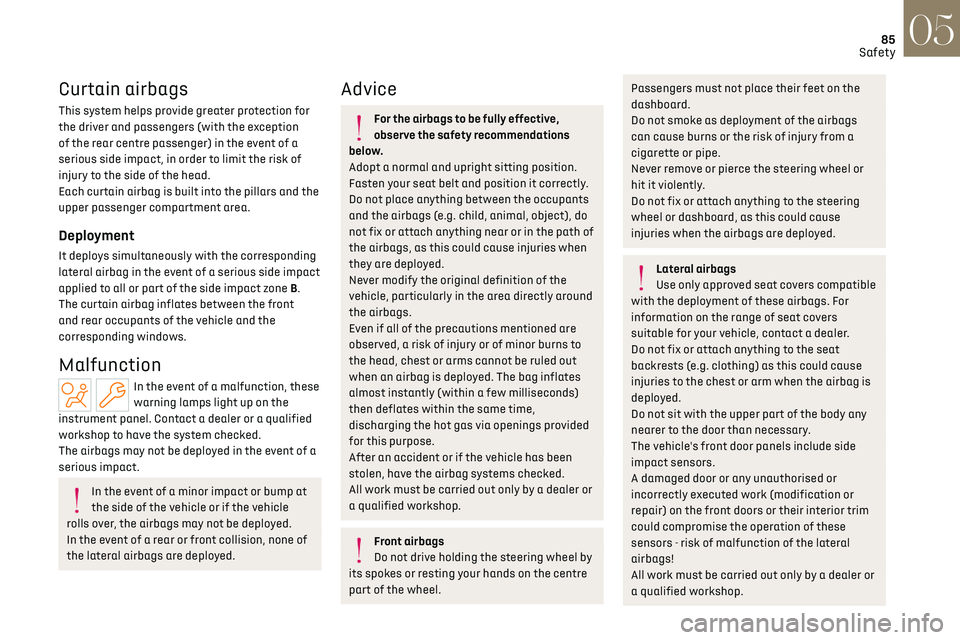
Curtain airbags
This system helps provide greater protection for
the driver and passengers (with the exception
of the rear centre passenger) in the event of a
serious side impact, in order to limit the risk of
injury to the side of the head.
Each curtain airbag is built into the pillars and the
upper passenger compartment area.
Deployment
It deploys simultaneously with the corresponding
lateral airbag in the event of a serious side impact
applied to all or part of the side impact zone B.
The curtain airbag inflates between the front
and rear occupants of the vehicle and the
corresponding windows.
Malfunction
In the event of a malfunction, these
warning lamps light up on the
instrument panel. Contact a dealer or a qualified
workshop to have the system checked.
The airbags may not be deployed in the event of a
serious impact.
In the event of a minor impact or bump at
the side of the vehicle or if the vehicle
rolls over, the airbags may not be deployed.
In the event of a rear or front collision, none of
the lateral airbags are deployed.
Advice
For the airbags to be fully effective,
observe the safety recommendations
below.
Adopt a normal and upright sitting position.
Fasten your seat belt and position it correctly.
Do not place anything between the occupants
and the airbags (e.g. child, animal, object), do
not fix or attach anything near or in the path of
the airbags, as this could cause injuries when
they are deployed.
Never modify the original definition of the
vehicle, particularly in the area directly around
the airbags.
Even if all of the precautions mentioned are
observed, a risk of injury or of minor burns to
the head, chest or arms cannot be ruled out
when an airbag is deployed. The bag inflates
almost instantly (within a few milliseconds)
then deflates within the same time,
discharging the hot gas via openings provided
for this purpose.
After an accident or if the vehicle has been
stolen, have the airbag systems checked.
All work must be carried out only by a dealer or
a qualified workshop.
Front airbags
Do not drive holding the steering wheel by
its spokes or resting your hands on the centre
part of the wheel.
Passengers must not place their feet on the
dashboard.
Do not smoke as deployment of the airbags
can cause burns or the risk of injury from a
cigarette or pipe.
Never remove or pierce the steering wheel or
hit it violently.
Do not fix or attach anything to the steering
wheel or dashboard, as this could cause
injuries when the airbags are deployed.
Lateral airbags
Use only approved seat covers compatible
with the deployment of these airbags. For
information on the range of seat covers
suitable for your vehicle, contact a dealer.
Do not fix or attach anything to the seat
backrests (e.g. clothing) as this could cause
injuries to the chest or arm when the airbag is
deployed.
Do not sit with the upper part of the body any
nearer to the door than necessary.
The vehicle's front door panels include side
impact sensors.
A damaged door or any unauthorised or
incorrectly executed work (modification or
repair) on the front doors or their interior trim
could compromise the operation of these
sensors - risk of malfunction of the lateral
airbags!
All work must be carried out only by a dealer or
a qualified workshop.
Page 107 of 244

105
Driving06
Push selector
A. Button P
To put the gearbox into Park mode.
B. Unlock button To unlock the gearbox and come out of P or to
change to R, with the foot on the brake pedal.
Press and hold this button before pushing the
selector.
C. Gearbox selector indicator lamps (R, N, D/B)
To exit Park mode, wait for the READY
indicator lamp to come on.
Displays in the instrument
panel
When the ignition is switched on, the status of
the gearbox is displayed in the instrument panel:
P: park.
R: reverse.
N: neutral.
D1 to D8: automatic forward gear.
B1 to B8: automatic forward gear with
regenerative braking function activated.
In all-electric driving, the gear engaged is not
indicated.
The state of the gearbox remains displayed in
the instrument panel for a few seconds after
switching off the ignition.
Regenerative braking (Brake
function)
The regenerative braking function emulates
engine braking, slowing the vehicle with no need
to depress the brake pedal. When the driver
releases the accelerator pedal, the vehicle slows
down more quickly.
The energy recovered when the accelerator
pedal is released is used to partially recharge the
traction battery.
This partial recharging has no effect on
the charge level indicator.
The resulting deceleration of the vehicle
does not cause the brake lamps to come
on.
► From mode D/B , move the push selector
backwards to activate/deactivate the function.
D on the instrument panel is replaced with B.
The state of the function is not saved when the
ignition is switched off.
In some situations (e.g. battery full,
extreme temperatures), the amount of
regenerative braking may be temporarily
limited, resulting in less deceleration.
The driver must remain alert to traffic
conditions and must always be ready to use
the brake pedal.
Regenerative braking using the brake
pedal
Energy recovery can also be produced by
depressing the brake pedal in order to partially
recharge the traction battery, without
affecting the charge level indicator.
DS ACTIVE SCAN
SUSPENSION
This system adapts the vehicle suspension
according to the road condition and profile, the
vehicle load, the driving style and the selected
driving mode.
Page 109 of 244
107
Driving06
With Rechargeable hybrid
engines
Whenever the ignition is switched on, Electric
driving mode is selected by default.
Electric
Allows driving using 100% electrical energy.
The maximum speed is approximately 84 mph
(135 km/h).
When starting the vehicle, if the conditions do
not allow the activation or retention of Electric
mode, the message "Electric mode currently
unavailable" is displayed on the instrument panel.
The vehicle automatically changes to Hybrid
mode.
If an LED comes on under the interior rear view
mirror, visible from outside the vehicle, this
confirms that you are driving in Electric mode
(depending on country of sale).
The LED can be deactivated by inserting
the tip of a paper clip or other similar
object into the hole located underneath the
interior rear view mirror.
Conditions of activation
–
Adequa
te battery charge level. Charging
the vehicle after each drive is therefore
recommended. Electric mode is available as long
as there is power left in the battery.
–
O
utside temperature between approximately
-5°C and 45°C.
Manually exiting the mode
► Fully depress the accelerator pedal, or
► Select another mode.
In case of non-use of the vehicle for a long
period (several months), a restart of the
petrol engine may occur even if the battery is
charged.
Depending on equipment, Electric mode is
combined with Normal mode of the DS
ACTIVE SCAN SUSPENSION function.
For more information on DS ACTIVE SCAN
SUSPENSION, refer to the corresponding
section.
In the event of multiple starts of the
internal combustion engine without a
sufficient rise in
temperature, Electric mode may be temporarily
unavailable (natural phenomenon of dilution of
fuel in oil). The message "Electric mode
unavailable: automatic operation in progress"
then appears on the instrument panel.
To regain normal electrical operation, drive
approximately 50 miles (80 km) in "motorway"
conditions or approximately 125 miles (200
km) in urban conditions.
This phenomenon does not cause any
mechanical or electrical damage. It can occur
several times in the life of the vehicle.
Hybrid
To optimise the vehicle's fuel consumption
by managing the alternating or simultaneous
operation of the two types of engine, depending
on driving conditions and driving style.
In Hybrid mode, it is possible to drive in 100%
electric mode if the battery charge level is
sufficient and acceleration requirements are
moderate.
Depending on equipment, Hybrid mode is
combined with Normal mode of the DS
ACTIVE SCAN SUSPENSION function.
For more information on DS ACTIVE SCAN
SUSPENSION, refer to the corresponding
section.
Sport
To obtain more dynamic driving in order to benefit
from the maximum performance of the vehicle.
Electric power is used to supplement the petrol
engine as long as there is energy left in the
battery.
Depending on equipment, Sport mode is
combined with Sport mode of the DS
ACTIVE SCAN SUSPENSION function.
For more information on DS ACTIVE SCAN
SUSPENSION, refer to the corresponding
section.
Page 147 of 244
145
Practical information07
Before travelling abroad, it is advisable to
check with a dealer if the vehicle is suitable
for the distribution equipment of the countries
visited.
Rechargeable hybrid
system
Electrical system
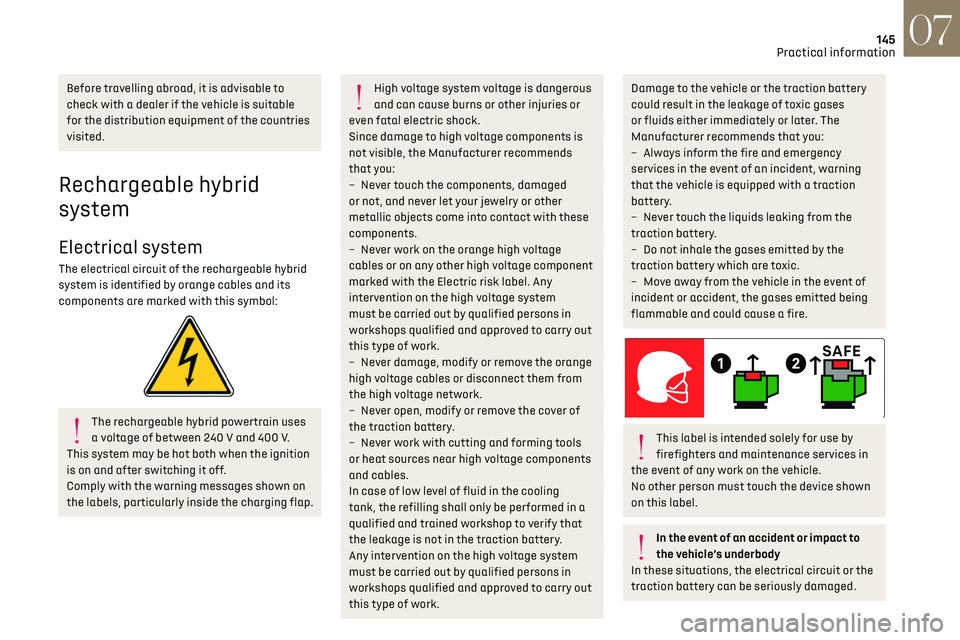
The electrical circuit of the rechargeable hybrid
system is identified by orange cables and its
components are marked with this symbol:
The rechargeable hybrid powertrain uses
a voltage of between 240 V and 400 V.
This system may be hot both when the ignition
is on and after switching it off.
Comply with the warning messages shown on
the labels, particularly inside the charging flap.
High voltage system voltage is dangerous
and can cause burns or other injuries or
even fatal electric shock.
Since damage to high voltage components is
not visible, the Manufacturer recommends
that you:
–
Ne
ver touch the components, damaged
or not, and never let your jewelry or other
metallic objects come into contact with these
components.
–
Ne
ver work on the orange high voltage
cables or on any other high voltage component
marked with the Electric risk label. Any
intervention on the high voltage system
must be carried out by qualified persons in
workshops qualified and approved to carry out
this type of work.
–
Ne
ver damage, modify or remove the orange
high voltage cables or disconnect them from
the high voltage network.
–
Ne
ver open, modify or remove the cover of
the traction battery.
–
Ne
ver work with cutting and forming tools
or heat sources near high voltage components
and cables.
In case of low level of fluid in the cooling
tank, the refilling shall only be performed in a
qualified and trained workshop to verify that
the leakage is not in the traction battery.
Any intervention on the high voltage system
must be carried out by qualified persons in
workshops qualified and approved to carry out
this type of work.Damage to the vehicle or the traction battery
could result in the leakage of toxic gases
or fluids either immediately or later. The
Manufacturer recommends that you:
–
Alw
ays inform the fire and emergency
services in the event of an incident, warning
that the vehicle is equipped with a traction
battery.
–
Ne
ver touch the liquids leaking from the
traction battery.
–
Do no
t inhale the gases emitted by the
traction battery which are toxic.
–
Mo
ve away from the vehicle in the event of
incident or accident, the gases emitted being
flammable and could cause a fire.
This label is intended solely for use by
firefighters and maintenance services in
the event of any work on the vehicle.
No other person must touch the device shown
on this label.
In the event of an accident or impact to
the vehicle’s underbody
In these situations, the electrical circuit or the
traction battery can be seriously damaged.
Page 148 of 244
146
Practical information07
Stop as soon as it is safe to do so and switch
off the ignition.
Contact a dealer or a qualified workshop.
When washing
Before washing the vehicle, always check
that the charging flap is closed correctly.
Never wash the vehicle while the battery is on
charge.
High-pressure washing
To avoid damaging the electrical
components, it is expressly prohibited to
use high-pressure washing in the engine
compartment or under the body.
Do not use a pressure greater than 80 bar
when washing the bodywork.
Never allow water or dust to enter the
connector or charging nozzle - risk of
electrocution or fire!
Never connect / disconnect the charging
nozzle or cable with wet hands - risk of
electrocution!
Traction battery
The Li-ion (Lithium-ion) traction battery stores the
electrical energy needed to propel the vehicle.
It is located under the rear seats.
The traction battery's range varies depending
on the type of driving, the route, the use of
thermal comfort equipment and the ageing of its
components.
The traction battery ageing depends on
several factors, such as climatic
conditions and the distance travelled.
To preserve the mileage of your vehicle
and the durability of your traction battery,
the Manufacturer recommends that you:
–
Do no
t fully charge the battery of your
electric vehicle daily (charge the traction
battery below 80% as often as possible).
–
Do no
t completely discharge the battery.
–
Do no
t store the vehicle for a long period
of non-use (more than 12 hours) when the
traction battery has a low or high charge level.
Prefer a charge level between 20 and 40%.
–
Limit the use o
f fast charging.
–
Do no
t expose the vehicle to temperatures
below -30°C and above +60°C for more than
24 hours.
–
A
void charging the vehicle at negative
temperatures (except if the vehicle ran more
than 20 minutes) or above +30°C.
–
Do no
t use the vehicle's traction battery as a
generator of energy.
–
Do no
t use a generator to recharge your
vehicle's traction battery.
In the event of damage to the traction
battery
It is strictly prohibited to work on the vehicle
yourself.
Do not touch liquids coming from the battery,
and in the event of skin contact with these
products, wash abundantly with water and
contact a doctor as soon as possible.
Contact a dealer or a qualified workshop to
have the system checked.
Disposal of the traction battery
The traction battery is designed for the life
of the vehicle if the recommendations of the
Manufacturer are followed.
If it becomes necessary to replace the battery,
contact the dealer for instructions on its disposal.
Improper disposal carries the risk of severe burns,
electric shock, and damage to the environment.
In accordance with regulations, the Manufacturer
ensures a second life or recycling of this
component in collaboration with qualified
operators.
Charging flap
The charging flap is located on the rear left-hand
side of the vehicle.
Page 149 of 244

147
Practical information07
1. Deferred charging activation button
2. Indicator lamp confirming that the nozzle is
locked into the charging connector.
Fixed red: nozzle correctly positioned and
locked.
Flashing red: nozzle incorrectly positioned or
locking not possible.
3. Charging connector
4. Light guides
Status of light
guides Meaning
Fixed white Welcome lighting when flap is opened
Status of light
guidesMeaning
Fixed blue Deferred charging
Flashing green Charging
Fixed green Charging complete
Fixed red Malfunction
In case of impact, even light, against the
charging flap, do not use it.
Do not dismantle or modify the charging
connector - risk of electrocution and/or fire!
Contact a dealer or a qualified workshop.
Charging cables, sockets and
chargers
The traction battery can be charged using several
different types of cables.
The charging cables supplied with the vehicle
are compatible with the electrical installations of
the country of sale. If you are travelling abroad,
refer to the following tables to check the
compatibility of local electrical installations with
the charging cables.
Contact a dealer or a qualified workshop to obtain
the appropriate charging cable(s).
Identification labels on charging sockets/
connectors
Identification labels are affixed to the vehicle,
charging cable and charger to inform the user
about which device needs to be used.
Page 150 of 244

148
Practical information07
The meaning of each identification label is as
follows:
Identification labelLocationConfigurationPower type/Voltage range
C
Charging connector (vehicle side) TYPE 2AC
< 480 Vrms
C
Charging socket (charger side) TYPE 2AC
< 480 Vrms
Types of charging
Cable type CompatibilitySpecifications
Mode 2 charging cable with integrated control unit
Identification label C on the charging connector (vehicle side). Conventional electrical socket (depending on
country).
Charge limited to a maximum of 10 A.
"Green'Up" type socket.
Charge limited to a maximum of 16 A.
Page 151 of 244

149
Practical information07
Cable type CompatibilitySpecifications
Mode 3 charging cable
Identification labels C on the charging connector (vehicle side) and on the socket (charger side). Accelerated charging unit socket.
Charge limited to a maximum of 32 A.
Wallbox accelerated charging unit.
The estimated charging time is indicated
on the instrument panel when the vehicle
is connected. It may vary depending on various
factors such as the outside temperature or the
quality of the electricity supply.
If the outside temperature is below -10°C, it is
recommended to connect the vehicle as soon
as possible as the charging time may increase
significantly. The traction battery may not
charge fully.Domestic charging cable (mode 2)
It is essential to avoid damaging the cable
and to keep it intact.
In the event of damage, do not use it and
contact a dealer or a qualified workshop to
replace it.
Accelerated charging unit (mode 3)
Do not dismantle or modify the
accelerated charging unit - risk of
electrocution and/or fire!
To find out how it is used, please refer to the
accelerated charging unit's user instructions.
Control unit (mode 2)
Type 1
Page 152 of 244

150
Practical information07
Type 2POWER
Green: electrical connection established;
charging can begin.
CHARGE
Flashing green: charging in progress or
temperature pre-conditioning activated.
Fixed green: charging complete.
FA U LT
Red: fault; charging not permitted or must
be stopped immediately. Check that everything
is connected correctly and that the electrical
system is not faulty.
If the indicator lamp does not go off, contact a
dealer or a qualified workshop.
Upon plugging the charging cable into a domestic
socket, all of the indicator lamps come on briefly.
If no indicator lamps come on, check the domestic
socket's circuit-breaker. –
If the circ
uit-breaker has tripped, contact a
professional to check that your electricity supply
is compatible and carry out any necessary repairs.
–
If the circ
uit-breaker has not tripped, stop
using the charging cable and contact a dealer or a
qualified workshop.
Type 1 control unit label - Recommendations
1. Refer to the handbook before use.
2. Incorrect use of this charging cable may
result in fire, property damage and serious
injury or death by electrocution!
3. Always use a correctly earthed power socket,
protected by a 30 mA residual current device.
4. Always use an electrical socket protected
by a circuit-breaker appropriate for the
electrical circuit’s current rating.
5. The weight of the control unit must not be
borne by the electrical socket, plug and
cables.
6. Never use this charging cable if it is defective
or in any way damaged. 7.
Never attempt to repair or open this charging
cable. It contains no repairable parts -
replace the charging cable if it is damaged.
8. Never immerse this charging cable in water.
9. Never use this charging cable with an
extension cable, a multi-plug socket,
a conversion adaptor or on a damaged
electrical socket.
10. Do not unplug the plug from the wall as a
means of stopping charging.
11. Do not force the connector if it is locked into
the vehicle.
12. Immediately stop charging, by locking and
then unlocking the vehicle using the remote
control key, if the charging cable or wall
socket feel burning hot to the touch.
13. This charging cable includes components
liable to cause electrical arcing or sparks. Do
not expose to flammable vapours.
14. Only use this charging cable with DS
AUTOMOBILES vehicles.
15. Never plug the cable into the wall socket (or
unplug it) with wet hands.
Type 2 control unit label - State of indicator
lamps
State of the indicator
lamp
Off