parking sensors CITROEN DS7 CROSSBACK 2022 Owners Manual
[x] Cancel search | Manufacturer: CITROEN, Model Year: 2022, Model line: DS7 CROSSBACK, Model: CITROEN DS7 CROSSBACK 2022Pages: 244, PDF Size: 6.87 MB
Page 5 of 244
3
Contents
137 Parking sensors
138 Reversing camera
140 360 Vision
07 Practical information
143 Compatibility of fuels
143 Refuelling
144 Misfuel prevention (Diesel)
145 Rechargeable hybrid system
153 Charging the traction battery
(Rechargeable hybrid)
155
Towing device
156 Towing device with retractable ball joint
157 Roof bars
158 Very cold climate screens
158 Snow chains
159 Energy economy mode
159 Bonnet
160 Engine compartment
161 Checking levels
163 Checks
165 AdBlue® (BlueHDi)
166 Free-wheeling
167 Advice on care and maintenance
08 In the event of a breakdown
170 Warning triangle
170 Running out of fuel (Diesel)
170 Tool kit
172 Temporary puncture repair kit
175 Spare wheel
178 Changing a bulb
180 Fuses
181 12 V battery/Accessory batteries
186 Towing the vehicle
09 Technical data
189 Engine technical data and towed loads
190 Petrol engines
191 Diesel engines
192 Rechargeable hybrid engines
193 Dimensions
193 Identification markings
10 DS IRIS SYSTEM - 12" touch screen Infotainment
system
194
First steps
197 Customisation
198 Steering mounted controls
198 Applications
199 Voice commands
200 Navigation
201 Connectivity
203 Mirror Screen
204 Media
206 Phone
207 Settings
208 Help
11 Vehicle data recording and privacy
Alphabetical index
Appendix
Page 16 of 244
14
Dashboard instruments01
Engine self-diagnostic systemFlashing.
The engine management system has a
fault.
There is a risk that the catalytic converter will be
destroyed.
You must carry out (2).
Fixed.
The emissions control system has a fault.
The warning lamp should go off when the engine
is started.
Carry out (3) without delay.
Dynamic stability control (DSC)/Anti-slip
regulation (ASR)
Fixed.
The system is deactivated.
The DSC/ASR system is reactivated automatically
when the vehicle is started, and at speeds above
approximately 31 mph (50 km/h).
At speeds below 31 mph (50 km/h), it can be
reactivated manually.
Flashing.
DSC/ASR system regulation is activated in
the event of a loss of grip or trajectory.
Fixed.
The DSC/ASR system has a fault.
Carry out (3).
Emergency brake malfunction (with electric
parking brake)
Fixed, accompanied by the
message "Parking brake fault".
Emergency braking does not deliver optimal
performance.
If automatic release is not available, use manual
release or carry out (3).
Hill start assistFixed, accompanied by the
message "Anti roll-back system
fault".
The system has a fault.
Carry out (3).
Under-inflationFixed.
The pressure in one or more tyres is too
low.
Check the pressure of the tyres as soon as
possible.
Reinitialise the detection system after adjusting
the pressure.
Under-inflation warning lamp
flashing then fixed and Service
warning lamp fixed.
The tyre pressure monitoring system is faulty.
Under-inflation detection is no longer monitored.
Check the tyre pressures as soon as possible and
carry out (3).
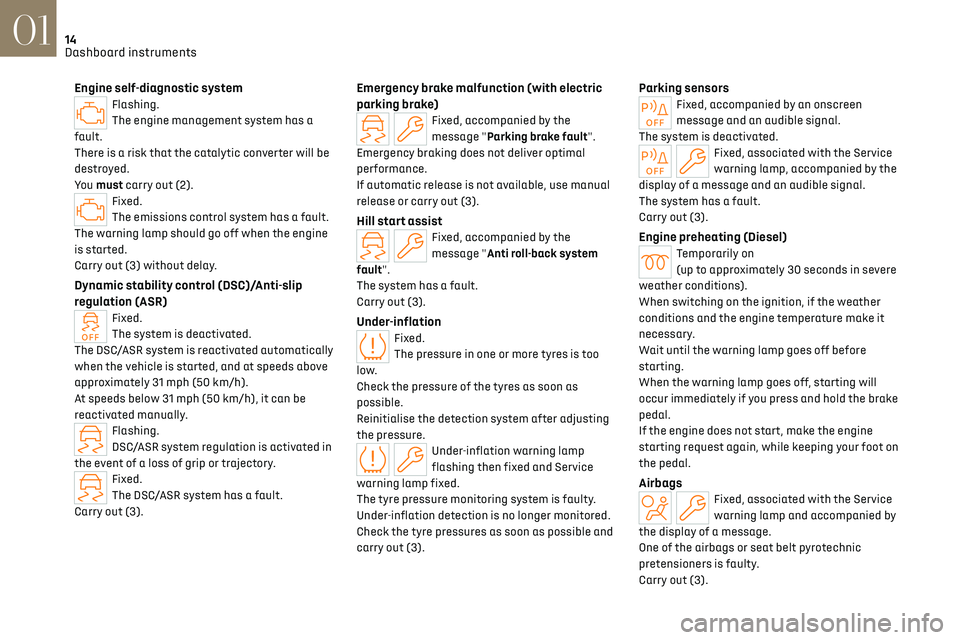
Parking sensorsFixed, accompanied by an onscreen
message and an audible signal.
The system is deactivated.
Fixed, associated with the Service
warning lamp, accompanied by the
display of a message and an audible signal.
The system has a fault.
Carry out (3).
Engine preheating (Diesel)Temporarily on
(up to approximately 30 seconds in severe
weather conditions).
When switching on the ignition, if the weather
conditions and the engine temperature make it
necessary.
Wait until the warning lamp goes off before
starting.
When the warning lamp goes off, starting will
occur immediately if you press and hold the brake
pedal.
If the engine does not start, make the engine
starting request again, while keeping your foot on
the pedal.
AirbagsFixed, associated with the Service
warning lamp and accompanied by
the display of a message.
One of the airbags or seat belt pyrotechnic
pretensioners is faulty.
Carry out (3).
Page 99 of 244
97Driving06
► Do not stop and do not switch off the engine.
On leaving the flooded road, as soon as safety
conditions allow, make several light brake
applications to dry the brake discs and pads.
If in doubt about the state of your vehicle, contact
a dealer or a qualified workshop.
Towing
Driving with a trailer places greater
demands on the towing vehicle and
particular care must be taken.
Do not exceed the maximum towable
weights.
At altitude: reduce the maximum load by 10%
per 1,000 metres of altitude; the lower air
density at high altitudes decreases engine
performance.
New vehicle: do not tow a trailer until the
vehicle has driven at least 620 miles
(1,000 kilometres).
If the outside temperature is high, let the
engine idle for 1 to 2 minutes after the
vehicle comes to a stop, to help it to cool.
Before setting off
Nose weight
► Distribute the load in the trailer so that the
heaviest items are as close as possible to the axle
and the nose weight (at the point where it joins
your vehicle) approaches the maximum permitted
without exceeding it.
Tyres
► Check the tyre pressures of the towing vehicle
and of the trailer, observing the recommended
pressures.
Lighting
► Check the electrical signalling on the trailer
and the headlamp beam height of your vehicle.
If a genuine towing device is used, the
rear parking sensors will be deactivated
automatically to avoid the audible signal.
When driving
Cooling
Towing a trailer uphill causes the coolant
temperature to increase. The maximum towable
load depends on the gradient and the exterior
temperature. The fan’s cooling capacity does not
increase with engine speed.
► Reduce speed and lower the engine speed to
limit the amount of heating produced.
► Pay constant attention to the coolant
temperature.
If this warning lamp and the STOP
warning lamp come on, stop the
vehicle and switch off the engine as soon as
possible.
Brakes
Using the engine brake is recommended to limit
the overheating of the brakes. Braking distances
are increased when towing a trailer.
Side wind
Bear in mind that the vehicle will be more
susceptible to wind when towing.
Anti-theft protection
Electronic immobiliser
The keys contain a code, which must be
recognised by the vehicle before starting is
possible.
If the system malfunctions, indicated by the
display of a message, the engine will not start.
Contact a dealer.
Starting/switching off the
engine
The electronic key must be present in the
passenger compartment.
If the electronic key is not detected, a message
is displayed.
Page 112 of 244
110
Driving06
– The outside temperature must be between 0°C
and 35°C.
Putting the engine into standby (STOP
mode)
The engine automatically enters standby mode
as soon as the driver indicates their intention to
stop:
–
With an automatic gearbo
x, at speeds below
12 mph (20 km/h) on BlueHDi versions, or below
2 mph (3 km/h) on PureTech 130, 180 and 225
versions, when you depress the brake pedal or
place the gear selector in mode N.
Time counter
A time counter adds up the time spent in standby
during the journey. It is reset to zero every time
the ignition is switched on.
Special cases:
The engine will not go into standby if the
conditions for operation are not met and in the
following cases:
–
St
eep slope (ascending or descending).
–
Needed t
o maintain a comfortable temperature
in the passenger compartment.
–
Demisting activ
e.
In these cases, this indicator lamp flashes
for a few seconds, then goes off.
After the engine has restarted, STOP
mode is not available until the vehicle has
reached a speed of 5 mph (8 km/h).
During parking manoeuvres, STOP mode is
not available for a few seconds after
coming out of reverse gear or turning the
steering wheel.
Restarting the engine (START mode)
The engine automatically restarts as soon as the
driver indicates the intention of moving off again:
–
With the select
or in mode D or M: with the
brake pedal released.
–
With the select
or in mode N and the brake
pedal released: with the selector at D or M.
–
With the select
or in mode P and the brake pedal
depressed: with the selector at R, N, D or M.
–
With re
verse gear engaged.
Special cases
The engine will restart automatically if the
conditions for operation are met again and in the
following cases:
–
V
ehicle speed exceeds 2.5 mph (4 km/h) with
PureTech 130, 180 and 225 versions, or 16 mph
(25 km/h) with BlueHDi versions.
In these cases, this indicator lamp flashes
for a few seconds, then goes off.
Malfunctions
In the event of a fault with the system, this
warning lamp flashes for a few moments
on the instrument panel, then remains on,
accompanied by the display of a message.
Have it checked by a dealer or a qualified
workshop.
The vehicle stalls in STOP mode
All of the instrument panel warning lamps come
on if there is a fault.
► Switch off the ignition then start the engine
again with the "START/STOP" button.
12 V battery
The Stop & Start system requires a
12 V battery of specific technology and
specification.
All work must be carried out only by a dealer or
a qualified workshop.
Tyre under-inflation
detection
This system alerts the driver if one or more tyres
suffer a drop in pressure.
The alert is raised when the vehicle is moving, not
when stationary.
It compares the information given by the wheel
speed sensors with reference values, which must
be reinitialised every time the tyre pressures are
adjusted or a wheel changed.
It takes into account the last values stored
during the reinitialisation request. It is therefore
essential that the tyre pressure is correct during
the operation. This operation is the driver’s
responsibility.
Page 139 of 244

137
Driving06
or other objects; they may hamper correct
operation of the system.
Parking sensors
For more information, refer to the General
recommendations on the use of driving
and manoeuvring aids.
This system detects and signals the proximity of
obstacles (e.g. pedestrian, vehicle, tree, barrier)
using sensors located in the bumper.
Rear parking sensors
► Engage reverse gear to start the system
(confirmed by an audible signal).
The system is switched off when reverse gear is
disengaged.
Audible assistance
The system signals the presence of obstacles
which are both within the sensors’ detection zone
and in the vehicle path defined by the direction of
the steering wheel.
Depending on version, in the example shown, only
the obstacles present in the shaded area will be
signalled by the audible assistance.
The proximity information is given by an
intermittent audible signal, the frequency of
which increases as the vehicle approaches the
obstacle.
When the distance between the vehicle and
the obstacle becomes less than about thirty
centimetres, the audible signal becomes
continuous.
The sound emitted by the speaker (right or
left) indicates the side on which the obstacle is
located.
Adjusting the audible signalPressing this button opens the
window for adjusting the volume of
the audible signal.
Visual assistance
This supplements the audible signal, without
taking account of the vehicle's trajectory, by
displaying bars on the screen whose location
represents the distance between the obstacle
and the vehicle (white: more distant, orange:
close, red: very close).
When the obstacle is very close, the "Danger"
symbol is displayed on the screen.
Front parking sensors
Supplementing the rear parking sensors, the front
parking sensors are triggered when an obstacle
is detected in front and the speed of the vehicle is
below 6 mph (10 km/h).
Front parking sensor operation is suspended if
the vehicle stops for more than three seconds in
forward gear, if an obstacle is no longer detected
or the vehicle speed exceeds 6 mph (10 km/h).
Page 140 of 244

138
Driving06
The sound emitted by the speaker (front
or rear) locates the obstacle relative to
the vehicle, whether in front of or behind it on
its path.
Side parking sensors
Using four additional sensors located on the sides
of the bumpers, the system records the position
of obstacles during the manoeuvre and indicates
them when they are located alongside the vehicle.
Only fixed obstacles are indicated
correctly. Moving obstacles detected at
the beginning of the manoeuvre may be
indicated mistakenly, while moving obstacles
that appear alongside the vehicle but were not
previously recorded will not be indicated.
Objects memorised during the manoeuvre
will no longer be stored after switching off
the ignition.
Deactivation/Activation
(Depending on country of sale)
It is configured in the ADAS touch screen
application.
If the function is deactivated, this
indicator lamp lights up on the instrument
panel.
The system status is saved when the ignition is
switched off.
The rear parking sensors are deactivated
automatically if a trailer or bicycle carrier
is connected to a towing device installed in
accordance with the Manufacturer's
recommendations.
In this case, the outline of a trailer is displayed
at the rear of the image of the vehicle.
When starting the vehicle, the graphic
and audible aids are only available after
the touch screen has started up.
Operating limits
If the boot is heavily loaded, the vehicle may tilt,
affecting distance measurements.
Malfunction
In the event of a malfunction when
changing into reverse gear, these
warning lamps light up on the instrument panel,
accompanied by the display of a message and an
audible signal (short beep).
Have it checked by a dealer or a qualified
workshop.
Reversing camera
For more information, refer to the General
recommendations on the use of driving
and manoeuvring aids.
When reverse gear is engaged, with the engine
running, this system displays views of the
vehicle's close surroundings on the touch screen
using a camera located at the rear of the vehicle.
The screen is divided into 3 parts with a side
menu, a contextual view and a view from above
the vehicle in its close surroundings.
Page 141 of 244
139
Driving06
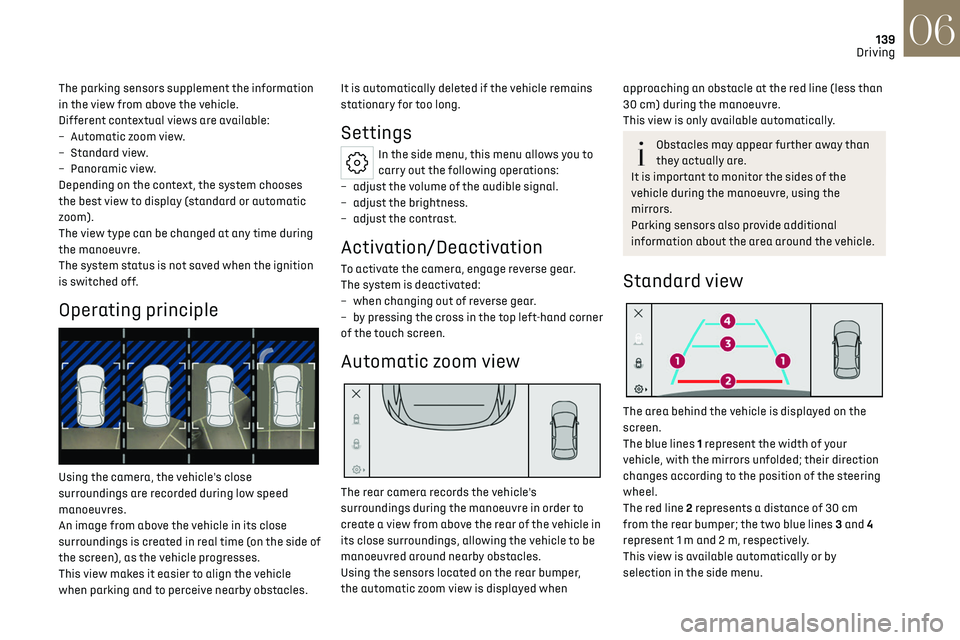
The parking sensors supplement the information
in the view from above the vehicle.
Different contextual views are available:
–
Aut
omatic zoom view.
–
St
andard view.
–
Panoramic vie
w.
Depending on the context, the system chooses
the best view to display (standard or automatic
zoom).
The view type can be changed at any time during
the manoeuvre.
The system status is not saved when the ignition
is switched off.
Operating principle
Using the camera, the vehicle's close
surroundings are recorded during low speed
manoeuvres.
An image from above the vehicle in its close
surroundings is created in real time (on the side of
the screen), as the vehicle progresses.
This view makes it easier to align the vehicle
when parking and to perceive nearby obstacles. It is automatically deleted if the vehicle remains
stationary for too long.
Settings
In the side menu, this menu allows you to
carry out the following operations:
–
adjust the v
olume of the audible signal.
–
adjust the brigh
tness.
–
adjust the c
ontrast.
Activation/Deactivation
To activate the camera, engage reverse gear.
The system is deactivated:
–
when changing out o
f reverse gear.
–
b
y pressing the cross in the top left-hand corner
of the touch screen.
Automatic zoom view
The rear camera records the vehicle's
surroundings during the manoeuvre in order to
create a view from above the rear of the vehicle in
its close surroundings, allowing the vehicle to be
manoeuvred around nearby obstacles.
Using the sensors located on the rear bumper,
the automatic zoom view is displayed when
approaching an obstacle at the red line (less than
30 cm) during the manoeuvre.
This view is only available automatically.
Obstacles may appear further away than
they actually are.
It is important to monitor the sides of the
vehicle during the manoeuvre, using the
mirrors.
Parking sensors also provide additional
information about the area around the vehicle.
Standard view
The area behind the vehicle is displayed on the
screen.
The blue lines 1 represent the width of your
vehicle, with the mirrors unfolded; their direction
changes according to the position of the steering
wheel.
The red line 2 represents a distance of 30 cm
from the rear bumper; the two blue lines 3 and 4
represent 1 m and 2 m, respectively.
This view is available automatically or by
selection in the side menu.
Page 142 of 244

140
Driving06
Panoramic view
The panoramic view allows you to leave, in
reverse, a parking space by anticipating the
arrival of vehicles, pedestrians or cyclists.
This view is not recommended for carrying out a
complete manoeuvre.
This view is only available by selection in the side
menu.
360 Vision
For more information, refer to the General
recommendations on the use of driving
and manoeuvring aids.
This system allows you to view your vehicle's
close surroundings on the touch screen using
cameras, located at the front and rear of the
vehicle.
The screen is divided into 4 parts with two side
menus, a contextual view and a view from above
the vehicle in its close surroundings.
The parking sensors supplement the information
in the view from above the vehicle.
Depending on the view angle chosen in the left-
hand side menu, the system provides specific
visual assistance in particular driving conditions,
such as entering a blind intersection or
manoeuvring in areas with reduced visibility.
Different contextual views are available for the
rear or for the front:
–
Aut
omatic zoom view.
–
St
andard view.
–
Panoramic vie
w.
Depending on the context, the system chooses
the best view to display (standard or automatic
zoom).
The view type can be changed at any time during
the manoeuvre.
The system status is not saved when the ignition
is switched off.
Operating principle
Reconstructed view
The cameras are activated and a reconstruction
of a view from above your vehicle in its close
surroundings is displayed on the touch screen.
Live view
The front and rear views automatically appear in
the view from above the vehicle.
It is also possible to display any live view by
selecting the corresponding zone.
The front view can be selected in forward gear up
to 10 mph (16 km/h).
Installing the very cold climate screen can
alter the image transmitted by the front
camera.
Settings
In the side menu, this menu allows you to
carry out the following operations:
–
adjust the v
olume of the audible signal.
–
adjust the brigh
tness.
–
adjust the c
ontrast.
Page 143 of 244

141
Driving06
Activation/Deactivation
Automatic
With the rear camera, engine running and vehicle
stationary, rear vision is displayed automatically
if reverse gear is engaged.
With the front camera, engine running and speed
below 10 mph (16 km/h), rear vision is displayed
automatically if a gear is engaged.
Manual
► In the ADAS touch screen application,
select Functions>Panoramic Camera
The system is deactivated:
–
aut
omatically for the rear, when changing out
of reverse gear.
–
aut
omatically for the front, above
approximately 10 mph (16 km/h).
–
b
y pressing the cross in the top left-hand corner
of the touch screen.
Automatic zoom view
The front or rear camera records the surroundings
during the manoeuvre to create a front or
rear view from above the vehicle in its close
surroundings, making it possible to manoeuvre
the vehicle around the surrounding obstacles.
Using the sensors located on the front or
rear bumper, the automatic zoom view is
displayed when approaching an obstacle at the
red line (less than 30 cm) during the manoeuvre.
This view is only available automatically.
Depending on version, it can be activated/
deactivated in the ADAS application of the touch
screen.
Obstacles may appear further away than
they actually are.
It is important to monitor the sides of the
vehicle during the manoeuvre, using the
mirrors.
Parking sensors also provide additional
information about the area around the vehicle.
Standard view
Depending on the context, the area behind or in
front of your vehicle is displayed on the screen.
The blue lines (at the rear)/orange lines (at the
front) 1 represent the width of your vehicle, with
the mirrors unfolded; their direction changes
according to the position of the steering wheel.
The red line 2 represents a distance of 30 cm from
the rear or front bumper; the two blue lines (at the rear)/orange lines (at the front) 3 and 4 represent
1 m and 2 m respectively.
This view is available automatically or by
selection in the left-hand side menu.
Panoramic view
The rear or front panoramic view allows you to
leave a parking space by anticipating the arrival
of vehicles, pedestrians or cyclists.
This view is not recommended for carrying out a
complete manoeuvre.
This view is only available by selection in the left-
hand side menu.
Page 169 of 244

167
Practical information07
Never leave the vehicle unattended with
the vehicle into free-wheeling mode.
/
Release procedure
► With the vehicle stationary and the engine
running, select mode N and switch off the engine.
Within 5 seconds:
► Switch on the ignition.
► While depressing the brake pedal, move the
push selector forwards or backwards to confirm
mode N.
► While depressing the brake pedal, press the
control to release the parking brake.
► Release the brake pedal, switch off the
ignition.
If the 5-second time limit is exceeded, the
gearbox engages mode P; it is then
necessary to restart the procedure.
Reverting to normal operation
► While depressing the brake pedal, restart the
engine and select mode P.
Keyless Entry and Start
You must not depress the brake pedal
while switching the ignition on again, then
switching it off. If you do, the engine will start,
requiring you to restart the procedure.
Advice on care and
maintenance
General recommendations
Observe the following recommendations to avoid
damaging the vehicle.
Exterior
Never use a high-pressure jet wash in the
engine compartment - risk of damaging
the electrical components!
Do not wash the vehicle in bright sunshine or
extremely cold conditions.
When washing the vehicle in an automatic
roller-brush car wash, be sure to lock the
doors and, depending on version, move the
electronic key away and deactivate the
"hands-free" function (Hands-Free Tailgate
Access).
When using a pressure washer, keep the jet
nozzle at a minimum distance of 30 cm from
the vehicle (particularly when cleaning areas
containing chipped paint, sensors or seals).
Promptly clean up any stains containing
chemicals liable to damage the vehicle's
paintwork (including tree resin, bird droppings,
insect secretions, pollen and tar).
Depending on the environment, clean the
vehicle frequently to remove salty deposits
(in coastal areas), soot (in industrial areas)
and mud/salts (in wet or cold areas). These
substances can be highly corrosive.
Contact a dealer or a qualified workshop for
advice on removing stubborn stains requiring
special products (such as tar or insect
removers).
Preferably, have paint touch-ups performed by
a dealer or a qualified workshop.
Interior
When washing the vehicle, never use a
water hose or high-pressure jet to clean
the interior.
Liquids carried in cups or other open
containers can spill, presenting a risk of
damage to the instruments and controls and
the controls located on the centre console. Be
vigilant!
To clean instrument panels, touch screens
or other displays, wipe gently with a soft,
dry cloth. Do not use products (e.g. alcohol,
disinfectant) or soapy water directly on these
surfaces - risk of damage!