engine CITROEN DS7 CROSSBACK 2023 Owner's Manual
[x] Cancel search | Manufacturer: CITROEN, Model Year: 2023, Model line: DS7 CROSSBACK, Model: CITROEN DS7 CROSSBACK 2023Pages: 244, PDF Size: 6.87 MB
Page 47 of 244
45
Ease of use and comfort03
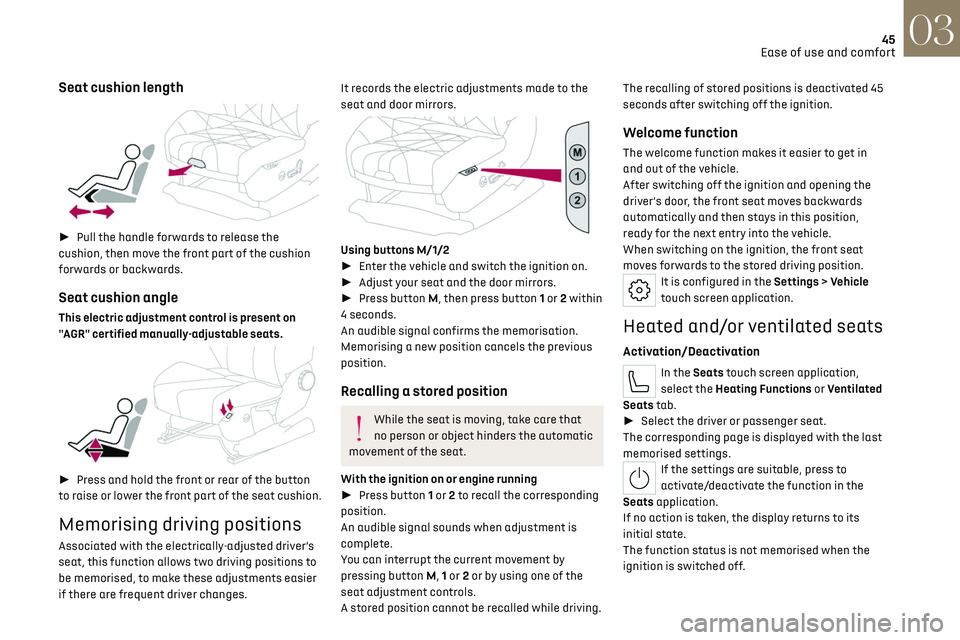
Seat cushion length
► Pull the handle forwards to release the
cushion, then move the front part of the cushion
forwards or backwards.
Seat cushion angle
This electric adjustment control is present on
"AGR" certified manually-adjustable seats.
► Press and hold the front or rear of the button
to raise or lower the front part of the seat cushion.
Memorising driving positions
Associated with the electrically-adjusted driver’s
seat, this function allows two driving positions to
be memorised, to make these adjustments easier
if there are frequent driver changes.
It records the electric adjustments made to the
seat and door mirrors.
Using buttons M/1/2
► Enter the vehicle and switch the ignition on.
► Adjust your seat and the door mirrors.
► Press button M, then press button 1 or 2 within
4 seconds.
An audible signal confirms the memorisation.
Memorising a new position cancels the previous
position.
Recalling a stored position
While the seat is moving, take care that
no person or object hinders the automatic
movement of the seat.
With the ignition on or engine running
► Press button 1 or 2 to recall the corresponding
position.
An audible signal sounds when adjustment is
complete.
You can interrupt the current movement by
pressing button M, 1 or 2 or by using one of the
seat adjustment controls.
A stored position cannot be recalled while driving. The recalling of stored positions is deactivated 45
seconds after switching off the ignition.
Welcome function
The welcome function makes it easier to get in
and out of the vehicle.
After switching off the ignition and opening the
driver’s door, the front seat moves backwards
automatically and then stays in this position,
ready for the next entry into the vehicle.
When switching on the ignition, the front seat
moves forwards to the stored driving position.
It is configured in the Settings > Vehicle
touch screen application.
Heated and/or ventilated seats
Activation/Deactivation
In the Seats touch screen application,
select the Heating Functions or Ventilated
Seats tab.
► Select the driver or passenger seat.
The corresponding page is displayed with the last
memorised settings.
If the settings are suitable, press to
activate/deactivate the function in the
Seats application.
If no action is taken, the display returns to its
initial state.
The function status is not memorised when the
ignition is switched off.
Page 48 of 244
46
Ease of use and comfort03
Changing settings
► In the Heating Functions or Ventilated Seats
page, select the relevant seat.
► Select an intensity from the three preset
levels: "1" (Low), "2" (Normal) or "3" (High).
The settings are memorised when the ignition is
switched off.
Do not use the function when the seat is
not occupied.
Reduce the heating intensity as soon as
possible.
When the seat and passenger compartment
have reached a satisfactory temperature,
switch the function off; reducing electrical
consumption in turn decreases energy
consumption.
Prolonged use of heated seats is not
recommended for people with sensitive
skin.
There is a risk of burns for people whose
perception of heat is impaired (e.g. illness,
taking medication).
To keep the heated pad intact and to prevent a
short circuit:
–
Do no
t place heavy or sharp objects on the
seat.
–
Do no
t kneel or stand on the seat.
–
Do no
t spill liquids onto the seat.
–
Ne
ver use the heating function if the seat
is damp.
Multipoint massage
System with a choice of type of massage and
adjustment of its intensity.
This system operates with the engine running, as
well as in STOP mode of the Stop & Start.
Activation/Deactivation
In the Seats touch screen application,
select the Massage tab.
► Select the driver or passenger seat.
The corresponding page is displayed with the last
memorised settings.
If the settings are suitable, press to
activate/deactivate the function in the
Seats application.
If no action is taken, the display returns to its
initial state.
The function status is not memorised when the
ignition is switched off.
Changing settings
► In the Massage page, select the seat
concerned.
► Select a massage intensity from the three
preset levels: "1" (Low), "2" (Normal) or "3"
(High).
► Select another type of massage from those
offered.
The modifications are taken into account
immediately and memorised when the ignition is
switched off.
Once activated, the system starts a one hour
massage cycle, made up of sequences of 6
minutes of massage followed by 3 minutes at
rest.
The system stops automatically at the end of the
cycle.
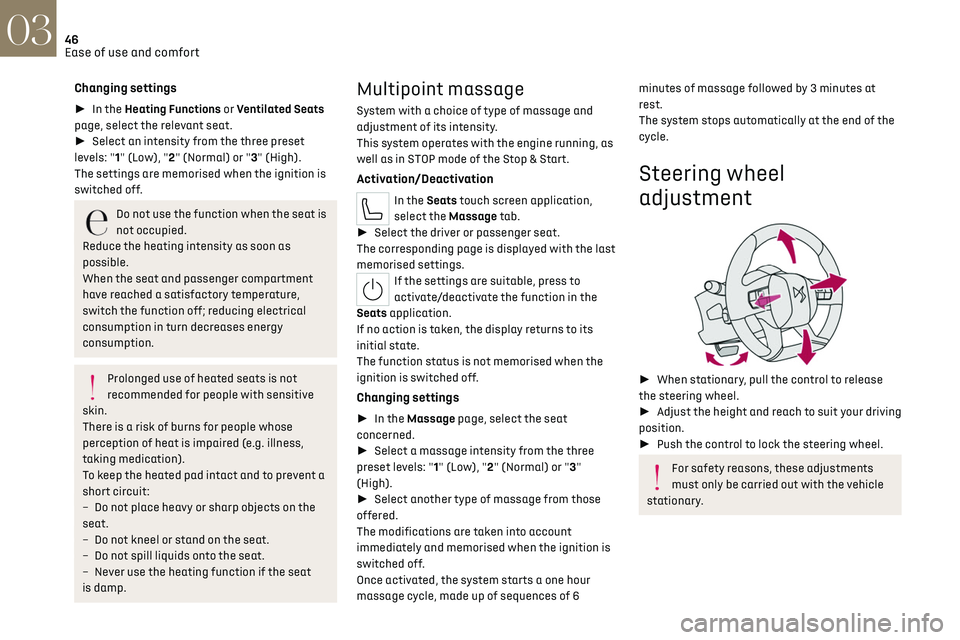
Steering wheel
adjustment
► When stationary, pull the control to release
the steering wheel.
► Adjust the height and reach to suit your driving
position.
► Push the control to lock the steering wheel.
For safety reasons, these adjustments
must only be carried out with the vehicle
stationary.
Page 49 of 244
47
Ease of use and comfort03
Mirrors
Door mirrors
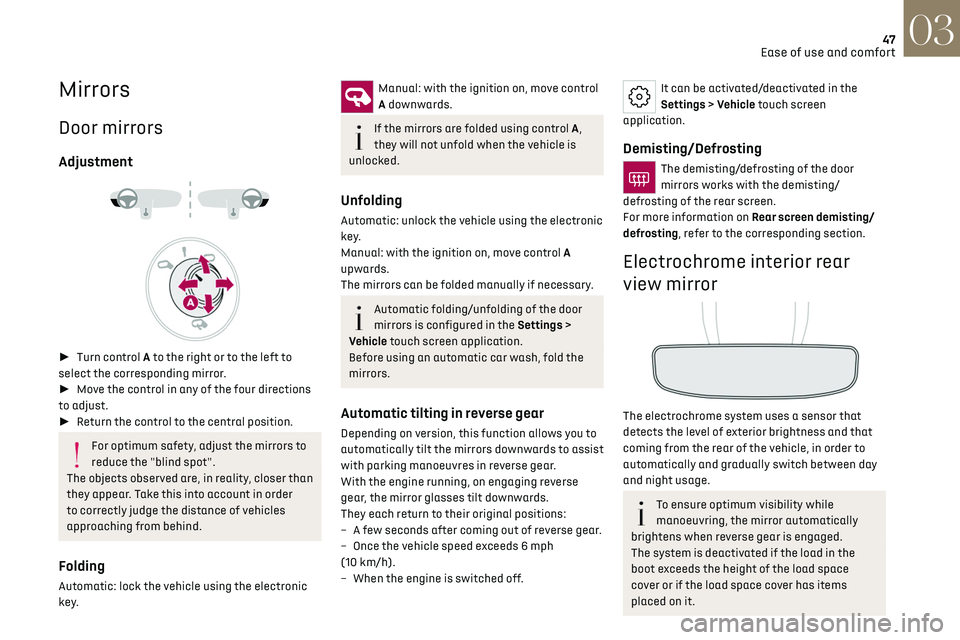
Adjustment
► Turn control A to the right or to the left to
select the corresponding mirror.
► Move the control in any of the four directions
to adjust.
► Return the control to the central position.
For optimum safety, adjust the mirrors to
reduce the "blind spot".
The objects observed are, in reality, closer than
they appear. Take this into account in order
to correctly judge the distance of vehicles
approaching from behind.
Folding
Automatic: lock the vehicle using the electronic
key.
Manual: with the ignition on, move control
A downwards.
If the mirrors are folded using control A,
they will not unfold when the vehicle is
unlocked.
Unfolding
Automatic: unlock the vehicle using the electronic
key.
Manual: with the ignition on, move control A
upwards.
The mirrors can be folded manually if necessary.
Automatic folding/unfolding of the door
mirrors is configured in the Settings >
Vehicle touch screen application.
Before using an automatic car wash, fold the
mirrors.
Automatic tilting in reverse gear
Depending on version, this function allows you to
automatically tilt the mirrors downwards to assist
with parking manoeuvres in reverse gear.
With the engine running, on engaging reverse
gear, the mirror glasses tilt downwards.
They each return to their original positions:
–
A fe
w seconds after coming out of reverse gear.
–
O
nce the vehicle speed exceeds 6 mph
(10 km/h).
–
When the engine is s
witched off.
It can be activated/deactivated in the
Settings > Vehicle touch screen
application.
Demisting/Defrosting
The demisting/defrosting of the door
mirrors works with the demisting/
defrosting of the rear screen.
For more information on Rear screen demisting/
defrosting, refer to the corresponding section.
Electrochrome interior rear
view mirror
The electrochrome system uses a sensor that
detects the level of exterior brightness and that
coming from the rear of the vehicle, in order to
automatically and gradually switch between day
and night usage.
To ensure optimum visibility while
manoeuvring, the mirror automatically
brightens when reverse gear is engaged.
The system is deactivated if the load in the
boot exceeds the height of the load space
cover or if the load space cover has items
placed on it.
Page 52 of 244
50
Ease of use and comfort03
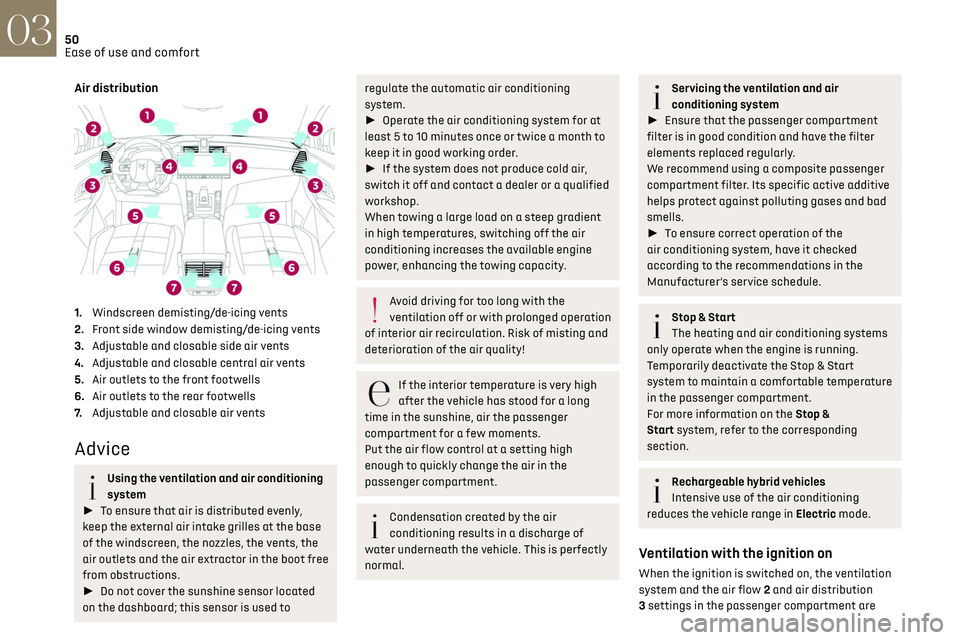
Air distribution
1.Windscreen demisting/de-icing vents
2. Front side window demisting/de-icing vents
3. Adjustable and closable side air vents
4. Adjustable and closable central air vents
5. Air outlets to the front footwells
6. Air outlets to the rear footwells
7. Adjustable and closable air vents
Advice
Using the ventilation and air conditioning
system
► To ensure that air is distributed evenly,
keep the external air intake grilles at the base
of the windscreen, the nozzles, the vents, the
air outlets and the air extractor in the boot free
from obstructions.
► Do not cover the sunshine sensor located
on the dashboard; this sensor is used to
regulate the automatic air conditioning
system.
► Operate the air conditioning system for at
least 5 to 10 minutes once or twice a month to
keep it in good working order.
► If the system does not produce cold air,
switch it off and contact a dealer or a qualified
workshop.
When towing a large load on a steep gradient
in high temperatures, switching off the air
conditioning increases the available engine
power, enhancing the towing capacity.
Avoid driving for too long with the
ventilation off or with prolonged operation
of interior air recirculation. Risk of misting and
deterioration of the air quality!
If the interior temperature is very high
after the vehicle has stood for a long
time in the sunshine, air the passenger
compartment for a few moments.
Put the air flow control at a setting high
enough to quickly change the air in the
passenger compartment.
Condensation created by the air
conditioning results in a discharge of
water underneath the vehicle. This is perfectly
normal.
Servicing the ventilation and air
conditioning system
► Ensure that the passenger compartment
filter is in good condition and have the filter
elements replaced regularly.
We recommend using a composite passenger
compartment filter. Its specific active additive
helps protect against polluting gases and bad
smells.
► To ensure correct operation of the
air conditioning system, have it checked
according to the recommendations in the
Manufacturer’s service schedule.
Stop & Start
The heating and air conditioning systems
only operate when the engine is running.
Temporarily deactivate the Stop & Start
system to maintain a comfortable temperature
in the passenger compartment.
For more information on the Stop &
Start system, refer to the corresponding
section.
Rechargeable hybrid vehicles
Intensive use of the air conditioning
reduces the vehicle range in Electric mode.
Ventilation with the ignition on
When the ignition is switched on, the ventilation
system and the air flow 2 and air distribution
3 settings in the passenger compartment are
Page 53 of 244
51
Ease of use and comfort03
activated, for a period which depends on the
battery charge.
This function does not include the air conditioning
system.
Dual-zone automatic air
conditioning
This system automatically controls the activation
of the air conditioning system, regulating the
temperature, air flow and air distribution inside
the passenger compartment.
This system works with the engine running, but
access to the ventilation and its controls remains
possible with the ignition on.
Press the Climate application button to
display the system controls page.
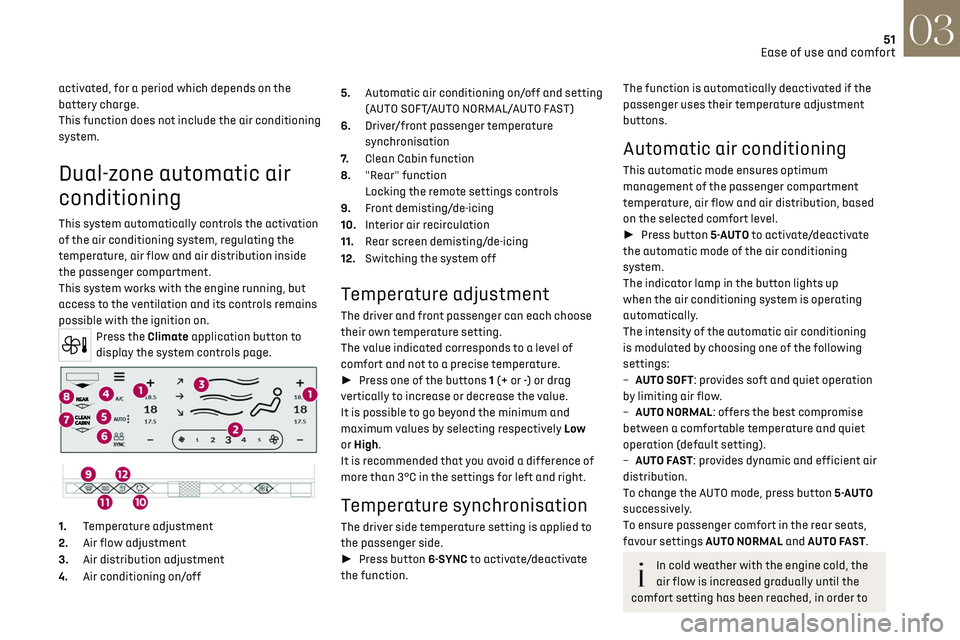
1. Temperature adjustment
2. Air flow adjustment
3. Air distribution adjustment
4. Air conditioning on/off 5.
Automatic air conditioning on/off and setting
(AUTO SOFT/AUTO NORMAL/AUTO FAST)
6. Driver/front passenger temperature
synchronisation
7. Clean Cabin function
8. "Rear" function
Locking the remote settings controls
9. Front demisting/de-icing
10. Interior air recirculation
11. Rear screen demisting/de-icing
12. Switching the system off
Temperature adjustment
The driver and front passenger can each choose
their own temperature setting.
The value indicated corresponds to a level of
comfort and not to a precise temperature.
► Press one of the buttons 1 (+ or -) or drag
vertically to increase or decrease the value.
It is possible to go beyond the minimum and
maximum values by selecting respectively Low
or High.
It is recommended that you avoid a difference of
more than 3°C in the settings for left and right.
Temperature synchronisation
The driver side temperature setting is applied to
the passenger side.
► Press button 6-SYNC to activate/deactivate
the function.
The function is automatically deactivated if the
passenger uses their temperature adjustment
buttons.
Automatic air conditioning
This automatic mode ensures optimum
management of the passenger compartment
temperature, air flow and air distribution, based
on the selected comfort level.
► Press button 5-AUTO to activate/deactivate
the automatic mode of the air conditioning
system.
The indicator lamp in the button lights up
when the air conditioning system is operating
automatically.
The intensity of the automatic air conditioning
is modulated by choosing one of the following
settings:
–
A
UTO SOFT: provides soft and quiet operation
by limiting air flow.
–
A
UTO NORMAL: offers the best compromise
between a comfortable temperature and quiet
operation (default setting).
–
A
UTO FAST: provides dynamic and efficient air
distribution.
To change the AUTO mode, press button 5-AUTO
successively.
To ensure passenger comfort in the rear seats,
favour settings AUTO NORMAL and AUTO FAST.
In cold weather with the engine cold, the
air flow is increased gradually until the
comfort setting has been reached, in order to
Page 56 of 244
54
Ease of use and comfort03
In wintry conditions, before moving off, it
is essential to remove any snow or ice
from the windscreen around the camera.
Otherwise, the operation of the equipment
using the camera may be affected.
Rear screen demisting/
defrosting
This demisting/de-icing only works with the
engine running.
Depending on version, it also demists/de-ices the
door mirrors.
► Press this button to activate/
deactivate the function (confirmed by the
indicator lamp coming on/switching off).
Demisting/defrosting switches off automatically
to prevent an excessive consumption of electrical
current.
Switch off demisting/defrosting when
you no longer need it; reducing electrical
consumption in turn decreases energy
consumption.
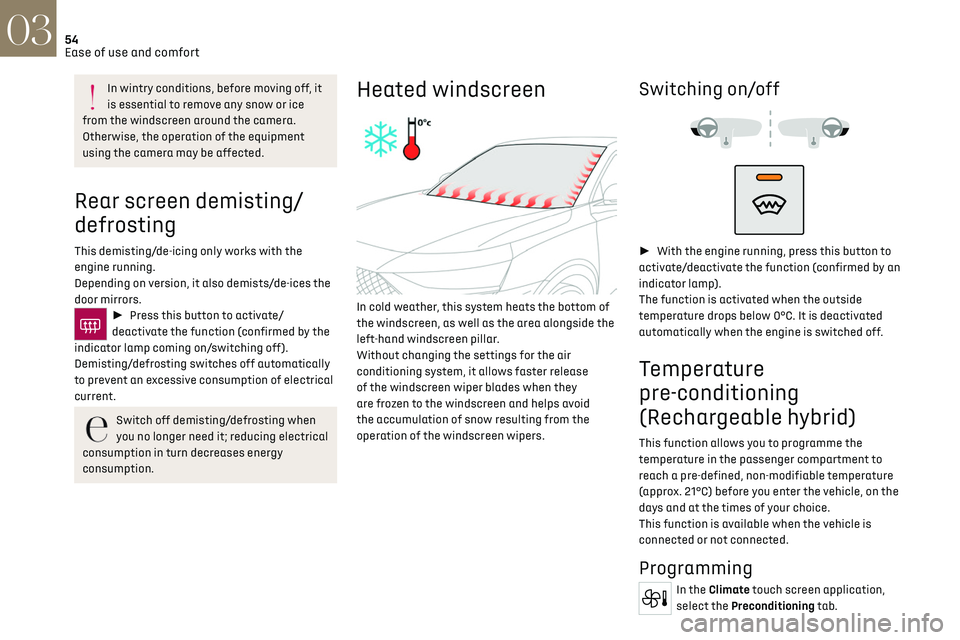
Heated windscreen
In cold weather, this system heats the bottom of
the windscreen, as well as the area alongside the
left-hand windscreen pillar.
Without changing the settings for the air
conditioning system, it allows faster release
of the windscreen wiper blades when they
are frozen to the windscreen and helps avoid
the accumulation of snow resulting from the
operation of the windscreen wipers.
Switching on/off
► With the engine running, press this button to
activate/deactivate the function (confirmed by an
indicator lamp).
The function is activated when the outside
temperature drops below 0°C. It is deactivated
automatically when the engine is switched off.
Temperature
pre-conditioning
(Rechargeable hybrid)
This function allows you to programme the
temperature in the passenger compartment to
reach a pre-defined, non-modifiable temperature
(approx. 21°C) before you enter the vehicle, on the
days and at the times of your choice.
This function is available when the vehicle is
connected or not connected.
Programming
In the Climate touch screen application,
select the Preconditioning tab.
Page 59 of 244
57
Ease of use and comfort03
When the USB socket is used, the portable
device charges automatically.
While charging, a message is displayed if the
power drawn by the portable device exceeds
the current supplied by the vehicle.
For more information about how to use this
equipment, refer to the sections describing the
audio and telematics systems.
Storage compartment
► To open the storage compartment, press the
front central part.
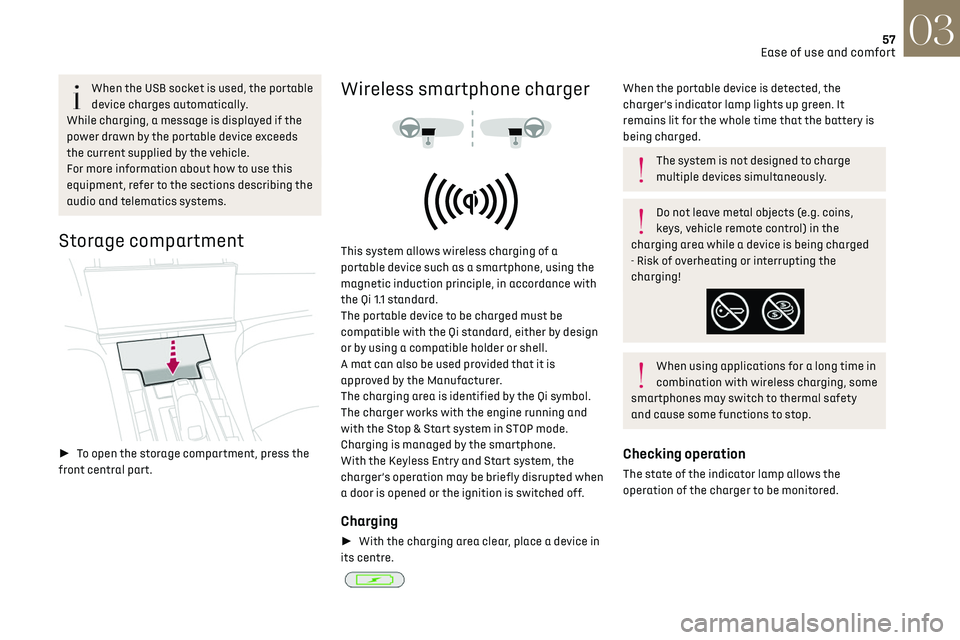
Wireless smartphone charger
This system allows wireless charging of a
portable device such as a smartphone, using the
magnetic induction principle, in accordance with
the Qi 1.1 standard.
The portable device to be charged must be
compatible with the Qi standard, either by design
or by using a compatible holder or shell.
A mat can also be used provided that it is
approved by the Manufacturer.
The charging area is identified by the Qi symbol.
The charger works with the engine running and
with the Stop & Start system in STOP mode.
Charging is managed by the smartphone.
With the Keyless Entry and Start system, the
charger’s operation may be briefly disrupted when
a door is opened or the ignition is switched off.
Charging
► With the charging area clear, place a device in
its centre.
When the portable device is detected, the
charger’s indicator lamp lights up green. It
remains lit for the whole time that the battery is
being charged.
The system is not designed to charge
multiple devices simultaneously.
Do not leave metal objects (e.g. coins,
keys, vehicle remote control) in the
charging area while a device is being charged
- Risk of overheating or interrupting the
charging!
When using applications for a long time in
combination with wireless charging, some
smartphones may switch to thermal safety
and cause some functions to stop.
Checking operation
The state of the indicator lamp allows the
operation of the charger to be monitored.
Page 60 of 244
58
Ease of use and comfort03
State of the
indicator lampMeaning
Off Engine switched off.
No compatible devices
detected.
Charging complete.
Fixed green Compatible portable device detected.
Charging.
Flashing orange Foreign object detected in the charging zone.
Portable device not well
centred in the charging
zone.
Fixed orange Malfunction of the portable device's battery
meter.
Device battery
temperature too high.
Charger malfunction.
If the indicator lamp is fixed orange:
– remo ve the device, then place it back in the
centre of the charging zone.
or
–
remo
ve the device and try again in a quarter of
an hour.
If the problem persists, have the system checked
by a dealer or a qualified workshop.
Front armrest
It includes a storage space.
Opening
► Press the lever beneath the cover.
The cover opens in two parts.
Closing
► Fold back the two parts of the cover.
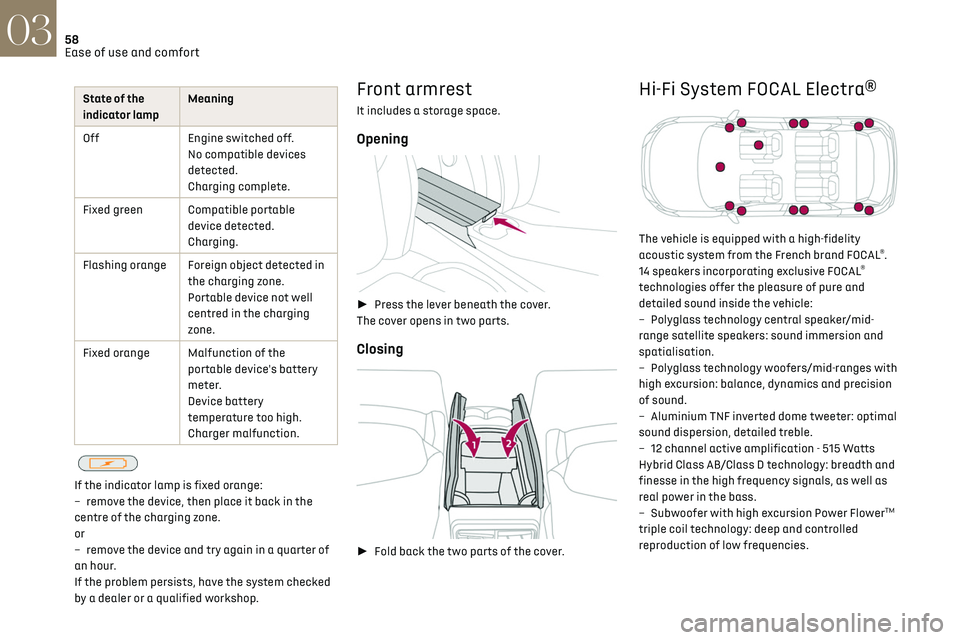
Hi-Fi System FOCAL Electra®
The vehicle is equipped with a high-fidelity
acoustic system from the French brand FOCAL®.
14 speakers incorporating exclusive FOCAL®
technologies offer the pleasure of pure and
detailed sound inside the vehicle:
–
Poly
glass technology central speaker/mid-
range satellite speakers: sound immersion and
spatialisation.
–
Poly
glass technology woofers/mid-ranges with
high excursion: balance, dynamics and precision
of sound.
–
Aluminium TNF in
verted dome tweeter: optimal
sound dispersion, detailed treble.
–
12 channel activ
e amplification - 515 Watts
Hybrid Class AB/Class D technology: breadth and
finesse in the high frequency signals, as well as
real power in the bass.
–
Sub
woofer with high excursion Power Flower
TM
triple coil technology: deep and controlled
reproduction of low frequencies.
Page 64 of 244
62
Ease of use and comfort03
The connection of an electrical device not
approved by the Manufacturer, such as a
USB charger, may adversely affect the
operation of vehicle electrical systems,
causing faults such as poor radio reception or
interference with displays in the screens.
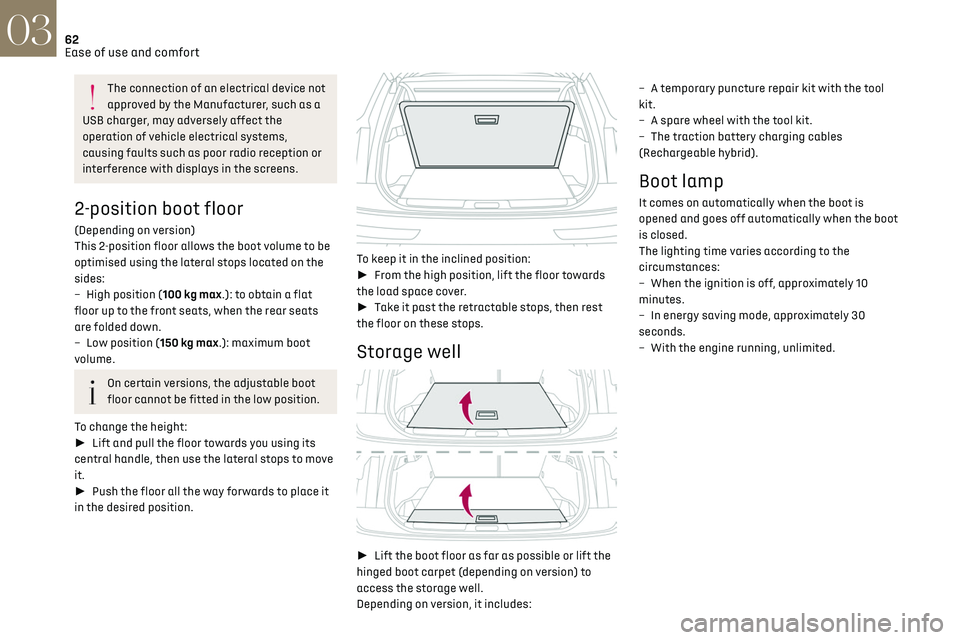
2-position boot floor
(Depending on version)
This 2-position floor allows the boot volume to be
optimised using the lateral stops located on the
sides:
–
High po
sition (100 kg max.): to obtain a flat
floor up to the front seats, when the rear seats
are folded down.
–
Lo
w position (150 kg max.): maximum boot
volume.
On certain versions, the adjustable boot
floor cannot be fitted in the low position.
To change the height:
► Lift and pull the floor towards you using its
central handle, then use the lateral stops to move
it.
► Push the floor all the way forwards to place it
in the desired position.
To keep it in the inclined position:
► From the high position, lift the floor towards
the load space cover.
► Take it past the retractable stops, then rest
the floor on these stops.
Storage well
► Lift the boot floor as far as possible or lift the
hinged boot carpet (depending on version) to
access the storage well.
Depending on version, it includes: –
A t
emporary puncture repair kit with the tool
kit.
–
A spare wheel with the t
ool kit.
–
The traction ba
ttery charging cables
(Rechargeable hybrid).
Boot lamp
It comes on automatically when the boot is
opened and goes off automatically when the boot
is closed.
The lighting time varies according to the
circumstances:
–
When the ignition is o
ff, approximately 10
minutes.
–
In energy sa
ving mode, approximately 30
seconds.
–
With the engine running, unlimit
ed.
Page 66 of 244
64
Lighting and visibility04
Switching on the lamps after switching
off the ignition
To reactivate the lighting control, rotate the
ring to the "AUTO" position, then to the desired
position.
If the driver's door is opened, a temporary
audible signal warns the driver that the lamps
are on.
They will go off automatically after a period of
time that depends on the level of charge in the
battery (entering energy economy mode).
In some weather conditions (e.g. low
temperature or humidity), misting on the
internal surface of the glass of the headlamps
and rear lamps is normal, and will disappear
after the lamps have been on for a few
minutes.
Never look too closely at the light beam of
LED technology lamps - risk of serious eye
injury!
Travelling abroad
The design of the dipped beam headlamps
allows you to drive, without any modification,
in a country that drives on the other side of
the road to the country in which your vehicle
was sold.
Daytime running lamps/
Sidelamps
These LED lamps at the front and rear of the
vehicle light up automatically when the engine
starts.
They perform the following functions:
–
Da
ytime running lamps (lighting control stalk at
position "AUTO" with adequate ambient light).
–
Sidelamp
s (lighting control stalk at position
"AUTO" with low ambient light or "Sidelamps
only" or "Dipped/main beam headlamps").
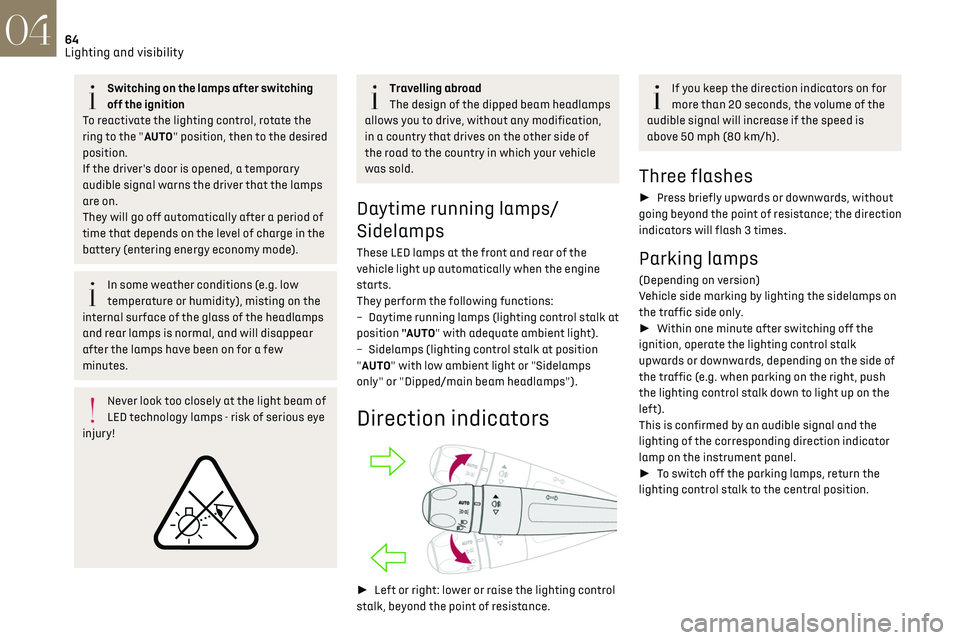
Direction indicators
► Left or right: lower or raise the lighting control
stalk, beyond the point of resistance.
If you keep the direction indicators on for
more than 20 seconds, the volume of the
audible signal will increase if the speed is
above 50 mph (80 km/h).
Three flashes
► Press briefly upwards or downwards, without
going beyond the point of resistance; the direction
indicators will flash 3 times.
Parking lamps
(Depending on version)
Vehicle side marking by lighting the sidelamps on
the traffic side only.
► Within one minute after switching off the
ignition, operate the lighting control stalk
upwards or downwards, depending on the side of
the traffic (e.g. when parking on the right, push
the lighting control stalk down to light up on the
left).
This is confirmed by an audible signal and the
lighting of the corresponding direction indicator
lamp on the instrument panel.
► To switch off the parking lamps, return the
lighting control stalk to the central position.