length CITROEN DS7 CROSSBACK 2023 Owners Manual
[x] Cancel search | Manufacturer: CITROEN, Model Year: 2023, Model line: DS7 CROSSBACK, Model: CITROEN DS7 CROSSBACK 2023Pages: 244, PDF Size: 6.87 MB
Page 44 of 244
42
Ease of use and comfort03
Driving position
Correct seating position
Adopting a good driving position contributes to
improving driver comfort and protection.
It also optimises interior and exterior visibility as
well as access to controls.
Certain seat adjustments described in this
section depend on the trim level and the country
in which the vehicle is sold.
Driver’s side
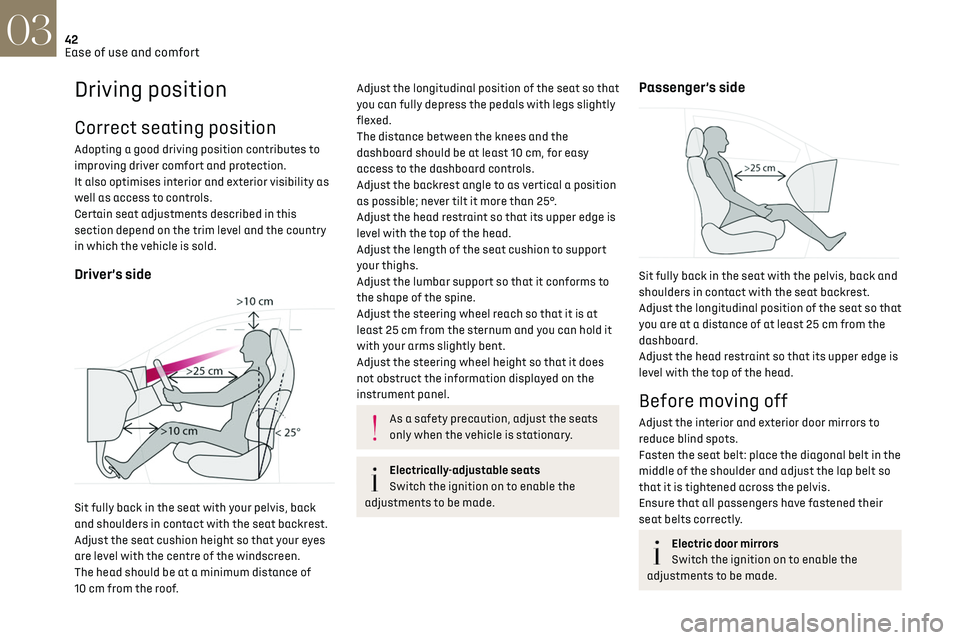
Sit fully back in the seat with your pelvis, back
and shoulders in contact with the seat backrest.
Adjust the seat cushion height so that your eyes
are level with the centre of the windscreen.
The head should be at a minimum distance of
10 cm from the roof.
Adjust the longitudinal position of the seat so that
you can fully depress the pedals with legs slightly
flexed.
The distance between the knees and the
dashboard should be at least 10 cm, for easy
access to the dashboard controls.
Adjust the backrest angle to as vertical a position
as possible; never tilt it more than 25°.
Adjust the head restraint so that its upper edge is
level with the top of the head.
Adjust the length of the seat cushion to support
your thighs.
Adjust the lumbar support so that it conforms to
the shape of the spine.
Adjust the steering wheel reach so that it is at
least 25 cm from the sternum and you can hold it
with your arms slightly bent.
Adjust the steering wheel height so that it does
not obstruct the information displayed on the
instrument panel.
As a safety precaution, adjust the seats
only when the vehicle is stationary.
Electrically-adjustable seats
Switch the ignition on to enable the
adjustments to be made.
Passenger’s side
Sit fully back in the seat with the pelvis, back and
shoulders in contact with the seat backrest.
Adjust the longitudinal position of the seat so that
you are at a distance of at least 25 cm from the
dashboard.
Adjust the head restraint so that its upper edge is
level with the top of the head.
Before moving off
Adjust the interior and exterior door mirrors to
reduce blind spots.
Fasten the seat belt: place the diagonal belt in the
middle of the shoulder and adjust the lap belt so
that it is tightened across the pelvis.
Ensure that all passengers have fastened their
seat belts correctly.
Electric door mirrors
Switch the ignition on to enable the
adjustments to be made.
Page 47 of 244
45
Ease of use and comfort03
Seat cushion length
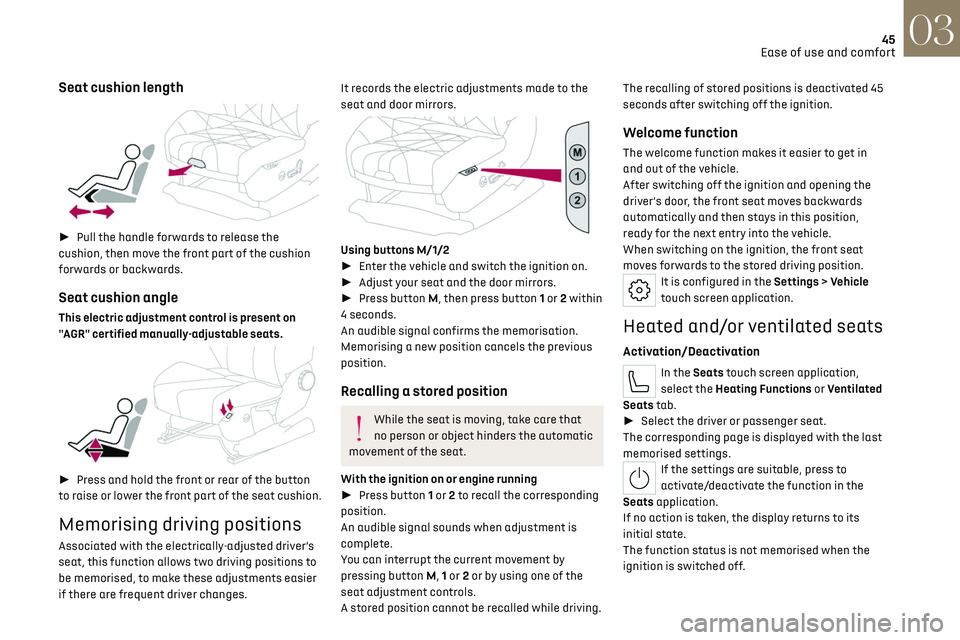
► Pull the handle forwards to release the
cushion, then move the front part of the cushion
forwards or backwards.
Seat cushion angle
This electric adjustment control is present on
"AGR" certified manually-adjustable seats.
► Press and hold the front or rear of the button
to raise or lower the front part of the seat cushion.
Memorising driving positions
Associated with the electrically-adjusted driver’s
seat, this function allows two driving positions to
be memorised, to make these adjustments easier
if there are frequent driver changes.
It records the electric adjustments made to the
seat and door mirrors.
Using buttons M/1/2
► Enter the vehicle and switch the ignition on.
► Adjust your seat and the door mirrors.
► Press button M, then press button 1 or 2 within
4 seconds.
An audible signal confirms the memorisation.
Memorising a new position cancels the previous
position.
Recalling a stored position
While the seat is moving, take care that
no person or object hinders the automatic
movement of the seat.
With the ignition on or engine running
► Press button 1 or 2 to recall the corresponding
position.
An audible signal sounds when adjustment is
complete.
You can interrupt the current movement by
pressing button M, 1 or 2 or by using one of the
seat adjustment controls.
A stored position cannot be recalled while driving. The recalling of stored positions is deactivated 45
seconds after switching off the ignition.
Welcome function
The welcome function makes it easier to get in
and out of the vehicle.
After switching off the ignition and opening the
driver’s door, the front seat moves backwards
automatically and then stays in this position,
ready for the next entry into the vehicle.
When switching on the ignition, the front seat
moves forwards to the stored driving position.
It is configured in the Settings > Vehicle
touch screen application.
Heated and/or ventilated seats
Activation/Deactivation
In the Seats touch screen application,
select the Heating Functions or Ventilated
Seats tab.
► Select the driver or passenger seat.
The corresponding page is displayed with the last
memorised settings.
If the settings are suitable, press to
activate/deactivate the function in the
Seats application.
If no action is taken, the display returns to its
initial state.
The function status is not memorised when the
ignition is switched off.
Page 71 of 244
69
Lighting and visibility04
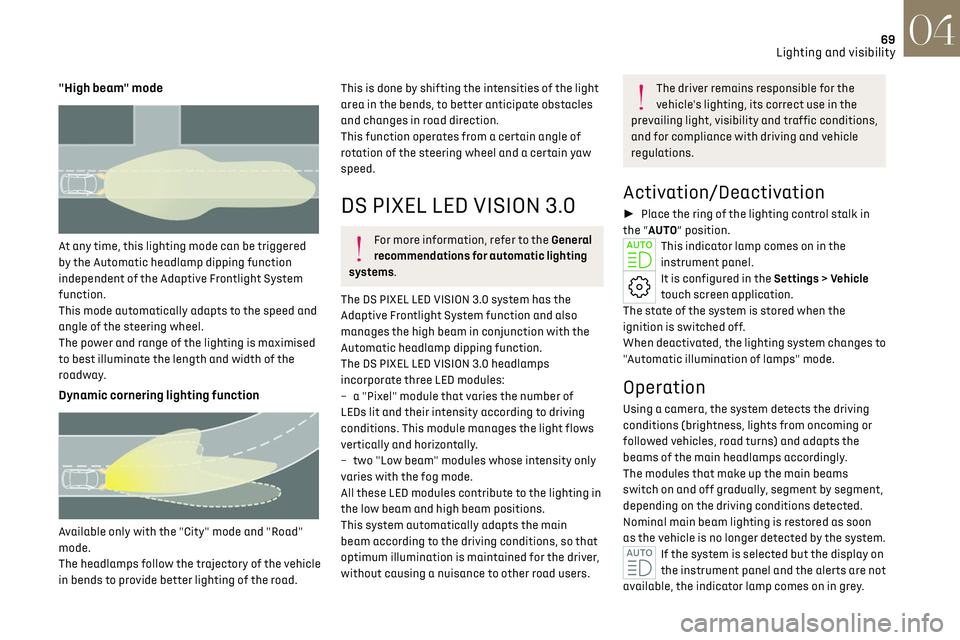
"High beam" mode
At any time, this lighting mode can be triggered
by the Automatic headlamp dipping function
independent of the Adaptive Frontlight System
function.
This mode automatically adapts to the speed and
angle of the steering wheel.
The power and range of the lighting is maximised
to best illuminate the length and width of the
roadway.
Dynamic cornering lighting function
Available only with the "City" mode and "Road"
mode.
The headlamps follow the trajectory of the vehicle
in bends to provide better lighting of the road.
This is done by shifting the intensities of the light
area in the bends, to better anticipate obstacles
and changes in road direction.
This function operates from a certain angle of
rotation of the steering wheel and a certain yaw
speed.
DS PIXEL LED VISION 3.0
For more information, refer to the General
recommendations for automatic lighting
systems.
The DS PIXEL LED VISION 3.0 system has the
Adaptive Frontlight System function and also
manages the high beam in conjunction with the
Automatic headlamp dipping function.
The DS PIXEL LED VISION 3.0 headlamps
incorporate three LED modules:
–
a "Pix
el" module that varies the number of
LEDs lit and their intensity according to driving
conditions. This module manages the light flows
vertically and horizontally.
–
tw
o "Low beam" modules whose intensity only
varies with the fog mode.
All these LED modules contribute to the lighting in
the low beam and high beam positions.
This system automatically adapts the main
beam according to the driving conditions, so that
optimum illumination is maintained for the driver,
without causing a nuisance to other road users.
The driver remains responsible for the
vehicle's lighting, its correct use in the
prevailing light, visibility and traffic conditions,
and for compliance with driving and vehicle
regulations.
Activation/Deactivation
► Place the ring of the lighting control stalk in
the “AUTO” position.
This indicator lamp comes on in the
instrument panel.
It is configured in the Settings > Vehicle
touch screen application.
The state of the system is stored when the
ignition is switched off.
When deactivated, the lighting system changes to
"Automatic illumination of lamps" mode.
Operation
Using a camera, the system detects the driving
conditions (brightness, lights from oncoming or
followed vehicles, road turns) and adapts the
beams of the main headlamps accordingly.
The modules that make up the main beams
switch on and off gradually, segment by segment,
depending on the driving conditions detected.
Nominal main beam lighting is restored as soon
as the vehicle is no longer detected by the system.
If the system is selected but the display on
the instrument panel and the alerts are not
available, the indicator lamp comes on in grey.
Page 75 of 244

73
Lighting and visibility04
Windscreen wash
► Pull the wiper control stalk towards you and
hold.
A final wiping cycle is performed when
screenwashing ends.
The windscreen wash jets are
incorporated into the tip of each wiper
arm.
Screenwash fluid is sprayed along the length
of the wiper blade. This improves visibility and
reduces screenwash fluid consumption.
To avoid damaging the wiper blades, do
not operate the screenwash if the
screenwash reservoir is empty.
Only operate the screenwash if there is no risk
of the fluid freezing on the windscreen and
hindering visibility. During the winter period,
use "very cold climate" rated products.
Never top up with water.
Rear wiper
► Turn the ring to align the desired symbol with
the marking.
Off
Intermittent wiping
Screenwash-wipe
Reverse
When reverse gear is engaged, the rear wiper will
come into operation automatically if the front
windscreen wipers are operating.
It is configured in the Settings > Vehicle
touch screen application.
In the event of accumulation of snow or
hard frost or if a bicycle carrier is fitted to
a towing system, deactivate the automatic
rear wiper via theSettings > Vehicle touch
screen application.
Rear screenwash
► Turn the ring as far as it will go and hold it in
position.
The screenwash and the wiper operate for as long
as the ring remains turned.
A final wiping cycle is performed when screen
washing ends.
Special position of the
windscreen wipers
This maintenance position is used while cleaning
or replacing the wiper blades. It can also be
useful, in wintry weather (ice, snow), to release
the wiper blades from the windscreen.
To maintain the effectiveness of the flat
wiper blades, it is advisable to:
–
handle them with c
are.
–
clean them regularly using soap
y water.
–
a
void using them to hold cardboard on the
windscreen.
–
replac
e them at the first signs of wear.
Before removing a windscreen wiper blade
Operating the wiper control stalk immediately
after switching off the ignition will place the
wiper blades in a vertical position.
► Proceed with the desired operation or the
replacement of the wiper blades.
After refitting a windscreen wiper blade
► To return the wiper blades to their initial
position after the operation, switch on the ignition
and operate the wiper control stalk.
Page 83 of 244
81
Safety05
All tyre specifications are listed on the
tyre/paint label. For more information
on Identification markings, refer to the
corresponding section.
Trailer stability assist (TSA)
When towing, this system reduces the risk of the
vehicle or trailer snaking.
Operation
The system is activated automatically when the
ignition is switched on.
The electronic stability control system (ESC) must
not have any faults.
The vehicle speed must be between 37 and 99
mph (60 and 160 km/h).
If the system detects that the trailer is
snaking, it applies the brakes to stabilise
the trailer and reduces engine power, if necessary,
to slow the vehicle (indicated by the flashing of
this warning lamp on the instrument panel and
the brake lamps coming on).
For information on weights and towed loads, refer
to the Engine technical data and towed loads
section or your vehicle’s registration certificate.
To ensure safe driving with a Towing device, refer
to the corresponding section.
Malfunction
If a fault occurs, this warning lamp lights
up on the instrument panel, accompanied
by a message and an audible signal.
To continue towing a trailer, reduce speed and
drive carefully!
Have it checked by a dealer or a qualified
workshop.
The trailer stability control system
provides an extra safety feature under
normal driving conditions, when following the
recommendations for use of trailers and
current legislation in force in your country. It
must not encourage the driver to take extra
risks, such as using a trailer in unsuitable
conditions of operation (e.g. excessive load,
exceeded nose weight, worn or under-inflated
tyres, faulty braking system) or driving at
excessive speed.
In certain cases, the system may not detect
trailer snaking, particularly with a light trailer.
When driving on slippery or poor surfaces, the
system may not be able to prevent sudden
trailer snaking.
Seat belts
Inertia reel
The seat belts are equipped with an inertia
reel which allows the strap length to adjust
automatically to the shape of the user. The seat
belt returns to its storage automatically when it
is not used.
The inertia reels are fitted with a device which
automatically locks the strap in the event of a
collision, emergency braking or if the vehicle rolls
over. It can be released by pulling the strap firmly
and then releasing it so that it reels in slightly.
Pyrotechnic pretensioning
This system improves safety in the event of a
frontal or side impact.
Depending on the severity of the impact, the
pyrotechnic pretensioning system instantly
tightens the seat belts against the body of the
occupants.
The pyrotechnic pretensioning seat belts are
enabled when the ignition is on.
Force limiting system
This system reduces the pressure of the seat belt
on the chest of the occupant, thus improving their
protection.
In the event of an impact
Depending on the nature and seriousness
of the impacts, the pyrotechnic device may
trigger before and independently of airbag
deployment. Deployment of the pretensioners
is accompanied by a slight discharge of
harmless smoke and a noise, due to the
activation of the pyrotechnic cartridge
incorporated in the system.
In all cases, the airbag warning lamp comes
on.
Following an impact, have the seat belt system
checked, and if necessary replaced, by a dealer
or a qualified workshop.
Page 113 of 244
111
Driving06
The tyre under-inflation detection cannot,
in any circumstances, replace the need
for vigilance on the part of the driver.
This system does not avoid the need to
regularly check the tyre pressures (including
the spare wheel), especially before a long
journey.
Driving with under-inflated tyres, particularly
in adverse conditions (heavy load, high speed,
long journey):
–
w
orsens road-holding.
–
lengthens braking dist
ances.
–
c
auses premature wear of the tyres.
–
increase
s energy consumption.
The inflation pressures defined for the
vehicle can be found on the tyre pressure
label.
For more information on the Identification
markings, refer to the corresponding section.
Checking tyre pressures
This check should be done monthly when
the tyres are "cold" (vehicle stopped for 1 hour
or after a journey of less than 6 miles (10 km)
at moderate speeds).
Otherwise, add 0.3 bar to the pressures shown
on the label.
Snow chains
The system does not have to be
reinitialised after fitting or removing snow
chains.
Under-inflation alert
This is signalled by the fixed illumination
of this warning lamp, accompanied by an
audible signal and, depending on equipment, the
display of a message.
► Reduce speed immediately, avoid excessive
steering movements and avoid sudden braking.
► Stop the vehicle as soon as it is safe to do so.
The loss of pressure detected may not
always cause visible deformation of the
tyre.
Do not rely on just a visual check.
► Using a compressor, such as the one in
the temporary puncture repair kit, check the
pressures of all four tyres when cold.
► If it is not possible to carry out this check
immediately, drive carefully at reduced speed.
► In the event of a puncture, use the temporary
puncture repair kit or the spare wheel (depending
on equipment).
Driving too slowly may not ensure
optimum monitoring.
The alert is not immediately triggered in the
event of a sudden loss of pressure or tyre blow-
out. This is because analysis of the values read
by the wheel's speed sensors can take several
minutes.
The alert may be delayed at speeds below 25
mph (40 km/h), or when adopting a sporty
driving mode.
The alert is kept active until the system is
reinitialised.
Reinitialisation
► The system must be reinitialised after any
adjustment to the pressure of one or more tyres,
and after changing one or more wheels.
Before reinitialising the system, make
sure that the pressures of the four tyres
are correct for the conditions of use of the
vehicle and conform to the values written on
the tyre pressure label.
Check the pressures of the four tyres before
performing the reinitialisation.
The system does not advise if a pressure is
incorrect at the time of reinitialisation.
With the vehicle stationary, the system
can be reinitialised in the Settings>Vehicle
touch screen application.
► Then select Safety > Tire Pressure Setup.
► Press YES to confirm.
The reinitialisation is confirmed by the display of
a message and an audible signal.