light CITROEN E-MEHARI 2023 Owners Manual
[x] Cancel search | Manufacturer: CITROEN, Model Year: 2023, Model line: E-MEHARI, Model: CITROEN E-MEHARI 2023Pages: 84, PDF Size: 3.48 MB
Page 4 of 84
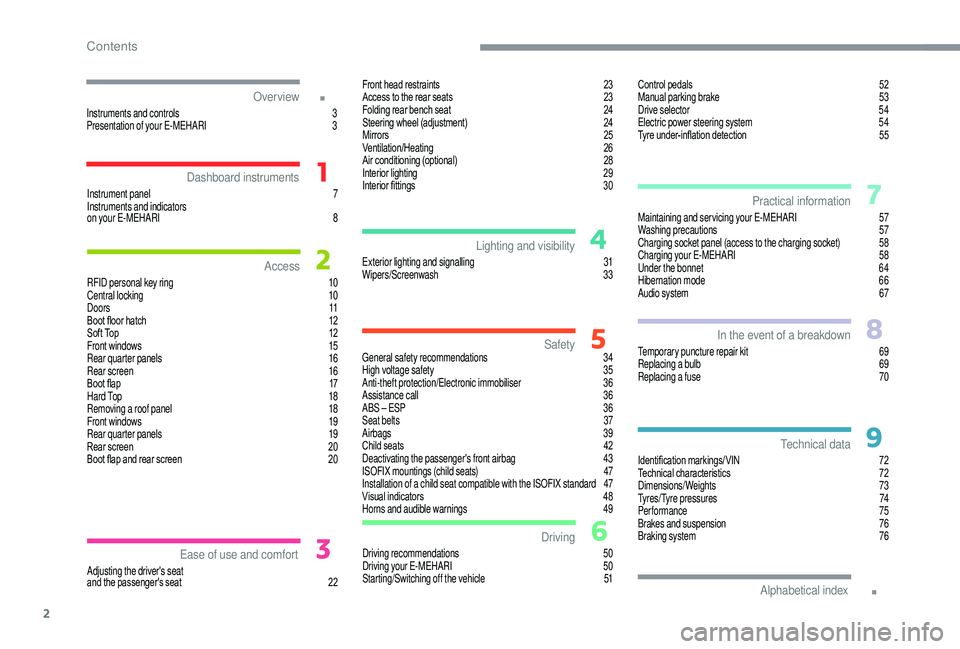
2
.
.
Driving recommendations 50
Driving your E-MEHARI 5 0
Starting/Switching off the vehicle
5
1Maintaining and servicing your E-MEHARI
5
7
Washing precautions
5
7
Charging socket panel (access to the charging socket)
5
8
Charging your E-MEHARI
5
8
Under the bonnet
6
4
Hibernation mode
6
6
Audio system
6
7
Temporary puncture repair kit
6
9
Replacing a bulb
6
9
Replacing a fuse
7
0
Identification markings/VIN
7
2
Technical characteristics
7
2
Dimensions/ Weights
73
Tyres/Tyre pressures
7
4
Performance
75
Brakes and suspension
7
6
Braking system
7
6
Instrument panel
7
I
nstruments and indicators
on your E-MEHARI
8
R
FID personal key ring
1
0
Central locking
1
0
D o o r s
11
Boot floor hatch
1
2
Soft Top
1
2
Front windows
1
5
Rear quarter panels
1
6
Rear screen
1
6
Boot flap
1
7
Hard Top
1
8
Removing a
roof panel
1
8
Front windows
1
9
Rear quarter panels
1
9
Rear screen
2
0
Boot flap and rear screen
2
0
Adjusting the driver's seat
and the passenger's seat
2
2 Exterior lighting and signalling
3
1
Wipers/Screenwash
33
G
eneral safety recommendations
3
4
High voltage safety
3
5
Anti-theft protection/Electronic immobiliser
3
6
Assistance call
3
6
ABS – ESP
3
6
Seat belts
3
7
Airbags
39
Child seats
4
2
Deactivating the passenger's front airbag
4
3
ISOFIX mountings (child seats)
4
7
Installation of a child seat compatible with the ISOFIX standard
4
7
Visual indicators
4
8
Horns and audible warnings
4
9
Over view
Dashboard instruments
Access
Ease of use and comfort Safety
Driving Practical information
In the event of a
breakdown
Technical data
Alphabetical index
Lighting and visibility
Instruments and controls 3
P resentation of your E-MEHARI 3F
ront head restraints
2
3
Access to the rear seats
2
3
Folding rear bench seat 2 4
Steering wheel (adjustment) 2 4
Mirrors
2
5
Ventilation/Heating
2
6
Air conditioning (optional)
2
8
Interior lighting
2
9
Interior fittings
3
0Control pedals
5
2
Manual parking brake
5
3
Drive selector 5 4
Electric power steering system 5 4
Tyre under-inflation detection
5
5
Contents
Page 5 of 84
3
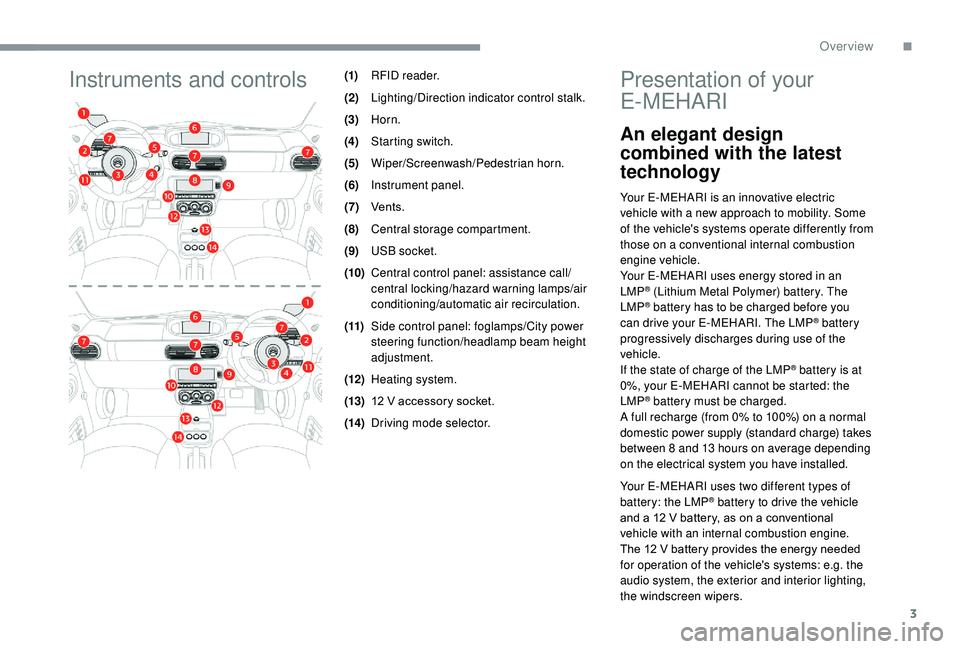
Instruments and controls(1)RFID reader.
(2) Lighting/Direction indicator control stalk.
(3) Horn.
(4) Starting switch.
(5) Wiper/Screenwash/Pedestrian horn.
(6) Instrument panel.
(7) Vents.
(8) Central storage compartment.
(9) USB socket.
(10) Central control panel: assistance call/
central locking/hazard warning lamps/air
conditioning/automatic air recirculation.
(11) Side control panel: foglamps/City power
steering function/headlamp beam height
adjustment.
(12) Heating system.
(13) 12
V accessory socket.
(14) Driving mode selector.Presentation of your
E-MEHARI
An elegant design
combined with the latest
technology
Your E-MEHARI is an innovative electric
vehicle with a
new approach to mobility. Some
of the vehicle's systems operate differently from
those on a
conventional internal combustion
engine vehicle.
Your E-MEHARI uses energy stored in an
LMP
® (Lithium Metal Polymer) battery. The
LMP® battery has to be charged before you
can drive your E-MEHARI. The LMP® battery
progressively discharges during use of the
vehicle.
If the state of charge of the LMP
® battery is at
0%, your E-MEHARI cannot be started: the
LMP
® battery must be charged.
A full recharge (from 0% to 100%) on a normal
domestic power supply (standard charge) takes
between 8
and 13 hours on average depending
on the electrical system you have installed.
Your E-MEHARI uses two different types of
battery: the LMP
® battery to drive the vehicle
and a
12
V battery, as on a conventional
vehicle with an internal combustion engine.
The 12
V battery provides the energy needed
for operation of the vehicle's systems: e.g. the
audio system, the exterior and interior lighting,
the windscreen wipers.
.
Over view
Page 24 of 84
22
Adjusting the driver's seat
and the passenger's seat
Never leave children unsuper vised inside
the vehicle.
Children could operate the switches and
controls.
Unsuper vised children run the risk of
a
serious accident.
The seat belts must be correctly adjusted.
The seat belts are more effective when
the passenger is seated fully back and
down in the seat.
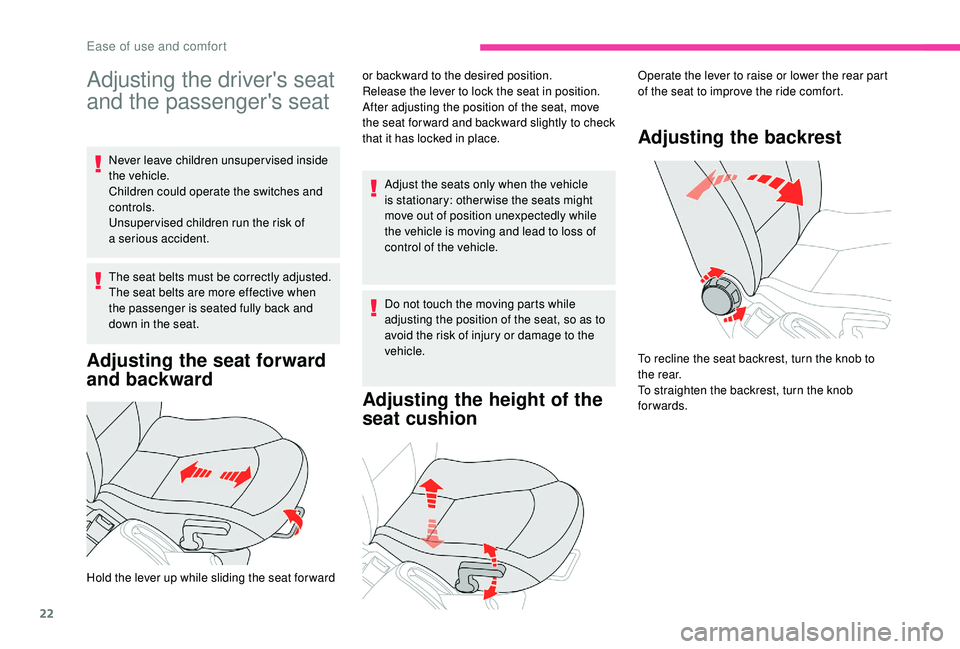
Adjusting the seat forward
and backward
or backward to the desired position.
Release the lever to lock the seat in position.
After adjusting the position of the seat, move
the seat for ward and backward slightly to check
that it has locked in place.
Adjust the seats only when the vehicle
is stationary: other wise the seats might
move out of position unexpectedly while
the vehicle is moving and lead to loss of
control of the vehicle.
Do not touch the moving parts while
adjusting the position of the seat, so as to
avoid the risk of injury or damage to the
vehicle.
Adjusting the height of the
seat cushion
Operate the lever to raise or lower the rear part
of the seat to improve the ride comfort.
Adjusting the backrest
To recline the seat backrest, turn the knob to
the rear.
To straighten the backrest, turn the knob
forwards.
Hold the lever up while sliding the seat for ward
Ease of use and comfort
Page 31 of 84
29
To switch off the air conditioning, press button
(5) again.
You can operate the automatic air recirculation
to increase the effectiveness and speed of the
air conditioning (no demisting/defrosting).
To be effective, the air conditioning should
only be used with the windows closed.
If the exterior temperature is below 19°C,
the instruction is received but the air
conditioning will not come on.
If the air flow setting is at minimum when
the air conditioning is switched on, the
system manages the air flow automatically
to optimise ventilation.
The condensation created by the air
conditioning results in a
discharge of
water under the vehicle which is per fectly
normal.
Advice
Operate the air conditioning system at
least once a month to keep it in per fect
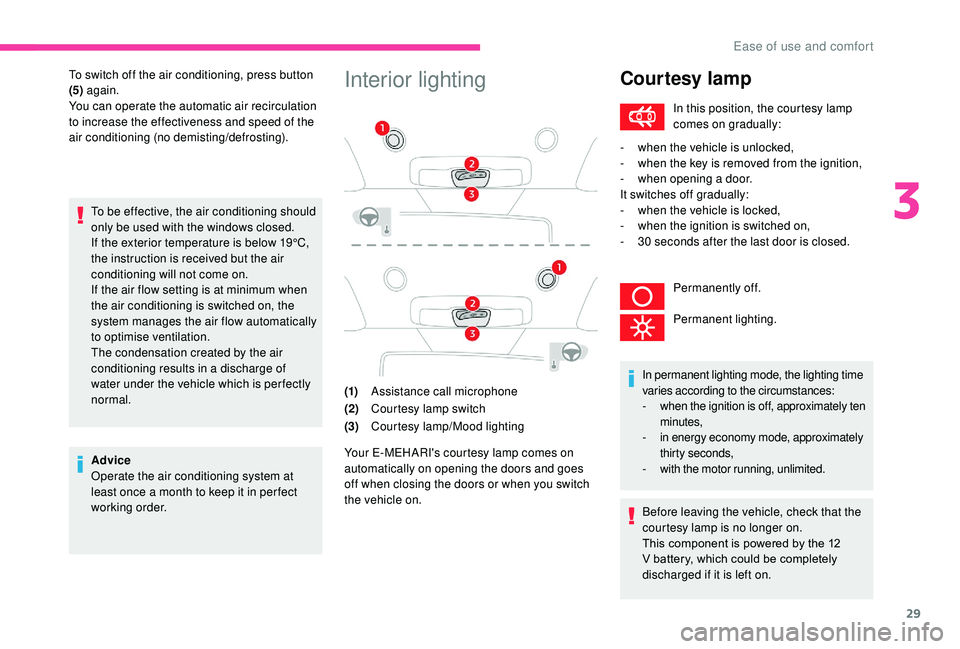
working order.Interior lighting
(1) Assistance call microphone
(2) Courtesy lamp switch
(3) Courtesy lamp/Mood lighting
Your E-MEHARI's courtesy lamp comes on
automatically on opening the doors and goes
off when closing the doors or when you switch
the vehicle on.
Courtesy lamp
In this position, the courtesy lamp
comes on gradually:
-
w
hen the vehicle is unlocked,
-
w
hen the key is removed from the ignition,
-
w
hen opening a
door.
It switches off gradually:
-
w
hen the vehicle is locked,
-
w
hen the ignition is switched on,
-
3
0
seconds after the last door is closed. Permanently off.
Permanent lighting.
In permanent lighting mode, the lighting time
varies according to the circumstances:
-
w
hen the ignition is off, approximately ten
minutes,
-
i
n energy economy mode, approximately
thirty seconds,
-
w
ith the motor running, unlimited.
Before leaving the vehicle, check that the
courtesy lamp is no longer on.
This component is powered by the 12
V battery, which could be completely
discharged if it is left on.
3
Ease of use and comfort
Page 32 of 84
30
Interior fittings
General view
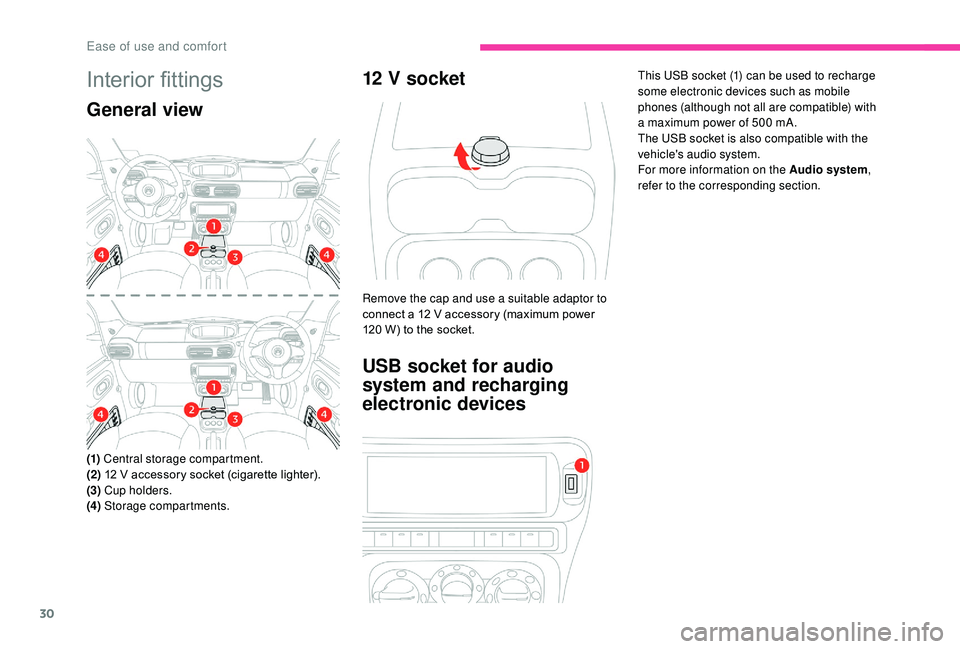
(1) Central storage compartment.
(2) 12 V accessory socket (cigarette lighter).
(3) Cup holders.
(4) Storage compartments.
12 V socket
Remove the cap and use a suitable adaptor to
c onnect a 12 V accessory (maximum power
120 W) to the socket.
USB socket for audio
system and recharging
electronic devices
This USB socket (1) can be used to recharge
some electronic devices such as mobile
phones (although not all are compatible) with
a
maximum power of 500 mA.
The USB socket is also compatible with the
vehicle's audio system.
For more information on the Audio system,
refer to the corresponding section.
Ease of use and comfort
Page 33 of 84
31
Exterior lighting and
signalling
Exterior lighting
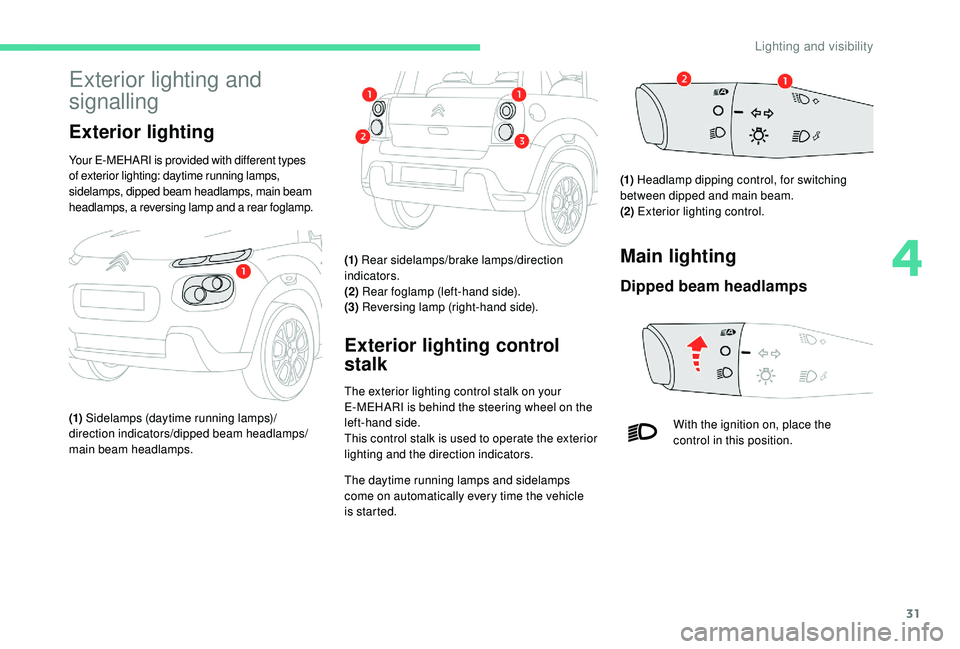
Your E-MEHARI is provided with different types
of exterior lighting: daytime running lamps,
sidelamps, dipped beam headlamps, main beam
headlamps, a reversing lamp and a
rear foglamp.
(1) Sidelamps (daytime running lamps)/
direction indicators/dipped beam headlamps/
main beam headlamps. (1)
Rear sidelamps/brake lamps/direction
indicators.
(2) Rear foglamp (left-hand side).
(3) Reversing lamp (right-hand side).
Exterior lighting control
stalk
The exterior lighting control stalk on your
E-MEHARI is behind the steering wheel on the
left-hand side.
This control stalk is used to operate the exterior
lighting and the direction indicators.
The daytime running lamps and sidelamps
come on automatically every time the vehicle
is started. (1)
Headlamp dipping control, for switching
between dipped and main beam.
(2) Exterior lighting control.
Main lighting
Dipped beam headlamps
With the ignition on, place the
control in this position.
4
Lighting and visibility
Page 34 of 84
32
Headlamp dipping control
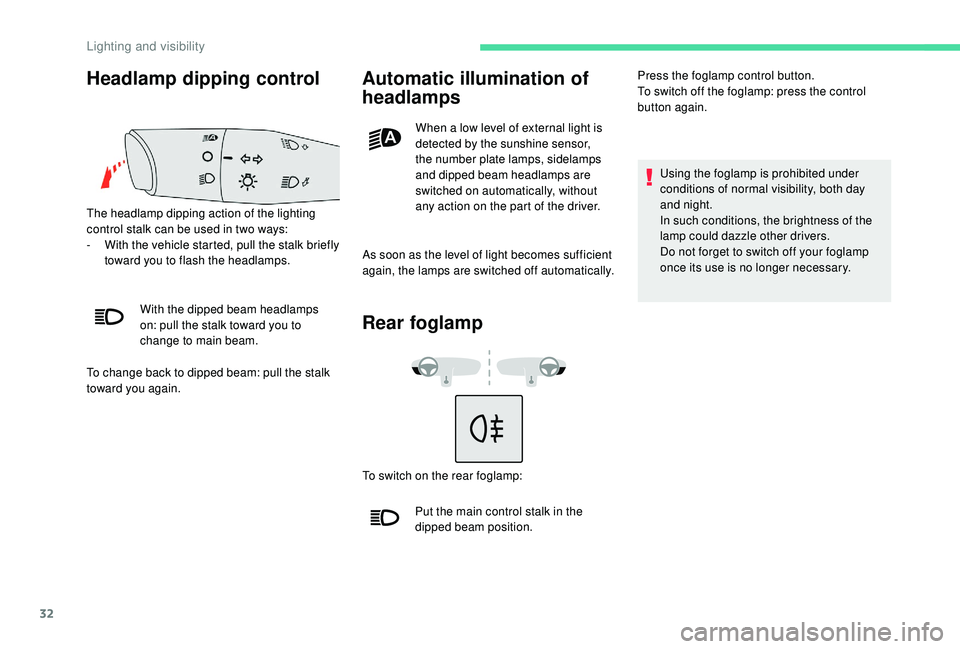
The headlamp dipping action of the lighting
control stalk can be used in two ways:
-
W
ith the vehicle started, pull the stalk briefly
toward you to flash the headlamps.
With the dipped beam headlamps
on: pull the stalk toward you to
change to main beam.
To change back to dipped beam: pull the stalk
toward you again.
Automatic illumination of
headlamps
When a low level of external light is
d etected by the sunshine sensor,
the number plate lamps, sidelamps
and dipped beam headlamps are
switched on automatically, without
any action on the part of the driver.
As soon as the level of light becomes sufficient
again, the lamps are switched off automatically.
Rear foglamp
To switch on the rear foglamp: Put the main control stalk in the
dipped beam position. Press the foglamp control button.
To switch off the foglamp: press the control
button again.
Using the foglamp is prohibited under
conditions of normal visibility, both day
and night.
In such conditions, the brightness of the
lamp could dazzle other drivers.
Do not forget to switch off your foglamp
once its use is no longer necessary.
Lighting and visibility
Page 35 of 84
33
Adjusting the headlamps
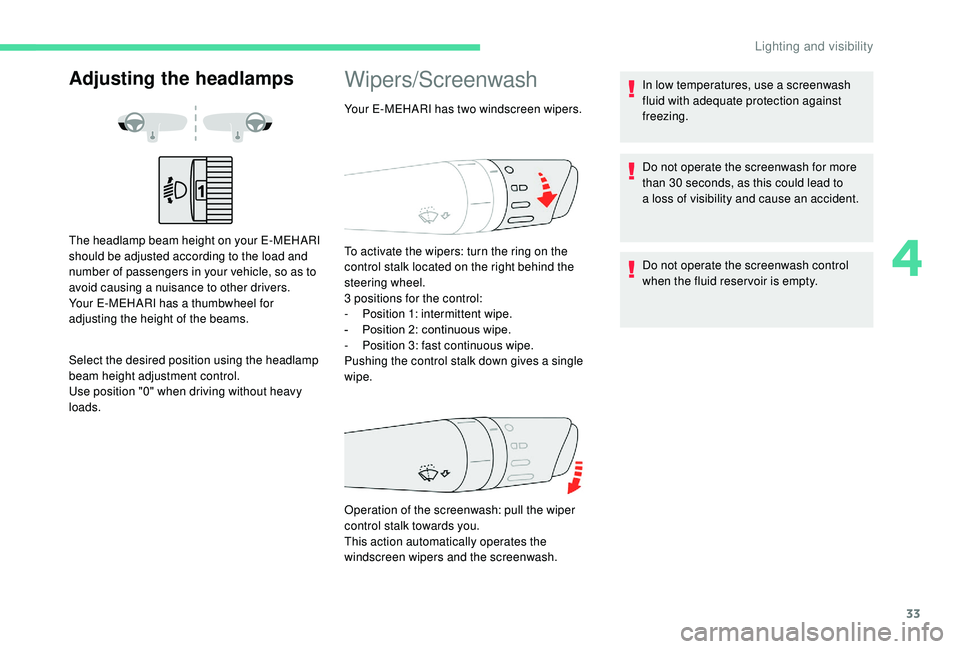
The headlamp beam height on your E-MEHARI
should be adjusted according to the load and
number of passengers in your vehicle, so as to
avoid causing a nuisance to other drivers.
Your E-MEHARI has a
thumbwheel for
adjusting the height of the beams.
Select the desired position using the headlamp
beam height adjustment control.
Use position "0" when driving without heavy
loads.
Wipers/Screenwash
Your E-MEHARI has two windscreen wipers.
To activate the wipers: turn the ring on the
control stalk located on the right behind the
steering wheel.
3
positions for the control:
-
P
osition 1: intermittent wipe.
-
P
osition 2: continuous wipe.
-
P
osition 3: fast continuous wipe.
Pushing the control stalk down gives a
single
wipe.
Operation of the screenwash: pull the wiper
control stalk towards you.
This action automatically operates the
windscreen wipers and the screenwash. In low temperatures, use a
screenwash
fluid with adequate protection against
freezing.
Do not operate the screenwash for more
than 30
seconds, as this could lead to
a
loss of visibility and cause an accident.
Do not operate the screenwash control
when the fluid reservoir is empty.
4
Lighting and visibility
Page 41 of 84
39
Rear seat belts not fastened
alerts
Seat belts unfastened alert
When the ignition is switched on, with the
motor running or the vehicle driving above
6 mph (10 km/h), warning lamp A and the
corresponding dots in warning lamp B come on
for around thirty seconds, if one or more rear
passengers have not fastened their seat belts.
After the ignition is switched on, warning
lamp A and the corresponding dots in warning
lamp B come on if the driver and/or one or
more passengers unfasten their seat belts.
These warning lamps flash for 30
seconds,
accompanied by an audible signal. Beyond
this period of time, the warning lamps stay on
continuously until the seat belts are fastened.
Airbags
General information
This system contributes towards improving the
safety of passengers (with the exception of the
rear centre passenger) in the event of violent
collisions. The airbags supplement the action
of the seat belts fitted with force limiters (with
the exception of the rear centre passenger).
If a
collision occurs, the electronic detectors
record and analyse the front and side impacts
sustained in the impact detection zones:
-
i
n the event of a serious impact, the airbags
are deployed instantly and contribute
towards better protection of the passengers
(with the exception of the rear centre
passenger); immediately after the impact,
the airbags deflate rapidly so that they
do not hinder visibility or the exit of the
passengers,
-
i
n the case of a minor or rear impact or in
certain roll-over conditions, the airbags
may not be deployed; the seat belt
alone contributes towards ensuring your
protection in these situations.
The airbags do not operate when the
ignition is switched off.
This equipment will only deploy once. If
a
second impact occurs (during the same
or a
subsequent accident), the airbag will
not be deployed again.
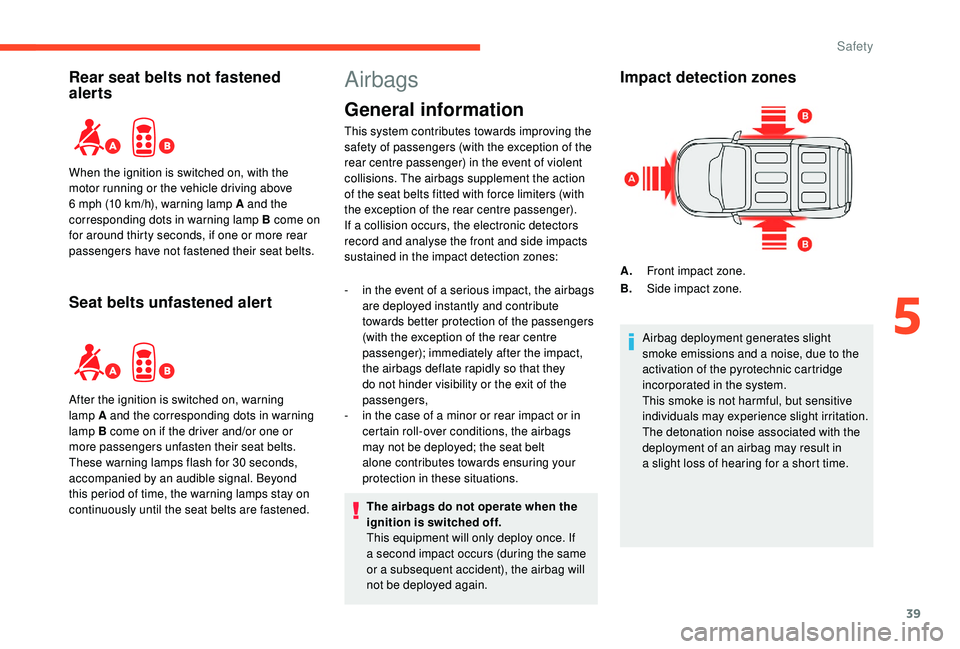
Impact detection zones
A. Front impact zone.
B. Side impact zone.
Airbag deployment generates slight
smoke emissions and a
noise, due to the
activation of the pyrotechnic cartridge
incorporated in the system.
This smoke is not harmful, but sensitive
individuals may experience slight irritation.
The detonation noise associated with the
deployment of an airbag may result in
a
slight loss of hearing for a short time.
5
Safety
Page 52 of 84
50
Driving recommendations
Observe the driving regulations and remain
vigilant whatever the traffic conditions.
Pay close attention to the traffic and keep your
hands on the wheel so that you are ready to
react at any time to any eventuality.
As a safety measure, the driver must only carry
out any operations that require close attention
when the vehicle is stationary.
On a
long journey, a break every two hours is
strongly recommended.
In bad weather, drive smoothly, anticipate the
need to brake and increase the distance from
other vehicles.
Important!
Never drive with the parking brake applied
– Risk of overheating and damage to the
braking system!
Never leave a
vehicle unsuper vised with
the motor running. If you have to leave
your vehicle with the motor running,
apply the parking brake and put the drive
selector into position N or P .
Driving on flooded roads
We strongly advise against driving on flooded
roads, as this could cause serious damage
to the motor or gearbox, as well as to the
electrical systems of your vehicle.
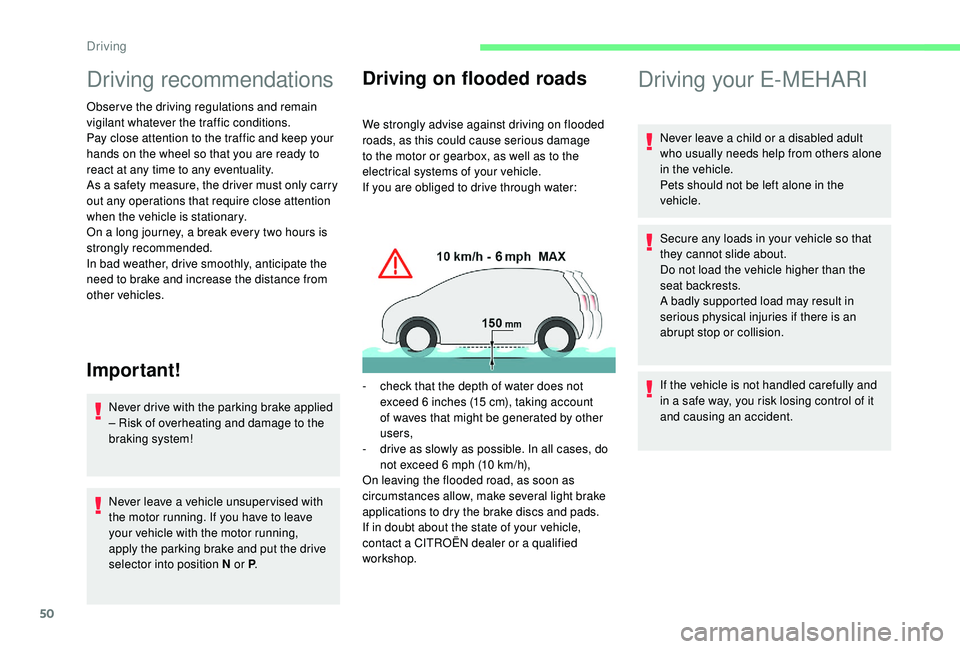
If you are obliged to drive through water:
-
c
heck that the depth of water does not
exceed 6
inches (15 cm), taking account
of waves that might be generated by other
users,
-
d
rive as slowly as possible. In all cases, do
not exceed 6
mph (10 km/h),
On leaving the flooded road, as soon as
circumstances allow, make several light brake
applications to dry the brake discs and pads.
If in doubt about the state of your vehicle,
contact a
CITROËN dealer or a qualified
workshop.
Driving your E-MEHARI
Never leave a child or a disabled adult
w ho usually needs help from others alone
in the vehicle.
Pets should not be left alone in the
vehicle.
Secure any loads in your vehicle so that
they cannot slide about.
Do not load the vehicle higher than the
seat backrests.
A badly supported load may result in
serious physical injuries if there is an
abrupt stop or collision.
If the vehicle is not handled carefully and
in a
safe way, you risk losing control of it
and causing an accident.
Driving