Sim Citroen GRAND C4 PICASSO 2017 2.G Owner's Manual
[x] Cancel search | Manufacturer: CITROEN, Model Year: 2017, Model line: GRAND C4 PICASSO, Model: Citroen GRAND C4 PICASSO 2017 2.GPages: 527, PDF Size: 12.91 MB
Page 14 of 527
12
C4-Picasso-II_en_Chap01_instruments-bord_ed02-2016
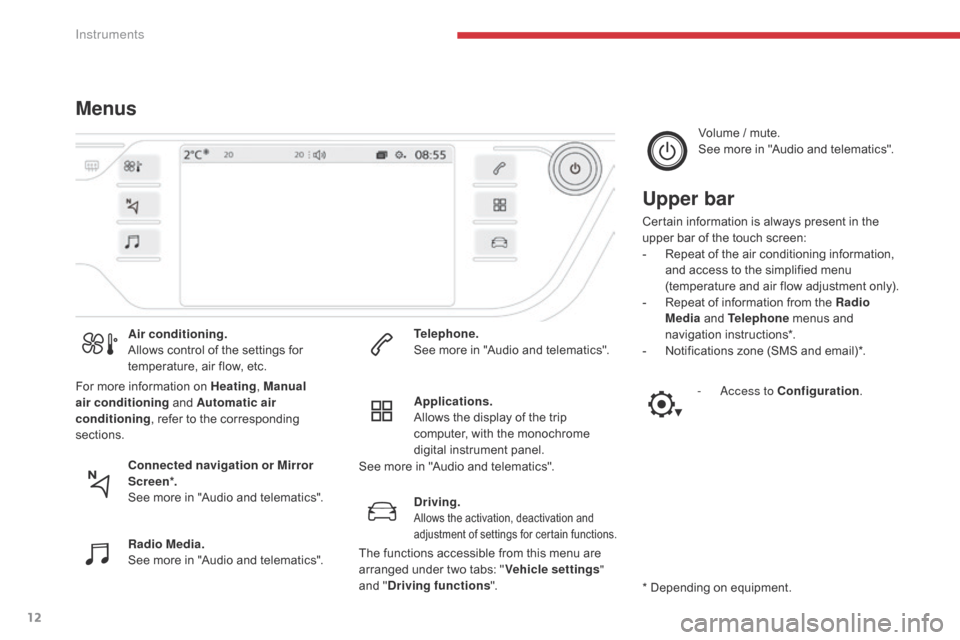
MenusUpper bar
Certain information is always present in the
upper bar of the touch screen:
-
R
epeat of the air conditioning information,
and access to the simplified menu
(temperature and air flow adjustment only).
-
R
epeat of information from the Radio
Media and Telephone menus and
navigation instructions*.
-
N
otifications zone (SMS and email)*.
* Depending on equipment.
Air conditioning.
Allows control of the settings for
temperature, air flow, etc.
Connected navigation or Mirror
Scre en*.
See more in "Audio and telematics".
Radio Media.
See more in "Audio and telematics".
Telephone.
See more in "Audio and telematics".
Driving.
Allows the activation, deactivation and
adjustment of settings for certain functions.
Applications.
Allows the display of the trip
computer, with the monochrome
digital instrument panel.Volume / mute.
See more in "Audio and telematics".
- A ccess to Configuration
.
For more information on Heating
, Manual
air conditioning and Automatic air
conditioning , refer to the corresponding
sections.
The functions accessible from this menu are
arranged under two tabs: "Vehicle settings"
and " Driving functions ".
See more in "Audio and telematics".
Instruments
Page 45 of 527
43
C4-Picasso-II_en_Chap01_instruments-bord_ed02-2016
AdBlue® fluid range indicators
Once the AdBlue® tank is on reserve or after
detection of a fault with the SCR emissions
control system, when the ignition is switched
on an indicator displays an estimate of the
distance that can be covered, the range, before
engine starting is prevented.
In the event of simultaneous system fault and
low AdBlue
® level, the shortest range figure is
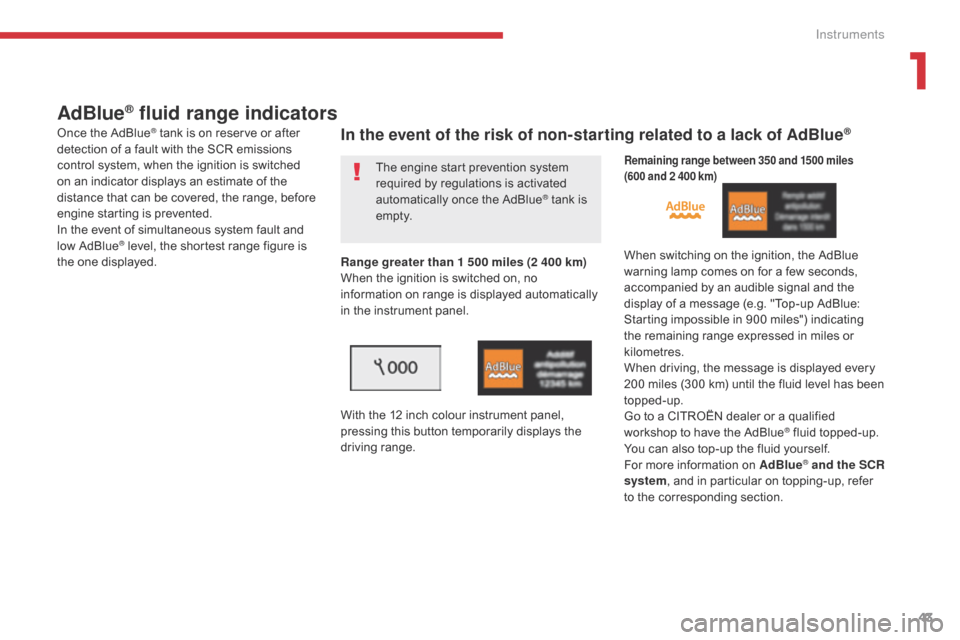
the one displayed. Range greater than 1 500 miles (2 400 km)
When the ignition is switched on, no
information on range is displayed automatically
in the instrument panel.
With the 12 inch colour instrument panel,
pressing this button temporarily displays the
driving range.
In the event of the risk of non-starting related to a lack of AdBlue®
The engine start prevention system
required by regulations is activated
automatically once the AdBlue
® tank is
e m pt y.
Remaining range between 350 and 1500 miles
(600 and 2 400 km)
When switching on the ignition, the AdBlue
warning lamp comes on for a few seconds,
accompanied by an audible signal and the
display of a message (e.g. "Top-up AdBlue:
Starting impossible in 900 miles") indicating
the remaining range expressed in miles or
kilometres.
When driving, the message is displayed every
200 miles (300 km) until the fluid level has been
topped-up.
Go to a CITROËN dealer or a qualified
workshop to have the AdBlue
® fluid topped-up.
You can also top-up the fluid yourself.
For more information on AdBlue
® and the SCR
system, and in particular on topping-up, refer
to the corresponding section.
1
Instruments
Page 88 of 527
86
C4-Picasso-II_en_Chap03_ergonomie-confort_ed02-2016
Flat floor
Folding a seat
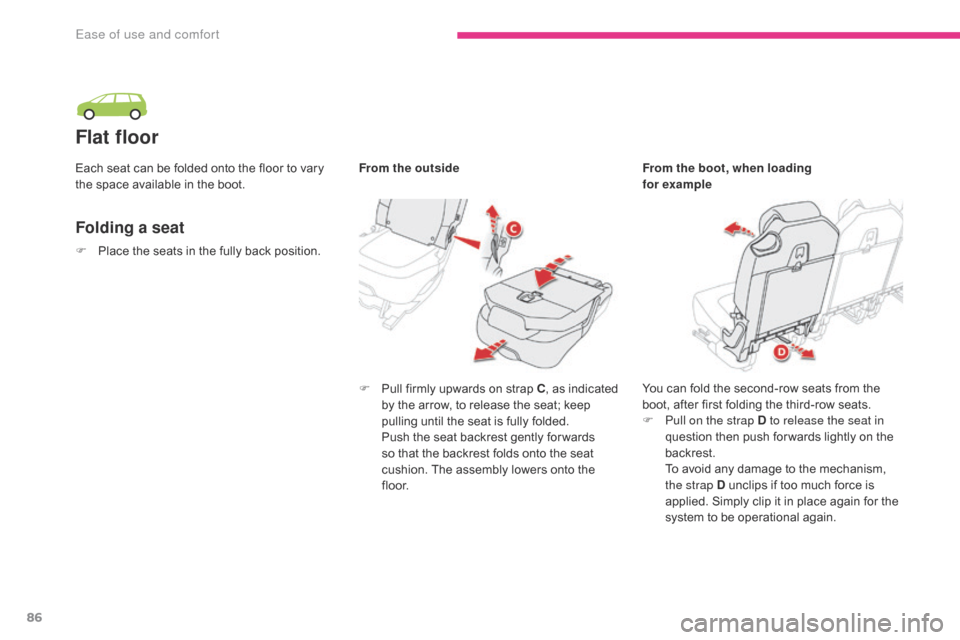
F Pull firmly upwards on strap C, as indicated
by the arrow, to release the seat; keep
pulling until the seat is fully folded.
P
ush the seat backrest gently for wards
so that the backrest folds onto the seat
cushion. The assembly lowers onto the
f l o o r. You can fold the second-row seats from the
boot, after first folding the third-row seats.
F
P
ull on the strap D to release the seat in
question then push for wards lightly on the
backrest.
T
o avoid any damage to the mechanism,
the strap D
unclips if too much force is
applied. Simply clip it in place again for the
system to be operational again.
F
P
lace the seats in the fully back position.
Each seat can be folded onto the floor to vary
the space available in the boot.
From the outside
From the boot, when loading
for example
Ease of use and comfort
Page 100 of 527
98
C4-Picasso-II_en_Chap03_ergonomie-confort_ed02-2016
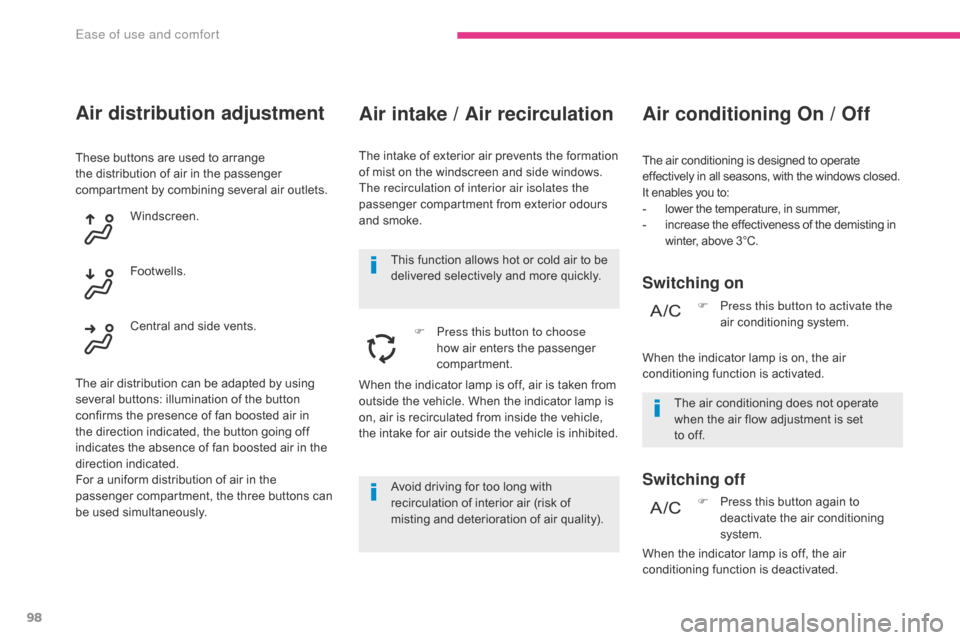
Air intake / Air recirculation
The intake of exterior air prevents the formation
of mist on the windscreen and side windows.
The recirculation of interior air isolates the
passenger compartment from exterior odours
and smoke.F
P
ress this button to choose
how air enters the passenger
compartment.
Air conditioning On / Off
Switching on
Switching off
The air conditioning does not operate
when the air flow adjustment is set
to
off.F
P
ress this button to activate the
air conditioning system.
Avoid driving for too long with
recirculation of interior air (risk of
misting and deterioration of air quality). This function allows hot or cold air to be
delivered selectively and more quickly. The air conditioning is designed to operate
effectively in all seasons, with the windows closed.
It enables you to:
-
l
ower the temperature, in summer,
-
i
ncrease the effectiveness of the demisting in
winter, above 3°C.
F
P
ress this button again to
deactivate the air conditioning
system.
Air distribution adjustment
These buttons are used to arrange
the distribution of air in the passenger
compartment by combining several air outlets.
Windscreen.
The air distribution can be adapted by using
several buttons: illumination of the button
confirms the presence of fan boosted air in
the direction indicated, the button going off
indicates the absence of fan boosted air in the
direction indicated.
For a uniform distribution of air in the
passenger compartment, the three buttons can
be used simultaneously. Footwells.
Central and side vents.
When the indicator lamp is off, air is taken from
outside the vehicle. When the indicator lamp is
on, air is recirculated from inside the vehicle,
the intake for air outside the vehicle is inhibited. When the indicator lamp is on, the air
conditioning function is activated.
When the indicator lamp is off, the air
conditioning function is deactivated.
Ease of use and comfort
Page 114 of 527
112
C4-Picasso-II_en_Chap03_ergonomie-confort_ed02-2016
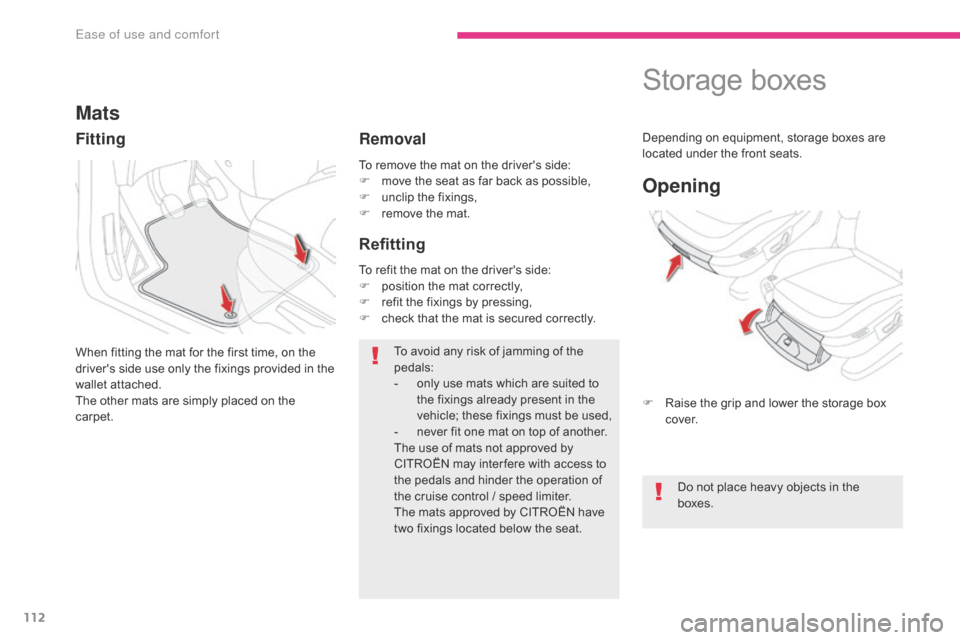
To remove the mat on the driver's side:
F m ove the seat as far back as possible,
F
u
nclip the fixings,
F
r
emove the mat.
Mats
When fitting the mat for the first time, on the
driver's side use only the fixings provided in the
wallet attached.
The other mats are simply placed on the
carpet. To avoid any risk of jamming of the
pedals:
-
o
nly use mats which are suited to
the fixings already present in the
vehicle; these fixings must be used,
-
n
ever fit one mat on top of another.
The use of mats not approved by
CITROËN may inter fere with access to
the pedals and hinder the operation of
the cruise control / speed limiter.
The mats approved by CITROËN have
two fixings located below the seat.
To refit the mat on the driver's side:
F
p
osition the mat correctly,
F
r
efit the fixings by pressing,
F
c
heck that the mat is secured correctly.
Fitting
Removal
Refitting
Storage boxes
F Raise the grip and lower the storage box
c ove r.
Opening
Do not place heavy objects in the
boxes.
Depending on equipment, storage boxes are
located under the front seats.
Ease of use and comfort
Page 117 of 527
115
C4-Picasso-II_en_Chap03_ergonomie-confort_ed02-2016
Rear multimedia
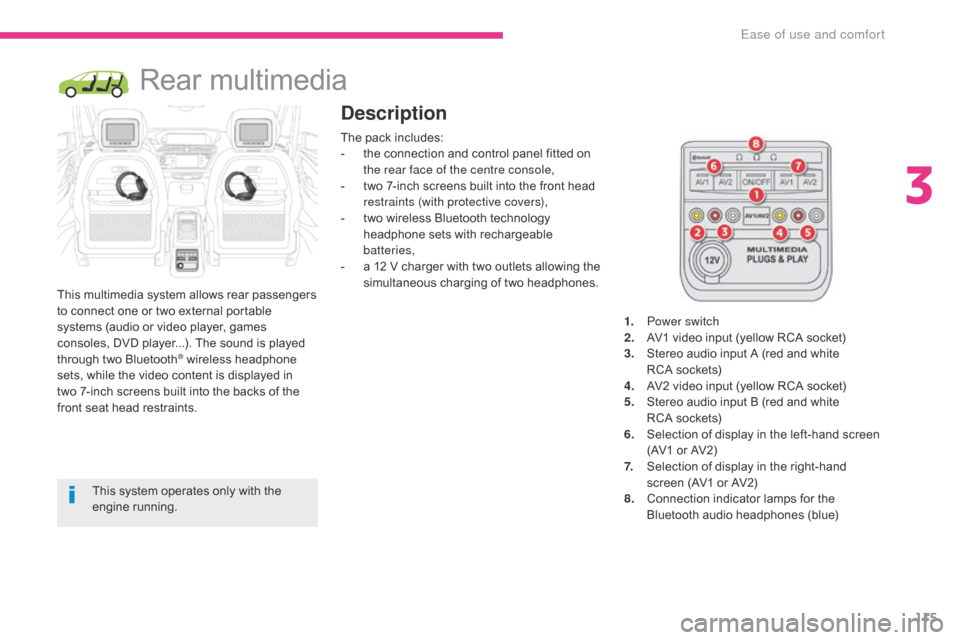
This multimedia system allows rear passengers
to connect one or two external portable
systems (audio or video player, games
consoles, DVD player...). The sound is played
through two Bluetooth
® wireless headphone
sets, while the video content is displayed in
two
7-inch screens built into the backs of the
front seat head restraints.
Description
This system operates only with the
engine running. The pack includes:
-
t
he connection and control panel fitted on
the rear face of the centre console,
-
t
wo 7-inch screens built into the front head
restraints (with protective covers),
-
t
wo wireless Bluetooth technology
headphone sets with rechargeable
batteries,
-
a 1
2 V charger with two outlets allowing the
simultaneous charging of two headphones.
1.
P
ower switch
2.
A
V1 video input (yellow RCA socket)
3.
S
tereo audio input A (red and white
RCA sockets)
4.
A
V2 video input (yellow RCA socket)
5.
S
tereo audio input B (red and white
RCA sockets)
6.
S
election of display in the left-hand screen
(AV1 or AV2)
7.
S
election of display in the right-hand
screen (AV1 or AV2)
8. C onnection indicator lamps for the
Bluetooth audio headphones (blue)
3
Ease of use and comfort
Page 135 of 527
133
C4-Picasso-II_en_Chap04_conduite_ed02-2016
Electric parking brake
In the event of a battery failure, the
electric parking brake no longer works.
As a safety measure, if the parking
brake is not applied, immobilise the
vehicle by engaging a gear (with a
manual gearbox) or placing a chock at
one of the wheels.
Contact a CITROËN dealer or a
qualified workshop.
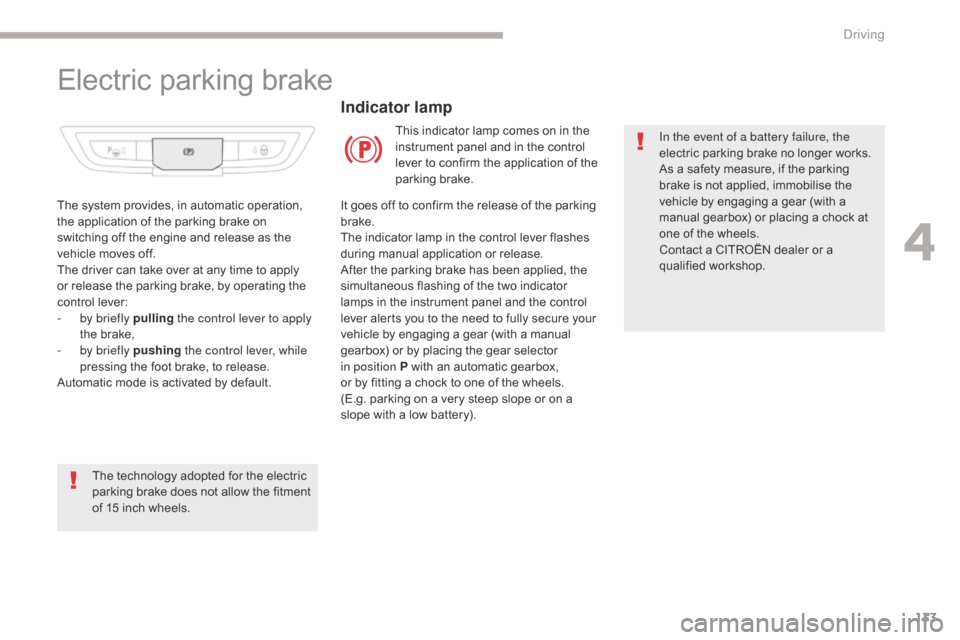
Indicator lamp
This indicator lamp comes on in the
instrument panel and in the control
lever to confirm the application of the
parking brake.
The system provides, in automatic operation,
the application of the parking brake on
switching off the engine and release as the
vehicle moves off.
The driver can take over at any time to apply
or release the parking brake, by operating the
control lever:
-
b
y briefly pulling the control lever to apply
the brake,
-
b
y briefly pushing the control lever, while
pressing the foot brake, to release.
Automatic mode is activated by default.
The technology adopted for the electric
parking brake does not allow the fitment
of 15 inch wheels. It goes off to confirm the release of the parking
brake.
The indicator lamp in the control lever flashes
during manual application or release.
After the parking brake has been applied, the
simultaneous flashing of the two indicator
lamps in the instrument panel and the control
lever alerts you to the need to fully secure your
vehicle by engaging a gear (with a manual
gearbox) or by placing the gear selector
in position P with an automatic gearbox,
or by fitting a chock to one of the wheels.
(E.g.
parking on a very steep slope or on a
slope with a low battery).
4
Driving
Page 158 of 527
156
C4-Picasso-II_en_Chap04_conduite_ed02-2016
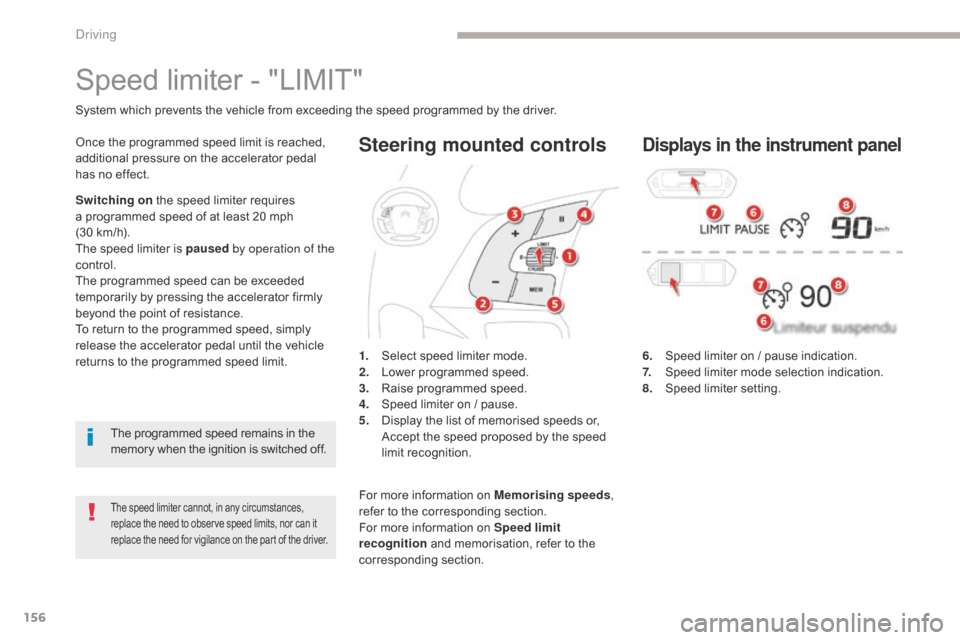
Steering mounted controls
6. Speed limiter on / pause indication.
7. Speed limiter mode selection indication.
8.
S
peed limiter setting.
Speed limiter - "LIMIT"
System which prevents the vehicle from exceeding the speed programmed by the driver.
The speed limiter cannot, in any circumstances,
replace the need to observe speed limits, nor can it
replace the need for vigilance on the part of the driver.
Once the programmed speed limit is reached,
additional pressure on the accelerator pedal
has no effect.
1.
S
elect speed limiter mode.
2.
L
ower programmed speed.
3.
R
aise programmed speed.
4.
S
peed limiter on / pause.
5.
D
isplay the list of memorised speeds or,
A
ccept the speed proposed by the speed
limit recognition.Displays in the instrument panel
S witching on the speed limiter requires
a programmed speed of at least 20 mph
(30
km/h).
The speed limiter is paused by operation of the
control.
The programmed speed can be exceeded
temporarily by pressing the accelerator firmly
beyond the point of resistance.
To return to the programmed speed, simply
release the accelerator pedal until the vehicle
returns to the programmed speed limit.
The programmed speed remains in the
memory when the ignition is switched off. For more information on Memorising speeds ,
refer to the corresponding section.
For more information on Speed limit
recognition and memorisation, refer to the
corresponding section.
Driving
Page 161 of 527
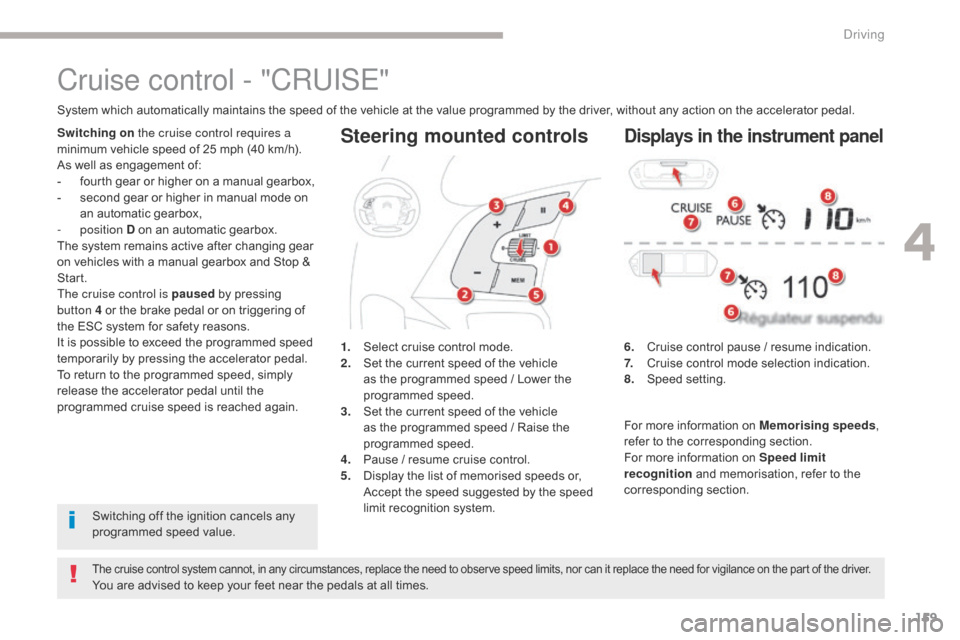
159
C4-Picasso-II_en_Chap04_conduite_ed02-2016
Steering mounted controls
6. Cruise control pause / resume indication.
7. Cruise control mode selection indication.
8.
Spe
ed setting.
Cruise control - "CRUISE"
System which automatically maintains the speed of the vehicle at the value programmed by the driver, without any action on the accelerator pedal.
The cruise control system cannot, in any circumstances, replace the need to observe speed limits, nor can it replace the need for vigilance on the part of the driver.
You are advised to keep your feet near the pedals at all times.
S
witching on the cruise control requires a
minimum vehicle speed of 25 mph (40 km/h).
As well as engagement of:
-
f
ourth gear or higher on a manual gearbox,
-
s
econd gear or higher in manual mode on
an automatic gearbox,
-
position
D on an automatic gearbox.
The system remains active after changing gear
on vehicles with a manual gearbox and Stop &
Start.
The cruise control is paused by pressing
button 4 or the brake pedal or on triggering of
the ESC system for safety reasons.
It is possible to exceed the programmed speed
temporarily by pressing the accelerator pedal.
To return to the programmed speed, simply
release the accelerator pedal until the
programmed cruise speed is reached again. 1.
S
elect cruise control mode.
2.
S
et the current speed of the vehicle
as the programmed speed / Lower the
programmed speed.
3.
S
et the current speed of the vehicle
as the programmed speed / Raise the
programmed speed.
4.
P
ause / resume cruise control.
5.
D
isplay the list of memorised speeds or,
A
ccept the speed suggested by the speed
limit recognition system.
Displays in the instrument panel
Switching off the ignition cancels any
programmed speed value. For more information on Memorising speeds
,
refer to the corresponding section.
For more information on Speed limit
recognition and memorisation, refer to the
corresponding section.
4
Driving
Page 167 of 527

165
C4-Picasso-II_en_Chap04_conduite_ed02-2016
In the event of the presence of a
vehicle detected by the radar, if the
speed selected is much higher than
the speed of that vehicle, the system
is not activated and the alert message
"Activation not possible, conditions
unsuitable" is displayed until driving
conditions are safe to allow activation of
the system.
Exceeding the speed setting
The information is grouped together in the
instrument panel.
6.
I
ndication of cruise control pause/resume.
7.
I
ndication of selection of cruise control
mode, or
v
ehicle speed adjustment phase.
8.
C
ruise speed setting, or
a
djusted speed lower than the cruise
setting.
Displays in the instrument panel
Modification of the inter-vehicle
distance
Press button 6 to choose a new inter-vehicle
distance setting from the 3 available (" Close",
" Normal ", "Distant ").
This value remains in memory, whatever the
state of the system.
It is possible to exceed the speed setting
temporarily by depressing the accelerator
pedal.
Then simply release the accelerator pedal to
return to the programmed speed.
If the speed setting is unintentionally exceeded,
descending a steep hill for example, the speed
setting in the instrument panel flashes as a
warning.
4
Driving