tailgate Citroen GRAND C4 PICASSO RHD 2016 2.G User Guide
[x] Cancel search | Manufacturer: CITROEN, Model Year: 2016, Model line: GRAND C4 PICASSO RHD, Model: Citroen GRAND C4 PICASSO RHD 2016 2.GPages: 523, PDF Size: 13.63 MB
Page 67 of 523
65
or
Opening the tailgate with the
electronic key / remote control (A)
Opening the tailgate with the
"Keyless Entry and Starting"
system "B"
Opening the tailgate
F Make a long press on the remote c
ontrol button.
F
P
ress button B on the tailgate, with the
e
lectronic key in the zone covered.
When
selective locking is activated, the
e
lectronic key must be near the rear of
t
he
vehicle.
By
default, the tailgate opens
c
ompletely or alternatively to the
m
emorised
p
osition.
F
A
fter
complete unlocking of the vehicle,
p
ress control B on the tailgate.
The
instruction is confirmed by an audible
s
ignal.
Motorised closing
There are two possibilities:
F P ress and release the exterior control B.
or
The
motorised tailgate has an anti-
pinch
system that interrupts closing if it
e
ncounters an obstacle.
F
P
ress and then release button C.
There
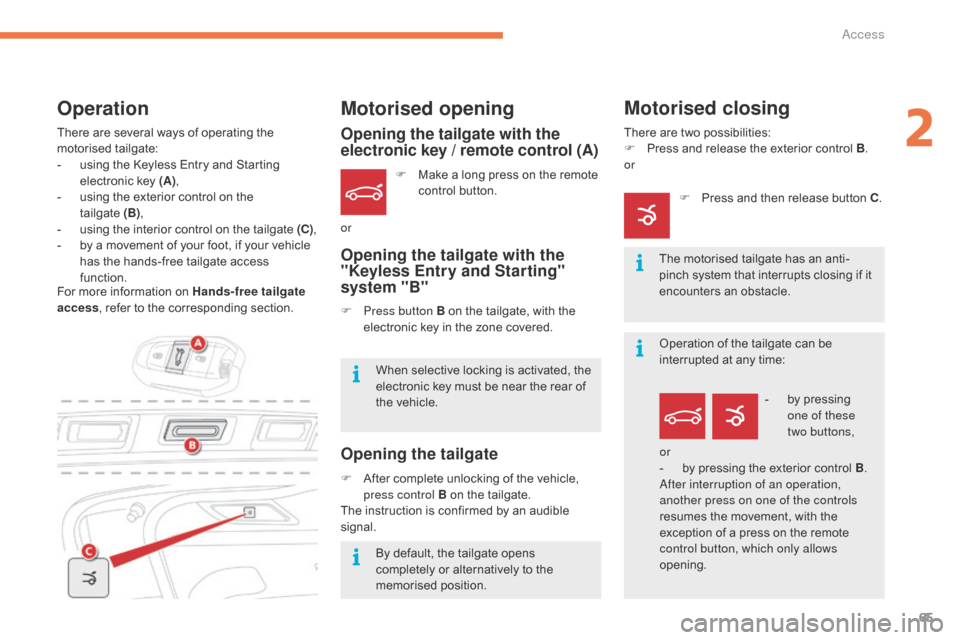
are
several
ways
of
operating
the
m
otorised t
ailgate:
-
u
sing
the
Keyless
Entry
and
Starting
e
lectronic
key
(A) ,
-
u
sing
the
exterior
control
on
the
t
ailgate (B),
-
u
sing
the
interior
control
on
the
tailgate
(C) ,
-
b
y
a
movement
of
your
foot,
if
your
vehicle
h
as
the
hands-free
tailgate
access
f
unction.
Motorised opening
For more information on Hands-free tailgate
a ccess ,
refer to the corresponding section.
Operation
Operation of the tailgate can be interrupted at any time:
-
b
y pressing
o
ne of these
two
buttons,
or
-
b
y pressing the exterior control B.
After interruption of an operation,
another press on one of the controls
resumes
the movement, with the
e
xception of a press on the remote
c
ontrol button, which only allows
opening.
2
Access
Page 68 of 523
66
Memorising an
opening position
Where height is restricted (garage with a low c
eiling, ...) it is possible to limit and memorise
t
he opening angle of the motorised tailgate.
This
memorisation is done as follows:
-
o
pen the tailgate to the desired position,
-
p
ress button C or the exterior control B for
more
than 3 seconds.
Memorisation
of the maximum opening position
o
f the tailgate is confirmed by an audible signal.
To
cancel the memorised position:
-
s
top the tailgate in an intermediate
p
osition,
-
p
ress button C or the exterior control B for
more
than 3 seconds.
Cancellation
of the memorised position is
c
onfirmed by an audible signal.
Manual operation
The motorised tailgate can be opened and closed manually, even if motorised operation is
a
ctivated.
However,
any manual intervention must be
d
one with the tailgate stopped.
Repeated
opening
and
closing
of
the
t
ailgate
can
cause
overheating
of
its
e
lectric
motor,
after
which
opening
and
c
losing
will
not
be
possible.
Allow
10
minutes
for
the
motor
to
cool
d
own
before
operating
the
tailgate
ag
ain.
If you are not able to wait, operate it
manually.
Detection of obstacles
Should an obstacle (person or object) be e ncountered, the anti-pinch system interrupts
t
he closing movement and raises the tailgate a
f
ew centimetres to clear the obstacle. When
opening and closing a motorised tailgate
m
anually, there is no assistance from gas-filled
s
truts. Resistance to opening and closing is
t
herefore entirely normal.
Access
Page 69 of 523
67
Reinitialising the motorised
tailgate
This operation is necessary where there is
no movement - after detection of an obstacle,
c
onnecting or recharging the battery, ...
F
O
pen the tailgate manually, if necessary.
F
M
anually close the tailgate fully.
If
the problem persists, contact a CITROËN
d
ealer or a qualified workshop.
Precautions in use
In wintry conditions
In the event of an accumulation of snow on the tailgate, clear the snow before
c
ommanding a motorised opening of
t
he tailgate.
The
formation of ice can block the
t
ailgate and prevent its opening: wait
u
ntil the ice melts with the heating of
t
he
p
assenger
c
ompartment.
When washing the vehicle
When washing the vehicle in an automatic car wash, don't forget to
l
ock your vehicle to avoid the risk of
u
nexpected
ope
ning.
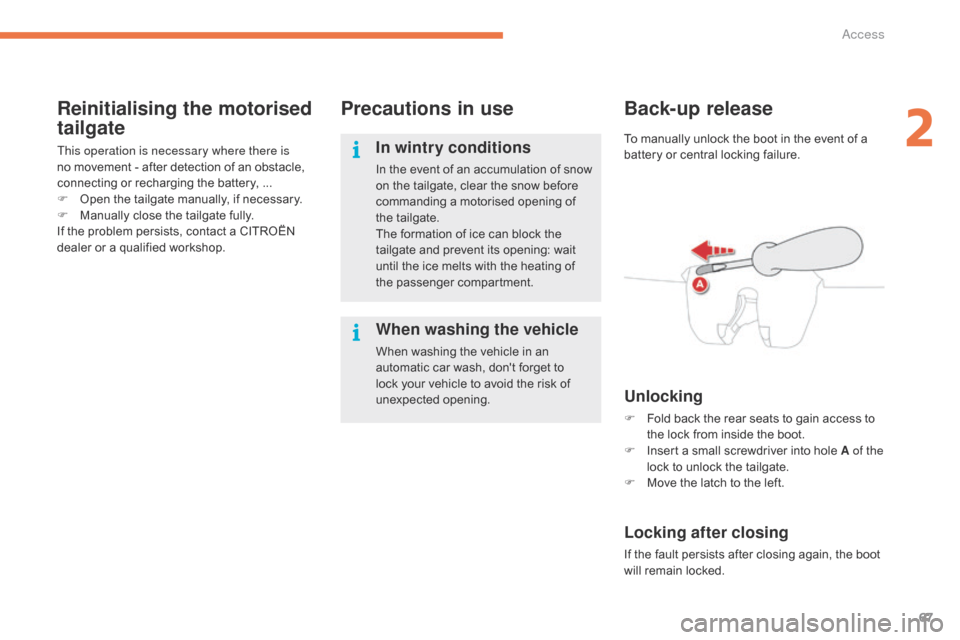
Back-up release
Unlocking
F Fold back the rear seats to gain access to t
he lock from inside the boot.
F
I
nsert a small screwdriver into hole A of the
lock
to unlock the tailgate.
F
M
ove the latch to the left.
Locking after closing
If the fault persists after closing again, the boot will remain locked.
To
manually unlock the boot in the event of a
b
attery or central locking failure.
2
Access
Page 70 of 523
68
Hands-free tailgate access
The tailgate my be equipped with a hands-free function, to allow you to open or close the tailgate when your hands are full.
For
more information on the Motorised tailgate,
refer to the corresponding section.
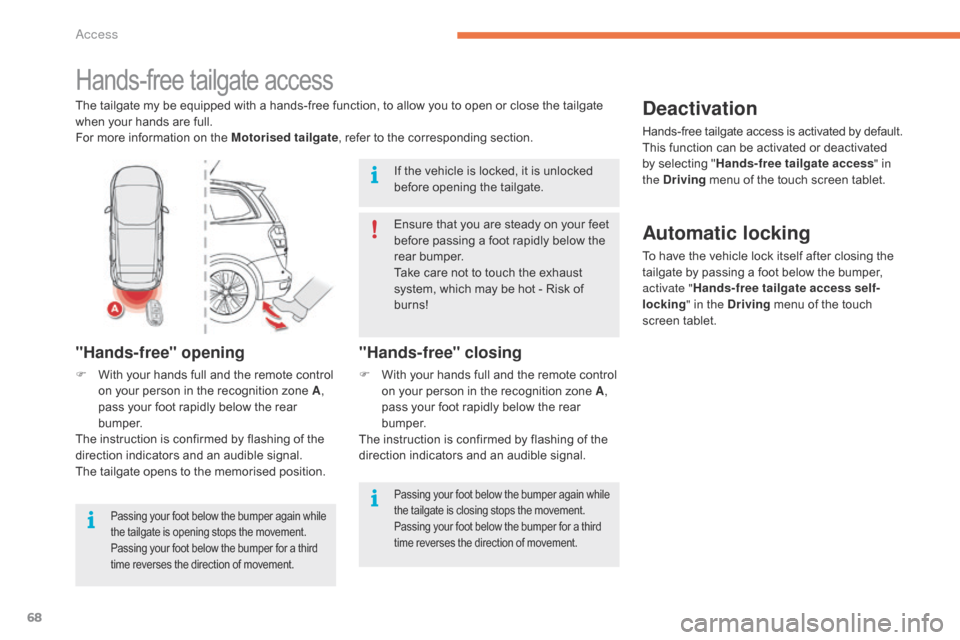
"Hands-free" opening
F With your hands full and the remote control o
n your person in the recognition zone A,
pass
your foot rapidly below the rear
b
u m p e r.
The
instruction is confirmed by flashing of the
d
irection indicators and an audible signal.
The
tailgate opens to the memorised position.
Passing your foot below the bumper again while the tailgate is opening stops the movement. P
assing your foot below the bumper for a third
t
ime reverses the direction of movement.
"Hands-free" closing
F With your hands full and the remote control o
n your person in the recognition zone A,
pass
your foot rapidly below the rear
b
u m p e r.
The
instruction is confirmed by flashing of the
d
irection indicators and an audible signal.
Deactivation
Hands-free tailgate access is activated by default.
T his function can be activated or deactivated
b
y selecting "Hands-free tailgate access " in
the Driving
menu of the touch screen tablet.
Ensure
that
you
are
steady
on
your
feet
b
efore
passing
a
foot
rapidly
below
the
r
ear
bumper.
Take
care
not
to
touch
the
exhaust
s
ystem,
which
may
be
hot
-
Risk
of
b
urns!
If
the
vehicle
is
locked,
it
is
unlocked
b
efore
opening
the
tailgate.
Automatic locking
To have the vehicle lock itself after closing the t ailgate by passing a foot below the bumper,
a
ctivate " Hands-free tailgate access self-
locking " in the Driving
menu of the touch
s
creen
t
ablet.
Passing your foot below the bumper again while the tailgate is closing stops the movement. P
assing your foot below the bumper for a third
t
ime reverses the direction of movement.
Access
Page 71 of 523
69
Operating faults
If several foot movements below the rear bumper fail to open the tailgate, wait a
f
ew seconds before starting again.
The
function is automatically deactivated in the
e
vent of heavy rain or accumulation of snow.
If
the function fails to operate, check
t
hat the electronic key is not exposed to
s
trong electromagnetic inter ference (a
s
mar tphone, ...).
The
function may not work correctly with a
pro
sthetic
le
g.
The
function may not work correctly if your
v
ehicle is fitted with a towbar. In
some circumstances, the tailgate may only o
pen or close, particularly if:
-
y
our vehicle is fitted with a towbar,
-
y
ou hitch or unhitch a trailer,
-
y
ou fit or remove a bicycle carrier,
-
y
ou load or unload bicycles from a bicycle
c
a r r i e r,
-
y
ou place or lift something behind the
v
ehicle,
-
a
n animal approaches the bumper,
-
y
ou are washing your vehicle,
-
a
service is being carried out on your
v
ehicle,
-
y
ou are accessing the spare wheel
(
depending
o
n
v
ersion).
To
avoid such operating problems, keep the
e
lectronic key away from the recognition zone
o
r deactivate "Hands-Free Tailgate Access".
Ensure
that no object or person might prevent
t
he correct opening or closing of the tailgate.
Be
particularly aware of children when
o
perating the tailgate.
2
Access
Page 189 of 523
187
Reversing camera
Clean the reversing camera regularly u
sing a soft, dry cloth.
The
reversing
camera
is
activated
automatically
w
hen
r
everse
g
ear
i
s
enga
ged.
Depending
on
version,
the
image
is
displayed
in
t
he
touch
screen
tablet
or
the
instrument
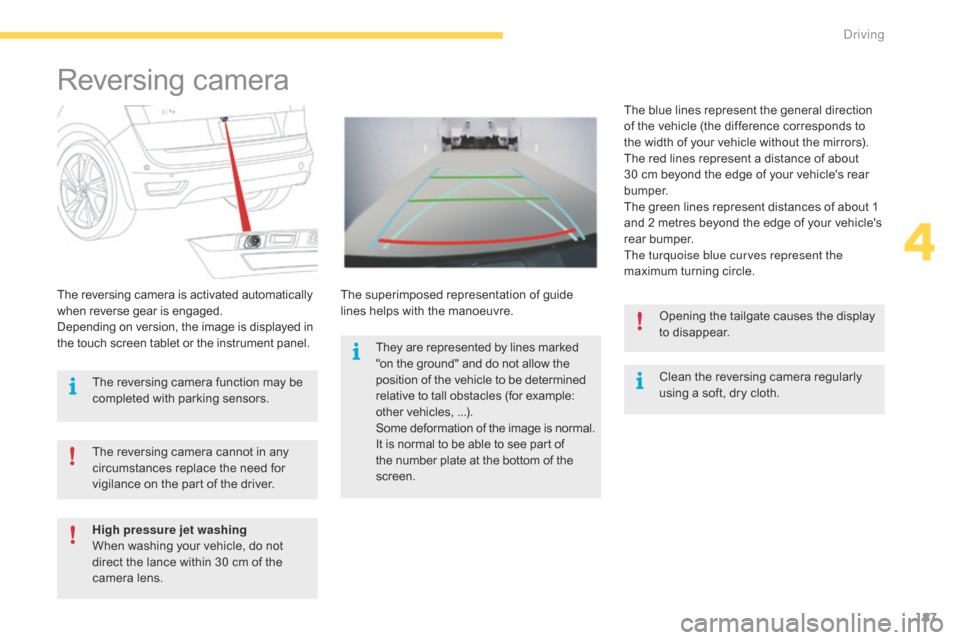
panel. The
superimposed
representation
of
guide
l
ines
helps
with
the
manoeuvre. The
blue lines represent the general direction
o
f
the
vehicle (the difference corresponds to
t
he
width of your vehicle without the mirrors).
The
red lines represent a distance of about
3
0
cm
beyond the edge of your vehicle's rear
b
u m p e r.
The
green lines represent distances of about 1
a
nd
2
metres beyond the edge of your vehicle's
r
ear
bumper.
The turquoise blue curves represent the
maximum turning circle.
The
reversing
camera
cannot
in
any
c
ircumstances
replace
the
need
for
v
igilance
on
the
part
of
the
driver. Opening
the tailgate causes the display
t
o disappear.
The
reversing
camera
function
may
be
c
ompleted
with
parking
sensors.
High pressure jet washing
When
washing
your
vehicle,
do
not
d
irect
the
lance
within
30
cm
of
the
c
amera
lens. They
are
represented
by
lines
marked
"
on
the
ground"
and
do
not
allow
the p
osition
of
the
vehicle
to
be
determined r
elative
to
tall
obstacles
(for
example:
o
ther
vehicles, ...).
Some
d
eformation
o
f
t
he
i
mage
i
s
n
ormal.
It
is
normal
to
be
able
to
see
part
of
t
he
number
plate
at
the
bottom
of
the
sc
reen.
4
Driving
Page 190 of 523
188
360 Vision
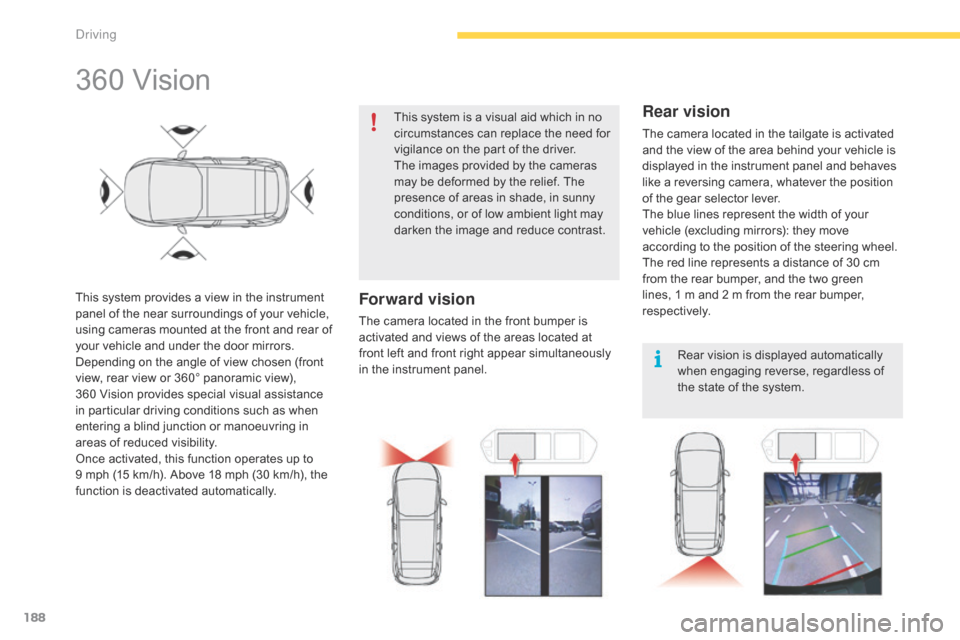
This system provides a view in the instrument panel of the near surroundings of your vehicle,
u
sing cameras mounted at the front and rear of
y
our vehicle and under the door mirrors.
Depending
on the angle of view chosen (front
v
iew, rear view or 360° panoramic view),
3
60 Vision provides special visual assistance
i
n particular driving conditions such as when
e
ntering a blind junction or manoeuvring in
a
reas of reduced visibility.
Once
activated, this function operates up to
9 m
ph (15 km/h). Above 18 mph (30 km/h), the
f
unction is deactivated automatically. This
system is a visual aid which in no
c
ircumstances can replace the need for
v
igilance on the part of the driver.
The images provided by the cameras
m
ay be deformed by the relief. The
p
resence of areas in shade, in sunny
c
onditions, or of low ambient light may
d
arken the image and reduce contrast.Forward vision
The camera located in the front bumper is a
ctivated and views of the areas located at
f
ront left and front right appear simultaneously
i
n the instrument panel.
Rear vision
The camera located in the tailgate is activated and the view of the area behind your vehicle is
d
isplayed in the instrument panel and behaves
l
ike a reversing camera, whatever the position
o
f the gear selector lever.
The
blue lines represent the width of your
v
ehicle (excluding mirrors): they move
a
ccording to the position of the steering wheel.
The
red line represents a distance of 30 cm
f
rom the rear bumper, and the two green
l
ines, 1 m and 2 m from the rear bumper,
r
espectively. Rear
vision is displayed automatically
w
hen engaging reverse, regardless of
t
he state of the system.
Driving
Page 191 of 523
189
Operation
Activating the function
With the engine running:
F I n the Driving menu, select the "Driving
assistance " tab, then "Panoramic visual
aid ".
With
this menu displayed, select one of the
t
hree views:
Deactivating the function
F Accelerate so as to exceed 18 mph
(30 km/h).
or
F
I
n the Driving
menu, select the "Driving
assistance " tab, then "Panoramic visual
aid ".
F
Sel
ect
"
Camera
O
ff".
Check
the cleanliness of the camera
l
enses
r
egularly.
High pressure jet wash
When
washing your vehicle, direct the
l
ance at least 30 cm away from the
c
amera.
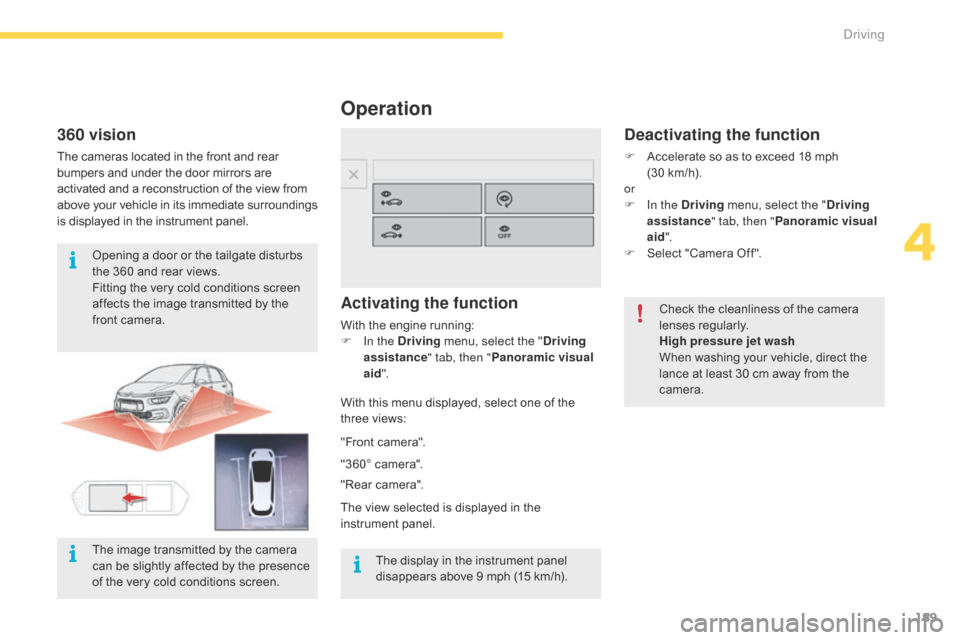
"Front
camera".
"360°
camera".
"Rear
camera".
The
view
selected
is
displayed
in
the
in
strument
pan
el.
360 vision
The cameras located in the front and rear b umpers and under the door mirrors are a
ctivated and a reconstruction of the view from
a
bove
y
our
v
ehicle
i
n
i
ts
i
mmediate
s
urroundings
i
s displayed in the instrument panel.
Opening
a door or the tailgate disturbs
t
he 360 and rear views.
Fitting
the very cold conditions screen
a
ffects the image transmitted by the
f
ront camera.
The
display in the instrument panel
d
isappears above 9 mph (15 km/h).
The
image transmitted by the camera
c
an be slightly affected by the presence
o
f the very cold conditions screen.
4
Driving
Page 207 of 523
205
Displays
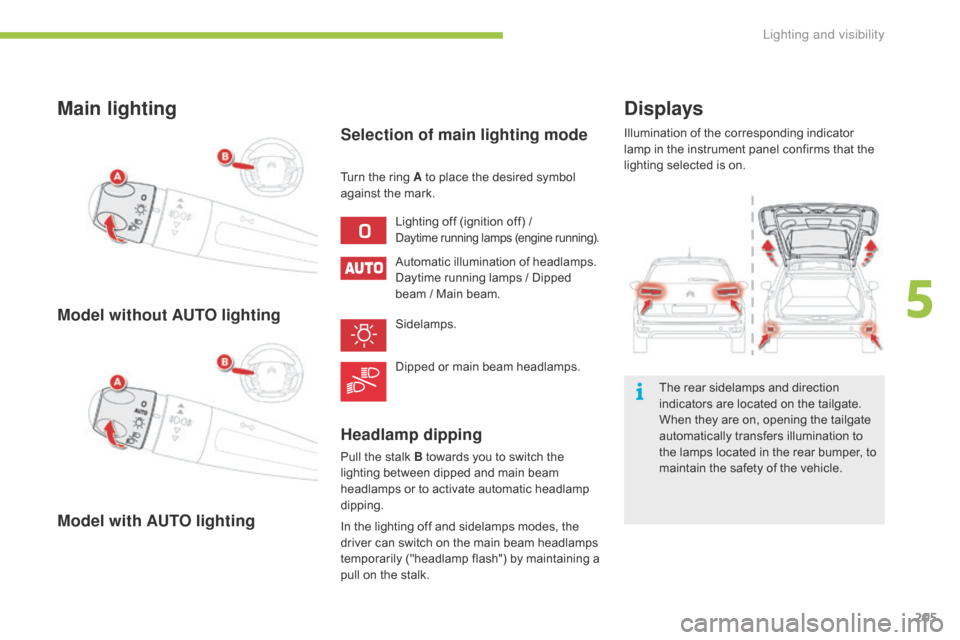
Illumination of the corresponding indicator lamp in the instrument panel confirms that the
l
ighting selected is on.
The
rear sidelamps and direction
i
ndicators are located on the tailgate.
W
hen they are on, opening the tailgate
a
utomatically transfers illumination to
t
he lamps located in the rear bumper, to
m
aintain the safety of the vehicle.
Main lighting
Lighting off (ignition off) /Daytime running lamps (engine running).
Automatic illumination of headlamps.
D aytime running lamps / Dipped
b
eam / Main beam.
Sidelamps.
Dipped
or main beam headlamps.
Turn
the
ring A to place the desired symbol
a
gainst
the mark.
Selection of main lighting mode
Model without AUTO lighting
Model with AUTO lighting Headlamp dipping
Pull the stalk B towards you to switch the l
ighting between dipped and main beam
h
eadlamps or to activate automatic headlamp
d
ipping.
In
the lighting off and sidelamps modes, the
d
river can switch on the main beam headlamps
t
emporarily ("headlamp flash") by maintaining a
p
ull on the stalk.
5
Lighting and visibility
Page 209 of 523
207
Operation of the rear foglamps is inhibited with the tailgate open.
Opening
the tailgate when these lamps
a
re on causes them and their indicator
l
amp in the instrument panel to go off.
They
do not come back on
a
utomatically when the tailgate is
c
losed: they must be switched on again
u
sing the control stalk. In
good or rainy weather, by both day a
nd night, the front foglamps and the
r
ear foglamps are prohibited. In these
s
ituations, the power of their beams
m
ay dazzle other drivers. They should
o
nly be used in fog or falling snow.
In
these weather conditions, you should
s
witch on the foglamps and dipped
b
eam headlamps manually, as the
s
unshine sensor may detect sufficient
l
ight.
Do
not forget to switch off the front and
r
ear foglamps when they are no longer
n
ecessary.Switching off the lighting
when switching off the ignition
When the ignition is switched off, all of the lamps switch off immediately, except for the d
ipped beam headlamps if automatic guide-
me-home
lighting is activated.
Switching on the lighting when
switching on the ignition
To reactivate the lighting control stalk, turn the ring A to position "0"
- lighting off, then t
o the position of your choice.
When the driver's door is opened, a temporary audible signal warns you that
t
he vehicle's lighting is on.
They switch off automatically after a period which depends on the state of charge of the b
attery (entry to energy economy mode).
5
Lighting and visibility