headlamp Citroen GRAND C4 PICASSO RHD 2016 2.G Owner's Guide
[x] Cancel search | Manufacturer: CITROEN, Model Year: 2016, Model line: GRAND C4 PICASSO RHD, Model: Citroen GRAND C4 PICASSO RHD 2016 2.GPages: 523, PDF Size: 13.63 MB
Page 213 of 523
211
The system may suffer inter ference or not work correctly:
-
u
nder conditions of poor visibility
(
falling snow, heavy rain or thick
f
og,
...
),
-
i
f the windscreen is dirty, misted or
o
bscured (by a sticker, ...) in front of
t
he camera,
-
i
f the vehicle is facing highly
re
flective
si
gns.
The
system is not able to detect:
-
r
oad users that do not have their
o
wn lighting, such as pedestrians,
-
r
oad users whose lighting is
o
bscured, such as vehicles running
b
ehind a safety barrier (on a
m
otor way, for example),
-
r
oad users at the top or bottom of
a
steep slope, on twisty roads, on
c
rossroads.
Deactivation
F In the Driving menu, select the "Driving
assistance " tab, then "Automatic
headlamp dip ";
the system changes to
"
automatic illumination headlamps" mode.
To
reactivate the system, flash the headlamps
ag
ain.
Depending on the situation,
t
hese indicator lamps
c
ome on.
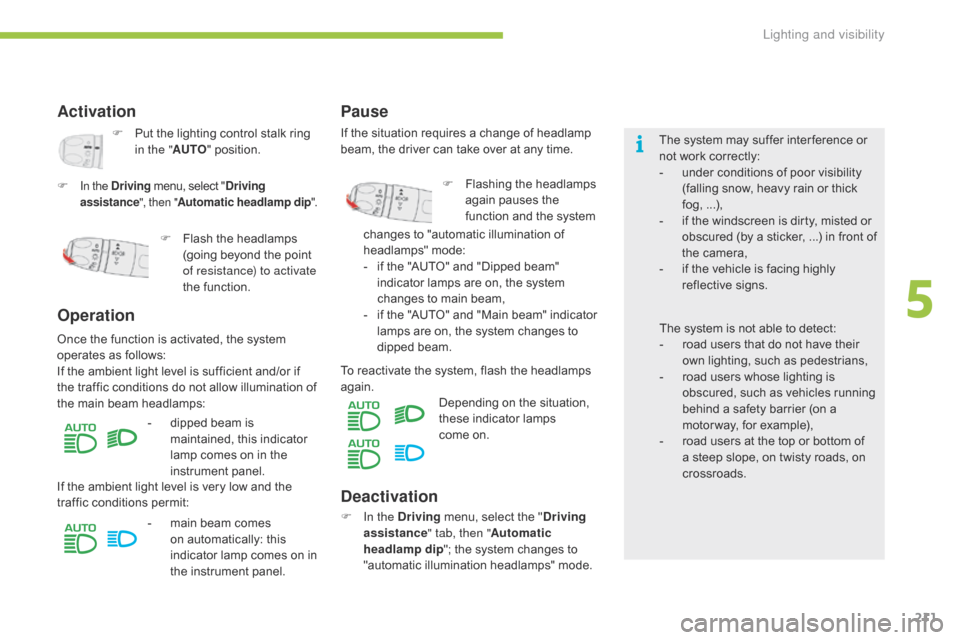
Activation
F Put
the lighting control stalk ring i
n the " AUTO "
position.
F
In the Driving menu, select "Driving
assistance ", then "Automatic headlamp dip ".
Operation
- dipped beam is m
aintained, this indicator
l
amp comes on in the
in
strument
pan
el.
F
F
lash the headlamps
(
going beyond the point
o
f resistance) to activate
the function.
Once
the
function is activated, the system
o
perates
as
follows:
If
the
ambient
light level is sufficient and/or if
t
he
traffic
conditions do not allow illumination of
t
he
main
beam
headlamps:
If
the
ambient
light level is very low and the
t
raffic
conditions permit:
-
m
ain beam comes
o
n automatically: this
i
ndicator lamp comes on in
t
he instrument panel.
Pause
If the situation requires a change of headlamp beam, the driver can take over at any time.
F
F
lashing the headlamps
a
gain pauses the
f
unction and the system
c
hanges to "automatic illumination of
h
eadlamps"
m
ode:
-
i
f the "AUTO" and "Dipped beam"
i
ndicator lamps are on, the system
c
hanges to main beam,
-
i
f the "AUTO" and "Main beam" indicator
l
amps are on, the system changes to
d
ipped
be
am.
5
Lighting and visibility
Page 214 of 523

212
To make your approach to the vehicle easier, these illuminate:
-
t
he zones facing the driver’s and
p
assenger’s
do
ors,
-
t
he zones for ward of the door mirrors and
r
ear ward of the front doors.
Door mirror spotlamps
Switching on
Switching off
They go off automatically after 30 seconds.
Exterior welcome lighting
Switching on
F Press the open padlock on the r
emote control or one of the front
d
oor handles with Keyless Entry
an
d
S
tarting.
Front daytime running
lamps
(light-emitting diodes)
They come on automatically when the engine is started, when the lighting control stalk is in
p
osition " 0" or " AUTO ".
In
some weather conditions (e.g. low
t
emperature or humidity), the presence
o
f misting on the internal sur face of the
g
lass of the headlamps and rear lamps
i
s normal; it disappears after the lamps
h
ave been on for a few minutes. The
remote switching on of the lighting makes
y
our approach to the vehicle easier in poor
light. It is activated when the lighting control
i
s in the "
AUTO" position and the level of light
d
etected by the sunshine sensor is low.
Switching off
The exterior welcome lighting switches off a
utomatically after a set time, when the ignition
i
s switched on or on locking the vehicle.
When
the
courtesy
lamp
is
in
this
p
osition,
the
spotlamps
come
on
au
tomatically:
-
w
hen
you
unlock
the
vehicle,
-
w
hen
you
remove
the
electronic
key
from
t
he
r
eader,
-
w
hen
you
open
a
door,
-
when you use the remote control to locate the vehicle.
The dipped beam headlamps and sidelamps c ome on; your vehicle is also unlocked.
Lighting and visibility
Page 215 of 523
213
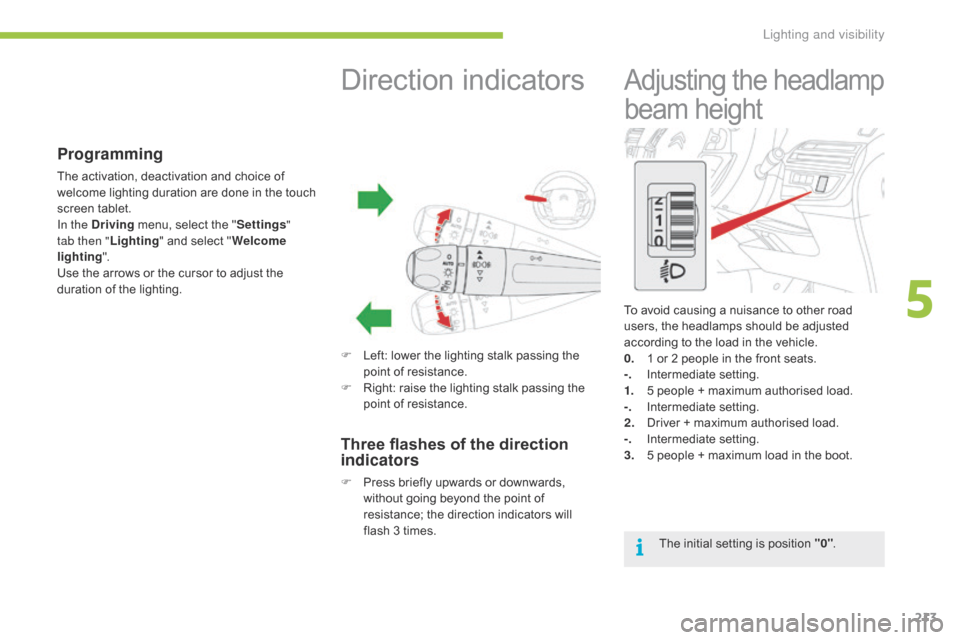
To avoid causing a nuisance to other road users, the headlamps should be adjusted
a
ccording to the load in the vehicle.
0.
1
or 2 people in the front seats.
-.
I
ntermediate
s
etting.
1.
5
people + maximum authorised load.
-.
I
ntermediate
s
etting.
2.
D
river + maximum authorised load.
-.
I
ntermediate
s
etting.
3.
5
people + maximum load in the boot.
Adjusting the headlamp
b
eam
hei
ght
The initial setting is position "0".
Programming
The activation, deactivation and choice of w
elcome lighting duration are done in the touch
s
creen
t
ablet.
In the Driving
menu, select the "Settings "
tab then " Lighting"
and select "Welcome
lighting ".
Use
the arrows or the cursor to adjust the
d
uration of the lighting.
Direction indicators
F Left: lower the lighting stalk passing the p
oint of resistance.
F
R
ight: raise the lighting stalk passing the
p
oint of resistance.
Three flashes of the direction
indicators
F Press briefly upwards or downwards, w
ithout going beyond the point of
r
esistance; the direction indicators will
f
lash 3 times.
5
Lighting and visibility
Page 216 of 523
214
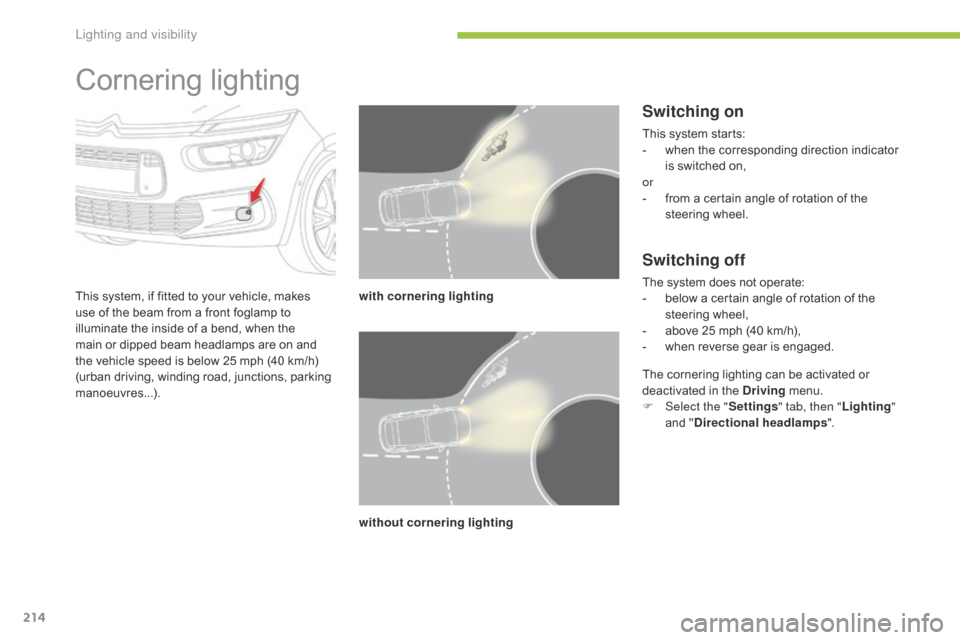
Cornering lighting
This system, if fitted to your vehicle, makes use of the beam from a front foglamp to
i
lluminate the inside of a bend, when the
m
ain or dipped beam headlamps are on and
t
he vehicle speed is below 25 mph (40 km/h)
(
urban driving, winding road, junctions, parking
m
anoeuvres...). with cornering lighting
without cornering lighting
Switching on
This system starts:
- w hen the corresponding direction indicator
i
s switched on,
or
-
f
rom a certain angle of rotation of the
s
teering
w
heel.
Switching off
The system does not operate:
- b elow a certain angle of rotation of the
s
teering
w
heel,
-
a
bove 25 mph (40 km/h),
-
w
hen reverse gear is engaged.
The
cornering lighting can be activated or
d
eactivated in the Driving
menu.
F
Sel
ect the " Settings " tab, then " Lighting"
and
"Directional headlamps ".
Lighting and visibility
Page 217 of 523
215
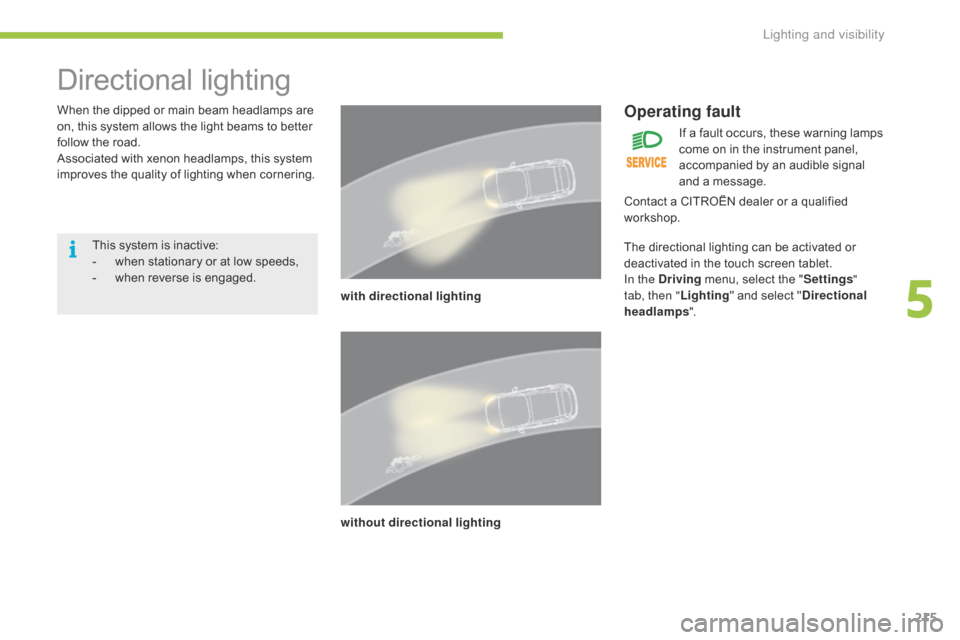
Directional lighting
When the dipped or main beam headlamps are o
n, this system allows the light beams to better
f
ollow the road.
Associated
with xenon headlamps, this system
i
mproves the quality of lighting when cornering.
with directional lighting
without directional lightingOperating fault
This system is inactive:
- w hen stationary or at low speeds,
-
w
hen
r
everse
is enga
ged. If
a fault occurs, these warning lamps
c
ome on in the instrument panel,
a
ccompanied by an audible signal
a
nd a message.
Contact a CITROËN dealer or a qualified
w
orkshop.
The directional lighting can be activated or
d
eactivated in the touch screen tablet.
In the Driving
menu, select the "Settings "
tab, then " Lighting"
and select "Directional
headlamps ".
5
Lighting and visibility
Page 265 of 523
263
Exiting economy mode
These functions are reactivated automatically next time the vehicle is driven.
In
order to restore the use of these functions
i
mmediately, start the engine and let it run:
-
f
or less than ten minutes, to use the
e
quipment for approximately five minutes,
-
f
or more than ten minutes, to use the
e
quipment for up to approximately
t
hirty minutes.
Let
the engine run for the duration specified to
e
nsure that the battery charge is sufficient.
Do
not repeatedly and continuously restart the
e
ngine in order to charge the battery.
A
flat battery prevents the engine from starting.
For
more information on the 12 V batter y, refer
to
the corresponding section.
Load reduction mode
System which manages the use of certain functions according to the level of charge
r
emaining in the battery.
When
the vehicle is being driven, the load
r
eduction function temporarily deactivates
c
ertain functions, such as the air conditioning,
t
he heated rear screen...
The
deactivated functions are reactivated
a
utomatically as soon as conditions permit.
Energy economy mode
Switching to economy
mode
A message appears in the instrument panel s
creen indicating that the vehicle has switched
t
o economy mode and the active functions are
p
ut on standby.
If
a telephone call is being made at this time, it
w
ill be maintained for around 10 minutes with
t
he Bluetooth hands-free system of your audio
s
ystem.
System
which manages the duration of use of certain functions to conserve a sufficient level of
c
harge in the battery.
After the engine has stopped, you can still use functions such as the audio and telematics
s
ystem, windscreen wipers, dipped beam headlamps, courtesy lamps, etc. for a maximum
c
ombined duration of about forty minutes.
7
Practical information
Page 272 of 523
270
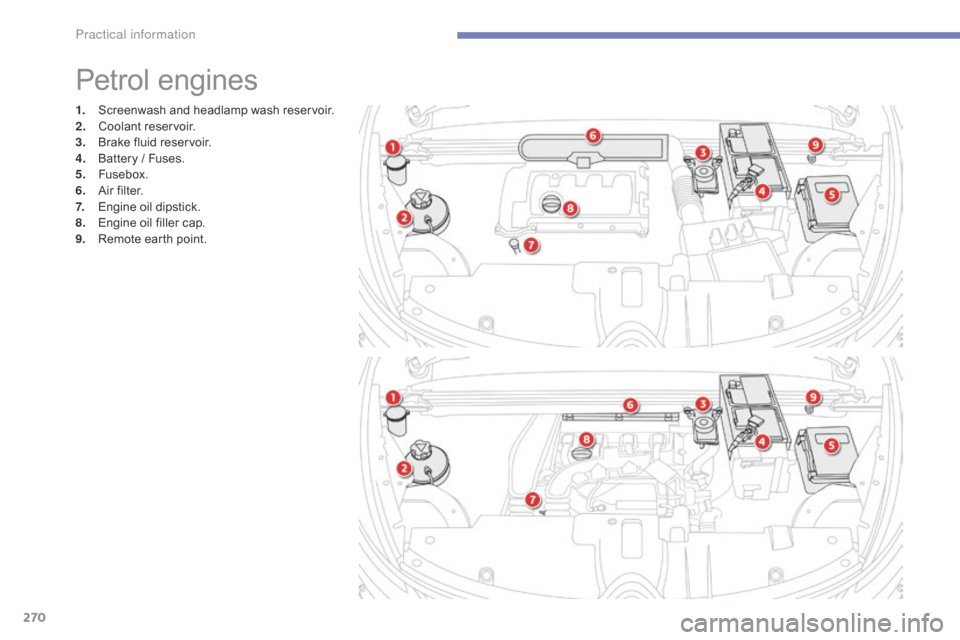
1. Screenwash and headlamp wash reservoir.
2. C oolant r eservoir.
3.
B
rake fluid reservoir.
4.
B
attery / Fuses.
5.
F
usebox.
6.
A
ir filter.
7.
E
ngine oil dipstick.
8.
E
ngine oil filler cap.
9.
R
emote earth point.
Petrol engines
Practical information
Page 273 of 523
271
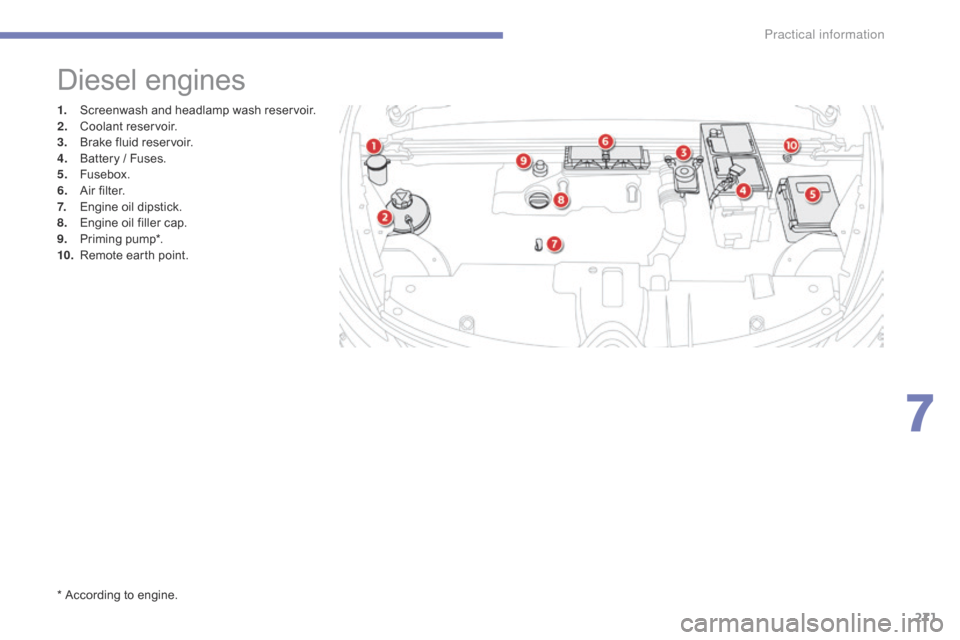
1. Screenwash and headlamp wash reservoir.
2. C oolant r eservoir.
3.
B
rake fluid reservoir.
4.
B
attery / Fuses.
5.
F
usebox.
6.
A
ir filter.
7.
E
ngine oil dipstick.
8.
E
ngine oil filler cap.
9.
P
riming
pu
mp*.
10.
R
emote earth point.
Diesel engines
* According to engine.
7
Practical information
Page 276 of 523
274
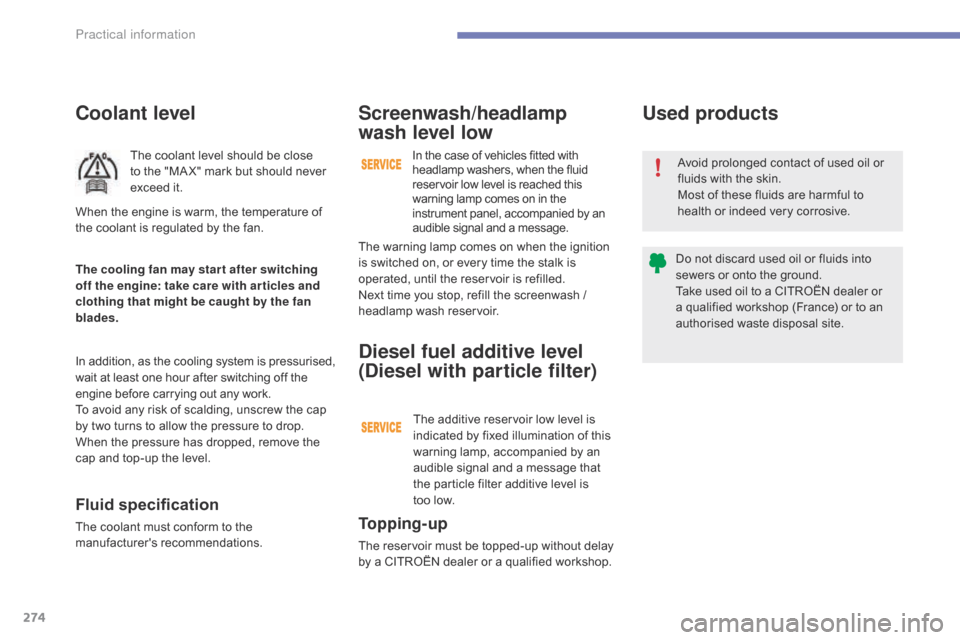
Coolant level
The coolant level should be close to the "MA X" mark but should never
e
xceed it.
In
addition, as the cooling system is pressurised,
w
ait
at
least one hour after switching off the
e
ngine
before carrying out any work.
To
avoid
any risk of scalding, unscrew the cap
b
y
two
turns to allow the pressure to drop.
W
hen
the
pressure has dropped, remove the
c
ap
and
top-up the level.
Fluid specification
The coolant must conform to the manufacturer's r ecommendations.
The cooling fan may star t after switching
off the engine: take care with ar ticles and
clothing that might be caught by the fan
blades. When the engine is warm, the temperature of
t
he coolant is regulated by the fan.To p p i n g - u p
The reservoir must be topped-up without delay b
y a CITROËN dealer or a qualified workshop.
Diesel fuel additive level
(Diesel with particle filter)
The additive reservoir low level is indicated by fixed illumination of this
w
arning lamp, accompanied by an
a
udible signal and a message that
t
he particle filter additive level is
t
oo low.
The
warning lamp comes on when the ignition
i
s
switched on, or every time the stalk is
o
perated,
until the reservoir is refilled.
Next
time
you stop, refill the screenwash /
h
eadlamp
wash reservoir.
Screenwash/headlamp
wash level low
In the case of vehicles fitted with h
eadlamp washers, when the fluid r
eservoir low level is reached this
w
arning lamp comes on in the
i
nstrument panel, accompanied by an
a
udible signal and a message. Avoid
prolonged contact of used oil or
f
luids with the skin.
Most
of these fluids are harmful to
h
ealth or indeed very corrosive.
Do
not discard used oil or fluids into
s
ewers or onto the ground.
Take
used oil to a CITROËN dealer or
a
qualified workshop (France) or to an
a
uthorised waste disposal site.
Used products
Practical information
Page 301 of 523
299
Changing a bulb
For H7 type bulbs with lugs... take care to observe their correct installation
so
as to ensure the best lighting
p
erformance.
Risk of electrocution
Xenon bulbs (D5S-25W) must be replaced by a CITROËN dealer or a
q
ualified
w
orkshop.
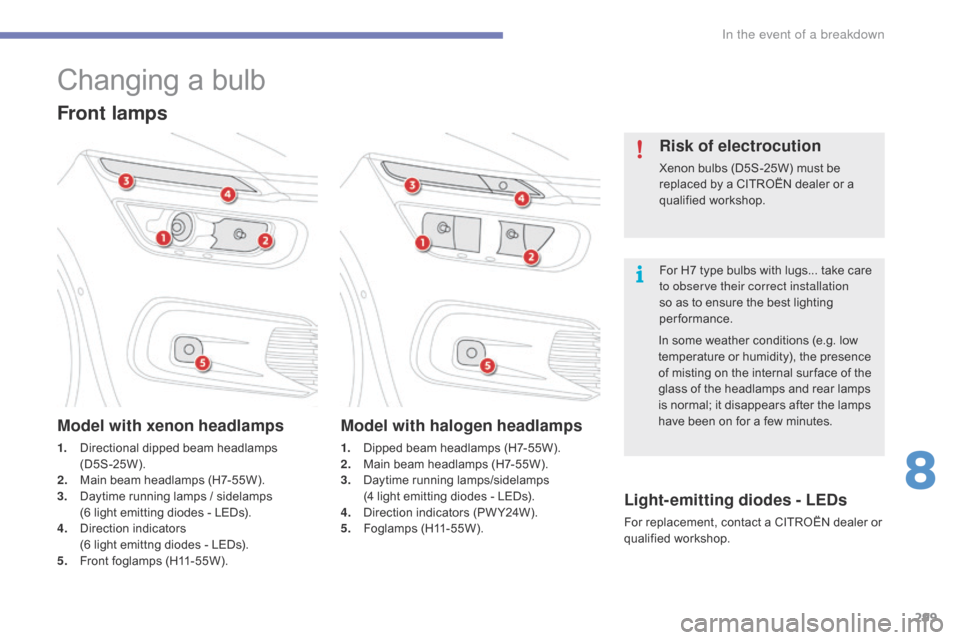
Front lamps
Model with xenon headlamps
1. Directional dipped beam headlamps
(D5S-25W).
2.
M
ain beam headlamps (H7-55W).
3.
D
aytime running lamps / sidelamps
(
6 light emitting diodes - LEDs).
4.
D
irection
i
ndicators
(
6 light emittng diodes - LEDs).
5.
F
ront foglamps (H11-55W).
Model with halogen headlamps
1. Dipped beam headlamps (H7-55W).
2. M ain beam headlamps (H7-55W).
3.
D
aytime
r
unning
lam
ps/sidelamps
(
4 light emitting diodes - LEDs).
4.
D
irection indicators (PW Y24W).
5.
F
oglamps
(
H11-55W). In
some weather conditions (e.g. low
t
emperature or humidity), the presence
o
f misting on the internal sur face of the
g
lass of the headlamps and rear lamps
i
s normal; it disappears after the lamps
h
ave been on for a few minutes.
Light- emitting diodes - LEDs
For replacement, contact a CITROËN dealer or q
ualified w orkshop.
8
In the event of a breakdown