tail light Citroen GRAND C4 PICASSO RHD 2016 2.G Owner's Manual
[x] Cancel search | Manufacturer: CITROEN, Model Year: 2016, Model line: GRAND C4 PICASSO RHD, Model: Citroen GRAND C4 PICASSO RHD 2016 2.GPages: 523, PDF Size: 13.63 MB
Page 4 of 523
Touch screen tablet 11
Instrument panels
1
7
Indicator
and warning lamps
2
1
Gauges
and indicators
3
7
Adjustment
buttons
4
5
Trip
computer
4
8
InstrumentsOver view
Electronic key - remote control 5
1
Keyless Entry and Starting
5
3
Central
locking
6
0
Doors
61
Boo
t
6
3
Motorised
tailgate
6
4
Hands-free
tailgate access
6
8
Alarm
7
0
Electric
windows
7
3
Access
Front seats 75
Rear seats
8
2
Seat
modularity
8
9
Steering
wheel adjustment
9
1
Ventilation
9
2
Heating
9
4
Dual-zone
m
anual
a
ir
c
onditioning
9
5
Dual-zone
automatic air conditioning
9
7
Front
demist - defrost
1
02
Rear
screen demist -
d
efrost
1
02
Scented
air freshener
1
03
Interior
fittings
1
05
Courtesy
lamps
1
19
Interior
mood lighting
1
20
Ease of use a nd c omfort
Driving recommendations 1 21
Starting-switching off the engine with
the
electronic key
1
23
Starting-switching
off the engine with
Keyless
Entry and Starting
1
25
Electric
parking brake
1
29
Hill
start assist
1
36
5 -speed
manual gearbox
1
37
6 -speed
manual gearbox
1
37
Automatic
gearbox
1
38
Gear
ef ficiency indicator
1
43
Stop & Start
1
44
Memorising
speeds
1
47
Speed
limit recognition
1
48
Speed
limiter
1
52
Cruise
control
1
55
Dynamic
cruise control
1
58
Dynamic
cruise control
with
Stop function
1
65
Collision
risk alert
1
74
Assisted
lane departure
warning
system
1
76
Blind
spot monitoring system
1
80
Fatigue
detection system
1
83
Parking
sensors
1
85
Reversing
camera
1
87
360
Vision
1
88
Park
Assist
1
90
Under-inflation
d
etection
1
98
Driving
Eco-driving
Contents
Page 6 of 523
4
Exterior
Fuel tank, misfuel
p revention 25 5-257
Wipers,
screenwash
2
16 -220
Changing a wiper blade
2
66
Exterior welcome lighting
2
12-213
Door mirror spotlamps
2
12
Cornering lighting
2
14
Directional
l
ighting
2
15
Adjusting the headlamp beam height 213
Changing bu
lbs 2
99-303
-
f
ront
lamps
-
fo
glamps
-
d
irection
indicator
repeaters
Very
cold
climate
screen(s)
2
59
Door
mirrors
2
01-202
Panoramic
sunroof
2
21
Roof
bars
2
67
Accessories
26
4-265
ESC:
ABS,
EBA,
ASR,
DSC
2
23 -225
Tyre
under-inflation
detection
1
98 -200
Tyre
pressures
3
29
Temporary
puncture
repair
kit
2
82-288
Changing
a
wheel
2
89 -298
-
t
ools
-
s
pare
wheel
-
r
emoving
/
refitting
Snow
chains
2
58
Changing
bu
lbs
3
03-307
-
r
ear
lamps
-
3
rd
brake
lamp
-
n
umber
plate
lamps
-
fo
glamps
Parking
sensors
1
85 -186
Reversing
camera
1
87
360
Vision
1
88 -189
Park
Assist
1
90 -197
Towbar
1
22,
262
Towing
(advice)
3
17-318
Towbar
with
quickly
detachable
tow
ball
2
60-261
Boot
6
3-69
-
o
pening
/
closing
- em
ergency r
elease
Motorised
tailgate
6
4- 67
Hands-free
tailgate
6
8 - 69
Electronic
key
/
"Keyless
Entry
and
S
tarting"
system
5
1-59
-
o
pening
/
closing
-
a
nti-theft
protection
-
b
ack-up
control
-
b
attery
Doors
61
- 62
-
o
pening
/
closing
-
em
ergency
c
ontrol
Central
locking
6
0
Alarm
7
0-72
Electric
windows
7
3 -74
Over view
Page 15 of 523
13
Driving menu
Settings tab
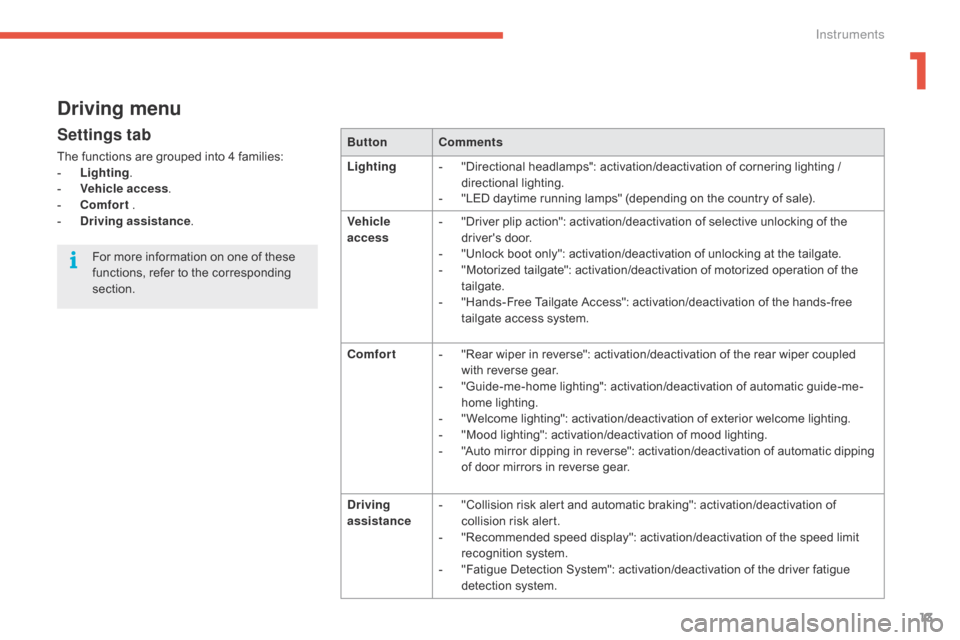
The functions are grouped into 4 families:
- L ighting .
-
V
ehicle access .
-
C
omfort
.
-
D
riving assistance . Button
Comments
Lighting -
" Directional headlamps": activation/deactivation of cornering lighting /
d
irectional
l
ighting.
-
"
LED daytime running lamps" (depending on the country of sale).
Vehicle
access -
"
Driver plip action": activation/deactivation of selective unlocking of the
d
river's
do
or.
-
"
Unlock boot only": activation/deactivation of unlocking at the tailgate.
-
"
Motorized tailgate": activation/deactivation of motorized operation of the
t
ailgate.
-
"
Hands-Free Tailgate Access": activation/deactivation of the hands-free
t
ailgate access system.
Comfort -
"
Rear wiper in reverse": activation/deactivation of the rear wiper coupled
w
ith reverse gear.
-
"
Guide-me-home lighting": activation/deactivation of automatic guide-me-
home
lighting.
-
"
Welcome lighting": activation/deactivation of exterior welcome lighting.
-
"
Mood lighting": activation/deactivation of mood lighting.
-
"
Auto mirror dipping in reverse": activation/deactivation of automatic dipping
o
f door mirrors in reverse gear.
Driving
assistance -
"
Collision risk alert and automatic braking": activation/deactivation of
c
ollision risk alert.
-
"
Recommended speed display": activation/deactivation of the speed limit
r
ecognition system.
-
"
Fatigue Detection System": activation/deactivation of the driver fatigue
d
etection system.
For
more information on one of these
f
unctions, refer to the corresponding
s
ection.
1
Instruments
Page 55 of 523
53
System that allows the unlocking, locking and starting of the vehicle while keeping the
e
lectronic key on your person.
For
reasons of safety and theft protection,
d
o not leave your electronic key in the
v
ehicle, even when you are close to it.
It
is recommended that you keep it on
y
our person.
The
electronic key can also be used as
a
remote control.
For
more information on the Electronic
key - remote control , refer to the
corresponding
s
ection.
Keyless Entry and Starting
Unlocking the vehicle
Complete unlocking
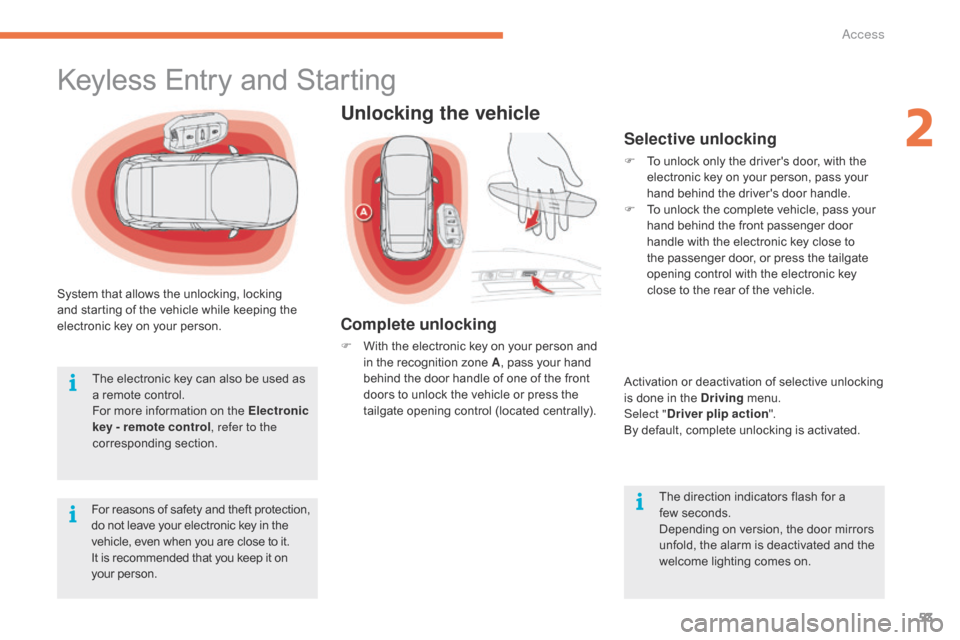
F With the electronic key on your person and i
n the recognition zone A,
pass your hand
b
ehind the door handle of one of the front
d
oors to unlock the vehicle or press the
t
ailgate opening control (located centrally).
Selective unlocking
F To unlock only the driver's door, with the e
lectronic key on your person, pass your
h
and behind the driver's door handle.
F
T
o unlock the complete vehicle, pass your
h
and behind the front passenger door
h
andle with the electronic key close to
t
he passenger door, or press the tailgate
o
pening control with the electronic key
c
lose to the rear of the vehicle.
Activation
or deactivation of selective unlocking
i
s done in the Driving
menu.
Select " Driver plip action ".
By
default, complete unlocking is activated.
The
direction indicators flash for a
few
seconds.
Depending
on version, the door mirrors
u
nfold, the alarm is deactivated and the
w
elcome lighting comes on.
2
Access
Page 190 of 523
188
360 Vision
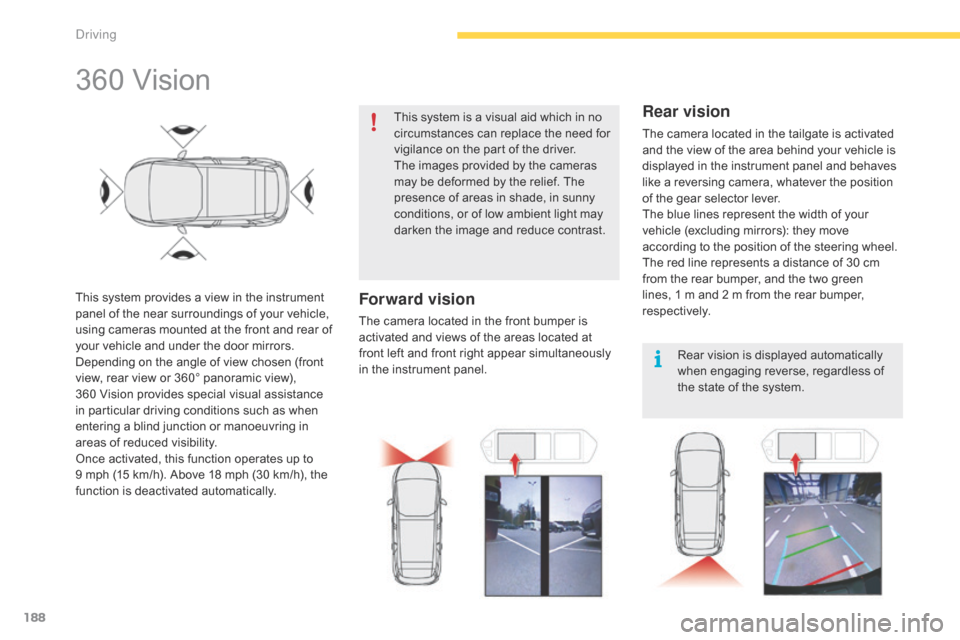
This system provides a view in the instrument panel of the near surroundings of your vehicle,
u
sing cameras mounted at the front and rear of
y
our vehicle and under the door mirrors.
Depending
on the angle of view chosen (front
v
iew, rear view or 360° panoramic view),
3
60 Vision provides special visual assistance
i
n particular driving conditions such as when
e
ntering a blind junction or manoeuvring in
a
reas of reduced visibility.
Once
activated, this function operates up to
9 m
ph (15 km/h). Above 18 mph (30 km/h), the
f
unction is deactivated automatically. This
system is a visual aid which in no
c
ircumstances can replace the need for
v
igilance on the part of the driver.
The images provided by the cameras
m
ay be deformed by the relief. The
p
resence of areas in shade, in sunny
c
onditions, or of low ambient light may
d
arken the image and reduce contrast.Forward vision
The camera located in the front bumper is a
ctivated and views of the areas located at
f
ront left and front right appear simultaneously
i
n the instrument panel.
Rear vision
The camera located in the tailgate is activated and the view of the area behind your vehicle is
d
isplayed in the instrument panel and behaves
l
ike a reversing camera, whatever the position
o
f the gear selector lever.
The
blue lines represent the width of your
v
ehicle (excluding mirrors): they move
a
ccording to the position of the steering wheel.
The
red line represents a distance of 30 cm
f
rom the rear bumper, and the two green
l
ines, 1 m and 2 m from the rear bumper,
r
espectively. Rear
vision is displayed automatically
w
hen engaging reverse, regardless of
t
he state of the system.
Driving
Page 191 of 523
189
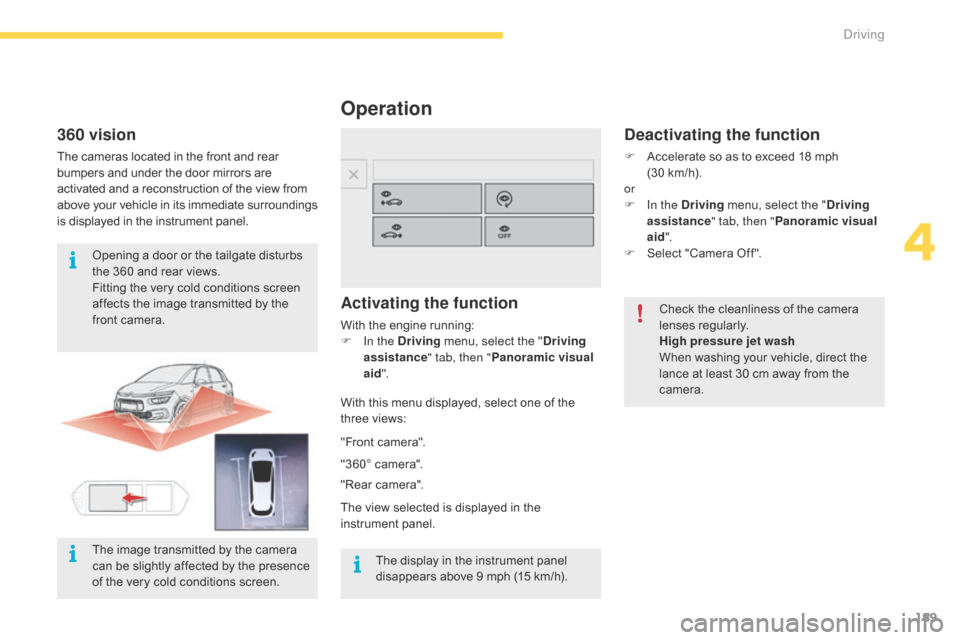
Operation
Activating the function
With the engine running:
F I n the Driving menu, select the "Driving
assistance " tab, then "Panoramic visual
aid ".
With
this menu displayed, select one of the
t
hree views:
Deactivating the function
F Accelerate so as to exceed 18 mph
(30 km/h).
or
F
I
n the Driving
menu, select the "Driving
assistance " tab, then "Panoramic visual
aid ".
F
Sel
ect
"
Camera
O
ff".
Check
the cleanliness of the camera
l
enses
r
egularly.
High pressure jet wash
When
washing your vehicle, direct the
l
ance at least 30 cm away from the
c
amera.
"Front
camera".
"360°
camera".
"Rear
camera".
The
view
selected
is
displayed
in
the
in
strument
pan
el.
360 vision
The cameras located in the front and rear b umpers and under the door mirrors are a
ctivated and a reconstruction of the view from
a
bove
y
our
v
ehicle
i
n
i
ts
i
mmediate
s
urroundings
i
s displayed in the instrument panel.
Opening
a door or the tailgate disturbs
t
he 360 and rear views.
Fitting
the very cold conditions screen
a
ffects the image transmitted by the
f
ront camera.
The
display in the instrument panel
d
isappears above 9 mph (15 km/h).
The
image transmitted by the camera
c
an be slightly affected by the presence
o
f the very cold conditions screen.
4
Driving
Page 207 of 523
205
Displays
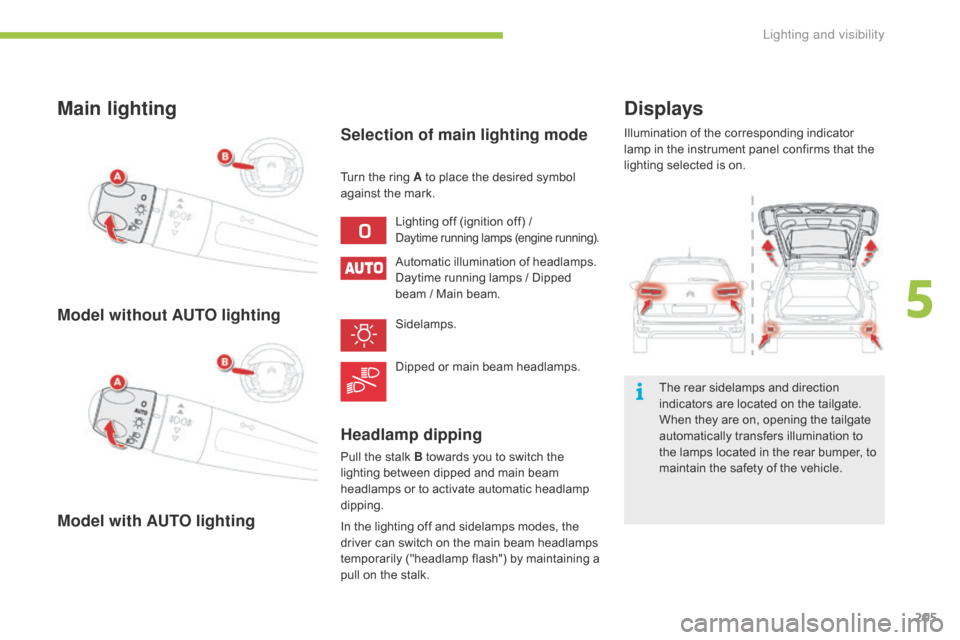
Illumination of the corresponding indicator lamp in the instrument panel confirms that the
l
ighting selected is on.
The
rear sidelamps and direction
i
ndicators are located on the tailgate.
W
hen they are on, opening the tailgate
a
utomatically transfers illumination to
t
he lamps located in the rear bumper, to
m
aintain the safety of the vehicle.
Main lighting
Lighting off (ignition off) /Daytime running lamps (engine running).
Automatic illumination of headlamps.
D aytime running lamps / Dipped
b
eam / Main beam.
Sidelamps.
Dipped
or main beam headlamps.
Turn
the
ring A to place the desired symbol
a
gainst
the mark.
Selection of main lighting mode
Model without AUTO lighting
Model with AUTO lighting Headlamp dipping
Pull the stalk B towards you to switch the l
ighting between dipped and main beam
h
eadlamps or to activate automatic headlamp
d
ipping.
In
the lighting off and sidelamps modes, the
d
river can switch on the main beam headlamps
t
emporarily ("headlamp flash") by maintaining a
p
ull on the stalk.
5
Lighting and visibility
Page 209 of 523
207
Operation of the rear foglamps is inhibited with the tailgate open.
Opening
the tailgate when these lamps
a
re on causes them and their indicator
l
amp in the instrument panel to go off.
They
do not come back on
a
utomatically when the tailgate is
c
losed: they must be switched on again
u
sing the control stalk. In
good or rainy weather, by both day a
nd night, the front foglamps and the
r
ear foglamps are prohibited. In these
s
ituations, the power of their beams
m
ay dazzle other drivers. They should
o
nly be used in fog or falling snow.
In
these weather conditions, you should
s
witch on the foglamps and dipped
b
eam headlamps manually, as the
s
unshine sensor may detect sufficient
l
ight.
Do
not forget to switch off the front and
r
ear foglamps when they are no longer
n
ecessary.Switching off the lighting
when switching off the ignition
When the ignition is switched off, all of the lamps switch off immediately, except for the d
ipped beam headlamps if automatic guide-
me-home
lighting is activated.
Switching on the lighting when
switching on the ignition
To reactivate the lighting control stalk, turn the ring A to position "0"
- lighting off, then t
o the position of your choice.
When the driver's door is opened, a temporary audible signal warns you that
t
he vehicle's lighting is on.
They switch off automatically after a period which depends on the state of charge of the b
attery (entry to energy economy mode).
5
Lighting and visibility
Page 278 of 523
276
Brake wear depends on the style of driving, particularly in the case o
f vehicles used in town, over short
d
istances. It may be necessary to have
t
he condition of the brakes checked,
e
ven between vehicle services.
Brake pads
For information on checking brake disc wear, contact a CITROËN dealer
o
r a qualified workshop.
Brake disc wear
Only use products recommended by CITROËN or products of equivalent
q
uality
an
d
sp
ecification.
In
order to optimise the operation of
u
nits as important as those in the
b
raking system, CITROËN selects and
o
ffers very specific products.
After
washing the vehicle, dampness,
o
r in wintry conditions, ice can form
o
n the brake discs and pads: braking
e
fficiency may be reduced. Make light
b
rake applications to dry and defrost
t
he brakes.
Electric parking brake
For more information, refer to the "E lectric
parking brake - Operating faults "
section.
This
system does not require any
r
outine servicing. However, in the
e
vent of a problem, have the system
c
hecked by a CITROËN dealer or a
q
ualified
w
orkshop.
Manual gearbox
The gearbox does not require any m
aintenance (no oil change).
Refer
to the manufacturer's service
s
chedule for the checking interval for
t
his
c
omponent.
Automatic gearbox
The gearbox does not require any maintenance (no oil change).
Refer
to the manufacturer's service
s
chedule for details of the level
c
hecking interval for this component.
To
avoid damaging the electrical units,
n
ever use a high pressure jet wash in
t
he engine compartment.
Unless
there is a leak in the circuit, a drop in
t
he brake fluid level indicates that the brake
p
ads are worn.
Practical information