weight Citroen GRAND C4 PICASSO RHD 2016 2.G Owner's Manual
[x] Cancel search | Manufacturer: CITROEN, Model Year: 2016, Model line: GRAND C4 PICASSO RHD, Model: Citroen GRAND C4 PICASSO RHD 2016 2.GPages: 523, PDF Size: 13.63 MB
Page 5 of 523
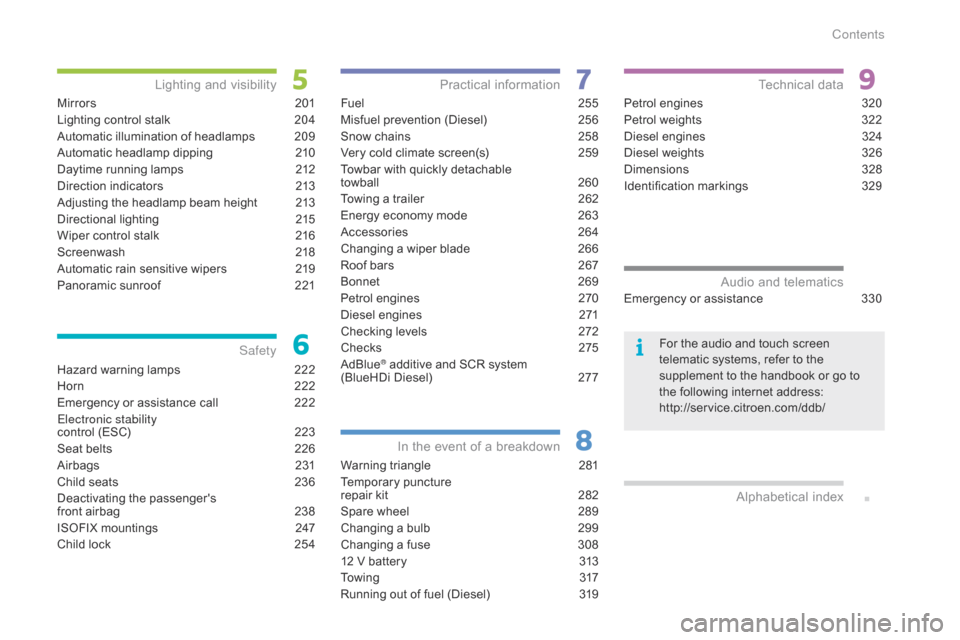
Hazard warning lamps 222
Horn
2
22
Emergency
or assistance call
2
22
Electronic stability
control
(ESC)
2
23
Seat
bel
ts
2
26
Airbags
2
31
Child
seats
2
36
Deactivating
t
he
p
assenger's
f
ront airbag
2
38
ISOFIX
mountings
2
47
Child
lock
2
54
Safety
Fuel 2 55
Misfuel prevention (Diesel)
2
56
Snow
chains
2
58
Very
cold climate screen(s)
2
59
Towbar
with quickly detachable
towball
2
60
Towing
a trailer
2
62
Energy
economy mode
2
63
Accessories
2
64
Changing
a wiper blade
2
66
Roof
bars
2
67
Bonnet
26
9
Petrol
engines
2
70
Diesel
engines
2
71
Checking
levels
2
72
Checks
2
75
AdBlue
® additive and SCR system
(
BlueHDi Diesel) 2 77
Practical information
Warning triangle 2 81
Temporary
pu
ncture
r
epair kit
2
82
Spare
wheel
2
89
Changing
a bulb
2
99
Changing
a fuse
3
08
12
V battery
3
13
To w i n g
3
17
Running
out of fuel (Diesel)
3
19
In the event o f a b reakdown
Petrol engines 3 20
Petrol weights
3
22
Diesel
engines
3
24
Diesel
weights
3
26
Dimensions
3
28
Identification
ma
rkings
3
29
Technical data
Emergency or assistance 3 30Audio and telematics
Mirrors 2 01
Lighting control stalk
2
04
Automatic
illumination of headlamps
2
09
Automatic
headlamp dipping
2
10
Daytime
running lamps
2
12
Direction
indicators
2
13
Adjusting
the headlamp beam height
2
13
Directional
l
ighting
2
15
Wiper
control stalk
2
16
Screenwash
2
18
Automatic
rain sensitive wipers
2
19
Panoramic
sunroof
2
21
Lighting and v isibility
Alphabetical
in
dex
For the audio and touch screen telematic systems, refer to the
s
upplement to the handbook or go to
t
he following internet address:
http://service.citroen.com/ddb/
Contents
Page 10 of 523
8
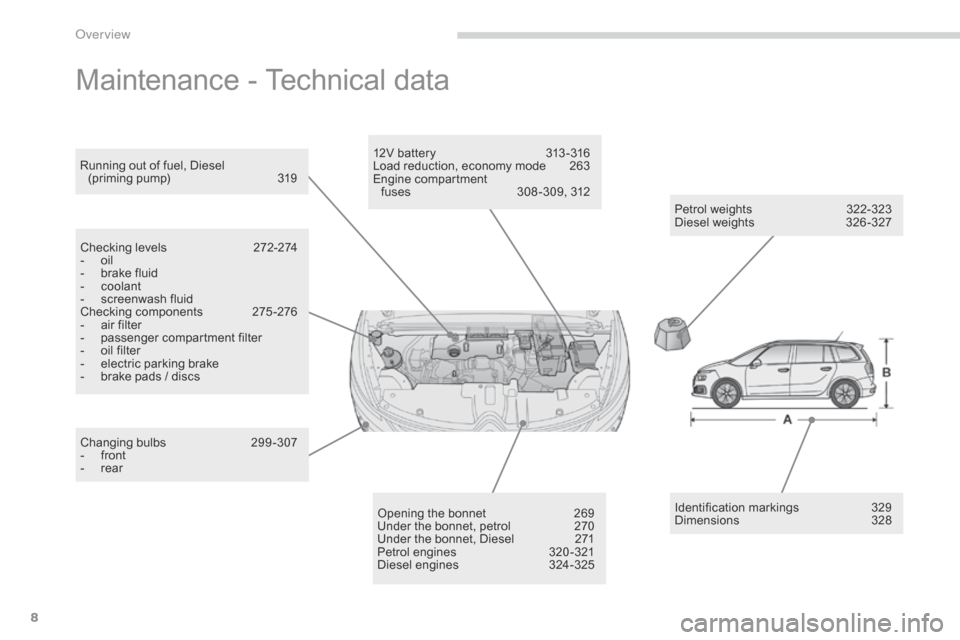
Maintenance - Technical data
Petrol weights 322-323
Diesel weights 3 26 -327
Running
out
of
fuel,
Diesel
(
priming pump)
3
19
Checking
levels
2
72-274
-
o
il
-
b
rake
fluid
-
c
oolant
-
s
creenwash
fluid
Checking
components
2
75 -276
-
a
ir
filter
-
p
assenger
c
ompartment
f
ilter
-
o
il
filter
-
e
lectric
parking
brake
-
b
rake
pads
/
discs
Changing
bu
lbs
2
99-307
-
f
ront
-
r
ear Opening
the
bonnet
2
69
Under
the
bonnet,
petrol
2
70
Under
the
bonnet,
Diesel
2
71
Petrol
engines
3
20 -321
Diesel
engines
3
24-325 Identification
ma
rkings
3
29
Dimensions
3
28
12V
battery
3
13 -316
Load
reduction,
economy
mode
2
63
Engine
c
ompartment
f
uses
3
08 -309,
312
Over view
Page 87 of 523
85
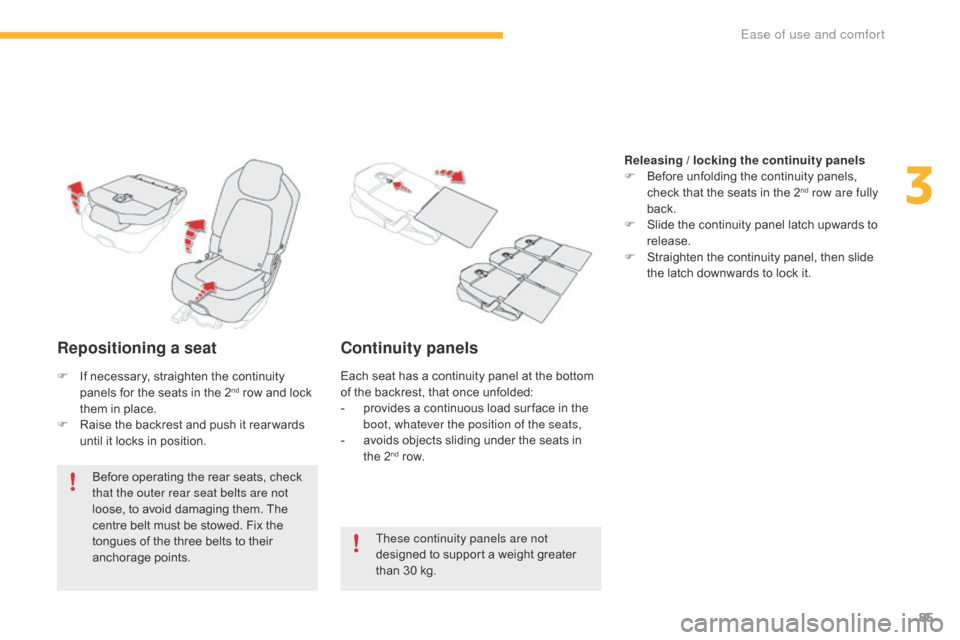
Repositioning a seat
Before operating the rear seats, check that the outer rear seat belts are not
loose,
to avoid damaging them. The
c
entre belt must be stowed. Fix the
t
ongues of the three belts to their
anc
horage
p
oints.
Continuity panels
These continuity panels are not
designed to support a weight greater
t
han 30 kg. Releasing / locking the continuity panels
F
B
efore unfolding the continuity panels,
c
heck that the seats in the 2
nd row are fully
back.
F
S
lide
the
continuity
panel
latch upwards to
r
elease.
F
S
traighten
the
continuity
panel, then slide
t
he
latch
downwards
to
lock
it.
F
I
f
necessary,
straighten
the
continuity
p
anels
for
the
seats
in
the
2
nd row and lock t
hem
in
place.
F
R
aise
the
backrest
and
push
it rear wards
u
ntil
it
locks
in
position. Each
seat has a continuity panel at the bottom o
f the backrest, that once unfolded:
- p rovides a continuous load sur face in the
b
oot, whatever the position of the seats,
-
a
voids objects sliding under the seats in
t
he 2
nd row.
3
Ease of use and comfort
Page 124 of 523
122
When towing
Distribution of loads
F Distribute the load in the trailer so that the h
eaviest items are as close as possible to t
he axle and the nose weight approaches the
m
aximum permitted without exceeding it.
Air
density decreases with altitude, thus
r
educing engine per formance. Above
1 0
00 metres, the maximum towed load must
b
e reduced by 10 % for every 1 000 metres of
al
titude.
Side wind
F Take into account the increased sensitivity t
o side wind.
For
more information on Weights
, refer
to the corresponding section.
The rear parking sensors will be
d
eactivated automatically to avoid the
a
udible signal if a genuine CITROËN
t
owbar is used.
Cooling
Towing a trailer on a slope increases the temperature of the coolant.
As
the fan is electrically controlled, its cooling
c
apacity is not dependent on the engine speed.
F
T
o lower the engine speed, reduce your
s
peed.
The
maximum towed load on a long incline
d
epends on the gradient and the ambient
t
emperature.
In
all cases, keep a check on the coolant
t
emperature. F
I
f the warning lamp and the
S
TOP
warning lamp come on,
s
top the vehicle and switch off
t
he engine as soon as possible.
Braking
Towing a trailer increases the braking distance.
T o avoid overheating of the brakes, the use of
e
ngine braking is recommended.
Ty r e s
F Check the tyre pressures of the towing v
ehicle and of the trailer, observing the
re
commended
p
ressures.
Lighting
F Check the electrical lighting and signalling o
n the trailer and the headlamp beam
h
eight of your vehicle.
For
more information on Adjusting the
headlamp beam height , refer to the
corresponding
s
ection.
Driving
Page 238 of 523
236
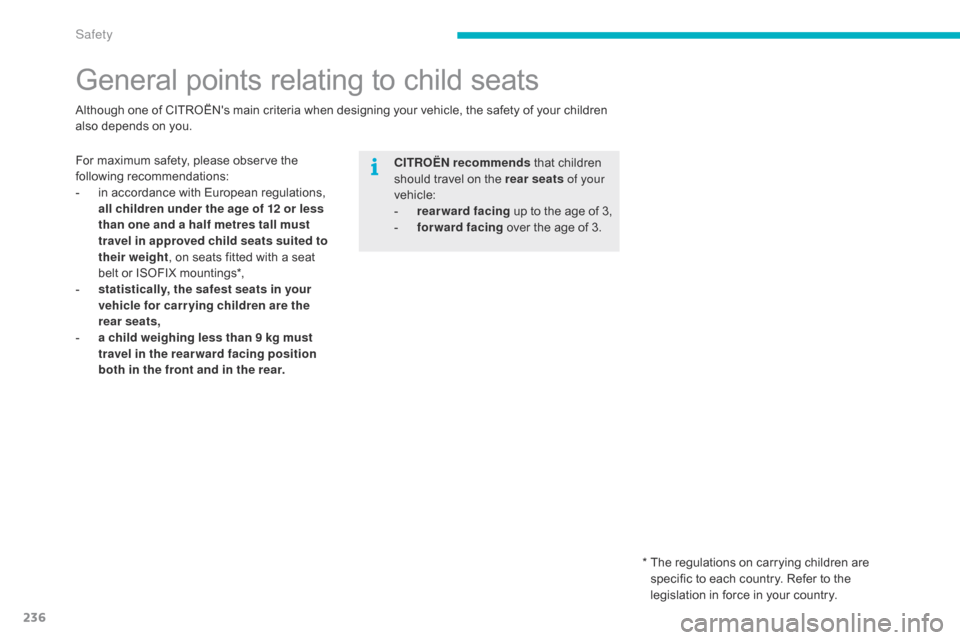
General points relating to child seats
For maximum safety, please observe the following r ecommendations:
-
i
n accordance with European regulations,
a
ll children under the age of 12 or less
than one and a half metres tall must
travel in approved child seats suited to
their weight ,
on seats fitted with a seat
b
elt or ISOFIX mountings*,
-
s
tatistically, the safest seats in your
vehicle for carr ying children are the
rear seats,
-
a c
hild weighing less than 9 kg must
travel in the rear ward facing position
both in the front and in the rear. CITROËN recommends
that children
s
hould travel on the rear seats of your
vehicle:
-
re
arward facing
up to the age of 3,
-
fo
rward facing
over the age of 3.
Although
one of CITROËN's main criteria when designing your vehicle, the safety of your children
a
lso depends on you.
*
T
he regulations on carrying children are
s
pecific to each country. Refer to the
l
egislation in force in your country.
Safety
Page 245 of 523
243
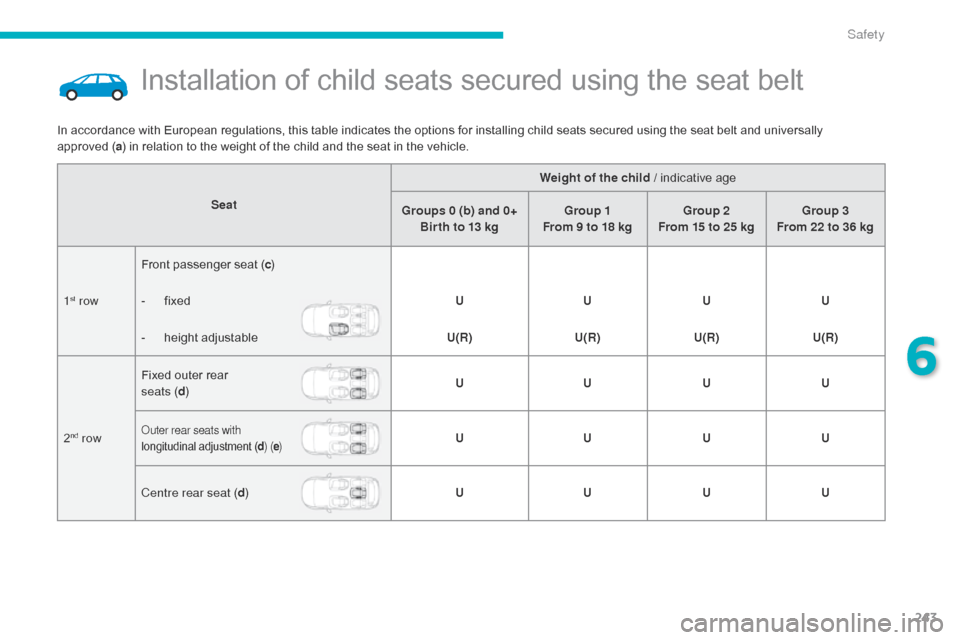
Installation of child seats secured using the seat belt
SeatWeight of the child /
indicative age
Groups 0 (b) and 0+ Bir th to 13 kg Group 1
From 9 to 18 kg Group 2
From 15 to 25 kg Group 3
From 22 to 36 kg
1
st row Front passenger seat (
c )
- f ixed UUUU
-
h
eight adjustable U(R)U(R)U(R)U(R)
2
nd row Fixed outer rear
seats ( d) U
UUUOuter rear seats with
longitudinal a djustment (d ) ( e)U UUU
Centre rear seat ( d) UUUU
In
accordance
with
European
regulations,
this
table
indicates
the
options
for installing child seats secured using the seat belt and universally
a
pproved (
a)
in
relation
to
the
weight
of
the
child
and
the
seat
in
the
vehicle.
6
Safety
Page 247 of 523
245
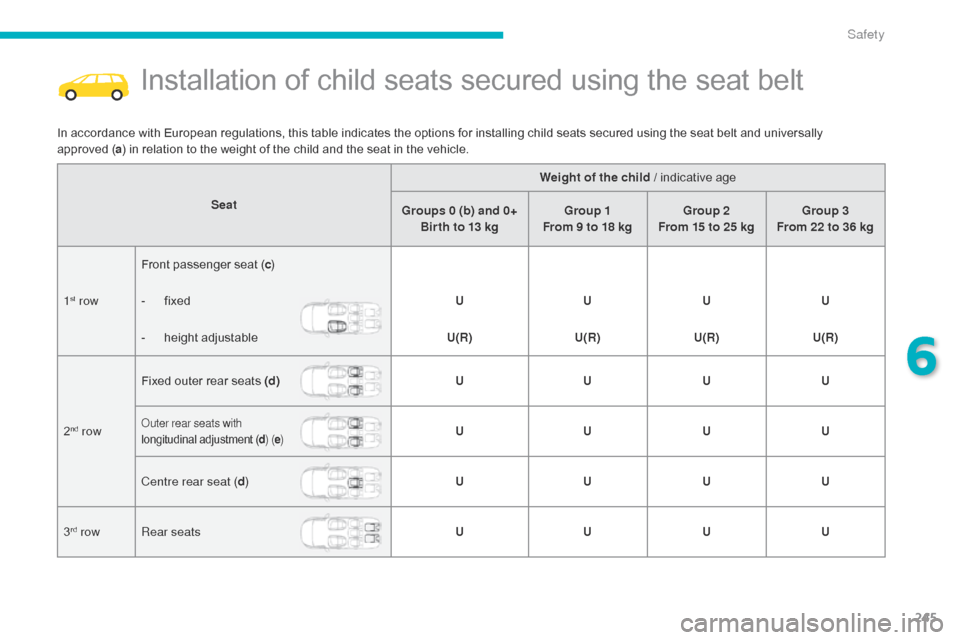
Installation of child seats secured using the seat belt
In accordance with European regulations, this table indicates the options for installing child seats secured using the seat belt and universally approved ( a)
in relation to the weight of the child and the seat in the vehicle.
Seat Weight of the child /
indicative age
Groups 0 (b) and 0+ Bir th to 13 kg Group 1
From 9 to 18 kg Group 2
From 15 to 25 kg Group 3
From 22 to 36 kg
1
st row Front passenger seat (
c )
- f ixed UUUU
-
h
eight adjustable U(R)U(R)U(R)U(R)
2
nd row Fixed outer rear seats (d)
UUUUOuter rear seats with
longitudinal a djustment (d ) ( e)U UUU
Centre rear seat ( d) UUUU
3
rd row Rear seats UUUU
6
Safety
Page 251 of 523
249
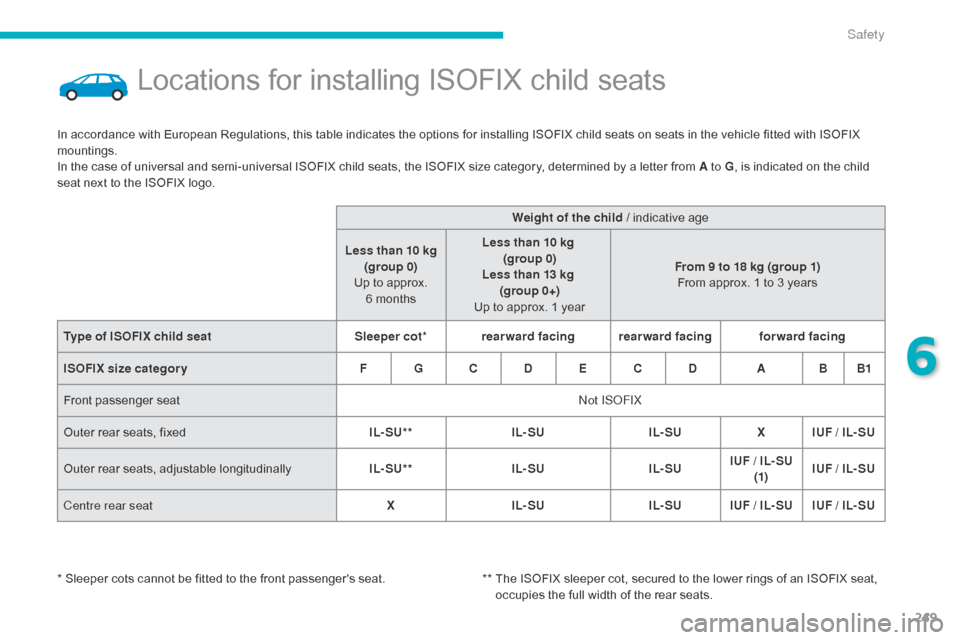
Locations for installing ISOFIX child seats
In accordance with European Regulations, this table indicates the options for installing ISOFIX child seats on seats in the vehicle fitted with ISOFIX mountings.
In
the case of universal and semi-universal ISOFIX child seats, the ISOFIX size category, determined by a letter from A to G,
is indicated on the child
s
eat next to the ISOFIX logo. Weight of the child
/ indicative age
Less than 10 kg (group 0)
Up
to approx.
6 m
onthsLess than 10 kg
(group 0)
Less than 13 kg (group 0+)
Up to approx. 1 yearFrom 9 to 18 kg (group 1)
From
approx. 1 to 3 years
Type of ISOFIX child seat Sleeper cot*rearward facing rearward facing forward facing
ISOFIX size categor y F G C D E C D A B B1
Front
p
assenger
sea
t Not ISOFIX
Outer
rear seats, fixed IL- SU**IL- SUIL- SUX IUF / IL- SU
Outer
r
ear
s
eats,
a
djustable
l
ongitudinallyIL- SU**IL- SUIL- SUIUF / IL- SU
(1) IUF / IL- SU
Centre rear seat XIL- SU IL- SUIUF / IL- SU IUF / IL- SU
*
S
leeper cots cannot be fitted to the front passenger's seat. **
T
he ISOFIX sleeper cot, secured to the lower rings of an ISOFIX seat,
o
ccupies the full width of the rear seats.
6
Safety
Page 252 of 523
250
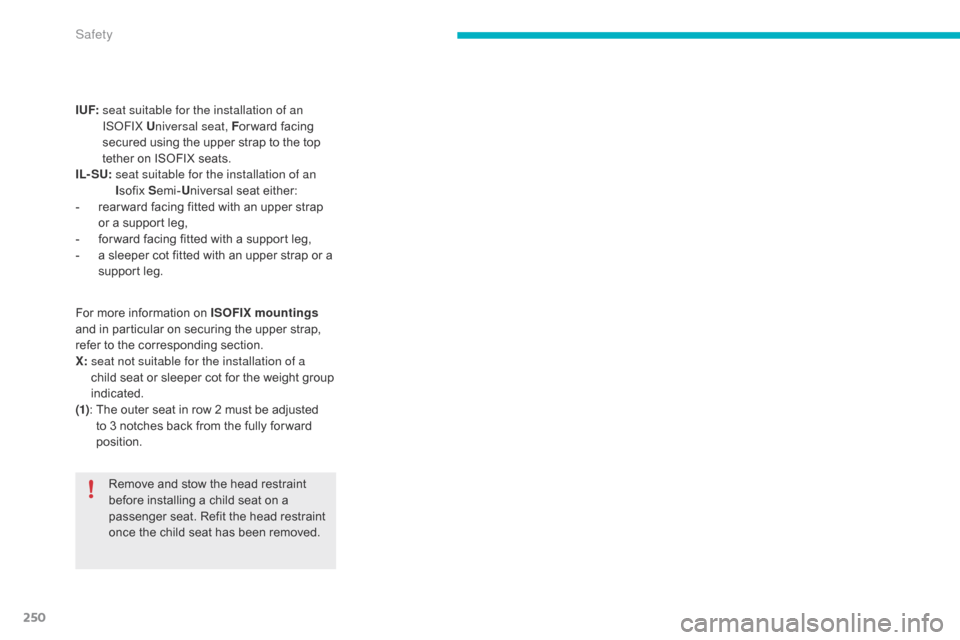
I UF: seat suitable for the installation of an
ISOFIX U niversal seat, F or ward
facing
s
ecured using the upper strap to the top
t
ether on ISOFIX seats.
IL- SU:
s
eat suitable for the installation of an
I sofix
Semi- Universal
sea
t
ei
ther:
-
r
ear ward facing fitted with an upper strap
o
r a support leg,
-
f
or ward facing fitted with a support leg,
-
a
sleeper cot fitted with an upper strap or a
s
upport leg.
Remove
and stow the head restraint
b
efore installing a child seat on a
p
assenger seat. Refit the head restraint
o
nce the child seat has been removed.
For
more information on ISOFIX mountings
and
in particular on securing the upper strap,
r
efer to the corresponding section.
X:
s
eat not suitable for the installation of a
child
seat or sleeper cot for the weight group
i
ndicated.
(1) :
T
he outer seat in row 2 must be adjusted
t
o 3 notches back from the fully for ward
p
osition.
Safety
Page 253 of 523
251
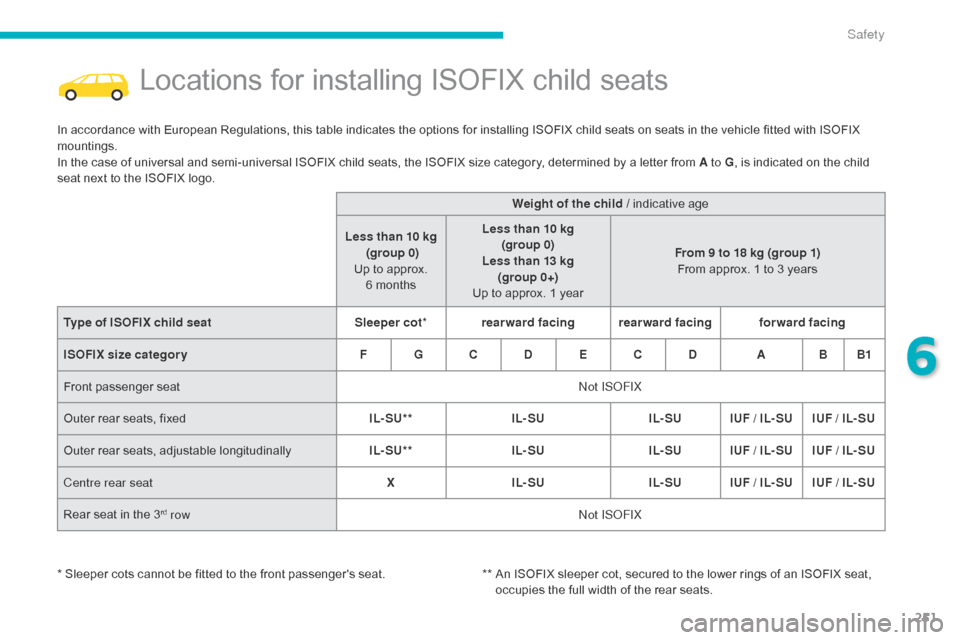
Locations for installing ISOFIX child seats
In accordance with European Regulations, this table indicates the options for installing ISOFIX child seats on seats in the vehicle fitted with ISOFIX mountings.
In
the case of universal and semi-universal ISOFIX child seats, the ISOFIX size category, determined by a letter from A to G,
is indicated on the child
s
eat next to the ISOFIX logo.
*
Sleeper cots cannot be fitted to the front passenger's seat.**
A
n ISOFIX sleeper cot, secured to the lower rings of an ISOFIX seat,
o
ccupies the full width of the rear seats.
Weight of the child
/ indicative age
Less than 10 kg (group 0)
Up
to approx.
6 m
onthsLess than 10 kg
(group 0)
Less than 13 kg (group 0+)
Up
to approx. 1 yearFrom 9 to 18 kg (group 1)
From
approx. 1 to 3 years
Type of ISOFIX child seat Sleeper cot*rearward facing rearward facing forward facing
ISOFIX size categor y F G C D E C D A B B1
Front
p
assenger
sea
t Not ISOFIX
Outer
rear seats, fixed IL- SU**IL- SUIL- SUIUF / IL- SU IUF / IL- SU
Outer
r
ear
s
eats,
a
djustable
l
ongitudinallyIL- SU**IL- SUIL- SUIUF / IL- SU IUF / IL- SU
Centre rear seat XIL- SU IL- SUIUF / IL- SU IUF / IL- SU
Rear
seat in the 3
rd row Not ISOFIX
6
Safety