wipers Citroen GRAND C4 PICASSO RHD 2016 2.G Owner's Manual
[x] Cancel search | Manufacturer: CITROEN, Model Year: 2016, Model line: GRAND C4 PICASSO RHD, Model: Citroen GRAND C4 PICASSO RHD 2016 2.GPages: 523, PDF Size: 13.63 MB
Page 5 of 523
Hazard warning lamps 222
Horn
2
22
Emergency
or assistance call
2
22
Electronic stability
control
(ESC)
2
23
Seat
bel
ts
2
26
Airbags
2
31
Child
seats
2
36
Deactivating
t
he
p
assenger's
f
ront airbag
2
38
ISOFIX
mountings
2
47
Child
lock
2
54
Safety
Fuel 2 55
Misfuel prevention (Diesel)
2
56
Snow
chains
2
58
Very
cold climate screen(s)
2
59
Towbar
with quickly detachable
towball
2
60
Towing
a trailer
2
62
Energy
economy mode
2
63
Accessories
2
64
Changing
a wiper blade
2
66
Roof
bars
2
67
Bonnet
26
9
Petrol
engines
2
70
Diesel
engines
2
71
Checking
levels
2
72
Checks
2
75
AdBlue
® additive and SCR system
(
BlueHDi Diesel) 2 77
Practical information
Warning triangle 2 81
Temporary
pu
ncture
r
epair kit
2
82
Spare
wheel
2
89
Changing
a bulb
2
99
Changing
a fuse
3
08
12
V battery
3
13
To w i n g
3
17
Running
out of fuel (Diesel)
3
19
In the event o f a b reakdown
Petrol engines 3 20
Petrol weights
3
22
Diesel
engines
3
24
Diesel
weights
3
26
Dimensions
3
28
Identification
ma
rkings
3
29
Technical data
Emergency or assistance 3 30Audio and telematics
Mirrors 2 01
Lighting control stalk
2
04
Automatic
illumination of headlamps
2
09
Automatic
headlamp dipping
2
10
Daytime
running lamps
2
12
Direction
indicators
2
13
Adjusting
the headlamp beam height
2
13
Directional
l
ighting
2
15
Wiper
control stalk
2
16
Screenwash
2
18
Automatic
rain sensitive wipers
2
19
Panoramic
sunroof
2
21
Lighting and v isibility
Alphabetical
in
dex
For the audio and touch screen telematic systems, refer to the
s
upplement to the handbook or go to
t
he following internet address:
http://service.citroen.com/ddb/
Contents
Page 6 of 523
4
Exterior
Fuel tank, misfuel
p revention 25 5-257
Wipers,
screenwash
2
16 -220
Changing a wiper blade
2
66
Exterior welcome lighting
2
12-213
Door mirror spotlamps
2
12
Cornering lighting
2
14
Directional
l
ighting
2
15
Adjusting the headlamp beam height 213
Changing bu
lbs 2
99-303
-
f
ront
lamps
-
fo
glamps
-
d
irection
indicator
repeaters
Very
cold
climate
screen(s)
2
59
Door
mirrors
2
01-202
Panoramic
sunroof
2
21
Roof
bars
2
67
Accessories
26
4-265
ESC:
ABS,
EBA,
ASR,
DSC
2
23 -225
Tyre
under-inflation
detection
1
98 -200
Tyre
pressures
3
29
Temporary
puncture
repair
kit
2
82-288
Changing
a
wheel
2
89 -298
-
t
ools
-
s
pare
wheel
-
r
emoving
/
refitting
Snow
chains
2
58
Changing
bu
lbs
3
03-307
-
r
ear
lamps
-
3
rd
brake
lamp
-
n
umber
plate
lamps
-
fo
glamps
Parking
sensors
1
85 -186
Reversing
camera
1
87
360
Vision
1
88 -189
Park
Assist
1
90 -197
Towbar
1
22,
262
Towing
(advice)
3
17-318
Towbar
with
quickly
detachable
tow
ball
2
60-261
Boot
6
3-69
-
o
pening
/
closing
- em
ergency r
elease
Motorised
tailgate
6
4- 67
Hands-free
tailgate
6
8 - 69
Electronic
key
/
"Keyless
Entry
and
S
tarting"
system
5
1-59
-
o
pening
/
closing
-
a
nti-theft
protection
-
b
ack-up
control
-
b
attery
Doors
61
- 62
-
o
pening
/
closing
-
em
ergency
c
ontrol
Central
locking
6
0
Alarm
7
0-72
Electric
windows
7
3 -74
Over view
Page 211 of 523
209
Automatic illumination of
headlamps
Activation
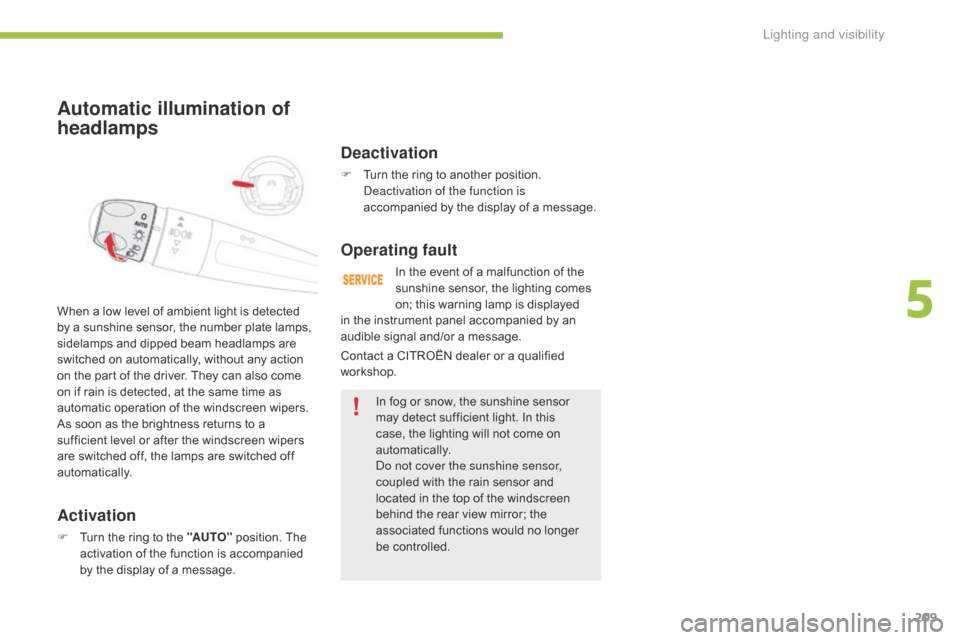
F Turn the ring to the "AUTO" position. The a
ctivation of the function is accompanied
b
y the display of a message.
When
a low level of ambient light is detected
b
y a sunshine sensor, the number plate lamps,
s
idelamps and dipped beam headlamps are
s
witched on automatically, without any action
o
n the part of the driver. They can also come
o
n if rain is detected, at the same time as
a
utomatic operation of the windscreen wipers.
As soon as the brightness returns to a
s
ufficient level or after the windscreen wipers
a
re switched off, the lamps are switched off
au
tomatically.
Deactivation
F Turn
the ring to another position. D
eactivation of the function is
accompanied
by the display of a message.
Operating fault
In the event of a malfunction of the sunshine sensor, the lighting comes
o
n; this warning lamp is displayed
I
n
fog or snow, the sunshine sensor
m
ay detect sufficient light. In this
c
ase, the lighting will not come on
au
tomatically.
Do not cover the sunshine sensor,
coupled
with the rain sensor and
l
ocated in the top of the windscreen
b
ehind the rear view mirror; the
a
ssociated functions would no longer
be c
ontrolled.
Contact
a
CITROËN dealer or a qualified
w
orkshop.
in
the
instrument panel accompanied by an
a
udible
signal and/or a message.
5
Lighting and visibility
Page 218 of 523
216
Wiper control stalk
Programming
Your vehicle may also include some functions that can be configured:
-
a
utomatic
r
ain
sen
sitive
w
indscreen
w
ipers,
-
r
ear wiping on engaging reverse gear.
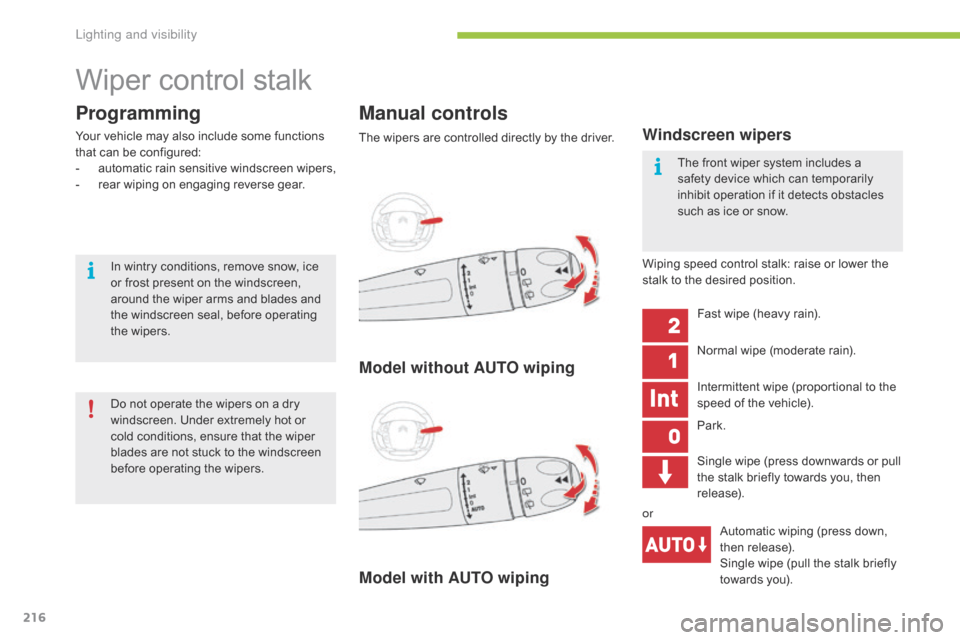
Manual controls
Windscreen wipers
Fast wipe (heavy rain).
N ormal wipe (moderate rain).
Intermittent
wipe (proportional to the
s
peed of the vehicle).
Park.
Automatic
wiping (press down,
t
hen
r
elease).
Single
wipe (pull the stalk briefly
t
owards you).
The
wipers
are
controlled
directly
by
the
driver.
Wiping
speed control stalk: raise or lower the
s
talk
to
the desired position.
Model without AUTO wiping
Model with AUTO wiping
Single wipe (press downwards or pull t
he stalk briefly towards you, then
r
elease).
or
In
wintry
conditions,
remove
snow,
ice
o
r
frost
present
on
the
windscreen,
a
round
the
wiper
arms
and
blades
and
t
he
windscreen
seal,
before
operating
t
he
wipers.
Do
not
operate
the
wipers
on
a
dry
w
indscreen.
Under
extremely
hot
or
c
old
conditions,
ensure
that
the
wiper
b
lades
are
not
stuck
to
the
windscreen
b
efore
operating
the
wipers. The
front wiper system includes a
s
afety device which can temporarily
i
nhibit operation if it detects obstacles
s
uch as ice or snow.
Lighting and visibility
Page 220 of 523
218
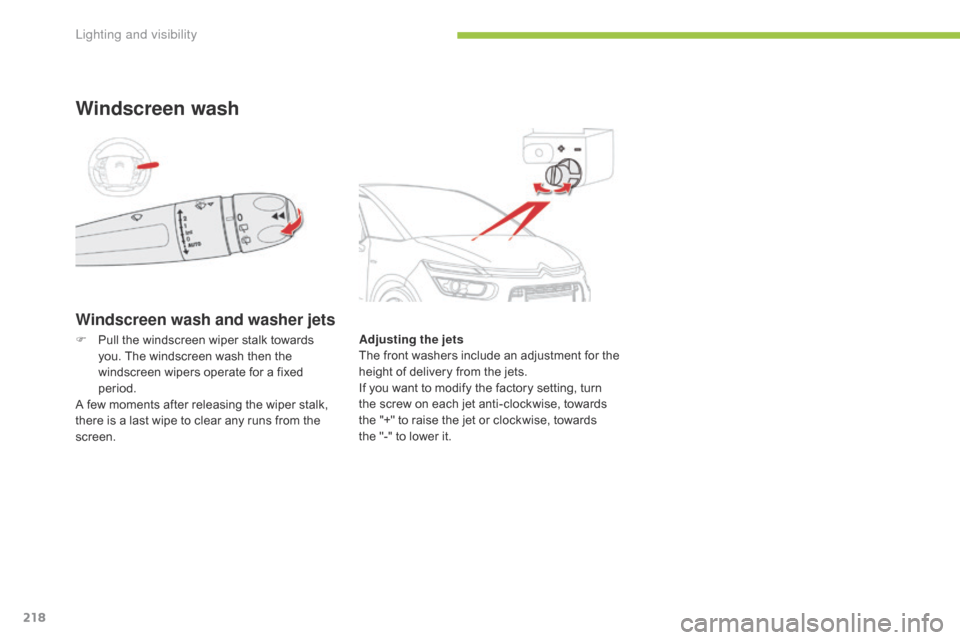
Windscreen wash and washer jets
Windscreen wash
Adjusting the jets
The f ront w ashers i nclude a n a djustment f or t he
h
eight of delivery from the jets.
If
you want to modify the factory setting, turn
t
he screw on each jet anti-clockwise, towards
t
he "+" to raise the jet or clockwise, towards
t
he "-" to lower it.
F
P
ull
the
windscreen
wiper
stalk
towards
y
ou.
The
windscreen
wash
then
the
w
indscreen
wipers
operate
for
a
fixed
p
eriod.
A
few
moments
after
releasing
the
wiper
stalk,
t
here
is
a
last
wipe
to
clear
any
runs
from
the
sc
reen.
Lighting and visibility
Page 221 of 523
219
Do not cover the rain sensor, linked with the sunshine sensor and located in the c
entre of the windscreen behind the rear
v
iew mirror.
Switch
off the automatic rain sensitive
w
ipers when using an automatic car wash.
In
winter, it is advisable to wait until the
w
indscreen is completely clear of ice
b
efore activating the automatic rain
sen
sitive
w
ipers.
Operating fault
If a fault occurs with the automatic rain sensitive wipers, the wipers will operate in
intermittent
mode.
Have
it checked by CITROËN dealer or a
q
ualified
w
orkshop.
The
windscreen
wipers
operate
automatically,
without
any
action
on
the
part
of
the
driver,
if
rain
is
d
etected
(sensor
behind
the
rear
view
mirror),
adapting
their
speed
to
the
intensity
of
the
rainfall.
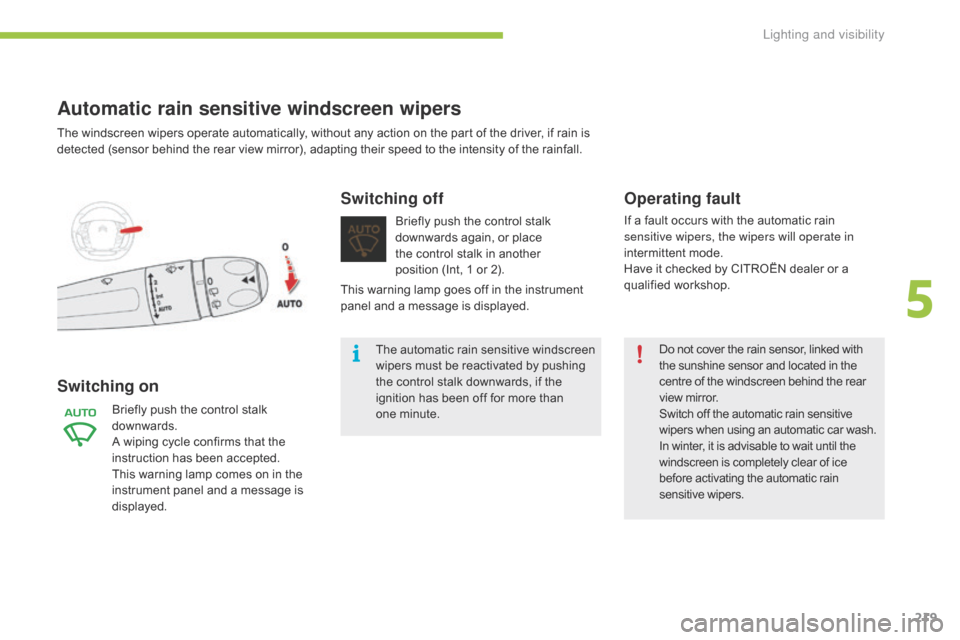
Switching on Switching off
The automatic r
ain sen sitive w indscreen w
ipers must be reactivated by pushing
t
he control stalk downwards, if the
i
gnition has been off for more than
o
ne minute.
Briefly
push
the
control
stalk
d
ownwards.
A
wiping
cycle
confirms
that
the
i
nstruction
has
been
accepted.
This
warning
lamp
comes
on
in
the
i
nstrument
panel
and
a
message
is
d
isplayed. Briefly
push the control stalk
d
ownwards again, or place
t
he control stalk in another
p
osition (Int, 1 or 2).
Automatic rain sensitive windscreen wipers
This warning lamp goes off in the instrument p
anel and a message is displayed.
5
Lighting and visibility
Page 222 of 523
220
Special position of the windscreen wipers
To maintain the effectiveness of the "flat-blade" type of wiper blades, it is
a
dvisable
t
o:
-
h
andle them with care,
-
c
lean them regularly using soapy
w
ater,
-
a
void using them to retain
c
ardboard on the windscreen,
-
r
eplace them at the first signs of
w
e a r.
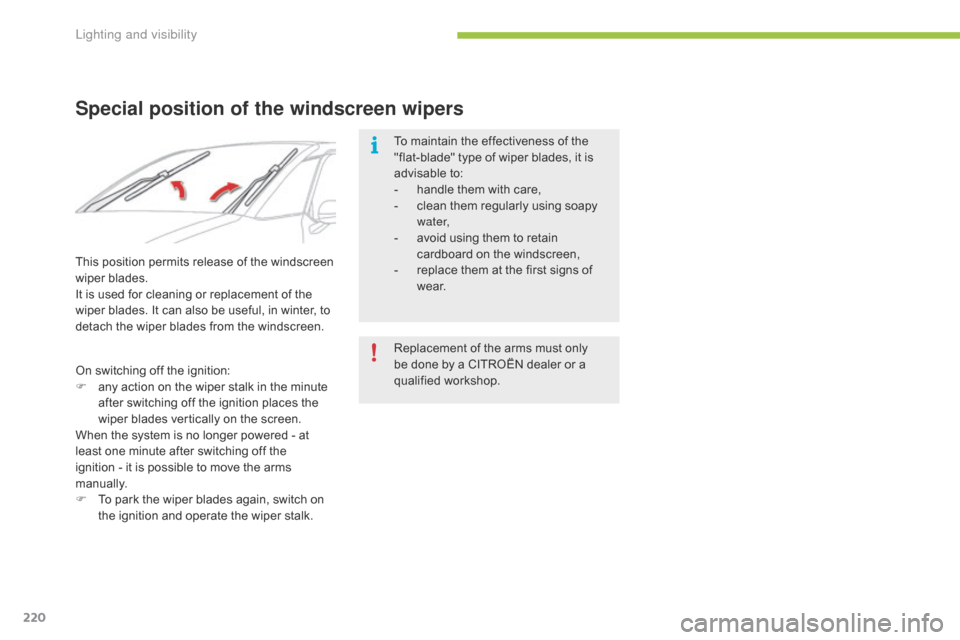
This
position
permits
release
of
the
windscreen
w
iper
blades.
It
is
used
for
cleaning
or
replacement
of
the
w
iper
blades.
It
can
also
be
useful,
in
winter,
to
d
etach
the
wiper
blades
from
the
windscreen.
On
switching
off
the
ignition:
F
a
ny
action
on
the
wiper
stalk
in
the
minute
a
fter
switching
off
the
ignition
places
the
w
iper
blades
vertically
on
the
screen.
When
the
system
is
no
longer
powered
-
at
l
east
one
minute
after
switching
off
the
i
gnition -
it
is
possible
to
move
the
arms
m
anually.
F
T
o
park
the
wiper
blades
again,
switch
on
t
he
ignition
and
operate
the
wiper
stalk. Replacement
of the arms must only
b
e done by a CITROËN dealer or a
q
ualified
w
orkshop.
Lighting and visibility
Page 265 of 523
263
Exiting economy mode
These functions are reactivated automatically next time the vehicle is driven.
In
order to restore the use of these functions
i
mmediately, start the engine and let it run:
-
f
or less than ten minutes, to use the
e
quipment for approximately five minutes,
-
f
or more than ten minutes, to use the
e
quipment for up to approximately
t
hirty minutes.
Let
the engine run for the duration specified to
e
nsure that the battery charge is sufficient.
Do
not repeatedly and continuously restart the
e
ngine in order to charge the battery.
A
flat battery prevents the engine from starting.
For
more information on the 12 V batter y, refer
to
the corresponding section.
Load reduction mode
System which manages the use of certain functions according to the level of charge
r
emaining in the battery.
When
the vehicle is being driven, the load
r
eduction function temporarily deactivates
c
ertain functions, such as the air conditioning,
t
he heated rear screen...
The
deactivated functions are reactivated
a
utomatically as soon as conditions permit.
Energy economy mode
Switching to economy
mode
A message appears in the instrument panel s
creen indicating that the vehicle has switched
t
o economy mode and the active functions are
p
ut on standby.
If
a telephone call is being made at this time, it
w
ill be maintained for around 10 minutes with
t
he Bluetooth hands-free system of your audio
s
ystem.
System
which manages the duration of use of certain functions to conserve a sufficient level of
c
harge in the battery.
After the engine has stopped, you can still use functions such as the audio and telematics
s
ystem, windscreen wipers, dipped beam headlamps, courtesy lamps, etc. for a maximum
c
ombined duration of about forty minutes.
7
Practical information
Page 314 of 523
312
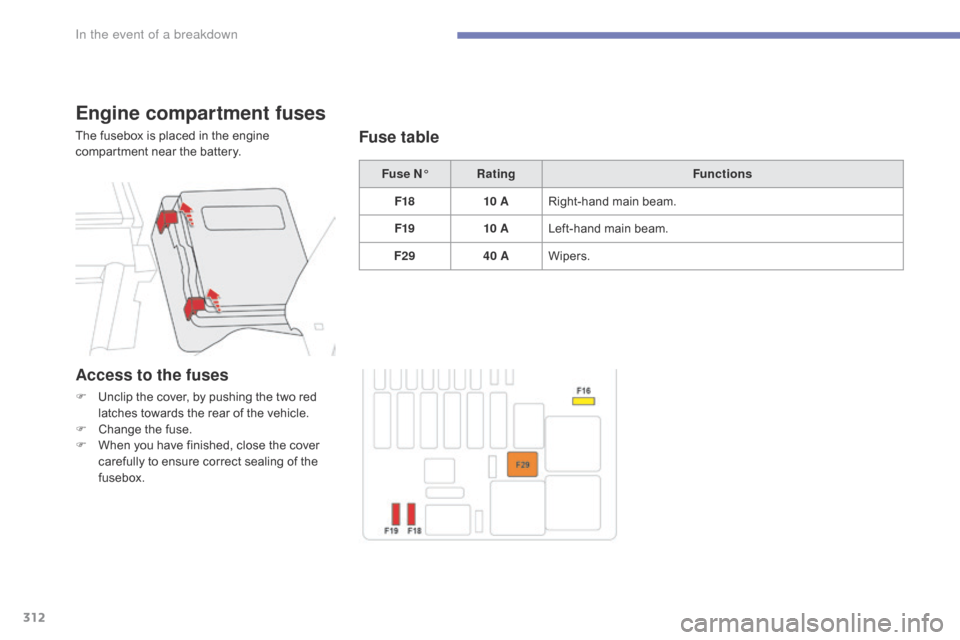
Engine compartment fuses
The fusebox is placed in the engine compartment near the battery.
Fuse N°Rating Functions
F18 10 ARight-hand
main beam.
F19 10 ALeft-hand
main beam.
F29 40 AWipers.Fuse table
Access to the fuses
F Unclip the cover, by pushing the two red l
atches towards the rear of the vehicle.
F
C
hange the fuse.
F
W
hen you have finished, close the cover
c
arefully to ensure correct sealing of the
f
usebox.
In the event of a breakdown
Page 316 of 523
314
F Start the engine of the vehicle with the g
ood battery and leave it running for a few
m
inutes.
F
O
perate the starter on the broken down
v
ehicle and let the engine run.
I
f the engine does not start straight away,
s
witch off the ignition and wait a few
m
oments before trying again.
F
W
ait until the engine returns to idle then
d
isconnect the jump lead cables in the
r
everse
o
rder.
F
R
efit the plastic cover to the (+) terminal, if
y
our vehicle has one.
F
A
llow the engine to run for at least
3
0 minutes, by driving or with the vehicle
s
tationary, so that the battery reaches an
adequate
state of charge.
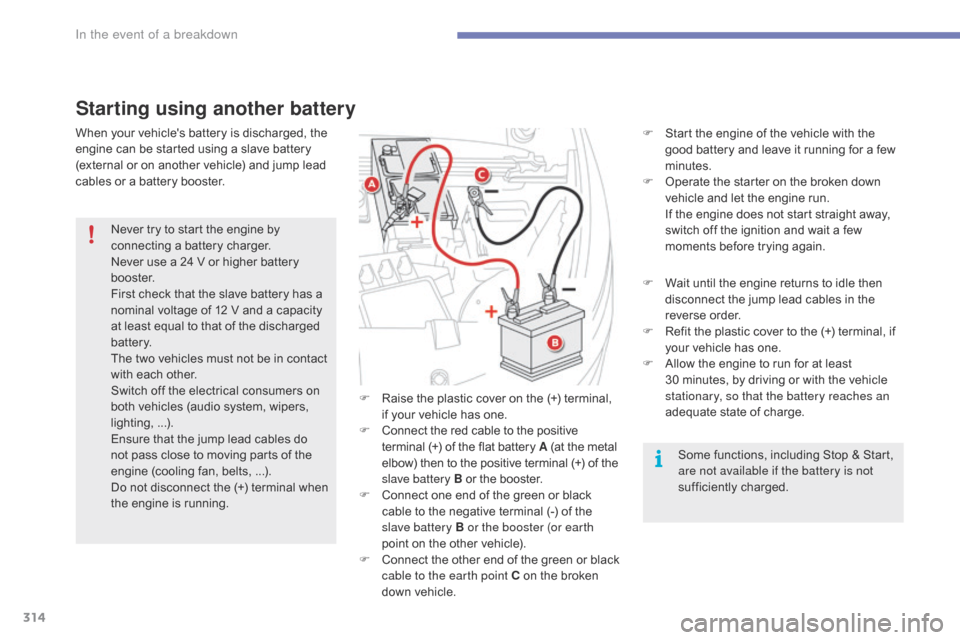
Starting using another battery
Some functions, including Stop & Start, are not available if the battery is not
sufficiently
c
harged.
F
R
aise
the
plastic
cover
on
the
(+)
terminal,
i
f
your
vehicle
has
one.
F
C
onnect
the
red
cable
to
the
positive
t
erminal
(+)
of
the
flat
battery
A
(at
the
metal e
lbow)
then
to
the
positive
terminal (+)
of
the s
lave battery B
or
the
booster.
F
C
onnect
one
end
of
the
green
or
black
c
able
to
the
negative
terminal
(-)
of
the
s
lave battery B or the booster (or earth
point
on
the
other
vehicle).
F
C
onnect
t
he
o
ther
e
nd
o
f
t
he
g
reen
o
r
b
lack
c
able to the earth point C
on
the
broken
d
own
vehicle.
Never
try
to
start
the
engine
by
c
onnecting
a
battery
charger.
Never
use
a
24
V
or
higher
battery
b
o o s t e r.
First
check
that
the
slave
battery
has
a
n
ominal
voltage
of
12
V
and
a
capacity
a
t
least
equal
to
that
of
the
discharged
b
attery.
The
two
vehicles
must
not
be
in
contact
w
ith
each
other.
Switch
off
the
electrical
consumers
on
b
oth
vehicles
(audio
system,
wipers,
l
ighting, ...).
Ensure
that
the
jump
lead
cables
do
n
ot
pass
close
to
moving
parts
of
the
e
ngine
(cooling
fan,
belts, ...).
Do
not
disconnect
the
(+)
terminal
when
t
he
engine
is
running.
When
your
vehicle's
battery
is
discharged,
the
e
ngine
can
be
started
using
a
slave
battery
(
external
or
on
another
vehicle)
and
jump
lead
c
ables
or
a
battery
booster.
In the event of a breakdown