stop start Citroen GRAND C4 PICASSO RHD 2017 2.G Service Manual
[x] Cancel search | Manufacturer: CITROEN, Model Year: 2017, Model line: GRAND C4 PICASSO RHD, Model: Citroen GRAND C4 PICASSO RHD 2017 2.GPages: 523, PDF Size: 11.96 MB
Page 315 of 523
313
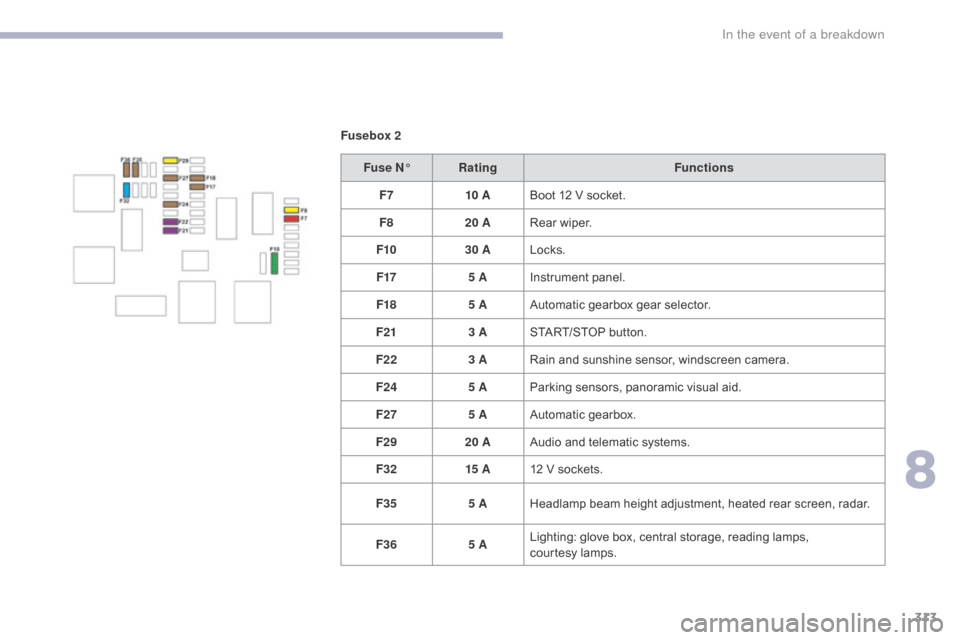
Fusebox 2Fuse N° Rating Functions
F7 10 ABoot 12 V socket.
F8 20 ARear wiper.
F10 30 ALocks.
F17 5 AInstrument panel.
F18 5 AAutomatic gearbox gear selector.
F21 3 ASTART/STOP button.
F22 3 ARain and sunshine sensor, windscreen camera.
F24 5 AParking sensors, panoramic visual aid.
F27 5 AAutomatic gearbox.
F29 20 AAudio and telematic systems.
F32 15 A12 V sockets.
F35 5 AHeadlamp beam height adjustment, heated rear screen, radar.
F36 5 ALighting: glove box, central storage, reading lamps,
courtesy
lamps.
8
In the event of a breakdown
Page 317 of 523
315
12 V battery
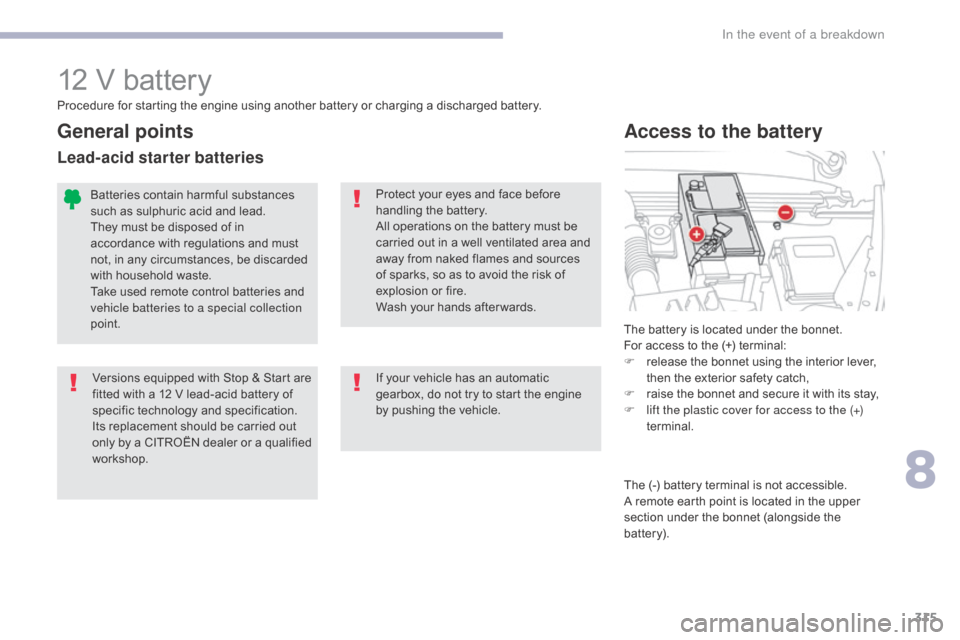
The battery is located under the bonnet.
For access to the (+) terminal:
F
r
elease the bonnet using the interior lever,
then the exterior safety catch,
F
r
aise the bonnet and secure it with its stay,
F
l
ift the plastic cover for access to the (+)
terminal.
Access to the battery
Procedure for starting the engine using another battery or charging a discharged battery.
Protect your eyes and face before
handling the battery.
All operations on the battery must be
carried out in a well ventilated area and
away from naked flames and sources
of sparks, so as to avoid the risk of
explosion or fire.
Wash your hands after wards.
Versions equipped with Stop & Start are
fitted with a 12 V lead-acid battery of
specific technology and specification.
Its replacement should be carried out
only by a CITROËN dealer or a qualified
workshop.
Batteries contain harmful substances
such as sulphuric acid and lead.
They must be disposed of in
accordance with regulations and must
not, in any circumstances, be discarded
with household waste.
Take used remote control batteries and
vehicle batteries to a special collection
point.
General points
Lead-acid starter batteries
If your vehicle has an automatic
gearbox, do not try to start the engine
by pushing the vehicle.
The (-) battery terminal is not accessible.
A remote earth point is located in the upper
section under the bonnet (alongside the
battery).
8
In the event of a breakdown
Page 318 of 523
316
F Start the engine of the vehicle with the good battery and leave it running for a
few
m
inutes.
F
O
perate the starter on the broken down
vehicle and let the engine run.
I
f the engine does not start straight
away, switch off the ignition and wait a
few
moments before trying again.
F
W
ait until the engine returns to idle then
disconnect the jump lead cables in the
reverse order.
F
R
efit the plastic cover to the (+) terminal, if
your vehicle has one.
F
A
llow the engine to run for at least
30
minutes, by driving or with the vehicle
stationary, so that the battery reaches an
adequate state of charge.
Starting using another battery
Some functions, including Stop & Start,
are not available if the battery is not
sufficiently charged.
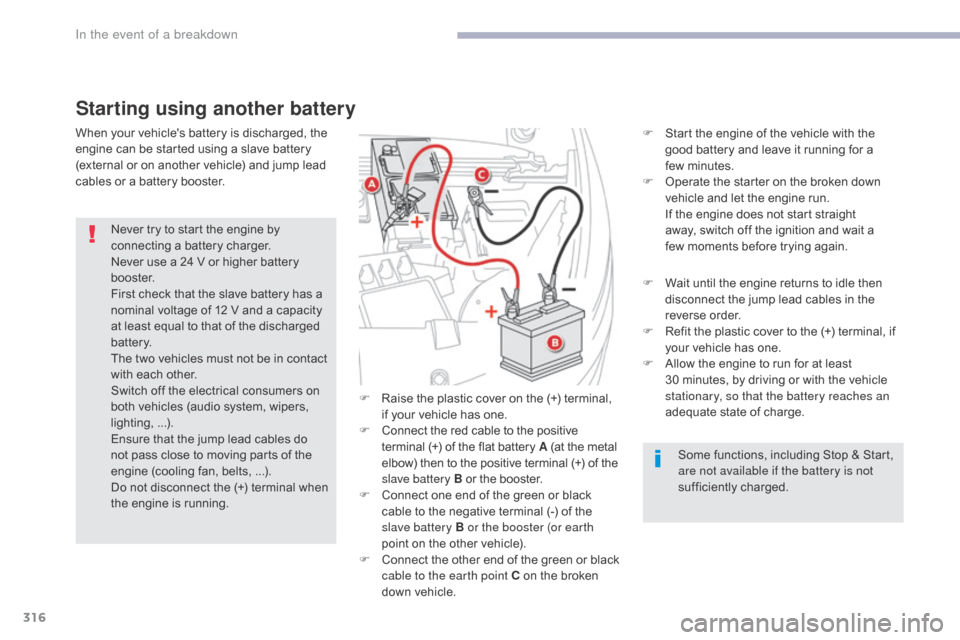
F
R
aise the plastic cover on the (+) terminal,
if your vehicle has one.
F
C
onnect the red cable to the positive
terminal (+) of the flat battery A (at the metal
elbow) then to the positive terminal
(+) of the
slave battery B or the booster.
F
C
onnect one end of the green or black
cable to the negative terminal (-) of the
slave battery B or the booster (or earth
point on the other vehicle).
F
C
onnect the other end of the green or black
cable to the earth point C on the broken
down vehicle.
Never try to start the engine by
connecting a battery charger.
Never use a 24 V or higher battery
b o o s t e r.
First check that the slave battery has a
nominal voltage of 12 V and a capacity
at least equal to that of the discharged
battery.
The two vehicles must not be in contact
with each other.
Switch off the electrical consumers on
both vehicles (audio system, wipers,
lighting,
...
).
Ensure that the jump lead cables do
not pass close to moving parts of the
engine (cooling fan, belts,
...).
Do not disconnect the (+) terminal when
the engine is running.
When your vehicle's battery is discharged, the
engine can be started using a slave battery
(external or on another vehicle) and jump lead
cables or a battery booster.
In the event of a breakdown
Page 319 of 523
317
Never try to charge a frozen battery.
If the battery has been frozen, have
it checked by a CITROËN dealer or a
qualified workshop, who will check that
the internal components have not been
damaged and the casing is not cracked,
which could cause a leak of toxic and
corrosive acid.
F
S
witch off the ignition.
F
S
witch off all electrical consumers (audio
system, lighting, wipers,
...).
F
S
witch off the charger B before connecting
the cables to the battery, so as to avoid any
dangerous sparks.
F
E
nsure that the charger cables are in good
condition.
F
R
aise the plastic cover, if your vehicle has
one, on the (+) terminal.
F
C
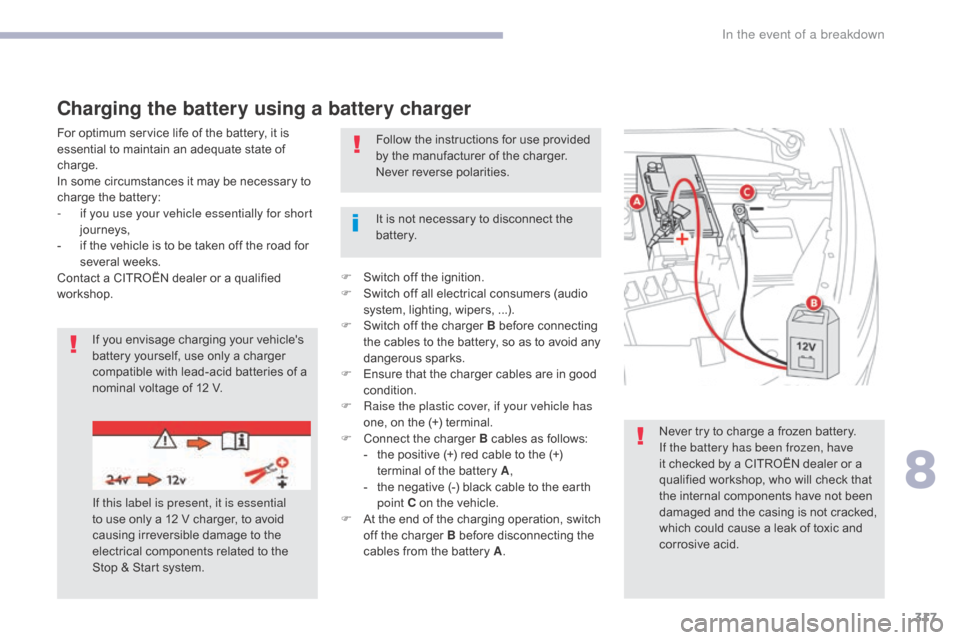
onnect the charger B cables as follows:
-
t
he positive (+) red cable to the (+)
terminal of the battery A ,
-
t
he negative (-) black cable to the earth
point C on the vehicle.
F
A
t the end of the charging operation, switch
off the charger B before disconnecting the
cables from the battery A .
It is not necessary to disconnect the
battery.
If you envisage charging your vehicle's
battery yourself, use only a charger
compatible with lead-acid batteries of a
nominal voltage of 12 V. Follow the instructions for use provided
by the manufacturer of the charger.
Never reverse polarities.
Charging the battery using a battery charger
If this label is present, it is essential
to use only a 12 V charger, to avoid
causing irreversible damage to the
electrical components related to the
Stop & Start system.
For optimum service life of the battery, it is
essential to maintain an adequate state of
charge.
In some circumstances it may be necessary to
charge the battery:
-
i
f you use your vehicle essentially for short
journeys,
-
i
f the vehicle is to be taken off the road for
several weeks.
Contact a CITROËN dealer or a qualified
workshop.
8
In the event of a breakdown
Page 320 of 523
318
The Stop & Start system may not be
operational during the trip following the
first engine start.
In this case, the system will only be
available again after a continuous
period of immobilisation of the vehicle,
a period which depends on the ambient
temperature and the state of charge of
the battery (up to about 8 hours).
Do not force the lever as locking will
not be possible if the clamp is not
positioned correctly; start the procedure
again.
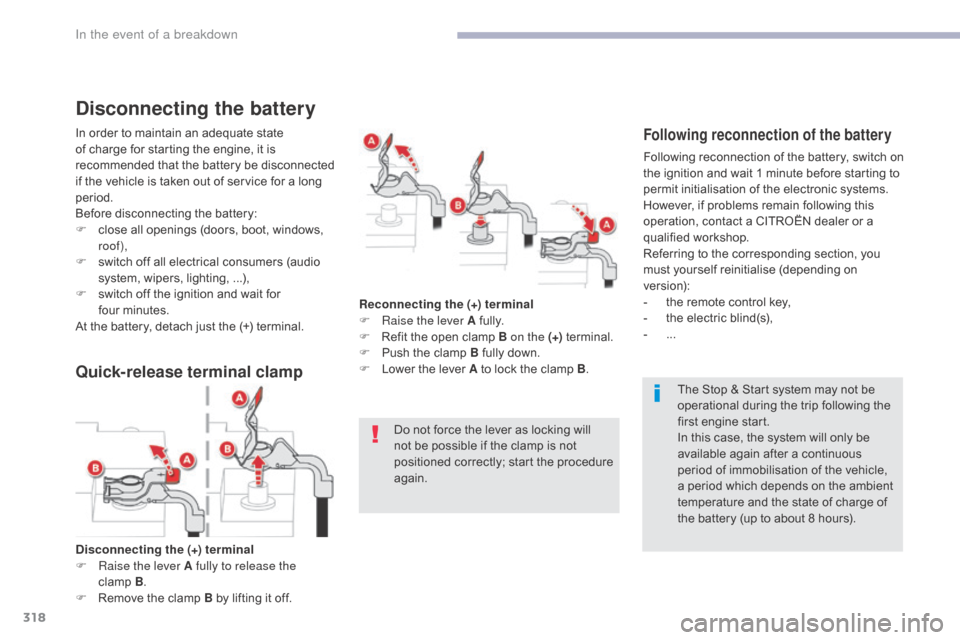
Disconnecting the (+) terminal
F
Ra
ise the lever A fully to release the
clamp
B .
F
R
emove the clamp B by lifting it off. Reconnecting the (+) terminal
F
Ra
ise the lever A fully.
F
R
efit the open clamp B on the (+)
terminal.
F
P
ush the clamp B fully down.
F
L
ower the lever A to lock the clamp B
.
Disconnecting the battery
In order to maintain an adequate state
of charge for starting the engine, it is
recommended that the battery be disconnected
if the vehicle is taken out of service for a long
period.
Before disconnecting the battery:
F
c
lose all openings (doors, boot, windows,
roof),
F
s
witch off all electrical consumers (audio
system, wipers, lighting,
...),
F
s
witch off the ignition and wait for
four
m
inutes.
At the battery, detach just the (+) terminal.Following reconnection of the battery
Following reconnection of the battery, switch on
the ignition and wait 1 minute before starting to
permit initialisation of the electronic systems.
However, if problems remain following this
operation, contact a CITROËN dealer or a
qualified workshop.
Referring to the corresponding section, you
must yourself reinitialise (depending on
version):
-
t
he remote control key,
-
t
he electric blind(s),
-
...
Quick-release terminal clamp
In the event of a breakdown
Page 328 of 523
326
Diesel engines and gearboxes
.../S: e-HDi model fitted with Stop & Start.
3D...: CITROËN C4 Picasso (5 -seat). 3E...:
CITROËN Grand C4 Picasso (5 -seat).
3A...: CITROËN Grand C4 Picasso (7-seat).
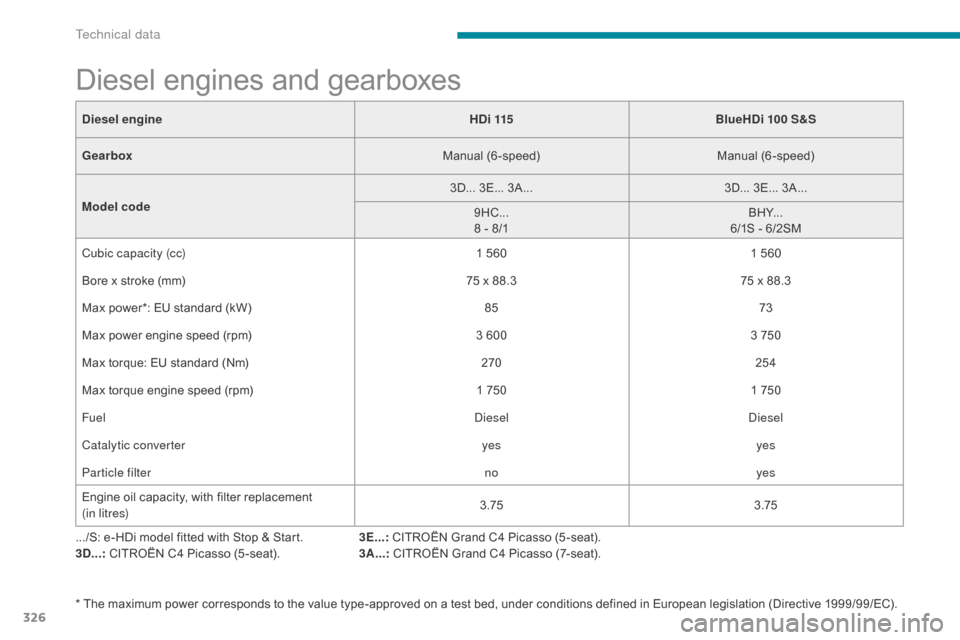
Diesel engine
HDi 115BlueHDi 100 S&S
Gearbox Manual (6-speed)Manual (6-speed)
Model code 3D... 3E... 3A...
3D... 3E... 3A...
9HC... 8 - 8/1 BHY...
6/1S - 6/2SM
Cubic capacity (cc) 1 5601 560
Bore x stroke (mm) 75 x 88.375 x 88.3
Max power*: EU standard (kW) 8573
Max power engine speed (rpm) 3 6003 750
Max torque: EU standard (Nm) 270254
Max torque engine speed (rpm) 1 7501 750
Fuel DieselDiesel
Catalytic converter yesyes
Particle filter noyes
Engine oil capacity, with filter replacement
(in litres) 3.75
3.75
* The maximum power corresponds to the value type-approved on a test bed, under conditions defined in European legislation (Directive 1999/99/EC).
Technical data
Page 329 of 523
327
Diesel engines and gearboxes
.../S: e-HDi model fitted with Stop & Start.
3D...: CITROËN C4 Picasso (5 -seat). 3E...:
CITROËN Grand C4 Picasso (5 -seat).
3A...: CITROËN Grand C4 Picasso (7-seat).
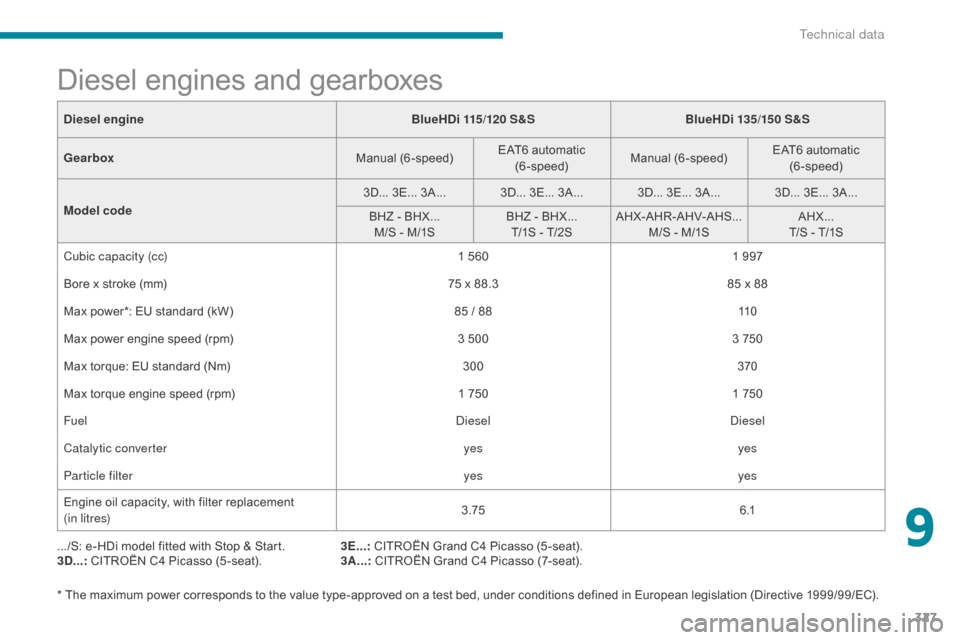
Diesel engine
BlueHDi 115/120 S&SBlueHDi 135/15 0 S&S
Gearbox Manual (6-speed)EAT6 automatic
(6-speed) Manual (6-speed) EAT6 automatic
(6-speed)
Model code 3D... 3E... 3A... 3D... 3E... 3A... 3D... 3E... 3A... 3D... 3E... 3A...
BHZ - BHX...M/S - M/1S BHZ - BHX...
T/1S - T/2S AHX-AHR-AHV-AHS...
M/S - M/1S AHX...
T/S - T/1S
Cubic capacity (cc) 1 5601 997
Bore x stroke (mm) 75 x 88.385 x 88
Max power*: EU standard (kW) 85 / 8811 0
Max power engine speed (rpm) 3 5003 750
Max torque: EU standard (Nm) 300370
Max torque engine speed (rpm) 1 7501 750
Fuel DieselDiesel
Catalytic converter yesyes
Particle filter yesyes
Engine oil capacity, with filter replacement
(in litres) 3.75
6 .1
* The maximum power corresponds to the value type-approved on a test bed, under conditions defined in European legislation (Directive 1999/99/EC).
9
Technical data
Page 338 of 523
336
Spotlamps, side ....................................216, 305
Stability control (ESC) ...................................230
Starting the vehicle
....................... 1
24, 126, 127
Starting using another battery
.............. 1
27, 316
Stay, bonnet
...............................
...................271
Steering wheel, adjustment
............................93
St
op
...............
.................................................. 28
Stopping the vehicle
..................... 1
24, 126, 127
Stop & Start
................ 2
6, 51, 95, 104, 145, 146,
259, 271, 277, 315, 318
Stop (warning lamp)
........................................ 28
St
orage
................
.......................................... 108
Storage boxes
........................................ 111
, 113
Storing driving positions
.................................79
S
un visor
....................................................... 10
8
Sun visor flap
...............................
.................108
Synchronising the remote control
...................59
W
U
T
V
Warning and indicator lamps .............. 2 2, 27, 28
Warning lamp, braking system .......................3
0
Warning lamp, Diesel engine pre-heater
.......25
W
arning lamps
....................................2
5, 28, 31
Warning lamp, SCR emissions control system
................
........................................... 37
Warning lamp, Service.................................... 29
Warning lamp, Stop
........................................ 28
W
ashing (advice) ........................................... 278
Weights
...............
..........................324, 328, 329
Wheel, spare
......................................... 29
1-294
Window controls
............................................. 74
W
iper blades (changing)
.......................2
24, 268
Wiper, rear ..................................................... 221
Wipers
............................................ 2
6, 220, 223
Wipers, automatic rain sensitive
.......... 2
20, 223
Under-inflation (detection)
............................
2
02
Unlocking
..............................
....................53, 55
Unlocking from the inside
............................... 61
U
nlocking the boot
.......................................... 53
U
nlocking the doors
........................................ 61
U
pdating the date
............................................ 52
U
pdating the time
............................................ 52
T
able of weights
............................3
24, 328, 329
Tables of engines
......................... 3
22, 326, 327
Tables of fuses
.............................................. 3
10
Tailgate
................
......................................64, 66
Tank, AdBlue
® additive ................................. 2 79
Tank, fuel
............................... ................259, 260
Technical data
....................... 3
22, 324, 326 -329
Temperature, coolant
...................................... 41
T
hree flashes (direction indicators)
..............2
17
Time (setting)
..............................
....................52
To o l s
................
...................................... 291-294
To r c h
..............................
............................... 11 9Total distance recorder
...................................
46
T
ouch screen
............................................. 11, 13
Touch screen tablet
.................................. 1
1, 13
To w b a r
................
...................................123, 266
Towed loads
..................................3
24, 328, 329
Towing another vehicle
.................................
31
9
Traction control (ASR)
................... 3
2, 230, 232
Tr a i l e r
...............
.....................................123, 266
Triangle, warning ........................................... 283
Trip computer
............................................
4
9 - 51
Trip distance recorder
.....................................
46
T
y r e s
..............................................................
.... 9
Tyre under-inflation detection
...............
............... 35, 202, 204, 290
Ventilation
..............................
.........9, 94, 95, 97
Visibility
...............................
..........................
104
Vision 360
.....................................................
19
2
Alphabetical index
Page 359 of 523
10
Audio and Telematics
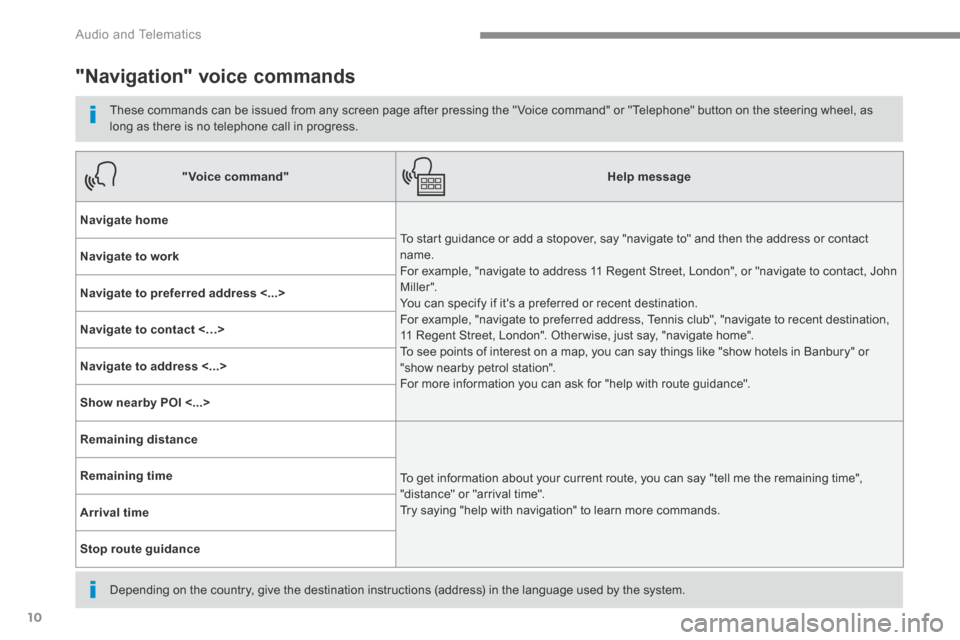
"Navigation" voice commands
These commands can be issued from any screen page after pressing the " Voice command" or "Telephone" button on the steering wheel, as long as there is no telephone call in progress.
Depending on the country, give the destination instructions (address) in the language used by the system.
"Voice command"Help message
Navigate home
To start guidance or add a stopover, say "navigate to" and then the address or contact name. For example, "navigate to address 11 Regent Street, London", or "navigate to contact, John M iller ". You can specify if it's a preferred or recent destination. For example, "navigate to preferred address, Tennis club", "navigate to recent destination, 11 Regent Street, London". Other wise, just say, "navigate home". To see points of interest on a map, you can say things like "show hotels in Banbury" or "show nearby petrol station". For more information you can ask for "help with route guidance".
Navigate to work
Navigate to preferred address <...>
Navigate to contact <…>
Navigate to address <...>
Show nearby POI <...>
Remaining distance
To get information about your current route, you can say "tell me the remaining time", "distance" or "arrival time". Try saying "help with navigation" to learn more commands.
Remaining time
Arrival time
Stop route guidance
Page 515 of 523
166
Audio and Telematics
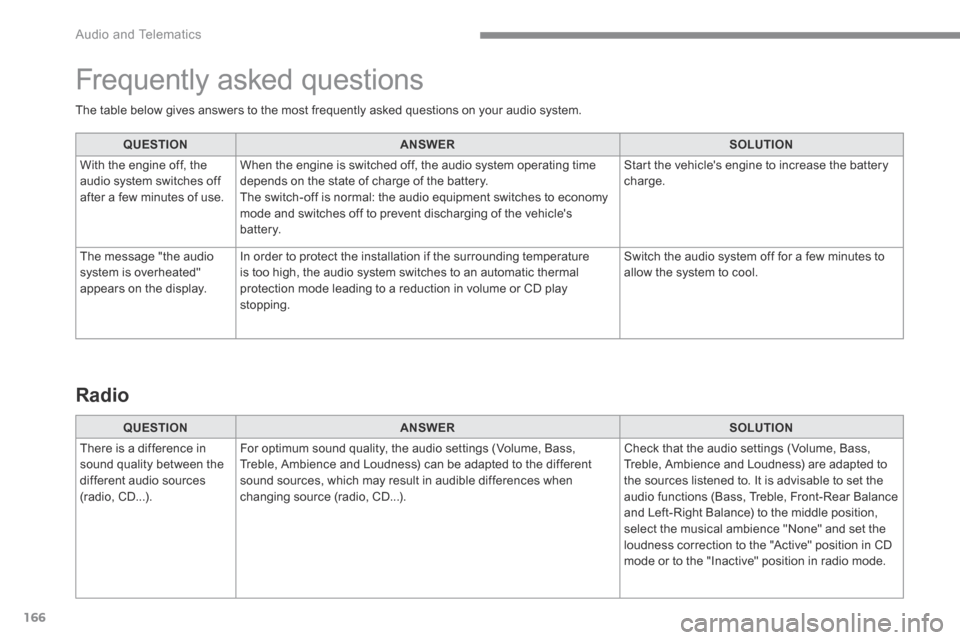
The table below gives answers to the most frequently asked questions on your audio system.
QUESTIONANSWERSOLUTION
With the engine off, the audio system switches off after a few minutes of use.
When the engine is switched off, the audio system operating time depends on the state of charge of the battery. The switch-off is normal: the audio equipment switches to economy mode and switches off to prevent discharging of the vehicle's battery.
Start the vehicle's engine to increase the battery charge.
The message "the audio system is overheated" appears on the display.
In order to protect the installation if the surrounding temperature is too high, the audio system switches to an automatic thermal protection mode leading to a reduction in volume or CD play stopping.
Switch the audio system off for a few minutes to allow the system to cool.
Frequently asked questions
QUESTIONANSWERSOLUTION
There is a difference in sound quality between the different audio sources (radio, CD...).
For optimum sound quality, the audio settings (Volume, Bass, Treble, Ambience and Loudness) can be adapted to the different sound sources, which may result in audible differences when changing source (radio, CD...).
Check that the audio settings (Volume, Bass, Treble, Ambience and Loudness) are adapted to the sources listened to. It is advisable to set the audio functions (Bass, Treble, Front-Rear Balance and Left-Right Balance) to the middle position, select the musical ambience "None" and set the loudness correction to the "Active" position in CD mode or to the "Inactive" position in radio mode.
Radio