audio Citroen GRAND C4 PICASSO RHD 2017 2.G Owner's Manual
[x] Cancel search | Manufacturer: CITROEN, Model Year: 2017, Model line: GRAND C4 PICASSO RHD, Model: Citroen GRAND C4 PICASSO RHD 2017 2.GPages: 523, PDF Size: 11.96 MB
Page 5 of 523
General safety recommendations 226
Hazard warning lamps
2
27
Horn
2
27
Emergency or assistance
2
28
Electronic stability control (ESC)
2
30
Seat belts
23
3
Airbags
2
38
Child seats
2
42
Deactivating the passenger's front airbag
2
44
ISOFIX mountings
2
51
Child lock
2
58
Safety
Fuel 2 59
Misfuel prevention (Diesel)
2
60
Snow chains
2
62
Very cold climate screen(s)
2
63
Towbar with quickly detachable towball
2
64
Towing a trailer
2
66
Energy economy mode
2
67
Changing a wiper blade
2
68
Roof bars
2
69
B o nnet
2
71
Petrol engines
2
72
Diesel engines
2
73
Checking levels
2
74
Checks
2
77
AdBlue
® additive and SCR system
(BlueHDi Diesel) 2 79
Practical information
Warning triangle 2 83
Temporary puncture repair kit
2
84
Spare wheel
2
91
Changing a bulb
3
01
Changing a fuse
3
10
12 V battery
3
15
To w i n g
3
19
Running out of fuel (Diesel)
3
21
In the event of a breakdown
Petrol engines 322
Petrol weights
3
24
Diesel engines
3
26
Diesel weights
3
28
Dimensions
3
30
Identification markings
3
31
Technical data
Mirrors 205
Lighting control stalk
2
08
Automatic illumination of headlamps
2
13
Automatic headlamp dipping
2
14
Daytime running lamps
2
16
Direction indicators
2
17
Adjusting the headlamp beam height
2
17
Directional lighting
2
19
Wiper control stalk
2
20
Screenwash
2
22
Automatic rain sensitive wipers
2
23
Panoramic sunroof
2
25
Lighting and visibility Alphabetical index
For the audio and telematic systems,
refer to the supplement to the handbook
or go to the following internet address:
http://service.citroen.com/ddb/
Contents
Page 13 of 523
11
Touch screen
The touch screen gives access to:
- t he heating/air conditioning controls,
-
t
he menus for adjusting settings for vehicle
functions and systems,
-
t
he audio system and telephone controls
and the display of associated information,
For safety reasons, the driver must
only carry out operations that
require close attention with the
vehicle stationary.
Some functions are not accessible
when driving.General operation
Recommendations
Use is possible in all temperatures.
Do not use pointed objects on the touch
screen.
Do not touch the touch screen with wet hands.
Use a soft clean cloth to clean the touch
screen.
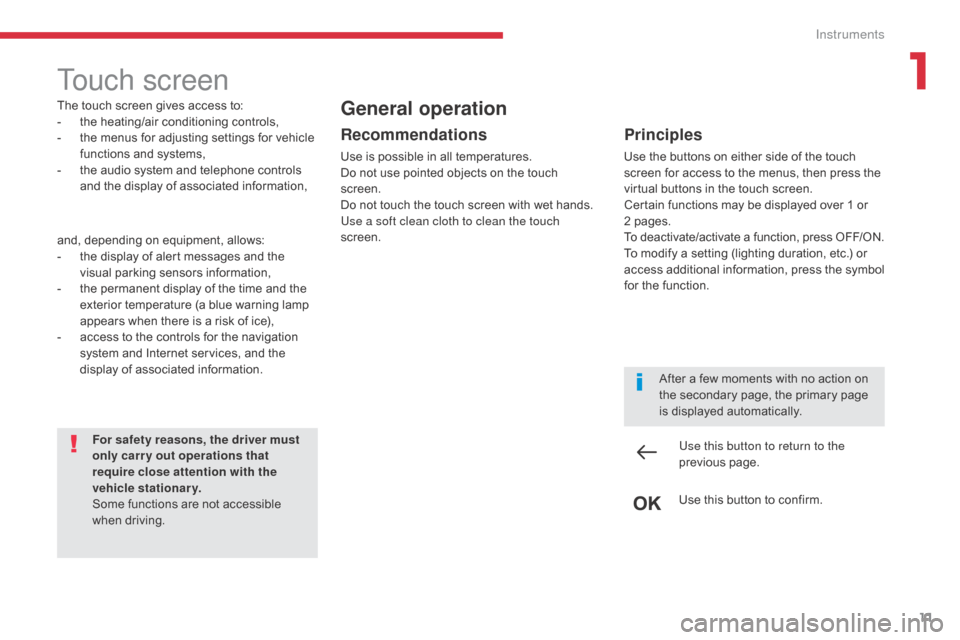
Use this button to return to the
previous page.
Use this button to confirm.
Principles
Use the buttons on either side of the touch
screen for access to the menus, then press the
virtual buttons in the touch screen.
Certain functions may be displayed over 1 or
2 pages.
To deactivate/activate a function, press OFF/ON.
To modify a setting (lighting duration, etc.) or
access additional information, press the symbol
for the function.After a few moments with no action on
the secondary page, the primary page
is displayed automatically.
and, depending on equipment, allows:
-
t
he display of alert messages and the
visual parking sensors information,
-
t
he permanent display of the time and the
exterior temperature (a blue warning lamp
appears when there is a risk of ice),
-
a
ccess to the controls for the navigation
system and Internet services, and the
display of associated information.
1
Instruments
Page 14 of 523
12
MenusUpper bar
Certain information is always present in the
upper bar of the touch screen:
-
R
epeat of the air conditioning information,
and access to the simplified menu
(temperature and air flow adjustment only).
-
R
epeat of information from the Radio
Media and Telephone menus and
navigation instructions*.
-
N
otifications zone (SMS and email)*.
* Depending on equipment.
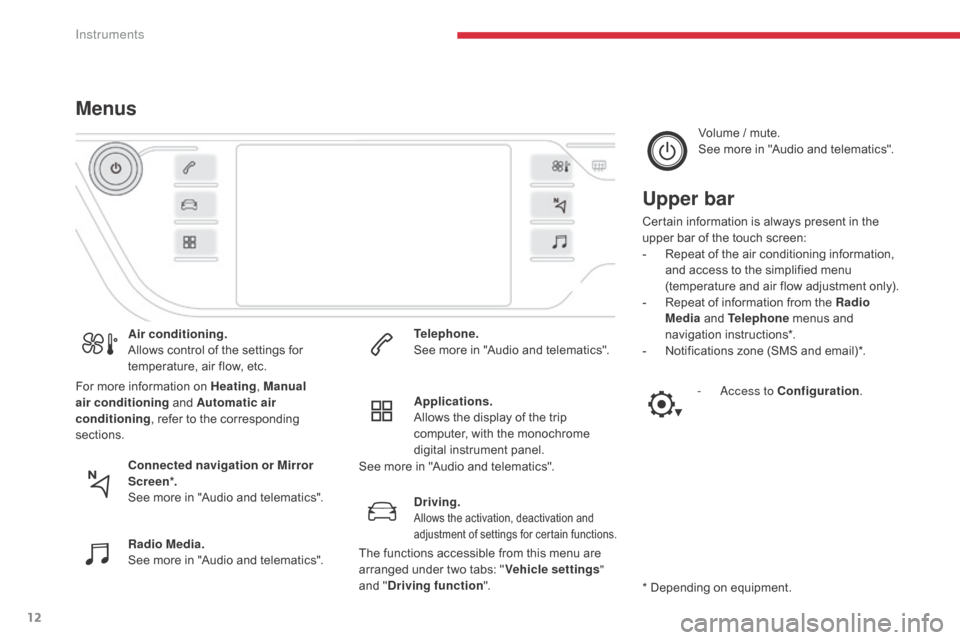
Air conditioning.
Allows control of the settings for
temperature, air flow, etc.
Connected navigation or Mirror
Scre en*.
See more in "Audio and telematics".
Radio Media.
See more in "Audio and telematics".
Telephone.
See more in "Audio and telematics".
Driving.
Allows the activation, deactivation and
adjustment of settings for certain functions.
Applications.
Allows the display of the trip
computer, with the monochrome
digital instrument panel.Volume / mute.
See more in "Audio and telematics".
- A ccess to Configuration
.
For more information on Heating
, Manual
air conditioning and Automatic air
conditioning , refer to the corresponding
sections.
The functions accessible from this menu are
arranged under two tabs: "Vehicle settings"
and " Driving function ".
See more in "Audio and telematics".
Instruments
Page 109 of 523
107
Front fittings
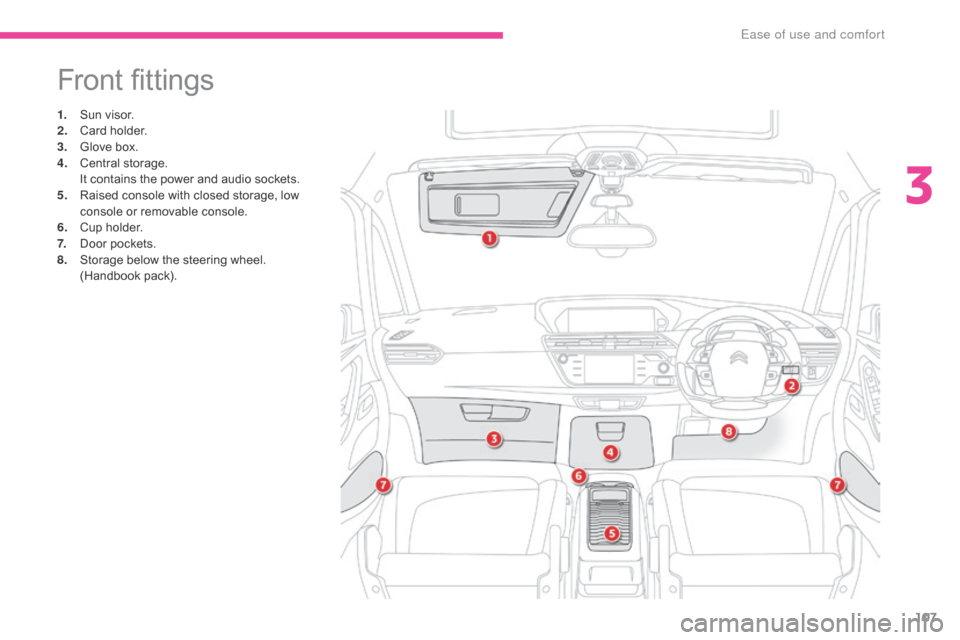
1. Sun visor.
2. Card holder.
3.
G
love box.
4.
C
entral storage.
I
t contains the power and audio sockets.
5.
R
aised console with closed storage, low
console or removable console.
6.
C
up holder.
7.
D
oor pockets.
8.
S
torage below the steering wheel.
(
Handbook pack).
3
Ease of use and comfort
Page 112 of 523
110
When the USB port is used, the
portable device charges automatically.
A message is displayed if the power
consumption of the portable device
exceeds the current supplied by the
vehicle.
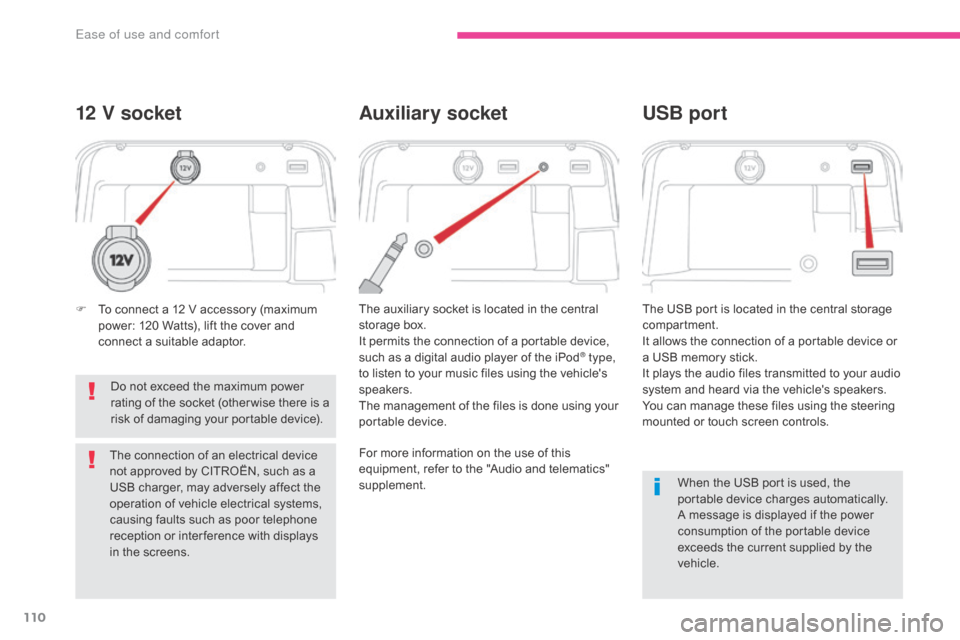
12 V socket
The auxiliary socket is located in the central
storage box.
It permits the connection of a portable device,
such as a digital audio player of the iPod
® type,
to listen to your music files using the vehicle's
speakers.
The management of the files is done using your
portable device. The USB port is located in the central storage
compartment.
It allows the connection of a portable device or
a USB memory stick.
It plays the audio files transmitted to your audio
system and heard via the vehicle's speakers.
You can manage these files using the steering
mounted or touch screen controls.
Auxiliary socket
USB port
For more information on the use of this
equipment, refer to the "Audio and telematics"
supplement.
F
T
o connect a 12 V accessory (maximum
power: 120 Watts), lift the cover and
connect a suitable adaptor.
Do not exceed the maximum power
rating of the socket (other wise there is a
risk of damaging your portable device).
The connection of an electrical device
not approved by CITROËN, such as a
USB charger, may adversely affect the
operation of vehicle electrical systems,
causing faults such as poor telephone
reception or inter ference with displays
in the screens.
Ease of use and comfort
Page 269 of 523
267
Exiting economy mode
These functions are reactivated automatically
next time the vehicle is driven.
In order to restore the use of these functions
immediately, start the engine and let it run:
-
f
or less than ten minutes, to use the
equipment for approximately five minutes,
-
f
or more than ten minutes, to use the
equipment for up to approximately
thirty
m
inutes.
Let the engine run for the duration specified to
ensure that the battery charge is sufficient.
Do not repeatedly and continuously restart the
engine in order to charge the battery.
A flat battery prevents the engine from starting.
For more information on the 12 V batter y , refer
to the corresponding section.
Load reduction mode
System which manages the use of certain
functions according to the level of charge
remaining in the battery.
When the vehicle is being driven, the load
reduction function temporarily deactivates
certain functions, such as the air conditioning,
the heated rear screen...
The deactivated functions are reactivated
automatically as soon as conditions permit.
Energy economy mode
Switching to economy mode
A message appears in the instrument panel
screen indicating that the vehicle has switched
to economy mode and the active functions are
put on standby.
If a telephone call is being made at this time, it
will be maintained for around 10 minutes with
the Bluetooth
® hands-free system of your audio
system. System which manages the duration of use of certain functions to conserve a sufficient level of
charge in the battery.
After the engine has stopped, you can still use functions such as the audio and telematics
system,
windscreen wipers, dipped beam headlamps, courtesy lamps, etc. for a maximum
combined duration of about forty minutes.
7
Practical information
Page 315 of 523
313
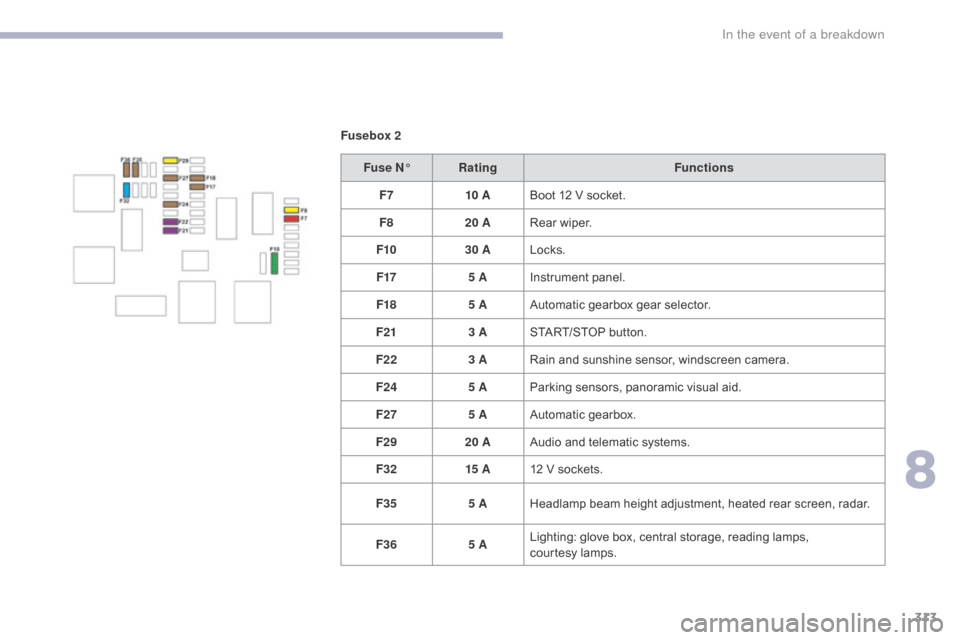
Fusebox 2Fuse N° Rating Functions
F7 10 ABoot 12 V socket.
F8 20 ARear wiper.
F10 30 ALocks.
F17 5 AInstrument panel.
F18 5 AAutomatic gearbox gear selector.
F21 3 ASTART/STOP button.
F22 3 ARain and sunshine sensor, windscreen camera.
F24 5 AParking sensors, panoramic visual aid.
F27 5 AAutomatic gearbox.
F29 20 AAudio and telematic systems.
F32 15 A12 V sockets.
F35 5 AHeadlamp beam height adjustment, heated rear screen, radar.
F36 5 ALighting: glove box, central storage, reading lamps,
courtesy
lamps.
8
In the event of a breakdown
Page 318 of 523
316
F Start the engine of the vehicle with the good battery and leave it running for a
few
m
inutes.
F
O
perate the starter on the broken down
vehicle and let the engine run.
I
f the engine does not start straight
away, switch off the ignition and wait a
few
moments before trying again.
F
W
ait until the engine returns to idle then
disconnect the jump lead cables in the
reverse order.
F
R
efit the plastic cover to the (+) terminal, if
your vehicle has one.
F
A
llow the engine to run for at least
30
minutes, by driving or with the vehicle
stationary, so that the battery reaches an
adequate state of charge.
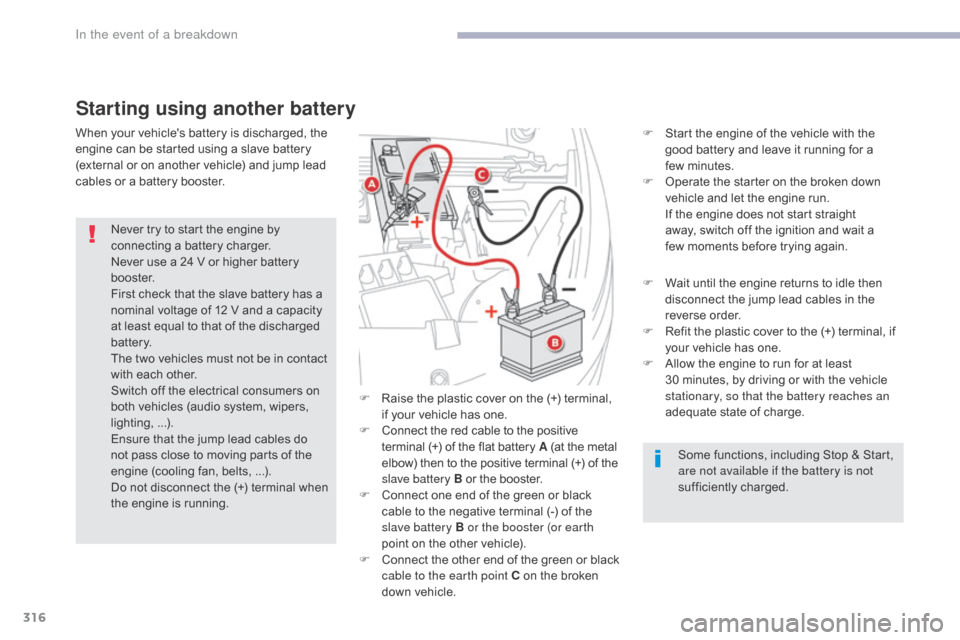
Starting using another battery
Some functions, including Stop & Start,
are not available if the battery is not
sufficiently charged.
F
R
aise the plastic cover on the (+) terminal,
if your vehicle has one.
F
C
onnect the red cable to the positive
terminal (+) of the flat battery A (at the metal
elbow) then to the positive terminal
(+) of the
slave battery B or the booster.
F
C
onnect one end of the green or black
cable to the negative terminal (-) of the
slave battery B or the booster (or earth
point on the other vehicle).
F
C
onnect the other end of the green or black
cable to the earth point C on the broken
down vehicle.
Never try to start the engine by
connecting a battery charger.
Never use a 24 V or higher battery
b o o s t e r.
First check that the slave battery has a
nominal voltage of 12 V and a capacity
at least equal to that of the discharged
battery.
The two vehicles must not be in contact
with each other.
Switch off the electrical consumers on
both vehicles (audio system, wipers,
lighting,
...
).
Ensure that the jump lead cables do
not pass close to moving parts of the
engine (cooling fan, belts,
...).
Do not disconnect the (+) terminal when
the engine is running.
When your vehicle's battery is discharged, the
engine can be started using a slave battery
(external or on another vehicle) and jump lead
cables or a battery booster.
In the event of a breakdown
Page 319 of 523
317
Never try to charge a frozen battery.
If the battery has been frozen, have
it checked by a CITROËN dealer or a
qualified workshop, who will check that
the internal components have not been
damaged and the casing is not cracked,
which could cause a leak of toxic and
corrosive acid.
F
S
witch off the ignition.
F
S
witch off all electrical consumers (audio
system, lighting, wipers,
...).
F
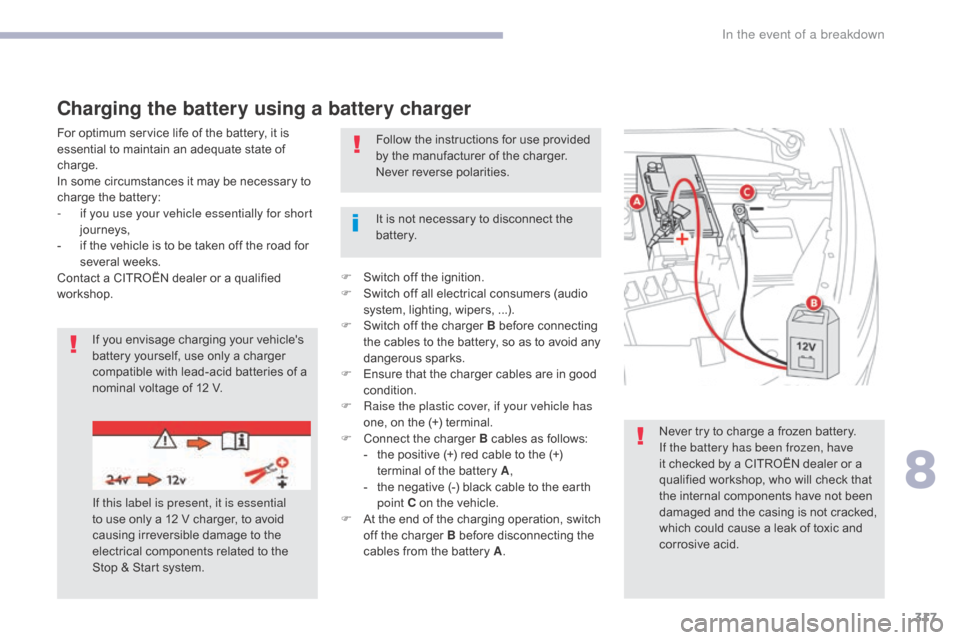
S
witch off the charger B before connecting
the cables to the battery, so as to avoid any
dangerous sparks.
F
E
nsure that the charger cables are in good
condition.
F
R
aise the plastic cover, if your vehicle has
one, on the (+) terminal.
F
C
onnect the charger B cables as follows:
-
t
he positive (+) red cable to the (+)
terminal of the battery A ,
-
t
he negative (-) black cable to the earth
point C on the vehicle.
F
A
t the end of the charging operation, switch
off the charger B before disconnecting the
cables from the battery A .
It is not necessary to disconnect the
battery.
If you envisage charging your vehicle's
battery yourself, use only a charger
compatible with lead-acid batteries of a
nominal voltage of 12 V. Follow the instructions for use provided
by the manufacturer of the charger.
Never reverse polarities.
Charging the battery using a battery charger
If this label is present, it is essential
to use only a 12 V charger, to avoid
causing irreversible damage to the
electrical components related to the
Stop & Start system.
For optimum service life of the battery, it is
essential to maintain an adequate state of
charge.
In some circumstances it may be necessary to
charge the battery:
-
i
f you use your vehicle essentially for short
journeys,
-
i
f the vehicle is to be taken off the road for
several weeks.
Contact a CITROËN dealer or a qualified
workshop.
8
In the event of a breakdown
Page 320 of 523
318
The Stop & Start system may not be
operational during the trip following the
first engine start.
In this case, the system will only be
available again after a continuous
period of immobilisation of the vehicle,
a period which depends on the ambient
temperature and the state of charge of
the battery (up to about 8 hours).
Do not force the lever as locking will
not be possible if the clamp is not
positioned correctly; start the procedure
again.
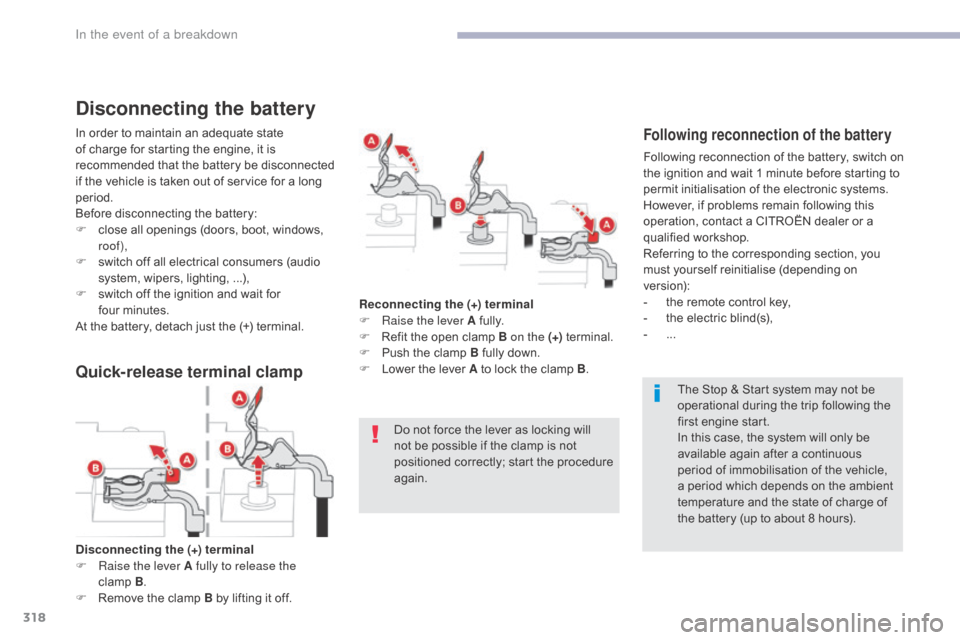
Disconnecting the (+) terminal
F
Ra
ise the lever A fully to release the
clamp
B .
F
R
emove the clamp B by lifting it off. Reconnecting the (+) terminal
F
Ra
ise the lever A fully.
F
R
efit the open clamp B on the (+)
terminal.
F
P
ush the clamp B fully down.
F
L
ower the lever A to lock the clamp B
.
Disconnecting the battery
In order to maintain an adequate state
of charge for starting the engine, it is
recommended that the battery be disconnected
if the vehicle is taken out of service for a long
period.
Before disconnecting the battery:
F
c
lose all openings (doors, boot, windows,
roof),
F
s
witch off all electrical consumers (audio
system, wipers, lighting,
...),
F
s
witch off the ignition and wait for
four
m
inutes.
At the battery, detach just the (+) terminal.Following reconnection of the battery
Following reconnection of the battery, switch on
the ignition and wait 1 minute before starting to
permit initialisation of the electronic systems.
However, if problems remain following this
operation, contact a CITROËN dealer or a
qualified workshop.
Referring to the corresponding section, you
must yourself reinitialise (depending on
version):
-
t
he remote control key,
-
t
he electric blind(s),
-
...
Quick-release terminal clamp
In the event of a breakdown