Fan Citroen JUMPER 2016 2.G Owner's Manual
[x] Cancel search | Manufacturer: CITROEN, Model Year: 2016, Model line: JUMPER, Model: Citroen JUMPER 2016 2.GPages: 276, PDF Size: 8.93 MB
Page 34 of 276
32
jumper_en_Chap02_Pret-a-Partir_ed01-2015
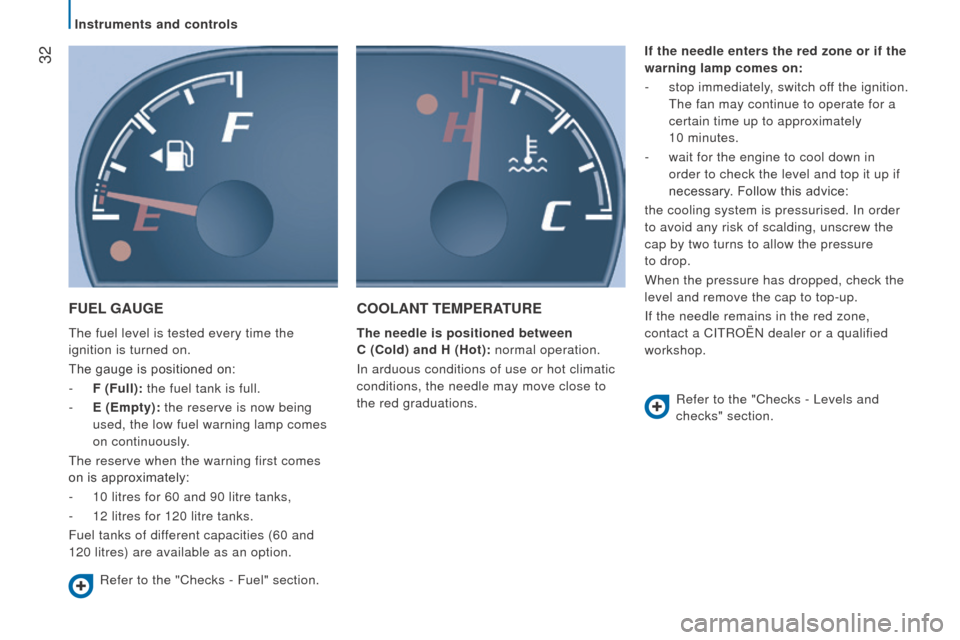
FuEL GA u GE
The fuel level is tested every time the
ignition is turned on.
The gauge is positioned on:
-
F (Full):
the fuel tank is full.
-
E (Empty):
the reserve is now being
used, the low fuel warning lamp comes
on continuously.
The reserve when the warning first comes
on is approximately:
-
10 litres for 60 and 90 litre tanks,
-
12 litres for 120 litre tanks.
Fuel tanks of dif
ferent capacities (60 and
120 litres) are available as an option.
cOOLAnt tEMPErAtur E
the needle is positioned between
c
( c old) and H (Hot): normal operation.
i
n arduous conditions of use or hot climatic
conditions, the needle may move close to
the red graduations. If the needle enters the red zone or if the
warning lamp comes on:
-
stop immediately
, switch off the ignition.
The fan may continue to operate for a
certain time up to approximately
10 minutes.
-
wait for the engine to cool down in
order to check the level and top it up if
necessary. Follow this advice:
the cooling system is pressurised. i n order
to avoid any risk of scalding, unscrew the
cap by two turns to allow the pressure
to drop.
When the pressure has dropped, check the
level and remove the cap to top-up.
i
f the needle remains in the red zone,
contact a C i T roën dealer or a qualified
workshop.
r
efer to the "Checks - Fuel" section.
r
efer to the "Checks - Levels and
checks" section.
Instruments and controls
Page 63 of 276
61
jumper_en_Chap03_Ergo-et-confort_ed01-2015
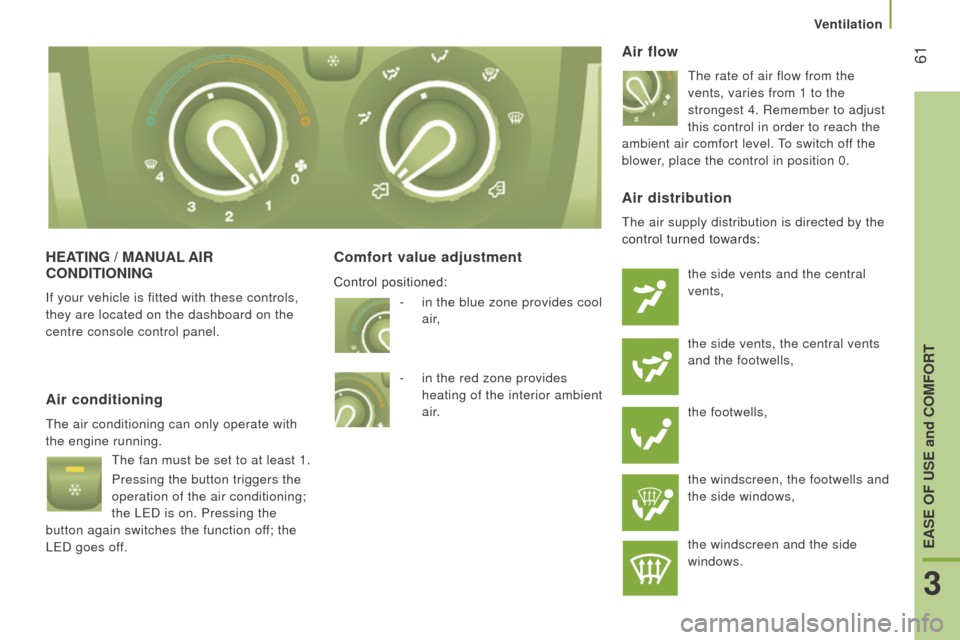
HEAtI n G / M A nu AL AI r
c O nd I t IO n I n G
if your vehicle is fitted with these controls,
they are located on the dashboard on the
centre console control panel.
comfort value adjustment Air flow
The rate of air flow from the
vents, varies from 1 to the
strongest 4.
r emember to adjust
this control in order to reach the
ambient air comfort level. To switch off the
blower, place the control in position 0.
Air conditioning
The air conditioning can only operate with
the engine running.
The fan must be set to at least 1.
Pressing the button triggers the
operation of the air conditioning;
the LED is on. Pressing the
button again switches the function off; the
LED goes off.
Air distribution
The air supply distribution is directed by the
control turned towards:
the side vents and the central
vents,
the side vents, the central vents
and the footwells,
the footwells,
the windscreen, the footwells and
the side windows,
the windscreen and the side
windows.
-
in the blue zone provides cool
air,
-
in the red zone provides
heating of the interior ambient
air.
Control positioned:
Ventilation
3
EASE OF uSE and cOMFOrt
Page 64 of 276
62
jumper_en_Chap03_Ergo-et-confort_ed01-2015
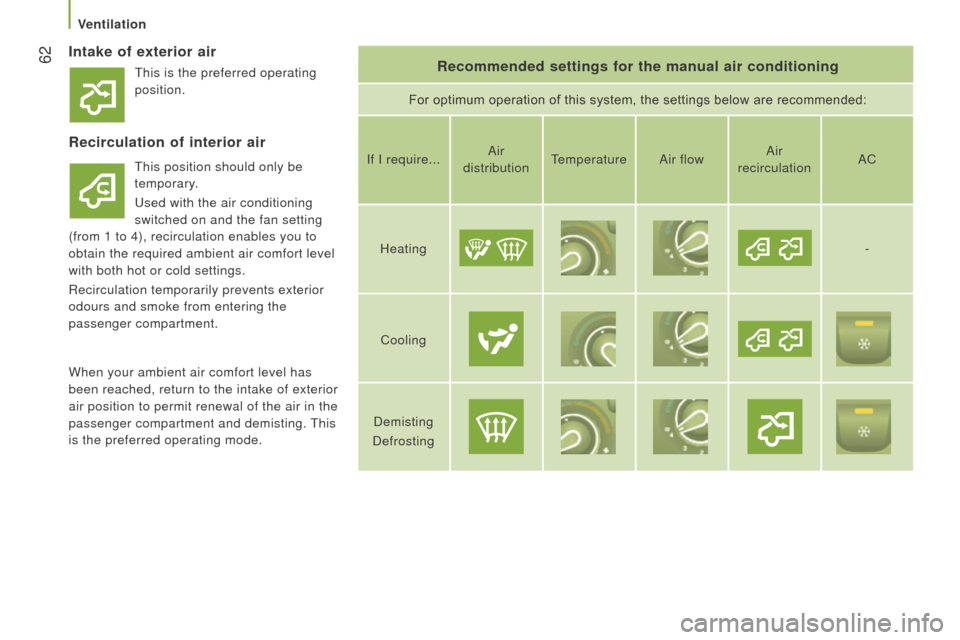
Intake of exterior airrecommended settings for the manual air conditioning
For optimum operation of this system, the settings below are recommended:
recirculation of interior air
This position should only be
temporary.
Used with the air conditioning
switched on and the fan setting
(from 1 to 4), recirculation enables you to
obtain the required ambient air comfort level
with both hot or cold settings.
r
ecirculation temporarily prevents exterior
odours and smoke from entering the
passenger compartment.i f i require...Air
distribution Temperature
Air flowAir
recirculation AC
Heating -
Cooling
Demisting
Defrosting
When your ambient air comfort level has
been reached, return to the intake of exterior
air position to permit renewal of the air in the
passenger compartment and demisting. This
is the preferred operating mode. This is the preferred operating
position.
Ventilation
Page 68 of 276
66
jumper_en_Chap03_Ergo-et-confort_ed01-2015
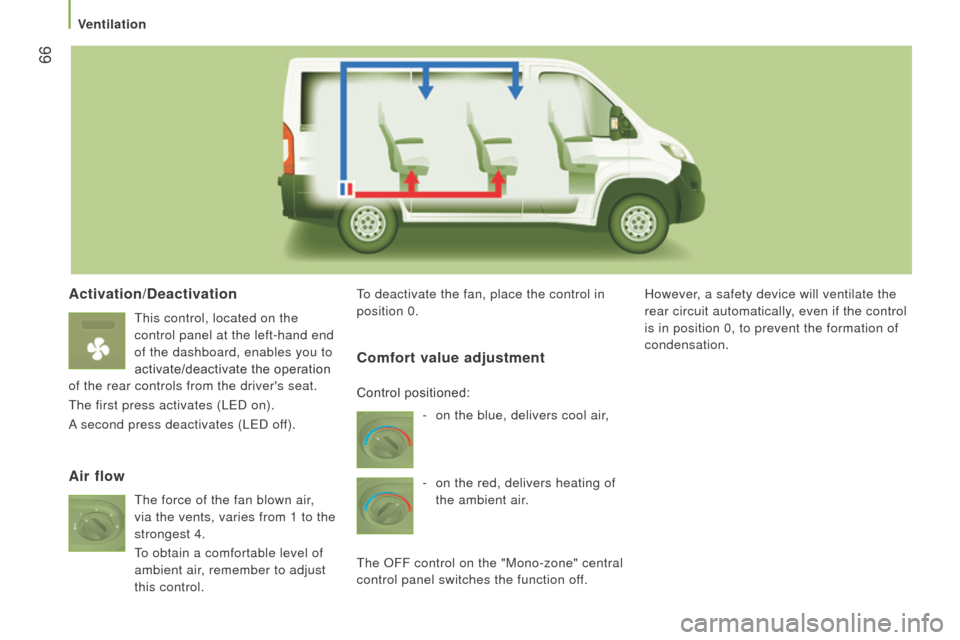
Activation/deactivation
This control, located on the
control panel at the left-hand end
of the dashboard, enables you to
activate/deactivate the operation
of the rear controls from the driver's seat.
The first press activates (LED on).
A second press deactivates (LED off). To deactivate the fan, place the control in
position 0.
However, a safety device will ventilate the
rear circuit automatically, even if the control
is in position 0, to prevent the formation of
condensation.
Air flow
c
omfort value adjustment
- on the blue, delivers cool air
,
-
on the red, delivers heating of
the ambient air.
The
o
FF control on the "Mono-zone" central
control panel switches the function off. Control positioned:
The force of the fan blown air,
via the vents, varies from 1 to the
strongest 4.
To obtain a comfortable level of
ambient air, remember to adjust
this control.
Ventilation
Page 117 of 276
Ar
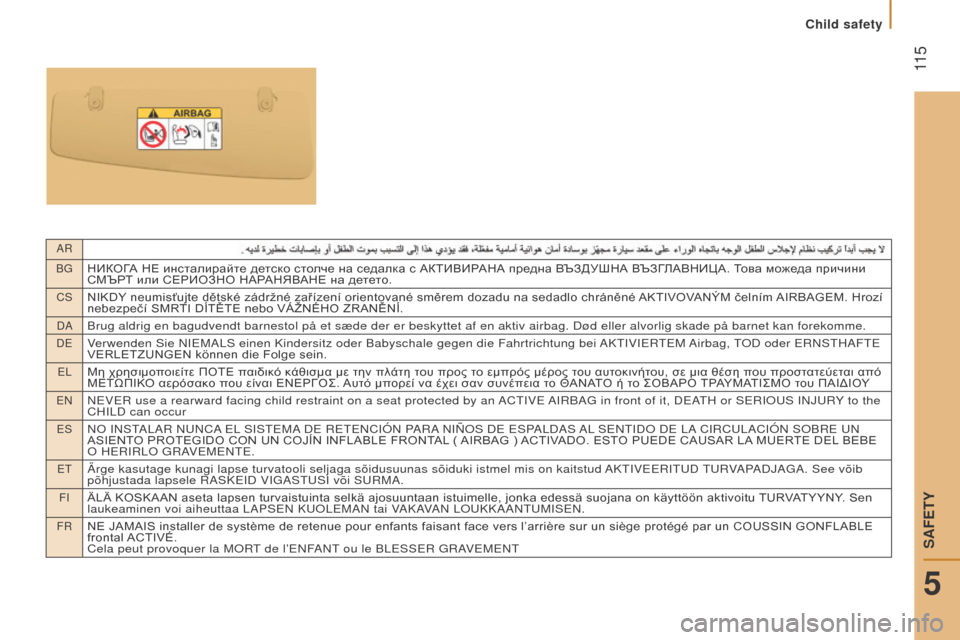
BGНИКОГА НЕ инсталирайте детско столче на седалка с АКТИВИРАНА предна ВЪЗДУШНА ВЪЗГЛАВНИЦА. Това можеда причини
СМЪРТ или СЕРИОЗНО НАРАНЯВАНЕ на детето.
CSNIKDY neumisťujte dětské zádržné zařízení orientované směrem dozadu na sedadlo chráněné AKTIVOVANÝM čelním AIRBAGEM. Hrozí
nebezpečí SMRTI DÍTĚTE nebo VÁŽNÉHO ZRANĚNÍ.
DABrug aldrig en bagudvendt barnestol på et sæde der er beskyttet af\
en aktiv airbag. Død eller alvorlig skade på barnet kan forekomme.
DEVerwenden Sie niEMALS einen Kindersitz oder Babyschale gegen die Fahrtrichtung bei AKTiViErTEM Airbag, To D oder E rn STHAFTE
VERLETZUNGEN können die Folge sein.
ELΜη χρησιμοποιείτε ΠΟΤΕ παιδικό κάθισμα με την πλάτη του προς το εμπρός μέρος του αυτοκινήτου, σε μια θέση που προστατεύεται από
ΜΕΤΩΠΙΚΟ αερόσακο που είναι ΕΝΕΡΓΟΣ. Αυτό μπορεί να έχει σαν συνέπεια το ΘΑΝΑΤΟ ή το ΣΟΒΑΡΟ ΤΡΑΥΜΑΤΙΣΜΟ του ΠΑΙΔΙΟΥ
EnnEVEr use a rearward facing child restraint on a seat protected by an ACTiVE AirBAG in front of it, DEATH or SErioUS inJUrY to the
CH i LD can occur
ESno inSTALAr nUnCA EL SiSTEMA DE rETEnCiÓn PArA niÑoS DE ESPALDAS AL SEnTiDo DE LA CirCULACiÓn SoBrE Un
ASIENT O PROTEGIDO CON UN COJÍN INFLABLE FRONTAL ( AIRBAG ) ACTIVADO. ESTO PUEDE CAUSAR LA MUERTE DEL BEBE
o
HE rir L o G r AVEME n TE.
ETÄrge kasutage kunagi lapse turvatooli seljaga sõidusuunas sõidu\
ki istmel mis on kaitstud AKTiVEEriTUD TUrV APADJAGA. See võib
põhjustada lapsele r ASKE i D V i GASTUS i või SU r MA.
FiÄLÄ KOSKAAN aseta lapsen turvaistuinta selkä ajosuuntaan istuimelle, jonka edessä suojana on käyttöön aktivoitu TURVATYYNY. Sen
laukeaminen voi aiheuttaa LAPSEn KU o LEMA n tai VAKAVA n L o UKKAA n TUM i SE n .
FrNE JAMAIS installer de système de retenue pour enfants faisant face vers l’arrière sur un siège protégé par un COUSSIN GONFLABLE
frontal ACTIVÉ.
Cela peut provoquer la M
or
T
de l’E n FA n T ou le BLESSE r G r AVEME n T
11 5
jumper_en_Chap05_Securite_ed01-2015
Child safety
5
SAFETY
Page 120 of 276

11 8
jumper_en_Chap05_Securite_ed01-2015
LOcAtIO n S FO r t HE I n S tALLAt IO n OF ISOFI x c HIL d SEAt S
in accordance with European regulations, this table indicates the options\
for the installation of iSoFiX child seats on the vehicle seats fitted
with i S o F i X mountings.
i
n the case of the universal and semi-universal i S o F i X child seats, the child seat's i S o F i X size category, determined by a letter from A to G,
is indicated on the child seat next to the
i S o F i X logo.Less than
10 kg
(group 0)
Up to 6 months approx Less than 10 kg
(group 0)
Less than 13 kg
(group 0+)
Up to 1 year approx From 9 to 18 kg
(group 1)
From 1 to 3 years approx
type of ISOFI
x child seat Infant carrierrearward facing forward facing
ISOFI
x size category F G
cdEcdAB1
r
ow 2 outer rear seats with
individual seats in
r ow 1 I
u FI
u FI
u F
r
ow 2 outer rear seats with
2-seat bench in
r ow 1 I
u F
xI
u F
xI
u F
I
u F:
Seat suitable for the installation of
an
i S o F i X child seat of the universal
category. Forward facing
i S o F i X child
seats fitted with an upper strap secured
to the upper ring of the vehicle seats
equipped with
i S o F i X mountings.
x
:
Seat not suitable for the installation of
an
i S o F i X child seat of the size category
indicated.
r
emove and stow the head restraint
before installing a child seat with
backrest on a passenger seat.
r
efit the head restraint once the child seat
has been removed.
Child safety
Page 124 of 276
122
jumper_en_Chap06_Accessoires_ed01-2015
driving advice
distribution of loads: distribute the load in
the trailer so that the heaviest objects are as
close as possible to the axle and the nose
weight is close to the maximum authorised
without, however, exceeding it.
c
ooling: towing a trailer on a slope
increases the coolant temperature.
As the fan is electrically controlled, its
cooling capacity is not dependent on the
engine speed.
o
n the contrary, use a high gear to lower the
engine speed and reduce your speed.
i
n all cases, pay attention to the coolant
temperature.
tyres:
check the tyre pressures of the
towing vehicle and of the trailer, observing
the recommended pressures.
Fitting a towbar
We recommend the use of genuine
C i T roën towbars and their harnesses,
which have been tested and approved from
the design stage of your vehicle and that
the fitting of this equipment is entrusted to a
C
i T roën dealer.
These genuine towbars are compatible with
the operation of the rear parking sensors
and the reversing camera, if fitted to your
vehicle.
i
f this equipment is not fitted by a C i T roën
dealer
, it must be fitted in line with the
manufacturer's instructions.
Good practice
if the coolant temperature
warning lamp comes on, stop the
vehicle and switch off the engine
as soon as possible.
r
efer to the "Checks - Levels and
checks" section.
Brakes: towing increases the braking
distance. Drive at a moderate speed,
change down early and brake gradually. Side wind: sensitivity to side wind is
increased. Drive smoothly and at a
moderate speed. ABS: the system only controls the vehicle,
not the trailer.
r
ear parking sensors: the system is
deactivated while the vehicle is towing with a
genuine C
i T roën towbar fitted.
r
efer to the "Technical data -
i
dentification markings" section.
Transport solutions
Page 132 of 276
130
jumper_en_Chap07_Verifications_ed01-2015
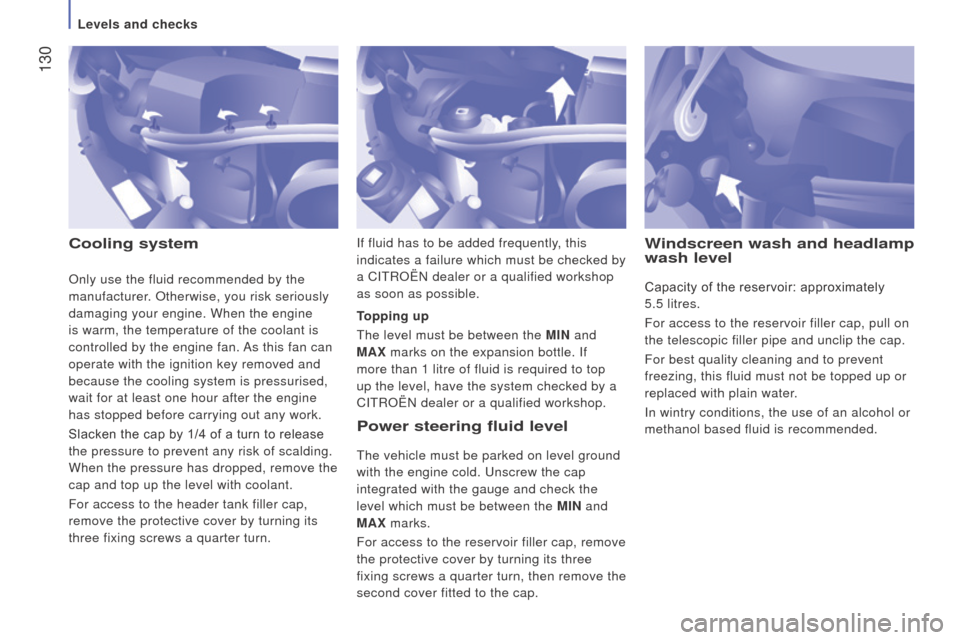
cooling systemPower steering fluid level
The vehicle must be parked on level ground
with the engine cold. Unscrew the cap
integrated with the gauge and check the
level which must be between the MI n and
MA
x marks.
For access to the reservoir filler cap, remove
the protective cover by turning its three
fixing screws a quarter turn, then remove the
second cover fitted to the cap.
topping up
The level must be between the
MI n and
MA x marks on the expansion bottle. i f
more than 1 litre of fluid is required to top
up the level, have the system checked by a
C i T roën dealer or a qualified workshop.
Windscreen wash and headlamp
wash level
Capacity of the reservoir: approximately
5.5
litres.
For access to the reservoir filler cap, pull on
the telescopic filler pipe and unclip the cap.
For best quality cleaning and to prevent
freezing, this fluid must not be topped up or
replaced with plain water.
i
n wintry conditions, the use of an alcohol or
methanol based fluid is recommended.
i
f fluid has to be added frequently, this
indicates a failure which must be checked by
a C
i
T
roën
dealer or a qualified workshop
as soon as possible.o
nly use the fluid recommended by the
manufacturer.
o
therwise, you risk seriously
damaging your engine. When the engine
is warm, the temperature of the coolant is
controlled by the engine fan. As this fan can
operate with the ignition key removed and
because the cooling system is pressurised,
wait for at least one hour after the engine
has stopped before carrying out any work.
Slacken the cap by 1/4 of a turn to release
the pressure to prevent any risk of scalding.
When the pressure has dropped, remove the
cap and top up the level with coolant.
For access to the header tank filler cap,
remove the protective cover by turning its
three fixing screws a quarter turn.
Levels and checks
Page 135 of 276
133
jumper_en_Chap07_Verifications_ed01-2015
Operating fault
i
f this alert persists, do not ignore the
warning; it indicates that a fault has occurred
in the exhaust / particle filter system.
Have the whole system checked by a
C
i T roën dealer or a qualified workshop.
i
f there is risk of blockage of the
filter, this warning lamp comes on
in the instrument panel.
Saturation /
r
egeneration
Because of the higher exhaust
gas temperature resulting from the
normal operation of the particle filter, it is
recommended that you do not park the
vehicle over inflammable materials (grass,
dry leaves, pine needles,
...) so as to avoid
any risk of fire.
Particle filter system (diesel)
An addition to the catalytic converter, this
filter makes an active contribution to the
preservation of air quality by the retaining
of the unburnt pollutant particles. Black
exhaust fumes are thus no longer emitted.
Operation
This filter, fitted in the exhaust system,
accumulates particles of soot. The engine
management unit controls the automatic
periodic elimination of the soot particles
(regeneration).
The regeneration procedure is invoked
according to the quantity of particles
accumulated and the driving conditions
of the vehicle. During this phase, you
may notice some unusual phenomena -
increased idling speed, cooling fan running,
increase in smoke and higher exhaust gas
temperature
- which does not affect the
operation of the vehicle or the environment. After prolonged idling or driving at very
low speeds, you may occasionally
notice water vapour being emitted from the
exhaust when accelerating. This is of no
consequence to the running of the vehicle or
to the environment. To regenerate the filter, it is advised to drive
as soon as possible, when traffic conditions
and the law permit, at a speed of at least
40 mph (around 60 km/h), with an engine
speed above 2 000 rpm for about fifteen
minutes (until the warning lamp and/or the
message disappears).
i
f possible, avoid switching off the engine
before the end of regeneration of the
filter; repeated interruptions could cause
premature deterioration of the engine oil.
i t
is not recommended to end regeneration of
the filter with the vehicle stationary.
This alert tells you that the particle filter
is starting to fill up (in conditions of urban
driving of exceptionally long duration: low
speeds, traffic jams etc.)
Levels and checks
7
CHECKS
Page 149 of 276
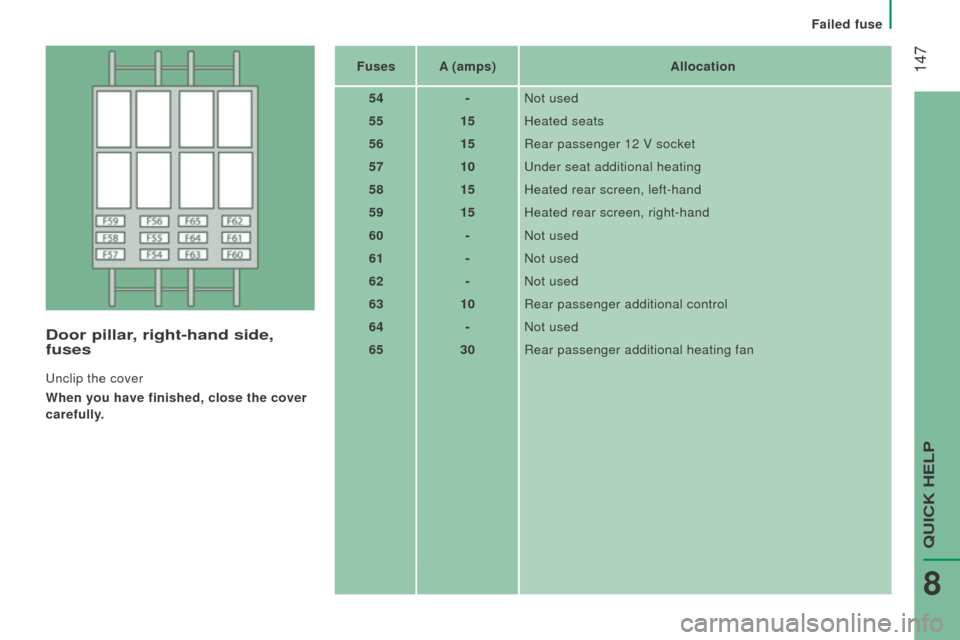
147
jumper_en_Chap08_Aide-rapide_ed01-2015
door pillar, right-hand side,
fuses
Unclip the cover
When you have finished, close the cover
carefully. Fuses
A (amps) Allocation
54 -
n
ot used
55 15Heated seats
56 15
r
ear passenger 12 V socket
57 10Under seat additional heating
58 15Heated rear screen, left-hand
59 15Heated rear screen, right-hand
60 -
n
ot used
61 -
n
ot used
62 -
n
ot used
63 10
r
ear passenger additional control
64 -
n
ot used
65 30
r
ear passenger additional heating fan
Failed fuse
QUiCK HELP
8