Fluid Citroen JUMPER 2016 2.G Owner's Manual
[x] Cancel search | Manufacturer: CITROEN, Model Year: 2016, Model line: JUMPER, Model: Citroen JUMPER 2016 2.GPages: 276, PDF Size: 8.93 MB
Page 12 of 276
10
jumper_en_Chap01_vue-ensemble_ed01-2015
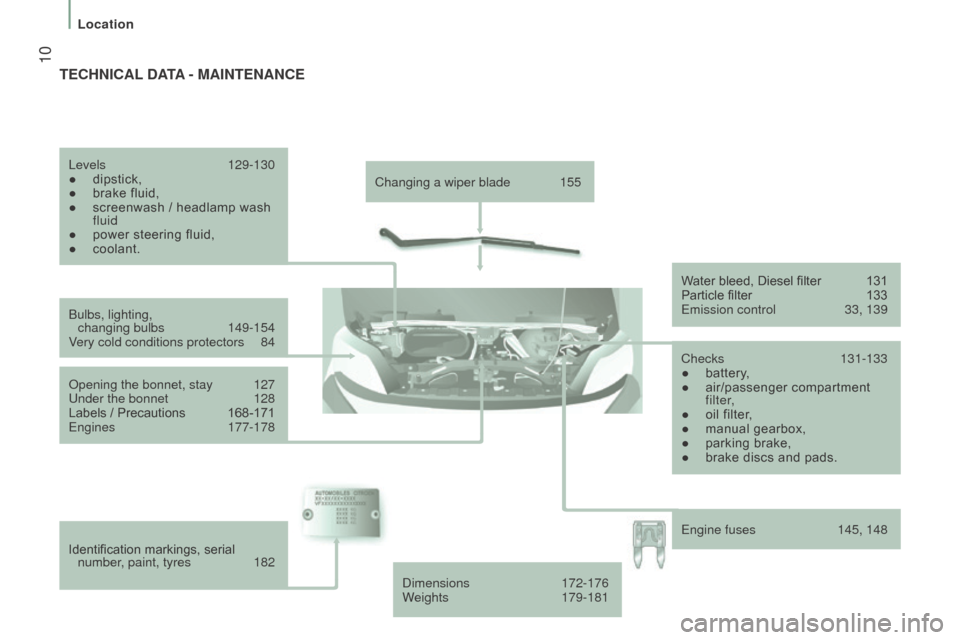
Changing a wiper blade 155
Bulbs, lighting, changing bulbs
149-154
V
ery cold conditions protectors
84
o
pening the bonnet, stay
127
Under the bonnet
128
Labels / Precautions
168-171
Engines
177-178
Identification markings, serial number, paint, tyres
182
Levels
129-130
●
dipstick,
●
brake fluid,
●
screenwash / headlamp wash
fluid
●
power steering fluid,
●
coolant. W
ater bleed, Diesel filter
131
Particle filter
133
Emission control
33, 139
Checks
131-133
●
battery
,
●
air/passenger compartment
filter,
●
oil filter
,
●
manual gearbox,
●
parking brake,
●
brake discs and pads.
tEcHnIcAL dAtA - M AI nt E n A nc E
Dimensions 172-176
W eights 179-181Engine fuses
145, 148
Location
Page 13 of 276
11
jumper_en_Chap01_vue-ensemble_ed01-2015
EnVIrOnMEnt
With you, CiTroën acts to protect the
environment.
W
e invite you to visit the
www.citroen.co.uk website. As the driver, you also can contribute to
protecting the environment in the following
way:
-
drive smoothly
, without frequent and
harsh acceleration,
-
observe the service intervals; we
recommend that services are carried
out by a C
i T roën dealer, authorised to
collect used batteries and fluids,
-
in order to preserve the reliability of the
engine and emission control systems,
do not use engine oil additives.r efer to information on eco-driving at
the end of this section.
1
oVErViEW
Motoring & the Environment
Page 26 of 276
24
jumper_en_Chap02_Pret-a-Partir_ed01-2015
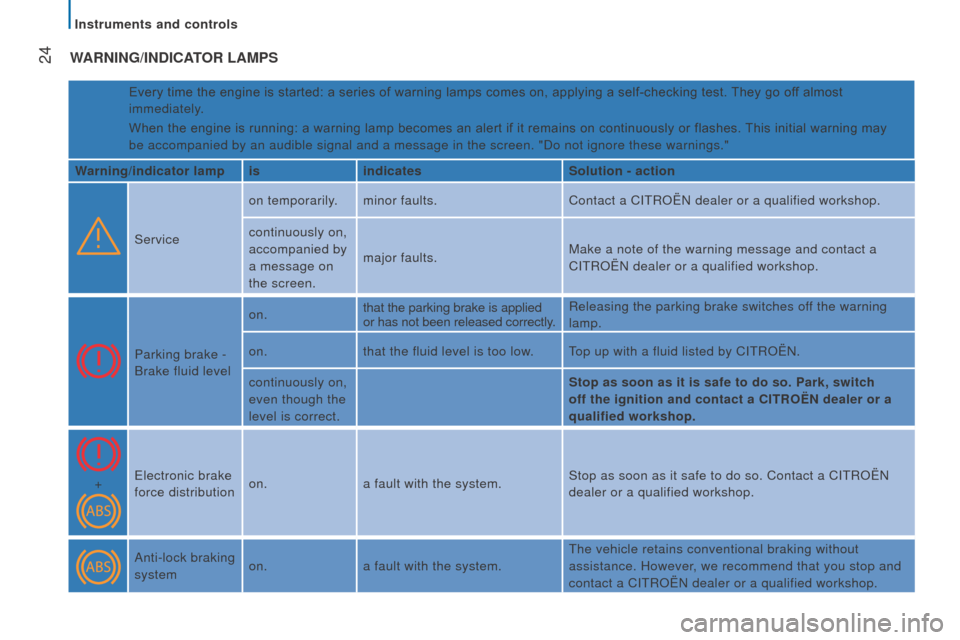
WArn I n G / I nd I c AtO r LAMPS
Every time the engine is started: a series of warning lamps comes on, applying a self-checking test. They go off almost
immediately.
When the engine is running: a warning lamp becomes an alert if it remains on continuously or flashes. This initial warning may
be accompanied by an audible signal and a message in the screen. "Do not\
ignore these warnings."
Warning/indicator lamp isindicates Solution - action
Service on temporarily. minor faults.
Contact a C
i T roën dealer or a qualified workshop.
continuously on,
accompanied by
a message on
the screen. major faults.
Make a note of the warning message and contact a
C
i T roën dealer or a qualified workshop.
Parking brake -
Brake fluid level on.
that the parking brake is applied
or has not been released correctly.
r
eleasing the parking brake switches off the warning
lamp.
on. that the fluid level is too low. Top up with a fluid listed by C
i T roën .
continuously on,
even though the
level is correct. Stop as soon as it is safe to do so. Park, switch
off the ignition and contact a
c I tr OË n dealer or a
qualified workshop.
+ Electronic brake
force distribution on.
a fault with the system. Stop as soon as it safe to do so. Contact a C
i T roën
dealer or a qualified workshop.
Anti-lock braking
system on.
a fault with the system. The vehicle retains conventional braking without
assistance. However, we recommend that you stop and
contact a C
i T roën dealer or a qualified workshop.
Instruments and controls
Page 50 of 276
48
jumper_en_Chap03_Ergo-et-confort_ed01-2015
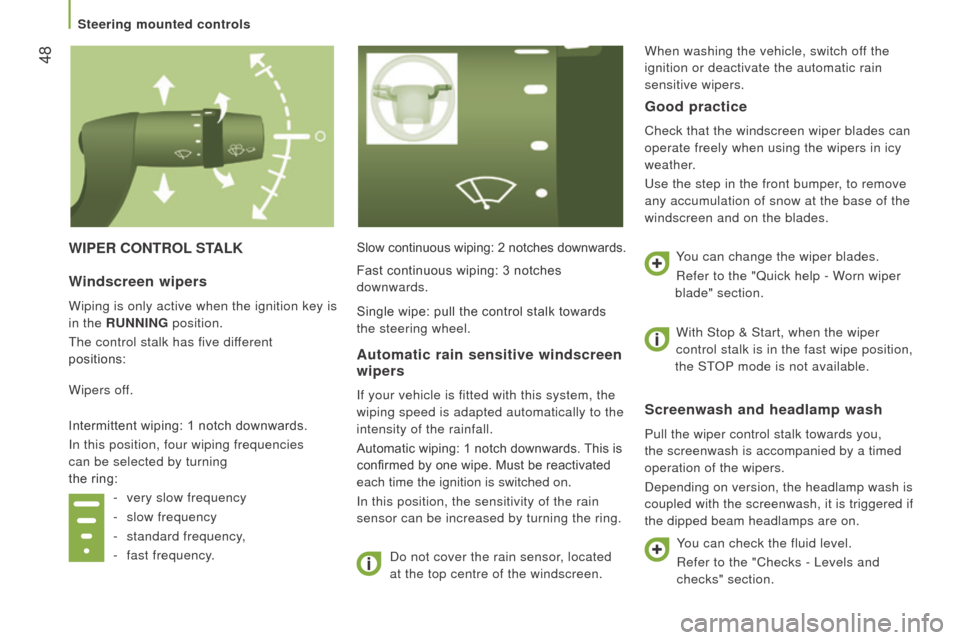
WIPEr cOntrOL S tALKSlow continuous wiping: 2 notches downwards.
Do not cover the rain sensor, located
at the top centre of the windscreen.
Screenwash and headlamp wash
Pull the wiper control stalk towards you,
the screenwash is accompanied by a timed
operation of the wipers.
Depending on version, the headlamp wash is
coupled with the screenwash, it is triggered if
the dipped beam headlamps are on.
Windscreen wipers
Wiping is only active when the ignition key is
in the runn I n G position.
The control stalk has five different
positions:
Wipers off.
Intermittent wiping: 1 notch downwards.
i
n this position, four wiping frequencies
can be selected by turning
the ring:
-
very slow frequency
-
slow frequency
-
standard frequency
,
-
fast frequency
.
Automatic rain sensitive windscreen
wipers
if your vehicle is fitted with this system, the
wiping speed is adapted automatically to the
intensity of the rainfall.
Automatic wiping: 1 notch downwards. This is
confirmed by one wipe. Must be reactivated
each time the ignition is switched on.
i
n this position, the sensitivity of the rain
sensor can be increased by turning the ring.
Good practice
Check that the windscreen wiper blades can
operate freely when using the wipers in icy
weather.
Use the step in the front bumper, to remove
any accumulation of snow at the base of the
windscreen and on the blades.
You can change the wiper blades.
r
efer to the "Quick help - Worn wiper
blade" section.
You can check the fluid level.
r
efer to the "Checks - Levels and
checks" section.
Fast continuous wiping: 3 notches
downwards.
Single wipe: pull the control stalk towards
the steering wheel.
With Stop & Start, when the wiper
control stalk is in the fast wipe position,
the ST
o
P mode is not available.
When washing the vehicle, switch off the
ignition or deactivate the automatic rain
sensitive wipers.
Steering mounted controls
Page 130 of 276
128
jumper_en_Chap07_Verifications_ed01-2015
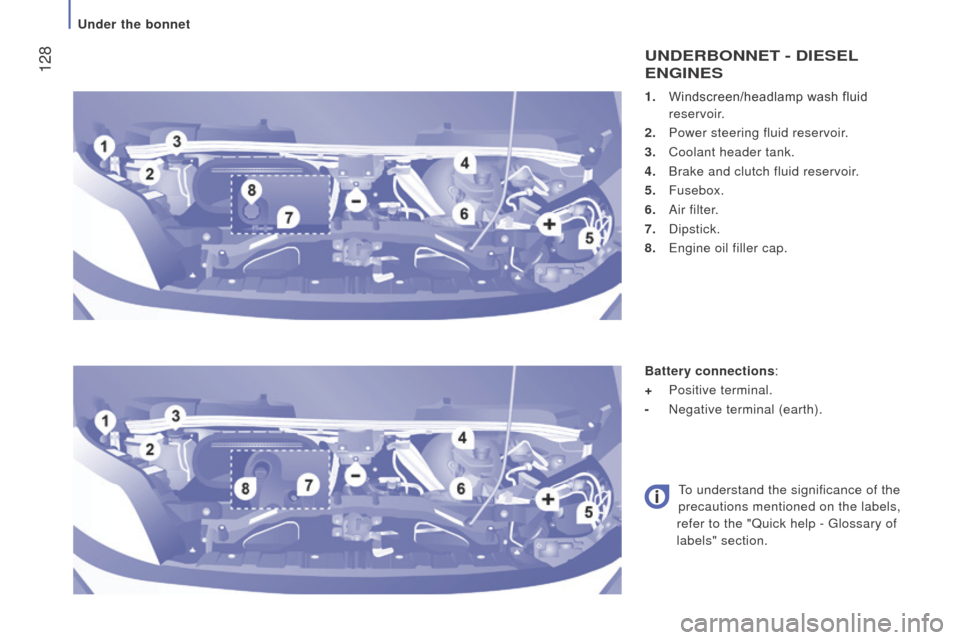
1. Windscreen/headlamp wash fluid
reservoir.
2.
Power steering fluid reservoir
.
3.
Coolant header tank.
4.
Brake and clutch fluid reservoir
.
5.
Fusebox.
6.
Air filter
.
7.
Dipstick.
8.
Engine oil filler cap.
undErBOnnEt - dIESEL
E
n GI n ES
Battery connections:
+
Positive terminal.
-
n egative terminal (earth).
To understand the significance of the
precautions mentioned on the labels,
refer to the "Quick help - Glossary of
labels" section.
Under the bonnet
Page 131 of 276
129
jumper_en_Chap07_Verifications_ed01-2015
used products
Avoid prolonged contact of used oil or fluids
with the skin.
Most of these fluids are harmful to health or
indeed very corrosive.
Do not discard used oil or fluids into sewers
or onto the ground.
Take used oil to a Ci T roën dealer or
a qualified workshop (France) or to an
authorised waste disposal site.
LEVELS
These regular maintenance operations
will keep your vehicle in good running
order. Ask for advice at a C
i T roën dealer
or consult the maintenance and warranty
guide contained in the handbook pack.
To maintain the reliability of engines and
emission control systems, the use of
additives in engine oil is prohibited.
changing the brake fluid
The brake fluid must be changed at
the intervals stated, according to the
manufacturer's servicing schedule.
Use fluids recommended by the
manufacturer, which fulfil Do T4 standards.
The level must be between the MI
n and
MA
x marks on the reservoir.
i
f fluid has to be added frequently, this
indicates a failure which must be checked by
a C
i T roën dealer or a qualified workshop
as soon as possible.
If you have to remove/refit the engine
styling cover, handle it with care to
avoid damaging the fixing clips.
d
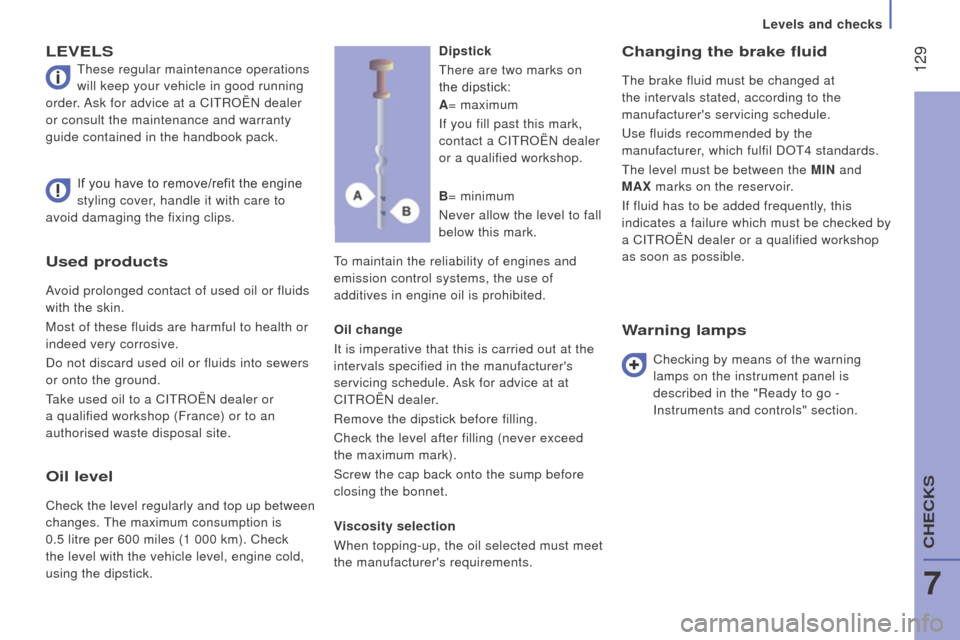
ipstick
There are two marks on
the dipstick:
Oil change
i
t is imperative that this is carried out at the
intervals specified in the manufacturer's
servicing schedule. Ask for advice at at
C
i
T
roën
dealer.
r
emove the dipstick before filling.
Check the level after filling (never exceed
the maximum mark).
Screw the cap back onto the sump before
closing the bonnet.
Viscosity selection
When topping-up, the oil selected must meet
the manufacturer's requirements.
Warning lamps
Checking by means of the warning
lamps on the instrument panel is
described in the "
r eady to go -
i
nstruments and controls" section.
A
= maximum
i
f you fill past this mark,
contact a C
i
T
roën
dealer
or a qualified workshop.
B = minimum
n
ever allow the level to fall
below this mark.
Oil level
Check the level regularly and top up between
changes. The maximum consumption is
0.5 litre per 600 miles (1
000 km). Check
the level with the vehicle level, engine cold,
using the dipstick.
Levels and checks
7
CHECKS
Page 132 of 276
130
jumper_en_Chap07_Verifications_ed01-2015
cooling systemPower steering fluid level
The vehicle must be parked on level ground
with the engine cold. Unscrew the cap
integrated with the gauge and check the
level which must be between the MI n and
MA
x marks.
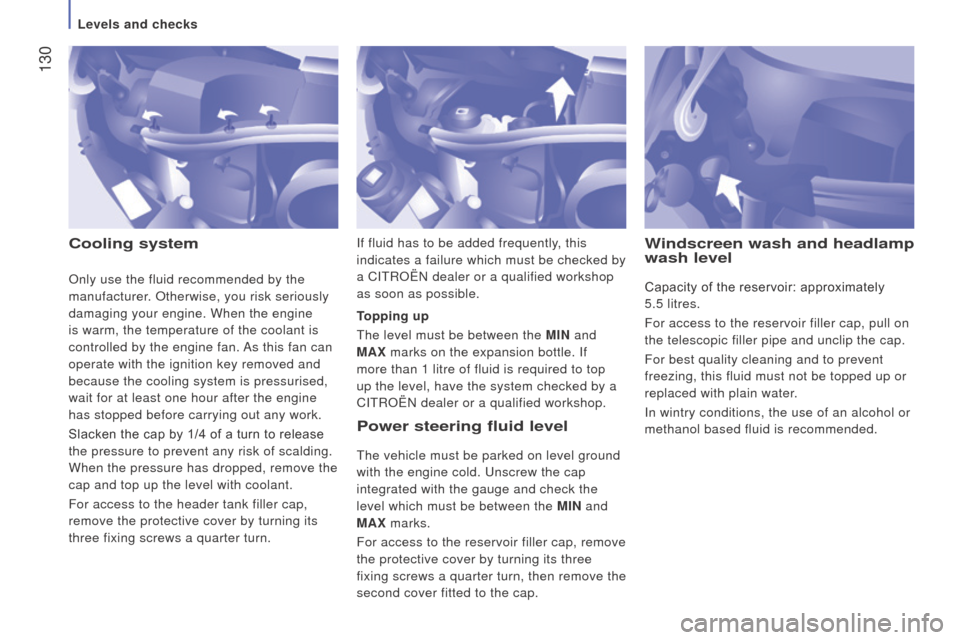
For access to the reservoir filler cap, remove
the protective cover by turning its three
fixing screws a quarter turn, then remove the
second cover fitted to the cap.
topping up
The level must be between the
MI n and
MA x marks on the expansion bottle. i f
more than 1 litre of fluid is required to top
up the level, have the system checked by a
C i T roën dealer or a qualified workshop.
Windscreen wash and headlamp
wash level
Capacity of the reservoir: approximately
5.5
litres.
For access to the reservoir filler cap, pull on
the telescopic filler pipe and unclip the cap.
For best quality cleaning and to prevent
freezing, this fluid must not be topped up or
replaced with plain water.
i
n wintry conditions, the use of an alcohol or
methanol based fluid is recommended.
i
f fluid has to be added frequently, this
indicates a failure which must be checked by
a C
i
T
roën
dealer or a qualified workshop
as soon as possible.o
nly use the fluid recommended by the
manufacturer.
o
therwise, you risk seriously
damaging your engine. When the engine
is warm, the temperature of the coolant is
controlled by the engine fan. As this fan can
operate with the ignition key removed and
because the cooling system is pressurised,
wait for at least one hour after the engine
has stopped before carrying out any work.
Slacken the cap by 1/4 of a turn to release
the pressure to prevent any risk of scalding.
When the pressure has dropped, remove the
cap and top up the level with coolant.
For access to the header tank filler cap,
remove the protective cover by turning its
three fixing screws a quarter turn.
Levels and checks
Page 138 of 276
136
jumper_en_Chap07_Verifications_ed01-2015
BLuEHdI
A nd AdB L u E® AddItIVE
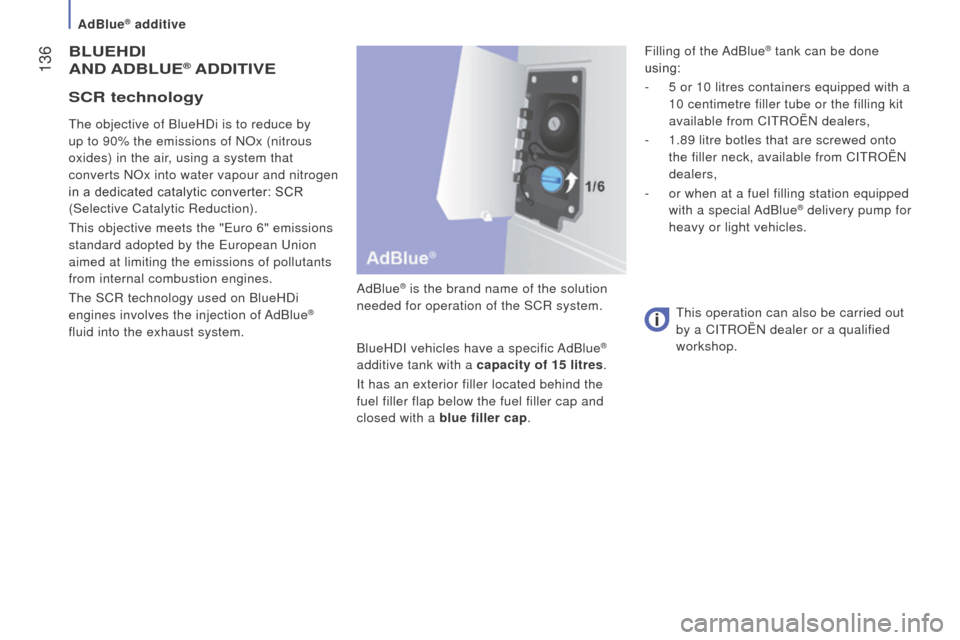
AdBlue® is the brand name of the solution
needed for operation of the SC r system.
BlueHD
i vehicles have a specific AdBlue
®
additive tank with a capacity of 15 litres.
i
t has an exterior filler located behind the
fuel filler flap below the fuel filler cap and
closed with a blue filler cap.
The objective of BlueHDi is to reduce by
up to 90% the emissions of
no
x (nitrous
oxides) in the air, using a system that
converts
no
x into water vapour and nitrogen
in a dedicated catalytic converter: SCR
(Selective Catalytic
r
eduction).
This objective meets the "Euro 6" emissions
standard adopted by the European Union
aimed at limiting the emissions of pollutants
from internal combustion engines.
The SC
r
technology used on BlueHDi
engines involves the injection of AdBlue
®
fluid into the exhaust system. This operation can also be carried out
by a C
i T roën dealer or a qualified
workshop.
Scr technology
Filling of the AdBlue® tank can be done
using:
-
5 or 10 litres containers equipped with a
10 centimetre filler tube or the filling kit
available from C
i
T roën dealers,
-
1.89 litre botles that are screwed onto
the filler neck, available from C
i T roën
dealers,
-
or when at a fuel filling station equipped
with a special AdBlue
® delivery pump for
heavy or light vehicles.
AdBlue® additive
Page 163 of 276
161
jumper_en_Chap08_Aide-rapide_ed01-2015
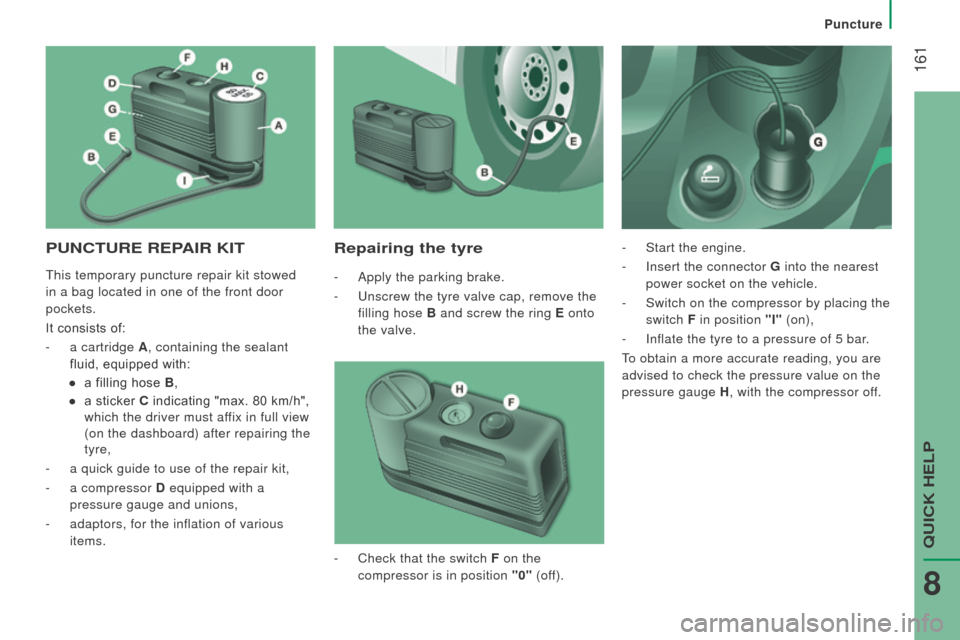
PuncturE rEPAIr KItrepairing the tyre
- Apply the parking brake.
-
Unscrew the tyre valve cap, remove the
filling hose B and screw the ring E onto
the valve. -
Start the engine.
-
i nsert the connector G
into the nearest
power socket on the vehicle.
-
Switch on the compressor by placing the
switch F in position "I" (on),
-
i nflate the tyre to a pressure of 5 bar.
To obtain a more accurate reading, you are
advised to check the pressure value on the
pressure gauge H , with the compressor off.
-
Check that the switch
F on the
compressor is in position "0" (off).
This temporary puncture repair kit stowed
in a bag located in one of the front door
pockets.
It consists of:
-
a cartridge
A , containing the sealant
fluid, equipped with:
●
a filling hose
B ,
●
a sticker
c
indicating "max. 80 km/h",
which the driver must affix in full view
(on the dashboard) after repairing the
tyre,
-
a quick guide to use of the repair kit,
-
a compressor
d
equipped with a
pressure gauge and unions,
-
adaptors, for the inflation of various
items.
Puncture
QUiCK HELP
8
Page 164 of 276
162
jumper_en_Chap08_Aide-rapide_ed01-2015
- if a pressure of at least 3 bar is not
reached within 5 minutes, disconnect
the compressor from the valve and the
power socket, then move the vehicle
forward by approximately 10 metres to
distribute the sealant fluid inside the
tyre.
-
Then repeat the inflation operation:
●
if a pressure of at least
3 bar is not
reached within 10 minutes, switch off
your vehicle: the tyre has suffered
too much damage and repair has not
been possible. Contact a C
i T roën
dealer or a qualified workshop.
●
if the tyre has been inflated to a
pressure of 5 bar, set off again
immediately.
After driving for approximately 10 minutes,
stop and check the pressure of the tyre
again.
Adjust the pressure to the value given on the
label on the driver's door pillar, and contact
a C
i T roën dealer or a qualified workshop
as soon as possible.
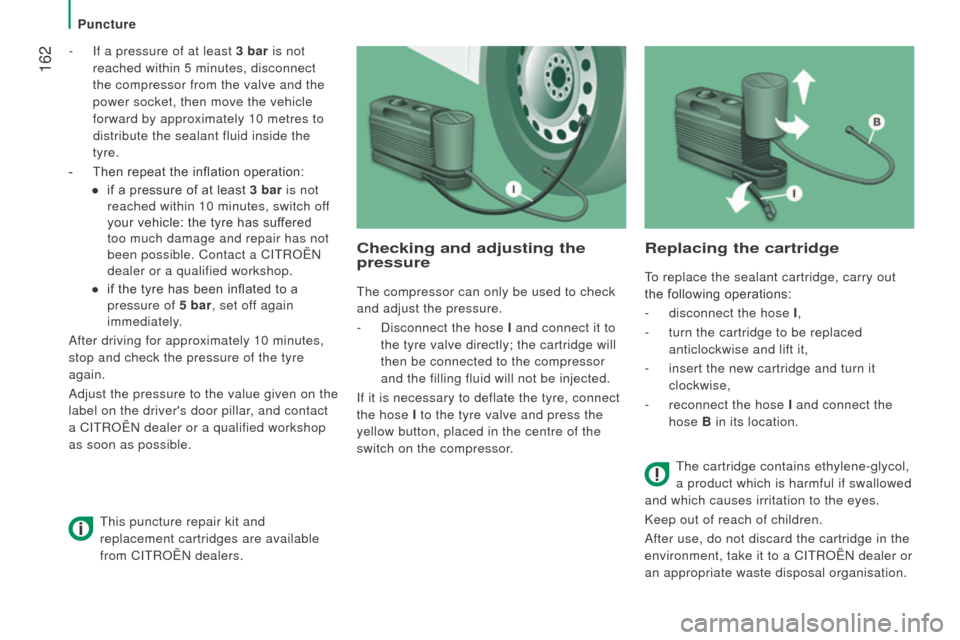
checking and adjusting the
pressure
The compressor can only be used to check
and adjust the pressure.
-
Disconnect the hose
I and connect it to
the tyre valve directly; the cartridge will
then be connected to the compressor
and the filling fluid will not be injected.
i
f it is necessary to deflate the tyre, connect
the hose I to the tyre valve and press the
yellow button, placed in the centre of the
switch on the compressor.
replacing the cartridge
To replace the sealant cartridge, carry out
the following operations:
-
disconnect the hose
I,
-
turn the cartridge to be replaced
anticlockwise and lift it,
-
insert the new cartridge and turn it
clockwise,
-
reconnect the hose
I and connect the
hose B in its location.
The cartridge contains ethylene-glycol,
a product which is harmful if swallowed
and which causes irritation to the eyes.
Keep out of reach of children.
After use, do not discard the cartridge in the
environment, take it to a C
i T roën dealer or
an appropriate waste disposal organisation.
This puncture repair kit and
replacement cartridges are available
from C
i
T
roën
dealers.
Puncture