check engine Citroen JUMPER RELAY 2012 2.G Owner's Guide
[x] Cancel search | Manufacturer: CITROEN, Model Year: 2012, Model line: JUMPER RELAY, Model: Citroen JUMPER RELAY 2012 2.GPages: 184, PDF Size: 4.62 MB
Page 144 of 184
142
Checks
Particle filter system (Diesel)
An addition to the catalytic converter, this
filter makes an active contribution to the
preservation of air quality by the retaining
of the unburnt pollutant particles. Black
exhaust fumes are thus no longer emitted.
This filter, fitted to the exhaust system,
accumulates particles of soot. The engine
control unit manages the automatic
periodic elimination of the soot particles
(regeneration).
The regeneration procedure is invoked
according to the quantity of particles
accumulated and the driving conditions of
the vehicle. During this phase, you may
notice some unusual phenomena - increased
idling speed, cooling fan running, increase in
smoke and higher exhaust gas temperature -
which does not affect the operation of the
vehicle or the environment. After prolonged idling or driving at very low
speeds, you may occasionally notice water
vapour being emitted from the exhaust when
accelerating. This is of no consequence
to the running of the vehicle or to the
environment.
Because of the higher exhaust gas
temperature resulting from the normal
operation of the particle filter, it is
recommended that you do not park the
vehicle over inflammable materials (grass,
dry leaves, pine needles, ...) so as to avoid
any risk of fire.
Saturation / Regeneration
Operating fault
If this alert persists, do not ignore the
warning; it indicates that a fault has occurred
in the exhaust / particle filter system.
Have it checked by a CITROËN dealer.
If there is risk of blockage of the
filter, this warning lamp comes on
in the instrument panel.
This alert tells you that the particle filter
is starting to fill up (in conditions of urban
driving of exceptionally long duration: low
speeds, traffic jams etc.)
To regenerate the filter, it is advised to drive
as soon as possible, when traffic conditions
and the law permit, at a speed of at least
40 mph (around 60 km/h), with an engine
speed above 2 000 rpm for about fifteen
minutes (until the warning lamp and/or the
message disappears).
If possible, avoid switching off the engine
before the end of regeneration of the
filter; repeated interruptions could cause
premature deterioration of the engine oil. It
is not recommended to end regeneration of
the filter with the vehicle stationary.
Page 145 of 184
14
3
7
CHECK
S
Maintenance with TOTAL
Innovation in the search for performance
For over 40 year, the TOTAL Research and
Development departments have developed
for CITROËN, lubricants to match the latest
technical innovations on CITROËN vehicles,
both for competition and for everyday motoring.
For you, this is an assurance that you will obtain
of the best performance for your engine.
Optimum protection for your
engine
By having your CITROËN vehicle
serviced with TOTAL lubricants, you
are contributing towards improving
the life and performances of your
engine, while also protecting the
environment.
prefers
Page 146 of 184
144
Fuel
Low fuel level
When the fuel tank level E
(Empty) is reached, this warning
lamp comes on. At this moment,
you have enough fuel left to
drive approximately 30 miles (50 km)
,
depending on the driving conditions, the
engine and the profile of the road. Fill up
without delay to avoid running out of fuel. The fuel tank must be filled with the engine
off.
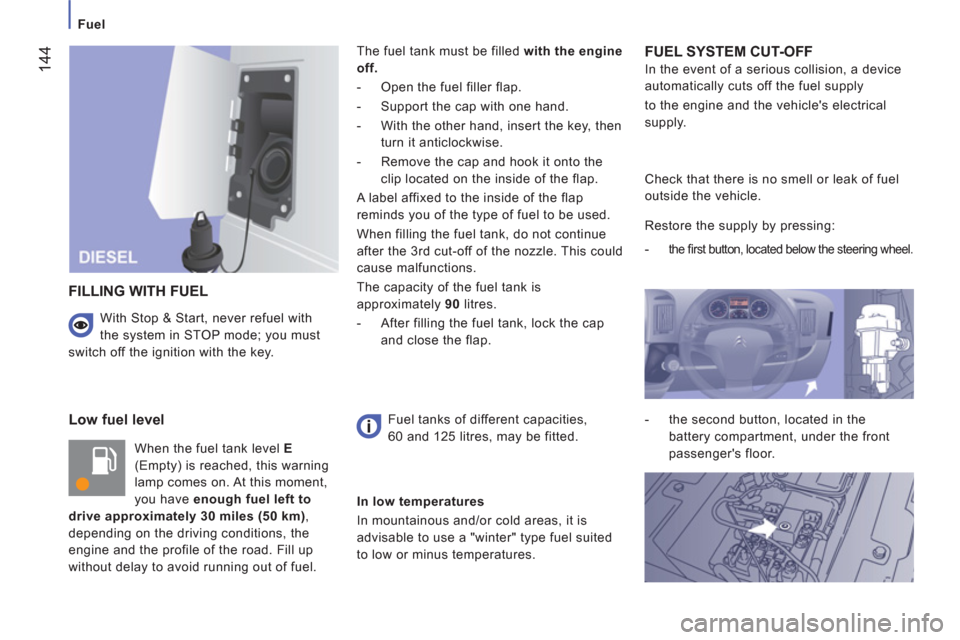
- Open the fuel filler flap.
- Support the cap with one hand.
- With the other hand, insert the key, then
turn it anticlockwise.
- Remove the cap and hook it onto the
clip located on the inside of the flap.
A label affixed to the inside of the flap
reminds you of the type of fuel to be used.
When filling the fuel tank, do not continue
after the 3rd cut-off of the nozzle. This could
cause malfunctions.
The capacity of the fuel tank is
approximately 90
litres.
- After filling the fuel tank, lock the cap
and close the flap.
FUEL SYSTEM CUT-OFF
In the event of a serious collision, a device
automatically cuts off the fuel supply
to the engine and the vehicle's electrical
supply.
FILLING WITH FUEL
Fuel tanks of different capacities,
60 and 125 litres, may be fitted. Check that there is no smell or leak of fuel
outside the vehicle.
Restore the supply by pressing:
-
the fi rst button,
located below the steering wheel.
- the second button, located in the
battery compartment, under the front
passenger's floor.
In low temperatures
In mountainous and/or cold areas, it is
advisable to use a "winter" type fuel suited
to low or minus temperatures.
With Stop & Start, never refuel with
the system in STOP mode; you must
switch off the ignition with the key.
Page 147 of 184
14
5
Battery
QUICK HELP
8
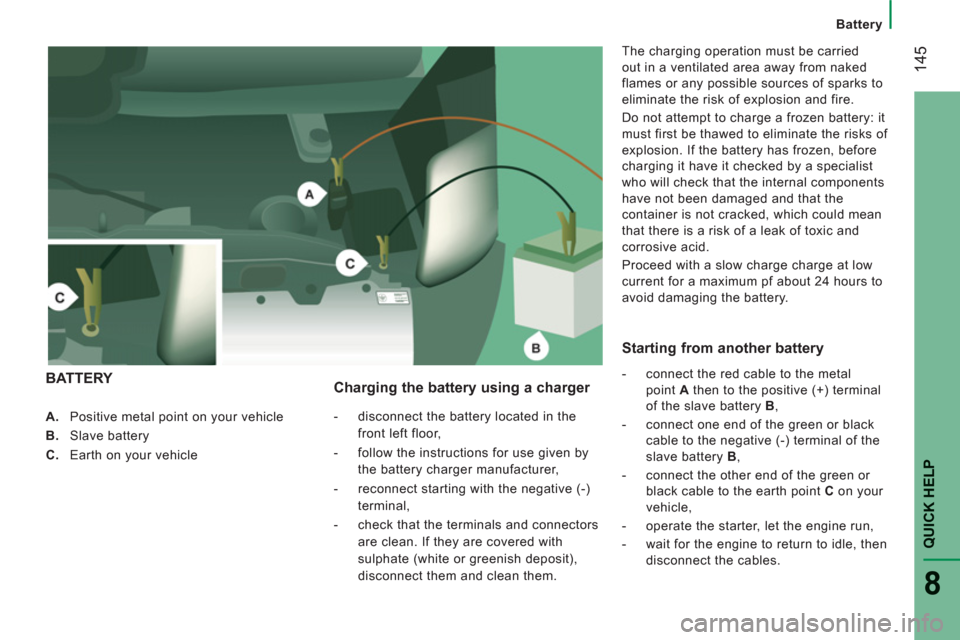
A.
Positive metal point on your vehicle
B.
Slave battery
C.
Earth on your vehicle
Charging the battery using a charger
- disconnect the battery located in the
front left floor,
- follow the instructions for use given by
the battery charger manufacturer,
- reconnect starting with the negative (-)
terminal,
- check that the terminals and connectors
are clean. If they are covered with
sulphate (white or greenish deposit),
disconnect them and clean them.
The charging operation must be carried
out in a ventilated area away from naked
flames or any possible sources of sparks to
eliminate the risk of explosion and fire.
Do not attempt to charge a frozen battery: it
must first be thawed to eliminate the risks of
explosion. If the battery has frozen, before
charging it have it checked by a specialist
who will check that the internal components
have not been damaged and that the
container is not cracked, which could mean
that there is a risk of a leak of toxic and
corrosive acid.
Proceed with a slow charge charge at low
current for a maximum pf about 24 hours to
avoid damaging the battery.
BATTERY Startin
g from another battery
- connect the red cable to the metal
point A
then to the positive (+) terminal
of the slave battery B
,
- connect one end of the green or black
cable to the negative (-) terminal of the
slave battery B
,
- connect the other end of the green or
black cable to the earth point C
on your
vehicle,
- operate the starter, let the engine run,
- wait for the engine to return to idle, then
disconnect the cables.
Page 153 of 184
151
QUICK HELP
8
Changing a wheel
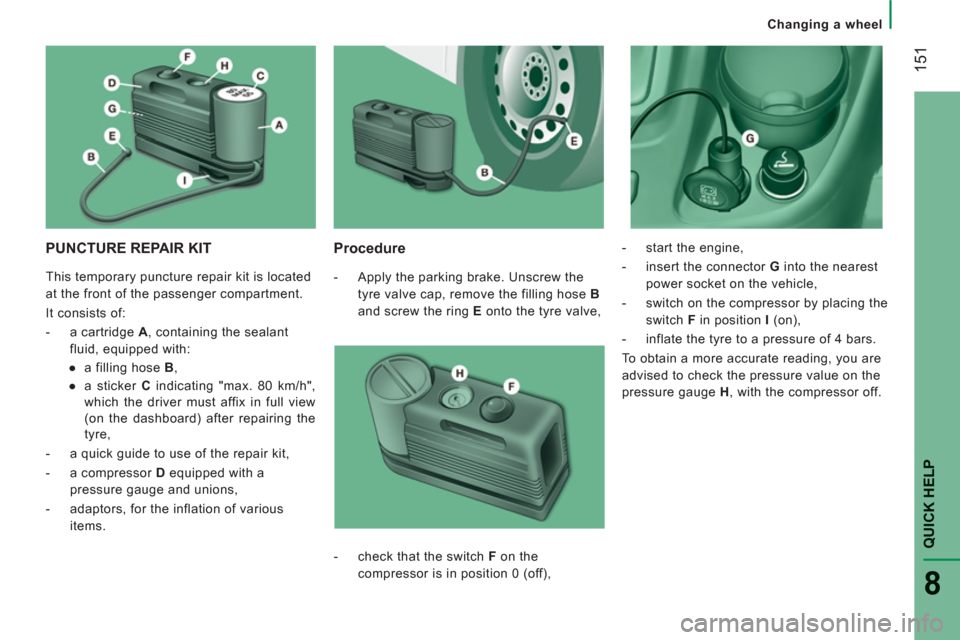
PUNCTURE REPAIR KIT
Procedure
- Apply the parking brake. Unscrew the
tyre valve cap, remove the filling hose B
and screw the ring E
onto the tyre valve,
- start the engine,
- insert the connector G
into the nearest
power socket on the vehicle,
- switch on the compressor by placing the
switch F
in position I
(on),
- inflate the tyre to a pressure of 4 bars.
To obtain a more accurate reading, you are
advised to check the pressure value on the
pressure gauge H
, with the compressor off.
- check that the switch F
on the
compressor is in position 0 (off), This temporary puncture repair kit is located
at the front of the passenger compartment.
It consists of:
- a cartridge A
, containing the sealant
fluid, equipped with:
●
a filling hose B
,
●
a sticker C
indicating "max. 80 km/h",
which the driver must affix in full view
(on the dashboard) after repairing the
tyre,
- a quick guide to use of the repair kit,
- a compressor D
equipped with a
pressure gauge and unions,
- adaptors, for the inflation of various
items.
Page 180 of 184
17
8
Technical data - Maintenance
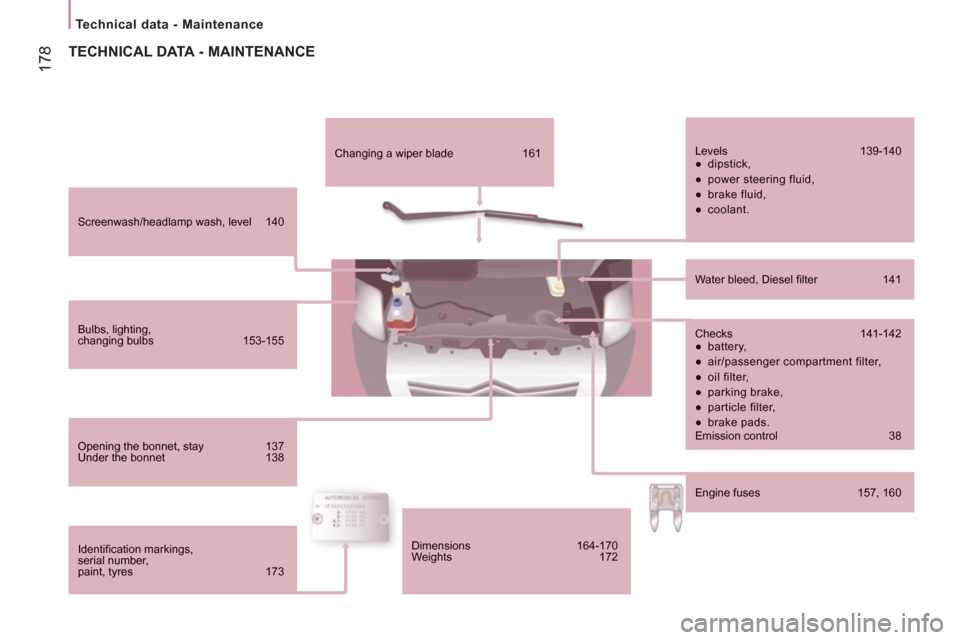
Screenwash/headlamp wash, level 140
Bulbs, lighting, changing bulbs 153-155
Opening the bonnet, stay 137
Under the bonnet 138
Identifi cation markings, serial number,paint, tyres 173
Changing a wiper blade 161
Levels 139-140
●
dipstick,
●
power steering fluid,
●
brake fluid,
●
coolant.
Water bleed, Diesel fi lter 141
Checks 141-142
●
battery,
●
air/passenger compartment filter,
●
oil filter,
●
parking brake,
●
particle filter,
●
brake pads.
Emission control 38
Engine fuses 157, 160
TECHNICAL DATA - MAINTENANCE
Dimensions 164-170
Weights 172