headlamp Citroen JUMPER RELAY 2012 2.G Owner's Manual
[x] Cancel search | Manufacturer: CITROEN, Model Year: 2012, Model line: JUMPER RELAY, Model: Citroen JUMPER RELAY 2012 2.GPages: 184, PDF Size: 4.62 MB
Page 10 of 184
8
Familiarisation
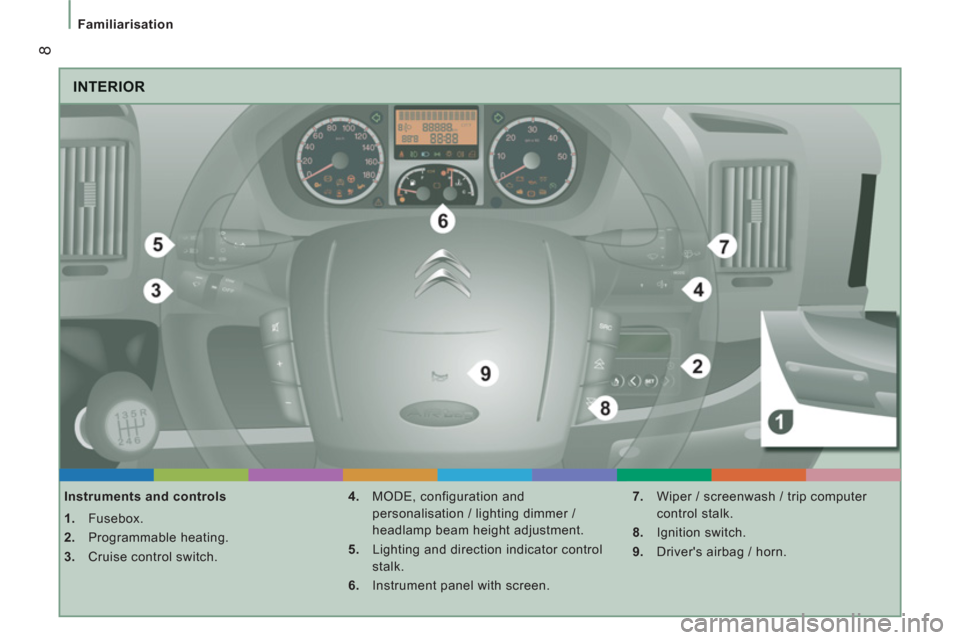
INTERIOR
Instruments and controls
1.
Fusebox.
2.
Programmable heating.
3.
Cruise control switch.
4.
MODE, configuration and
personalisation / lighting dimmer /
headlamp beam height adjustment.
5.
Lighting and direction indicator control
stalk.
6.
Instrument panel with screen.
7.
Wiper / screenwash / trip computer
control stalk.
8.
Ignition switch.
9.
Driver's airbag / horn.
Page 14 of 184
33
12
Familiarisation
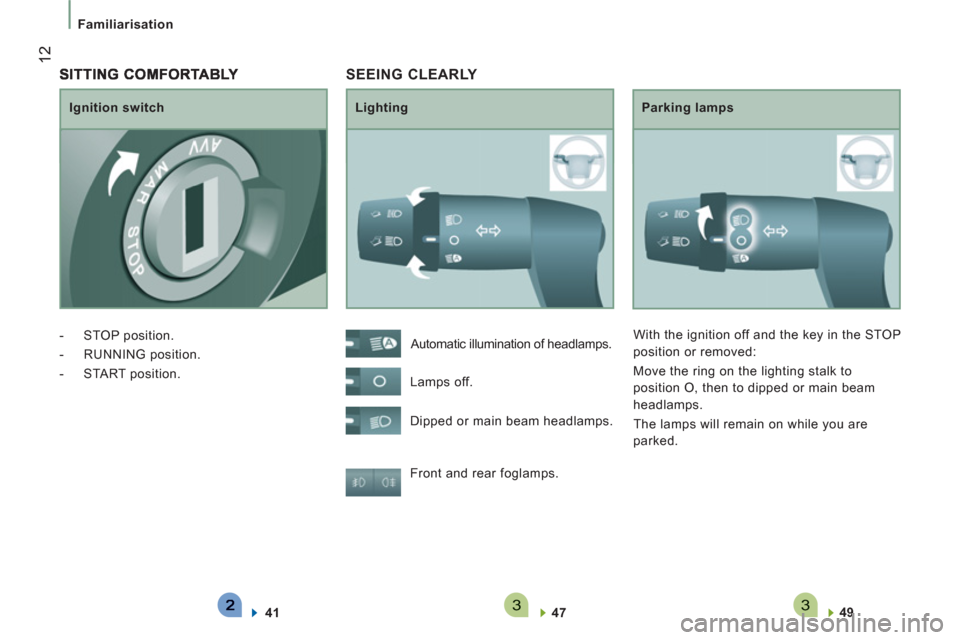
SEEING CLEARLY
Lighting
Parking lamps
Front and rear foglamps.
47
49
Automatic illumination of headlamps.
Lamps off.
Dipped or main beam headlamps. With the ignition off and the key in the STOP
position or removed:
Move the ring on the lighting stalk to
position O, then to dipped or main beam
headlamps.
The lamps will remain on while you are
parked.
Ignition switch
- STOP position.
- RUNNING position.
- START position.
41
Page 21 of 184
19
ECO-DRIVING
Eco-driving is a range of everyday practices that allow the motorist to optimise their fuel consumption and CO2 emissions.
Optimise the use of your gearbox
With a manual gearbox, move off gently,
change up without waiting and drive by
changing up quite soon. If your vehicle
has the system, the gear efficiency
indicator invites you to change up; it is
displayed in the instrument panel, follow
its instructions.
Drive smoothly
Maintain a safe distance between vehicles,
use engine braking rather than the
brake pedal, and press the accelerator
progressively. These practices contribute
towards a reduction in fuel consumption
and CO
2 emissions and also helps reduce
the background traffic noise.
If your vehicle has cruise control, make
use of the system at speeds above 25 mph
(40 km/h) when the traffic is flowing well.
Control the use of your electricalequipment
Before moving off, if the passenger
compartment is too warm, ventilate it by
opening the windows and air vents before
using the air conditioning.
Above 30 mph (50 km/h), close the windows
and leave the air vents open.
Remember to make use of equipment
that can help keep the temperature in the
passenger compartment down (sunroof and
window blinds...).
Switch off the air conditioning, unless it has
automatic digital regulation, as soon as the
desired temperature is attained.
Switch off the demisting and defrosting
controls, if not automatic.
Switch off the heated seat as soon as
possible.
Switch off the headlamps and front foglamps
when the level of light does not require their
use.
Avoid running the engine before moving
off, particularly in winter; your vehicle will
warm up much faster while driving.
As a passenger, if you avoid connecting
your multimedia devices (film, music,
video game...), you will contribute towards
limiting the consumption of electrical
energy, and so of fuel.
Disconnect your portable devices before
leaving the vehicle.
Page 32 of 184
30
Instruments and controls
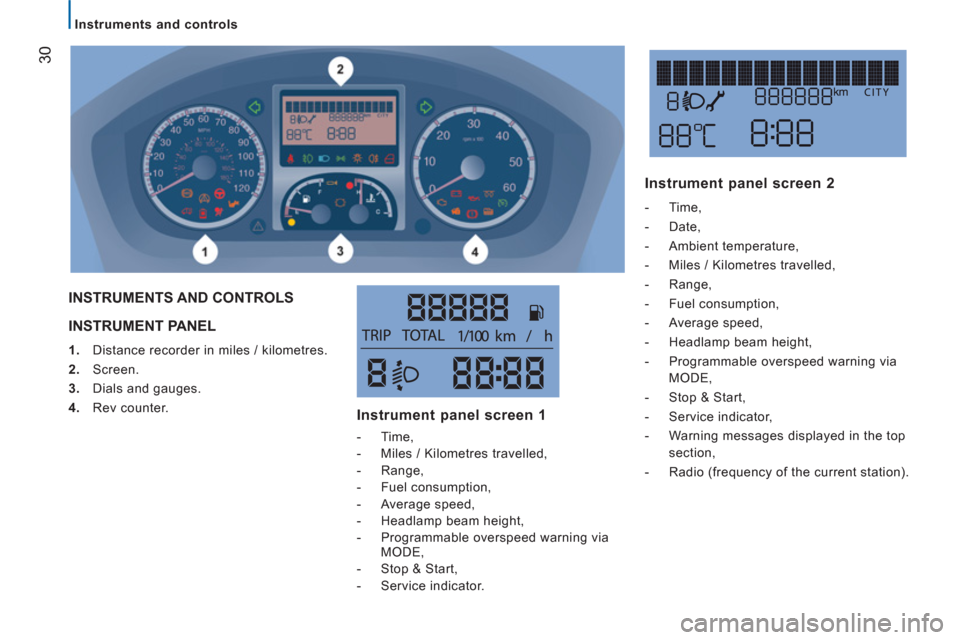
INSTRUMENT PANEL
1.
Distance recorder in miles / kilometres.
2.
Screen.
3.
Dials and gauges.
4.
Rev counter.
INSTRUMENTS AND CONTROLS
Instrument panel screen 1
- Time,
- Miles / Kilometres travelled,
- Range,
- Fuel consumption,
- Average speed,
- Headlamp beam height,
- Programmable overspeed warning via
MODE,
- Stop & Start,
- Service indicator.
Instrument panel screen 2
- Time,
- Date,
- Ambient temperature,
- Miles / Kilometres travelled,
- Range,
- Fuel consumption,
- Average speed,
- Headlamp beam height,
- Programmable overspeed warning via
MODE,
- Stop & Start,
- Service indicator,
- Warning messages displayed in the top
section,
- Radio (frequency of the current station).
Page 37 of 184
35
2
READY TO G
O
Instruments and controls
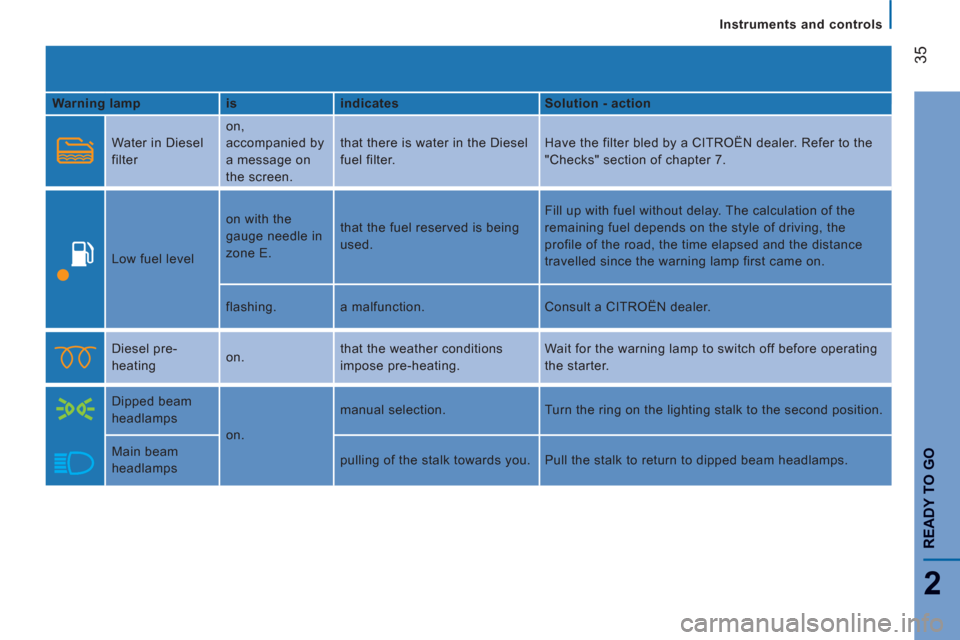
Warning lamp
is
indicates
Solution - action
Water in Diesel
filter on,
accompanied by
a message on
the screen. that there is water in the Diesel
fuel filter. Have the filter bled by a CITROËN dealer. Refer to the
"Checks" section of chapter 7.
Low fuel level on with the
gauge needle in
zone E. that the fuel reserved is being
used. Fill up with fuel without delay. The calculation of the
remaining fuel depends on the style of driving, the
profile of the road, the time elapsed and the distance
travelled since the warning lamp first came on.
flashing. a malfunction. Consult a CITROËN dealer.
Diesel pre-
heating on. that the weather conditions
impose pre-heating. Wait for the warning lamp to switch off before operating
the starter.
Dipped beam
headlamps
on. manual selection. Turn the ring on the lighting stalk to the second position.
Main beam
headlamps pulling of the stalk towards you. Pull the stalk to return to dipped beam headlamps.
Page 38 of 184

36
Instruments and controls
Warning lamp
is
indicates
Solution - action
Direction
indicators flashing with
buzzer. a change of direction using the
lighting stalk, to the left of the
steering wheel. To the Right: press the stalk upwards.
To the Left: press the stalk downwards.
Front foglamps on. that the button on the centre
console has been pressed. Manual selection.
The foglamps only operate if the dipped beam
headlamps are on.
Rear foglamps on. that the button on the centre
console has been pressed. Manual selection. The foglamps only operate if the
dipped beam headlamps are on. When visibility is
normal, please switch the foglamps off.
Cruise
control on. that the cruise control has been
selected. Manual selection.
Refer to the "Steering mounted controls" section of
chapter 3.
Faulty bulb on accompanied
by a message
on the screen. that one or more bulbs have
blown. Have the bulb changed.
Refer to the "Changing a bulb" section of chapter 8 or
contact a CITROËN dealer.
Rear parking
sensors on. failure of the system. The audible assistance is no longer active.
Have the system checked by a CITROËN dealer without
delay.
Page 39 of 184
37
2
READY TO G
O
Instruments and controls
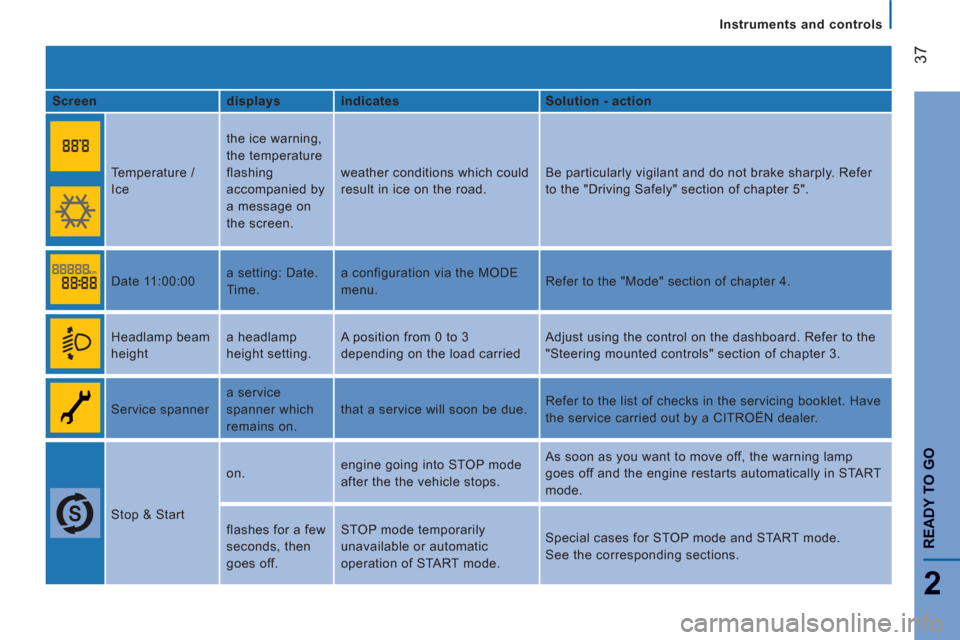
Screen
displays
indicates
Solution - action
Temperature /
Ice the ice warning,
the temperature
flashing
accompanied by
a message on
the screen. weather conditions which could
result in ice on the road. Be particularly vigilant and do not brake sharply. Refer
to the "Driving Safely" section of chapter 5".
Date 11:00:00 a setting: Date.
Time. a configuration via the MODE
menu. Refer to the "Mode" section of chapter 4.
Headlamp beam
height a headlamp
height setting. A position from 0 to 3
depending on the load carried Adjust using the control on the dashboard. Refer to the
"Steering mounted controls" section of chapter 3.
Service spanner a service
spanner which
remains on. that a service will soon be due. Refer to the list of checks in the servicing booklet. Have
the service carried out by a CITROËN dealer.
Stop & Start on. engine going into STOP mode
after the the vehicle stops. As soon as you want to move off, the warning lamp
goes off and the engine restarts automatically in START
mode.
flashes for a few
seconds, then
goes off. STOP mode temporarily
unavailable or automatic
operation of START mode. Special cases for STOP mode and START mode.
See the corresponding sections.
Page 49 of 184
47
3
EASE OF USE
and
COMFOR
T
Steering mounted controls
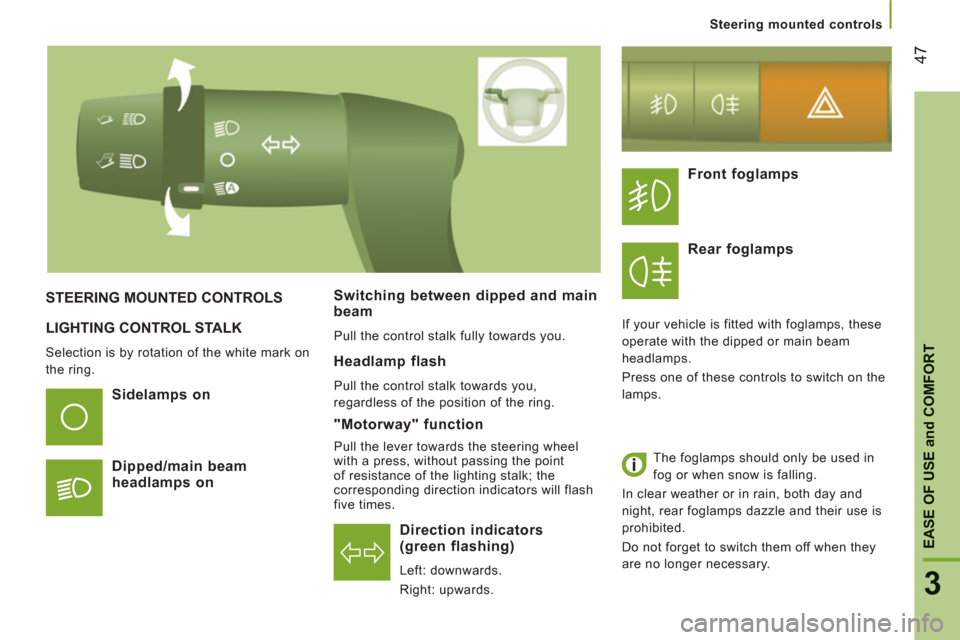
LIGHTING CONTROL STALK
Selection is by rotation of the white mark on
the ring.
Direction indicators(green flashing)
Left: downwards.
Right: upwards.
STEERING MOUNTED CONTROLS
Sidelamps on
Di
pped/main beam headlamps on
Switchin
g between dipped and main beam
Pull the control stalk fully towards you.
Headlamp flash
Pull the control stalk towards you,
regardless of the position of the ring.
Front foglamps
Rear fo
glamps
If your vehicle is fitted with foglamps, these
operate with the dipped or main beam
headlamps.
Press one of these controls to switch on the
lamps.
The foglamps should only be used in
fog or when snow is falling.
In clear weather or in rain, both day and
night, rear foglamps dazzle and their use is
prohibited.
Do not forget to switch them off when they
are no longer necessary.
"Motorway" function
Pull the lever towards the steering wheel
with a press, without passing the point
of resistance of the lighting stalk; the
corresponding direction indicators will flash
five times.
Page 50 of 184

48
Steering mounted controls
AUTOMATIC ILLUMINATION OF HEADLAMPS
Activation
Turn the ring to this position.
The lamps are switched off
automatically when the ignition is
switched off.
Do not cover the sunshine sensor at
the top centre of the windscreen.
GUIDE-ME-HOME LIGHTING
Ignition off or key in the STOP position.
Within 2 minutes after switching off the
engine, position the ignition key in the STOP
position or remove it.
Pull the lighting stalk towards the steering
wheel.
The indicator lamp comes on in
the instrument panel.
Each action on the lighting stalk,
pulled towards the steering
wheel, prolongs the guide me home
lighting by 30 seconds up to approximately
3 minutes. When this time has elapsed, the
lamps are switched off automatically.
Deactivate this control by keeping the stalk
pulled towards the steering wheel for more
than 2 seconds.
If your vehicle is fitted with this function:
when you leave your vehicle, the dipped
beam headlamps remain on for the selected
duration (when leaving a car park for
example).
To set the sensitivity of the sensor,
refer to "Mode" in chapter 4
.
If your vehicle is fitted with this function, the
dipped beam headlamps are switched on
automatically if the light is poor.
In fog or snow, the sunshine sensor may
detect sufficient light. Therefore, the lamps
will not be switched on automatically. If
necessary, you must switch on the dipped
beam headlamps manually.
They are switched off when the light returns
to a sufficient level.
Page 51 of 184
49
3
EASE OF USE
and
COMFOR
T
Steering mounted controls
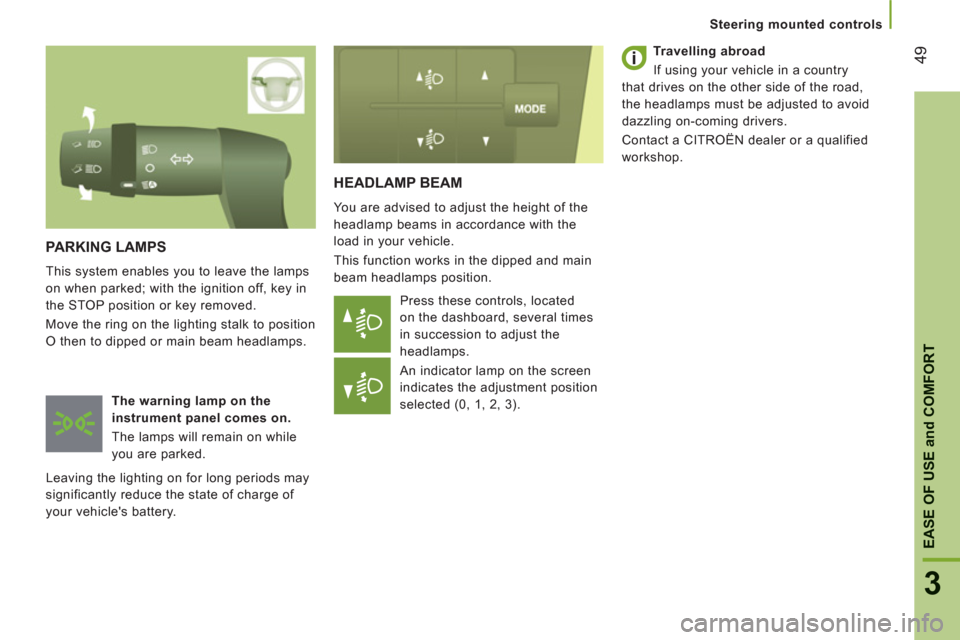
HEADLAMP BEAM
You are advised to adjust the height of the
headlamp beams in accordance with the
load in your vehicle.
This function works in the dipped and main
beam headlamps position.
Press these controls, located
on the dashboard, several times
in succession to adjust the
headlamps.
An indicator lamp on the screen
indicates the adjustment position
selected (0, 1, 2, 3).
PARKING LAMPS
This system enables you to leave the lamps
on when parked; with the ignition off, key in
the STOP position or key removed.
Move the ring on the lighting stalk to position
O then to dipped or main beam headlamps.
The warning lamp on the
instrument panel comes on.
The lamps will remain on while
you are parked.
Leaving the lighting on for long periods may
significantly reduce the state of charge of
your vehicle's battery.
Travelling abroad
If using your vehicle in a country
that drives on the other side of the road,
the headlamps must be adjusted to avoid
dazzling on-coming drivers.
Contact a CITROËN dealer or a qualified
workshop.