door lock Citroen JUMPER RHD 2015.5 2.G User Guide
[x] Cancel search | Manufacturer: CITROEN, Model Year: 2015.5, Model line: JUMPER RHD, Model: Citroen JUMPER RHD 2015.5 2.GPages: 276, PDF Size: 8.88 MB
Page 40 of 276
38
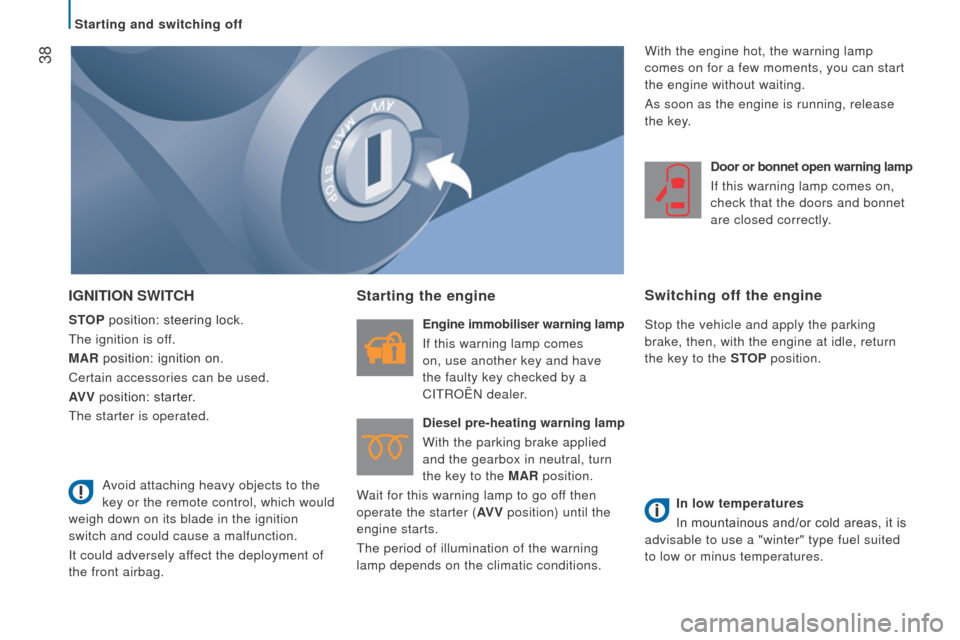
IGnItIOn SWItcH
StOP position: steering lock.
The ignition is off.
MA
r position: ignition on.
Certain accessories can be used.
AV V position: starter.
The starter is operated.
Starting the engine
Engine immobiliser warning lamp
If this warning lamp comes
on, use another key and have
the faulty key checked by a
CITROËN dealer.
d
iesel pre-heating warning lamp
With the parking brake applied
and the gearbox in neutral, turn
the key to the MA
r position.
Wait for this warning lamp to go off then
operate the starter (AV V position) until the
engine starts.
The period of illumination of the warning
lamp depends on the climatic conditions.
d
oor or bonnet open warning lamp
If this warning lamp comes on,
check that the doors and bonnet
are closed correctly.
Switching off the engine
Stop the vehicle and apply the parking
brake, then, with the engine at idle, return
the key to the S
t
OP
position.
In low temperatures
In mountainous and/or cold areas, it is
advisable to use a "winter" type fuel suited
to low or minus temperatures.
Avoid attaching heavy objects to the
key or the remote control, which would
weigh down on its blade in the ignition
switch and could cause a malfunction.
It could adversely affect the deployment of
the front airbag. With the engine hot, the warning lamp
comes on for a few moments, you can start
the engine without waiting.
As soon as the engine is running, release
the key.
Starting and switching off
Page 82 of 276
80
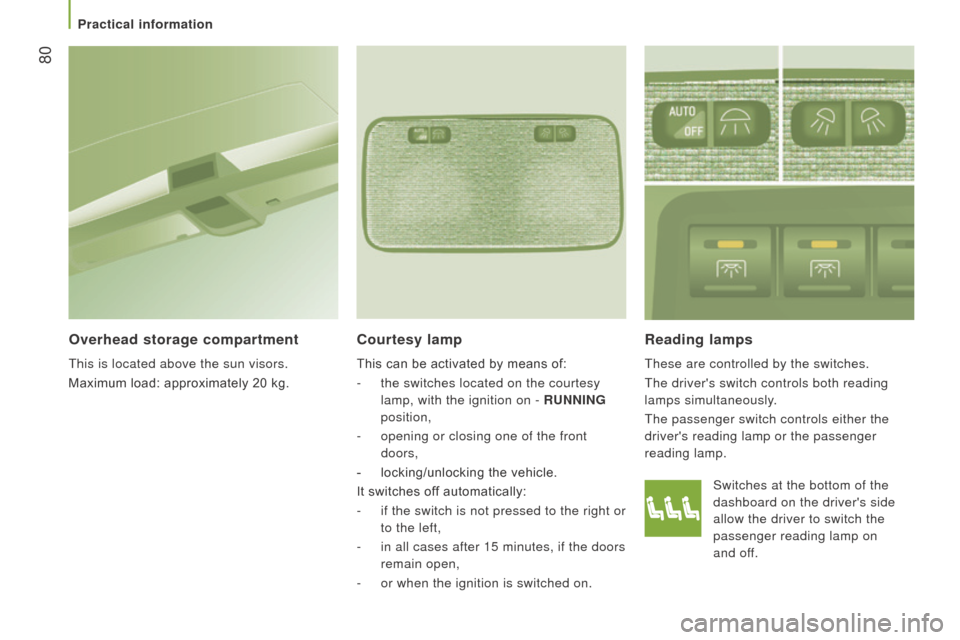
reading lamps
These are controlled by the switches.
The driver's switch controls both reading
lamps simultaneously.
The passenger switch controls either the
driver's reading lamp or the passenger
reading lamp.
courtesy lamp
This can be activated by means of:
-
the switches located on the courtesy
lamp, with the ignition on -
runn I n G
position,
-
opening or closing one of the front
doors,
-
locking/unlocking the vehicle.
It switches of
f automatically:
-
if the switch is not pressed to the right or
to the left,
-
in all cases after 15 minutes, if the doors
remain open,
-
or when the ignition is switched on.
Overhead storage compartment
This is located above the sun visors.
Maximum load: approximately 20 kg. Switches at the bottom of the
dashboard on the driver's side
allow the driver to switch the
passenger reading lamp on
and
off.
Practical information
Page 90 of 276
88Menu...Press... Sub-menu… Press... Select…c onfirm
and exit Enables you to...
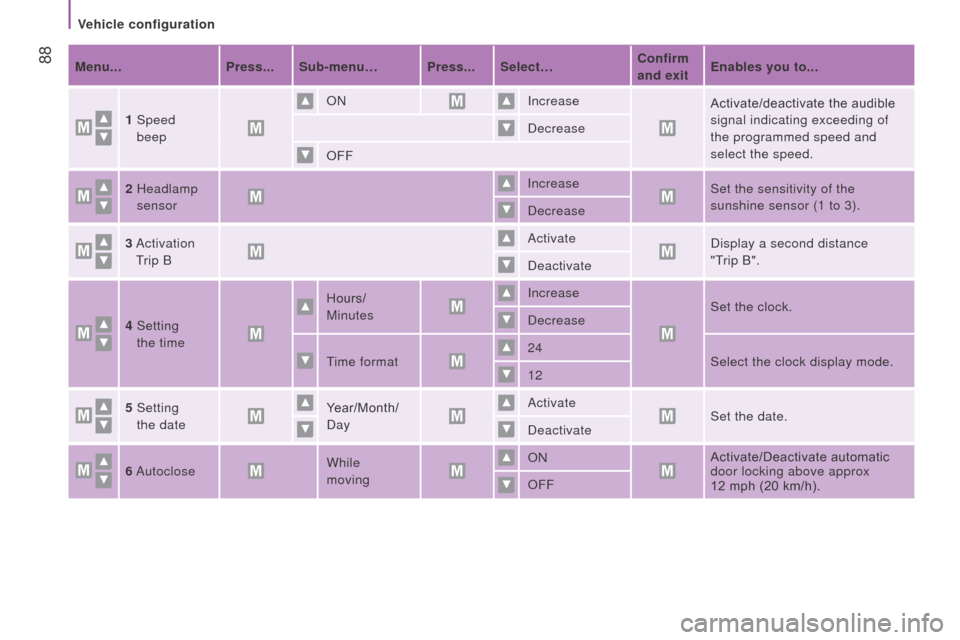
1
Speed
beep ON
Increase
Activate/deactivate the audible
signal indicating exceeding of
the programmed speed and
select the speed.
Decrease
OFF
2
Headlamp
sensor Increase
Set the sensitivity of the
sunshine sensor (1 to 3).
Decrease
3
Activation
Trip B Activate
Display a second distance
"Trip
B".
Deactivate
4
Setting
the time Hours/
Minutes Increase
Set the clock.
Decrease
Time format 24
Select the clock display mode.
12
5
Setting
the date Year/Month/
Day Activate
Set the date.
Deactivate
6 Autoclose While
moving ON
Activate/Deactivate automatic
door locking above approx
12
mph (20 km/h).
OFF
Vehicle configuration
Page 92 of 276
90
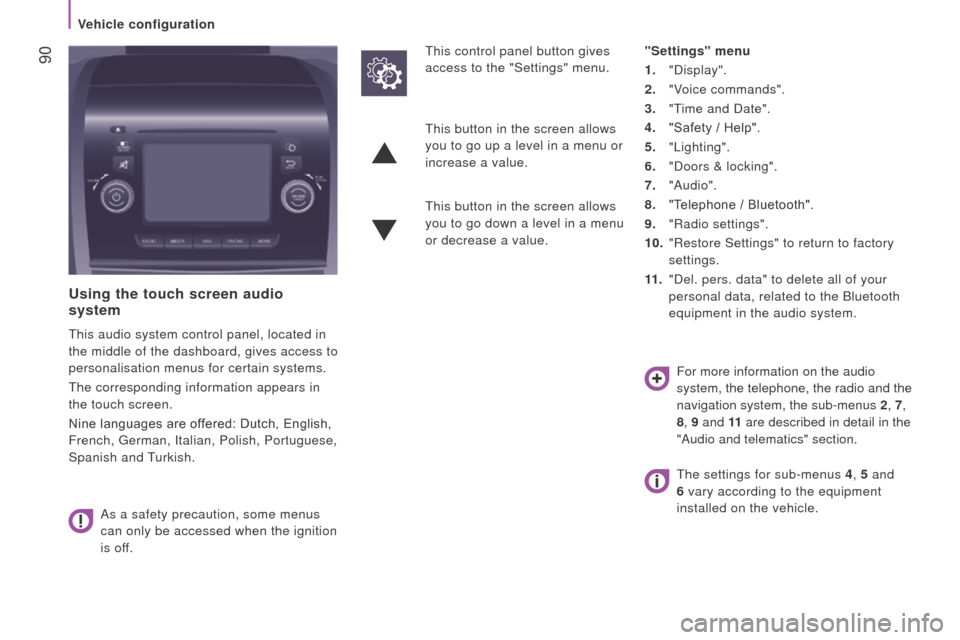
using the touch screen audio
system
This audio system control panel, located in
the middle of the dashboard, gives access to
personalisation menus for certain systems.
The corresponding information appears in
the touch screen.
Nine languages are offered: Dutch, English,
French, German, Italian, Polish, Portuguese,
Spanish and Turkish.
As a safety precaution, some menus
can only be accessed when the ignition
is off. This control panel button gives
access to the "Settings" menu.
"Settings" menu
1. "Display".
2.
"V
oice commands".
3.
"T
ime and Date".
4.
"Safety / Help".
5.
"Lighting".
6.
"Doors & locking".
7.
"Audio".
8.
"T
elephone / Bluetooth".
9.
"Radio settings".
10.
"Restore Settings" to return to factory
settings.
11 .
"Del. pers. data" to delete all of your
personal data, related to the Bluetooth
equipment in the audio system.
This button in the screen allows
you to go up a level in a menu or
increase a value.
This button in the screen allows
you to go down a level in a menu
or decrease a value.
For more information on the audio
system, the telephone, the radio and the
navigation system, the sub-menus 2, 7,
8 , 9 and 11 are described in detail in the
"Audio and telematics" section.
The settings for sub-menus 4 , 5 and
6 vary according to the equipment
installed on the vehicle.
Vehicle configuration
Page 93 of 276
91From the "Safety / Help" sub menu, you can:
-
select "Parkview Camera", then
"Reversing camera" to activate or
deactivate its use (On, Off),
-
select "Parkview Camera", then "Camera
delay" to activate or deactivate the
maintaining of the display for 10 seconds
or up to 11 mph (18 km/h) (On, Off),
-
select "Passenger airbag" to activate or
deactivate its use (On, Off).
From the "Lighting" sub-menu, you can:
-
select "Day lamps" to activate or
deactivate their use (On, Off),
-
select "Headlamp sensor" to adjust its
sensitivity (1, 2, 3).
From the "Doors & locking", you can:
-
select "Autoclose" to activate or
deactivate its use (On, Off).
From the "Display" sub-menu, you can:
-
select "Languages" and choose one of
the languages listed above,
-
select "Units of measurement" to
choose the units for fuel consumption
(l/100
km, mpg), distance (miles, km)
and temperature (°C, °F),
-
select "Display
Trip B" to switch trip B
On or Off in the trip computer.
From the "Time and Date" sub-menu, you
can:
-
select "Adjust time and format" to set the
hour, minutes and seconds and choose
the format (24 h, 12 h with am or pm),
-
select "Adjust Date" to set the day
,
month and year.
To set the time manually, "Synch Time"
must be Off.
4
TECHNOLOGY ON BOARD
Vehicle configuration
Page 111 of 276
109
Impact resistance
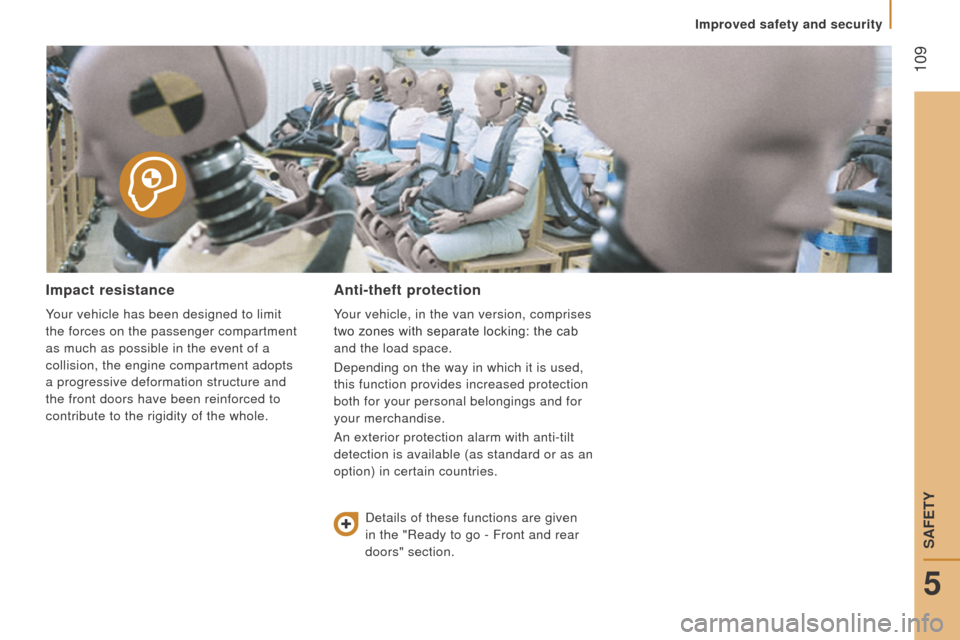
Your vehicle has been designed to limit
the forces on the passenger compartment
as much as possible in the event of a
collision, the engine compartment adopts
a progressive deformation structure and
the front doors have been reinforced to
contribute to the rigidity of the whole.
Anti-theft protection
Your vehicle, in the van version, comprises
two zones with separate locking: the cab
and the load space.
Depending on the way in which it is used,
this function provides increased protection
both for your personal belongings and for
your merchandise.
An exterior protection alarm with anti-tilt
detection is available (as standard or as an
option) in certain countries.Details of these functions are given
in the "Ready to go - Front and rear
doors" section.
5
SAFETY
Improved safety and security
Page 122 of 276
120
Good practice
children at the front
The legislation on carrying a child on the
front passenger seat is specific to each
country. Refer to the legislation in force in
your country.
Deactivate the passenger's airbag when a
rearward facing child seat is installed on the
front seat.
Otherwise, the child would risk being
seriously injured or killed if the airbag were
deployed. As a safety precaution, never leave:
-
one or more children alone and
unsupervised in a vehicle,
- a child or an animal in a vehicle which
is exposed to the sun, with the windows
closed,
-
the keys within reach of children inside
the vehicle.
To prevent accidental opening of the doors,
use the "Child Lock".
Take care not to open the rear windows by
more than one third.
To protect young children from the rays of
the sun, fit side blinds to the rear windows. Installing a booster seat
The chest part of the seat belt must be
positioned on the child's shoulder without
touching the neck.
Ensure that the lap part of the seat belt
passes correctly over the child's thighs.
CITROËN recommends the use of a booster
seat which has a back, fitted with a seat belt
guide at shoulder level.
For the optimum installation of a forward
facing child seat, ensure that the back of
the child seat is as close as possible to the
backrest of the vehicle's seat, or in contact
if possible.
The head restraint must be removed before
installing a child seat with a backrest on the
passenger seat.
Ensure that the head restraint is stowed or
attached securely so that it is not thrown
around the vehicle in the event of sharp
braking.
Refit the head restraint as soon as the child
seat is removed.
At the rear, always leave sufficient space
between the front seat and:
-
a rearward facing child seat,
-
the feet of a child seated in a forward
facing child seat.
For this, move the front seat forward and, if
necessary, straighten its backrest as well. The incorrect installation of a child seat in a
vehicle compromises the child's protection in
the event of an accident.
Check that there is no seat belt or seat belt
buckle under the child seat, as this could
destabilise the seat.
Remember to fasten the seat belts or the
child seat harnesses keeping the slack
relative to the child's body to a minimum,
even for short journeys.
For the installation of a child seat using
the seat belt, ensure that the seat belt is
well tensioned on the child seat and that
it is holding the child seat firmly against
the vehicle's seat. If the passenger seat is
adjustable, move it forward if necessary.
Child safety
Page 126 of 276
124
OtHEr AccESSOrIES
These accessories and parts, having been
tested and approved for reliability and
safety, are all adapted to your vehicle. A
wide range of recommended and genuine
parts is available.
"c omfort":
Air deflectors, insulated module, scented air
fresheners, reading lamp, cigarette lighter,
portable ashtray, non-slip seat cushions,
rear parking sensors...
"Protection":
Mats, mudflaps, vehicle protective cover,
seat covers, security grills for rear door
windows, twin rear security doors with
security locks, paint touch-up... "Security":
Anti-intrusion alarm, vehicle tracking system,
snow chains, non-slip covers, child seats,
first aid kit, warning triangle, high visibility
vest, fire extinguisher, pet safety belt, seat
belt cutter / glass hammer...
"Style":
Alloy wheels...
"Multimedia":
CD player, Wi-Fi on Board, semi-integral
satellite navigation system, hands-free kits,
driving aids, rear multimedia support, DVD
player, navigation mapping update, portable
satellite navigation systems, telephone
carrier, aftermarket digital radio, audio
systems...
"
t
ransport solutions":
T
owbars, towbar wiring harness with 7/13
connector, 7/7 connector, 13 connector,
interior protection kits, non-slip floor, wheel
arch protector, cab dividers, transverse roof
bars, roof racks, ladder for roof rack, roof
loading runners, loading plate for roof rack... Installation of radiocommunication
transmitters
You are advised to contact a CITROËN
dealer before installing accessory
radiocommunication transmitters with
external aerial on your vehicle.
CITROËN dealers can advise you on
the specifications (frequency waveband,
maximum output power, aerial position,
specific installation conditions) of the
transmitters which can be fitted, in
accordance with the Vehicle Electromagnetic
Compatibility Directive (2004/104/EC).
The fitting of electrical equipment or
accessories which are not listed by
CITROËN may result in the failure of your
vehicle's electronic system.
We request that you take note of this point
and recommend that you contact a dealer
to be shown the range of recommended
equipment and accessories.
Depending on the country in which the
vehicle is sold or operated, it may be
compulsory to have a high visibility vest,
warning triangle, replacement bulbs and
breathalyzer in the vehicle.
To prevent the mat from becoming
caught under the pedals:
-
ensure that the mat and its fixings are
positioned correctly,
-
never fit one mat on top of another
.
Equipment
Page 137 of 276
135
FuEL SYS t EM cut- OFF
After the collision and before restore
these supplies, check that there is no
fuel leak or sparks, to avoid the risk of fire. In the event of a collision, a device
automatically cuts off the fuel supply
from the engine and cuts off the vehicle's
electrical supply
It triggers operation of the hazard warning
lamps and courtesy lamps, and unlocking of
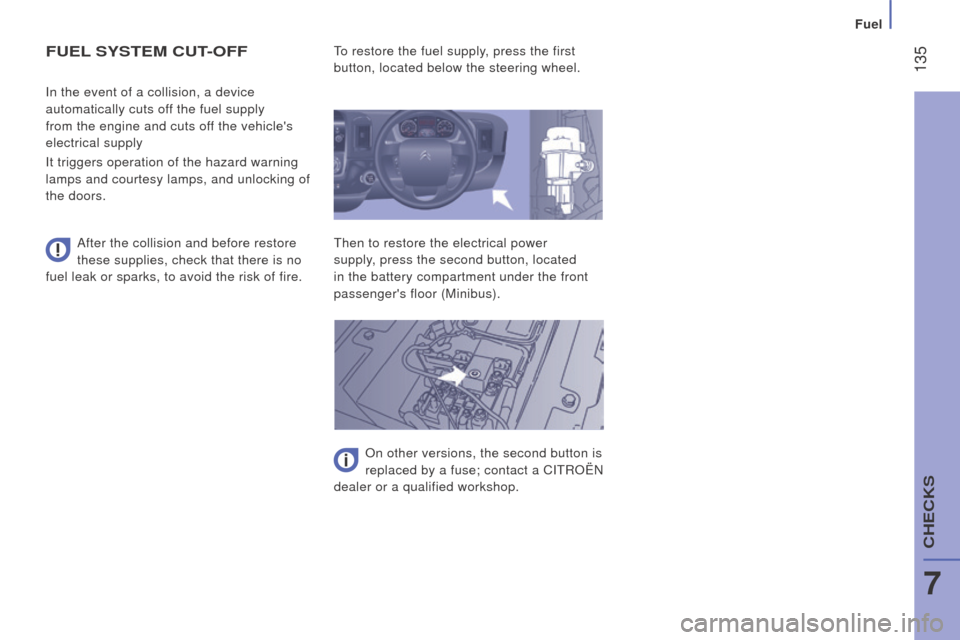
the doors. To restore the fuel supply, press the first
button, located below the steering wheel.
Then to restore the electrical power
supply, press the second button, located
in the battery compartment under the front
passenger's floor (Minibus).
On other versions, the second button is
replaced by a fuse; contact a CITROËN
dealer or a qualified workshop.
7
CHECKS
Fuel
Page 148 of 276
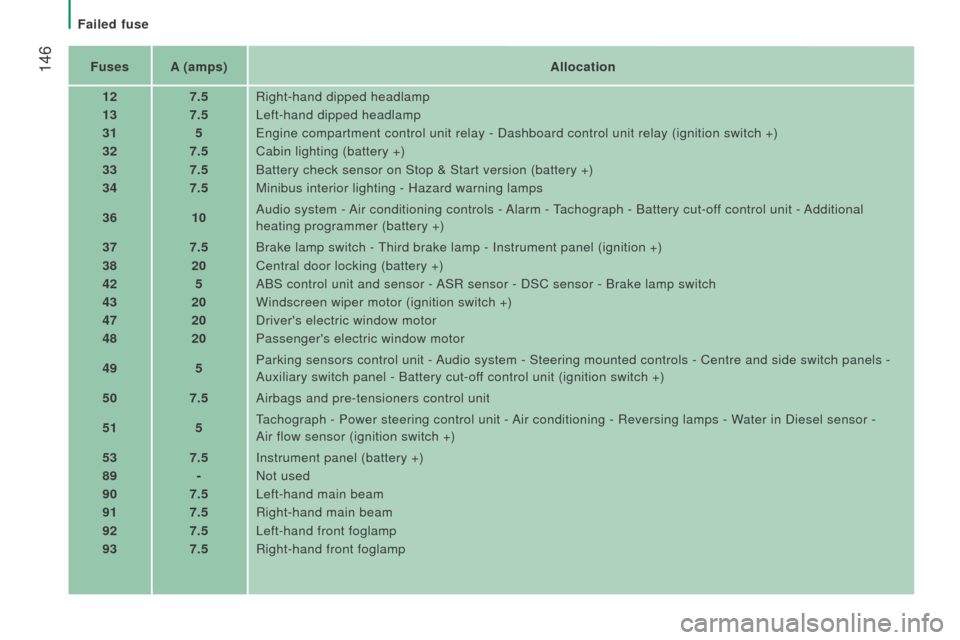
146FusesA (amps) Allocation
12 7.5Right-hand dipped headlamp
13 7.5Left-hand dipped headlamp
31 5Engine compartment control unit relay - Dashboard control unit relay (i\
gnition switch +)
32 7.5Cabin lighting (battery +)
33 7.5Battery check sensor on Stop & Start version (battery +)
34 7.5Minibus interior lighting - Hazard warning lamps
36 10Audio system - Air conditioning controls - Alarm - Tachograph - Battery cut-off control unit - Additional
heating programmer (battery +)
37 7.5Brake lamp switch - Third brake lamp - Instrument panel (ignition +)
38 20Central door locking (battery +)
42 5ABS control unit and sensor - ASR sensor - DSC sensor - Brake lamp switch
43 20Windscreen wiper motor (ignition switch +)
47 20Driver's electric window motor
48 20Passenger's electric window motor
49 5Parking sensors control unit - Audio system - Steering mounted controls - Centre and side switch panels\
-
Auxiliary switch panel - Battery cut-off control unit (ignition switch +)
50 7.5Airbags and pre-tensioners control unit
51 5Tachograph - Power steering control unit - Air conditioning - Reversing lamps - Water in Diesel sensor -
Air
flow sensor (ignition switch +)
53 7.5Instrument panel (battery +)
89 -Not used
90 7.5Left-hand main beam
91 7.5Right-hand main beam
92 7.5Left-hand front foglamp
93 7.5Right-hand front foglamp
Failed fuse