window Citroen JUMPY 2011 2.G User Guide
[x] Cancel search | Manufacturer: CITROEN, Model Year: 2011, Model line: JUMPY, Model: Citroen JUMPY 2011 2.GPages: 260, PDF Size: 9.5 MB
Page 83 of 260
81
Mirrors and windows
EASE OF USE
and
COMFOR
T
3
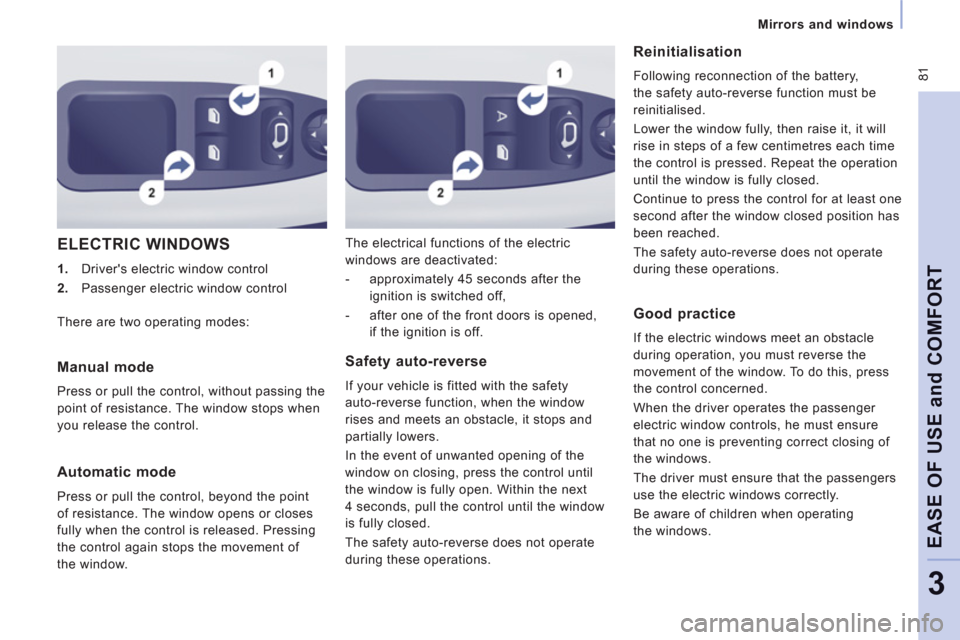
ELECTRIC WINDOWS
1.
Driver's electric window control
2.
Passenger electric window control The electrical functions of the electric
windows are deactivated:
- approximately 45 seconds after the
ignition is switched off,
- after one of the front doors is opened,
if the ignition is off.
Reinitialisation
Following reconnection of the battery,
the safety auto-reverse function must be
reinitialised.
Lower the window fully, then raise it, it will
rise in steps of a few centimetres each time
the control is pressed. Repeat the operation
until the window is fully closed.
Continue to press the control for at least one
second after the window closed position has
been reached.
The safety auto-reverse does not operate
during these operations.
Manual mode
Press or pull the control, without passing the
point of resistance. The window stops when
you release the control.
Automatic mode
Press or pull the control, beyond the point
of resistance. The window opens or closes
fully when the control is released. Pressing
the control again stops the movement of
the window.
Safety auto-reverse
If your vehicle is fitted with the safety
auto-reverse function, when the window
rises and meets an obstacle, it stops and
partially lowers.
In the event of unwanted opening of the
window on closing, press the control until
the window is fully open. Within the next
4 seconds, pull the control until the window
is fully closed.
The safety auto-reverse does not operate
during these operations. There are two operating modes:
Good practice
If the electric windows meet an obstacle
during operation, you must reverse the
movement of the window. To do this, press
the control concerned.
When the driver operates the passenger
electric window controls, he must ensure
that no one is preventing correct closing of
the windows.
The driver must ensure that the passengers
use the electric windows correctly.
Be aware of children when operating
the windows.
Page 99 of 260
97
Child safety
SAFETY
4
ADVICE ON CHILD SEATS
The incorrect installation of a child seat in a
vehicle compromises the child's protection in
the event of an accident.
Remember to fasten the seat belts or the
child seat harnesses keeping the slack
in
relation to the child's body to a minimum
,
even for short journeys.
For optimum installation of the "forward
facing" child seat, ensure that the back of
the child seat is in contact with the back of
the vehicle's seat and that the head restraint
does not cause any discomfort.
If the head restraint has to be removed,
ensure that it is stored or attached securely
to prevent it from being thrown around the
vehicle in the event of sharp braking.
Children under the age of 10 must not travel
in the "forward facing" position on the front
passenger seat, unless the rear seats are
already occupied by other children, cannot
be used or are absent.
Deactivate the passenger airbag when a
"rear facing" child seat is installed on the
front seat.
Otherwise, the child would risk being
seriously injured or killed if the airbag were
to inflate.
As a safety precaution, do not leave:
- one or more children alone and
unsupervised in a vehicle,
- a child or an animal in a vehicle which
is exposed to the sun, with the windows
closed,
- the keys within reach of children inside
the vehicle.
To prevent accidental opening of the doors,
use the "Child Lock".
Take care not to open the rear windows by
more than one third.
To protect young children from the rays of
the sun, fit side blinds to the rear windows.
Installing a booster seat
The chest part of the seat belt must be
positioned on the child's shoulder without
touching the neck.
Ensure that the lap part of the seat belt
passes correctly over the child's thighs.
CITROËN recommends the use of a booster
seat which has a back, fitted with a seat belt
guide at shoulder level.
Page 103 of 260
10
1
Equipment
ACCESSORIE
S
5
The fitting of electrical equipment
or accessories which are not
recommended by CITROËN may result
in the failure of your vehicle's electronic
system. Please note this specific warning.
You are advised to contact a representative
of the Marque to be shown the range of
recommended equipment and accessories.
Depending on the country in which the
vehicle is sold or operated, it is compulsory
to have a high visibility safety jacket,
warning triangle and replacement bulbs
available in the vehicle.
Installation of radiocommunication
transmitters
Before installing accessory
radiocommunication transmitters with an
external aerial on your vehicle, you are
advised to contact a representative of the
CITROËN marque.
The CITROËN Network will inform you of the
specifications (frequency band, maximum
output power, aerial position, specific
installation conditions) of the transmitters
which can be fitted, in accordance with the
Motor Vehicle Electromagnetic Compatibility
Directive (2004/104/CE). Front mud flaps, rear mud flaps, ...
Range of professional equipment
Parts and Service technical information
publishes an accessories catalogue offering
various equipment and fittings, such as: Screenwash, replacement fuses, wiper
blades, interior and exterior cleaning
and maintenance products, replacement
bulbs, ...
Roof bars for short, medium and long
wheelbase (load retainers for all models).
Towbar, towbar harness: trailer towbar which
must be fitted by the network. Sill plate, loading roller, sill. Sill plate,
loading roller, sill.
Roof bars for the various heights, roof bars,
ladder.
Separation partitions and grilles, smooth,
non-slip wooden protective floor.
Protective grilles, multimedia.
Another range is also available, structured
around comfort, leisure and maintenance:
Anti-theft alarm, window engraving, first aid
kit, high visibility safety jacket, rear parking
assistance, warning triangle,
Front seat covers compatible with airbags,
bench, rubber mats, carpet mats, snow
chains. To prevent the mat from becoming caught
under the pedals:
- ensure that the mat and its fixings are
positioned correctly,
- never fit one mat on top of another.
Audio equipment, hands-free kit, speakers,
CD changer, navigation, ...
Regardless of the audio and telematic
equipment offered on the market, the
technical constraints linked with the fi tting of
equipment of these families of products mean
that the special features of the equipment and
its compatibility with the capacities of the your
vehicle's standard equipment must be taken
into account. Please contact a dealer for
information before fi tting such equipment.
Page 115 of 260

11
3
Battery
QUICK HEL
P
7
BATTERY
This is housed in a compartment located
underneath the fl oor, in front of the front right seat.
Before disconnecting the battery, you must
wait for 2 minutes after switching off the
ignition.
Never disconnect a terminal when the
engine is running.
Never charge a battery without first
disconnecting the terminals.
After every reconnection of the battery,
switch on the ignition and wait 1 minute
before starting to allow the electronic
systems to be initialised. If some problems
persist after this operation, please contact a
CITROËN dealer or a qualified workshop. It is advisable to disconnect the battery
if the vehicle is not to be used for a
period of more than one month.
After the engine has stopped, with the key
in the ignition position, certain functions
(windscreen wiper, electric windows, courtesy
lights, audio equipment, etc.) can only be used
for a cumulative duration of thirty minutes, to
prevent discharging of the battery.
To charge the battery using a battery
charger
- Disconnect the battery,
- Follow the instructions for use given by
the battery charger manufacturer,
- Reconnect starting with the negative (-)
terminal,
- Check that the terminals and connectors
are clean. If they are covered with
sulphate (white or greenish deposit),
disconnect them and clean them.
To start the vehicle from another
battery
- Connect the red cable to the positive (+)
terminals of the two batteries,
- Connect one end of the green or black
cable to the negative (-) terminal of the
slave battery,
- Connect the other end of the green or
black cable to an earth point on the
broken down vehicle as far as possible
from the battery,
- Operate the starter, let the engine run,
- Wait for the engine to return to idle, then
disconnect the cables. Once the thirty minutes are over, the active
functions are put on standby and the battery
warning light flashes accompanied by a
message on the display.
To resume the use of these functions
immediately, start the engine and let it run
for a few minutes.
The time available will then be double the
time for which the engine was left running.
However, this time will always be between
five and thirty minutes.
A flat battery will prevent the engine from
starting.
Page 129 of 260
12
7
Changing a fuse
QUICK HEL
P
7
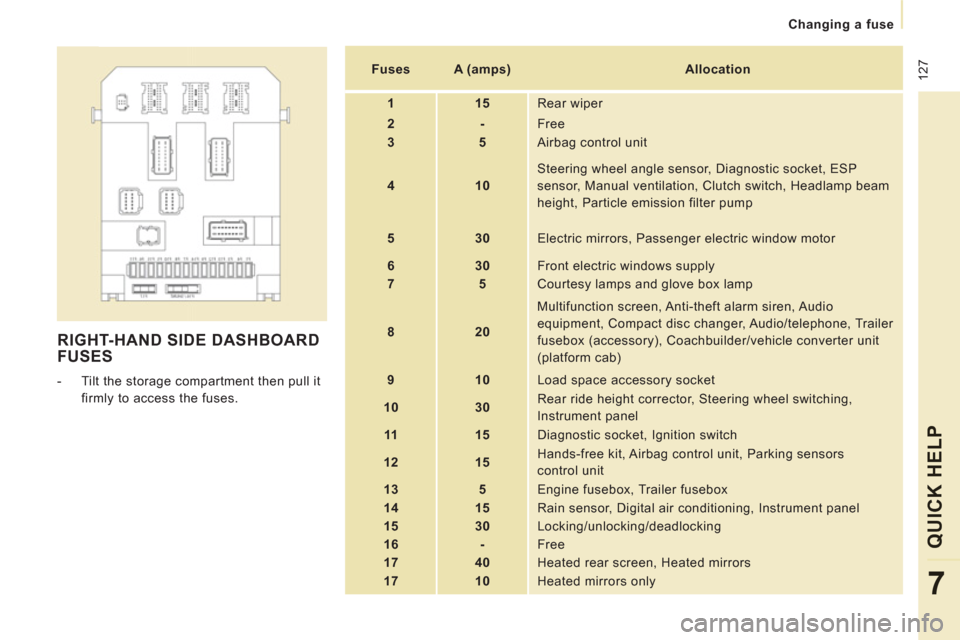
RIGHT-HAND SIDE DASHBOARD
FUSES
- Tilt the storage compartment then pull it
firmly to access the fuses.
Fuses
A (amps)
Allocation
1
15
Rear wiper
2
-
Free
3
5
Airbag control unit
4
10
Steering wheel angle sensor, Diagnostic socket, ESP
sensor, Manual ventilation, Clutch switch, Headlamp beam
height, Particle emission filter pump
5
30
Electric mirrors, Passenger electric window motor
6
30
Front electric windows supply
7
5
Courtesy lamps and glove box lamp
8
20
Multifunction screen, Anti-theft alarm siren, Audio
equipment, Compact disc changer, Audio/telephone, Trailer
fusebox (accessory), Coachbuilder/vehicle converter unit
(platform cab)
9
10
Load space accessory socket
10
30
Rear ride height corrector, Steering wheel switching,
Instrument panel
11
15
Diagnostic socket, Ignition switch
12
15
Hands-free kit, Airbag control unit, Parking sensors
control unit
13
5
Engine fusebox, Trailer fusebox
14
15
Rain sensor, Digital air conditioning, Instrument panel
15
30
Locking/unlocking/deadlocking
16
-
Free
17
40 Heated rear screen, Heated mirrors
17
10
Heated mirrors only
Page 164 of 260
9.20
04
2
3
4
5
6
7
NAVIGATION - GUIDANCE
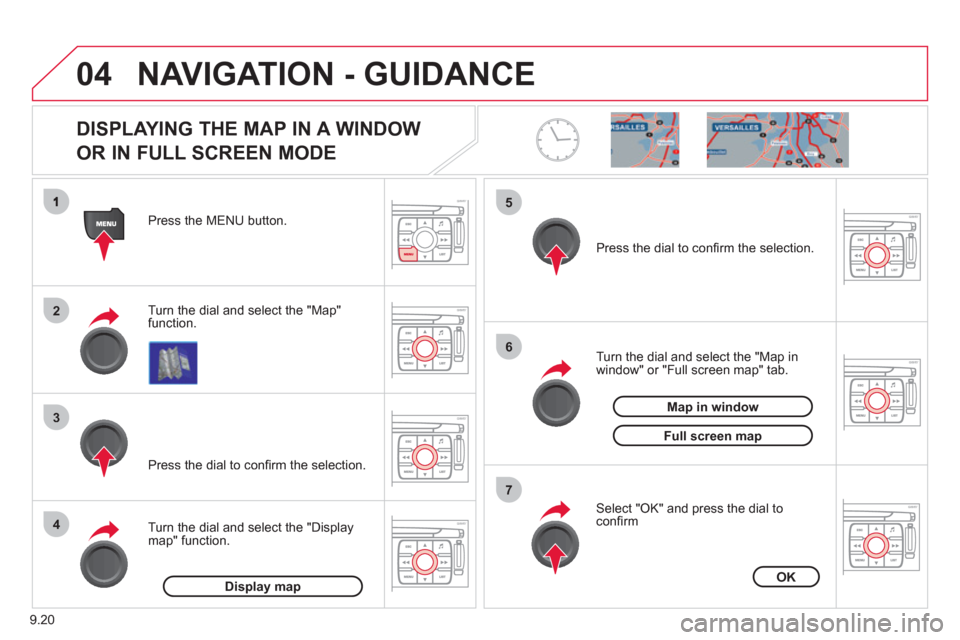
DISPLAYING THE MAP IN A WINDOW
OR IN FULL SCREEN MODE
Turn the dial and select the "Map"
function. Press the MENU button.
Turn the dial and select the "Displa
ymap" function. Pr
ess the dial to confi rm the selection.
Turn the dial and select the "Map in
window" or "Full screen map" tab.
Pr
ess the dial to confi rm the selection.
Select "OK" and press the dial to confi rm
Display mapOK
Map in window
Full screen map
Page 184 of 260
9.40
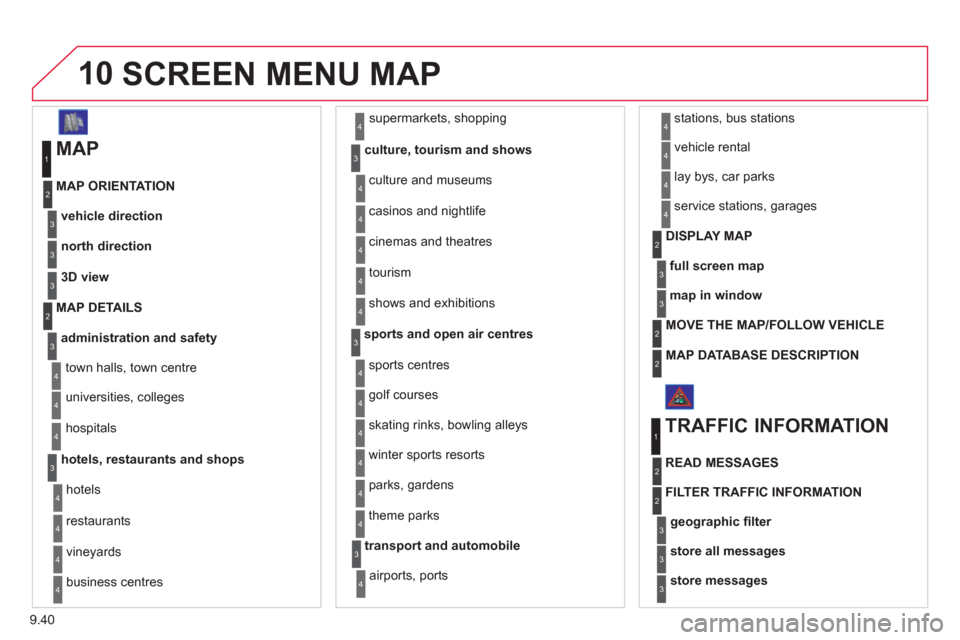
10SCREEN MENU MAP
MAP
vehicle direction MAP ORIENTATION
1
2
3
supermarkets, shopping
culture, tourism and shows
4
3
north direction3
3D view3
administration and safety
MAP DETAILS
town halls, town centre
universities, colleges
hospitals
hotels, restaurants and shops
4
3
2
4
4
3
hotels
r
estaurants
vineyards
business centres
4
4
4
4
culture and museums
casinos and ni
ghtlife
cinemas and theatres
tourism
shows and exhibitions
4
4
4
4
4
sports and open air centres
sports centres
theme parks
golf courses
s
kating rinks, bowling alleys
winter sports resorts
parks, gardens
3
4
4
4
4
4
4
transport and automobile
airports, ports
3
4
stations, bus stations 4
full screen map
DISPLAY MAP2
3
map in window3
MOVE THE MAP/FOLLOW VEHICLE 2
MAP DATABASE DESCRIPTION2
vehicle rental
lay bys, car parks
serv
ice stations, garages
4
4
4
TRAFFIC INFORMATION
READ MESSAGES
1
2
geographic fi lter3
store all messages3
store messages3
FILTER TRAFFIC INFORMATION 2
Page 210 of 260
9.66
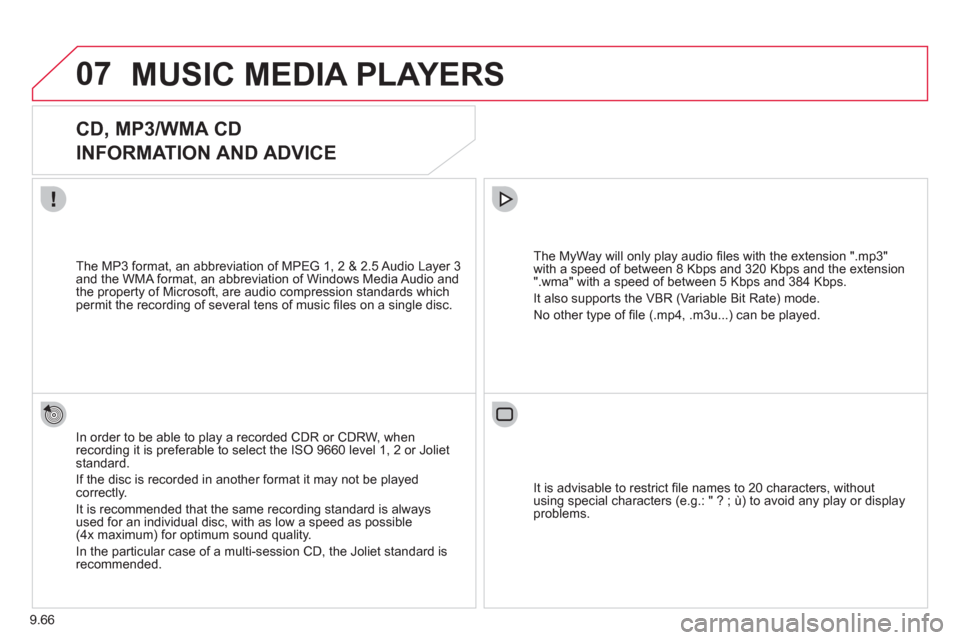
07MUSIC MEDIA PLAYERS
CD, MP3/WMA CD
INFORMATION AND ADVICE
In order to be able to play a recorded CDR or CDRW, when recording it is preferable to select the ISO 9660 level 1, 2 or Jolietstandard.
I
f the disc is recorded in another format it may not be playedcorrectly.
It is recommended that the same recordin
g standard is alwaysused for an individual disc, with as low a speed as possible(4x maximum) for optimum sound quality.
In the particular case o
f a multi-session CD, the Joliet standard is recommended.
The M
yWay will only play audio fi les with the extension ".mp3"
with a speed of between 8 Kbps and 320 Kbps and the extension
".wma" with a speed of between 5 Kbps and 384 Kbps.
It also supports the VBR
(Variable Bit Rate) mode.
No other t
ype of fi le (.mp4, .m3u...) can be played. The MP3
format, an abbreviation of MPEG 1, 2 & 2.5 Audio Layer 3 and the WMA format, an abbreviation of Windows Media Audio and
the property of Microsoft, are audio compression standards which permit the recording of several tens of music fi les on a single disc.
It is advisable to restrict fi le names to 20 characters
, without
using special characters (e.g.: " ? ; ù) to avoid any play or display
problems.
Page 237 of 260
9.93
06
1
2
3
4
5
6
7
8
9
10
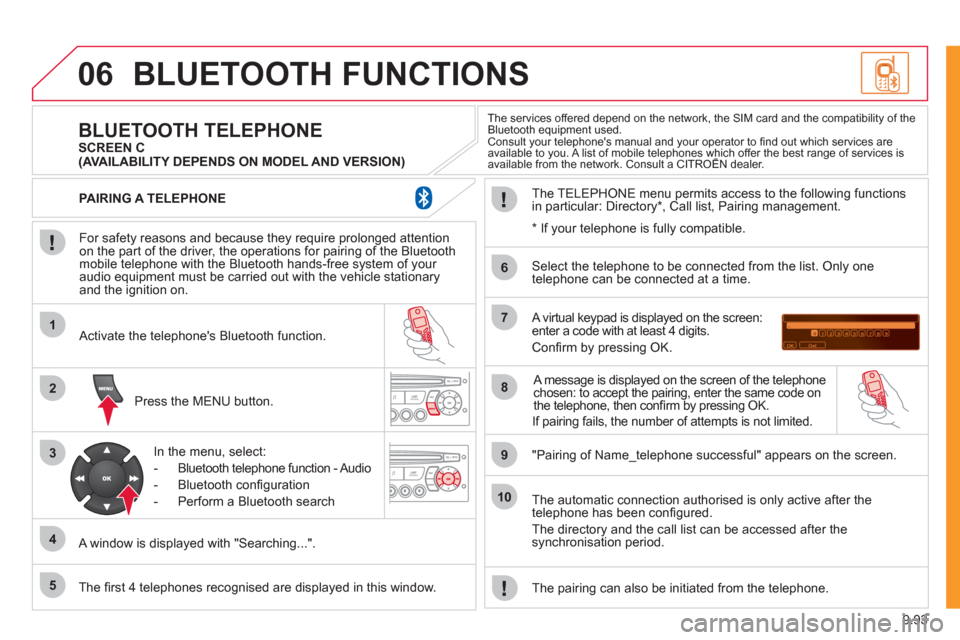
BLUETOOTH FUNCTIONS
For safety reasons and because they require prolonged attentionon the part of the driver, the operations for pairing of the Bluetooth mobile telephone with the Bluetooth hands-free system of your
audio equipment must be carried out with the vehicle stationary
and the ignition on.
Press the MENU button.
A window is displa
yed with "Searching...".
Activate the telephone's Bluetooth
function.
In the menu, select:
- Bluetooth tele
phone function - Audio
- Bluetooth confi
guration
- P
erform a Bluetooth search
The services offered depend on the network, the SIM card and the compatibility of theBluetooth equipment used.
Consult your telephone's manual and your operator to fi nd out which services are available to you. A list of mobile telephones which offer the best range of services isavailable from the network. Consult a CITROËN dealer. yp
BLUETOOTH TELEPHONE SCREEN C
The TELEPH
ONE menu permits access to the following functions
in particular: Directory * , Call list, Pairing management.
The fi rst 4 telephones reco
gnised are displayed in this window.
A virtual keypad is displayed on the screen: enter a code with at least 4 digits.
Confi rm by pressing OK.
"Pairin
g of Name_telephone successful" appears on the screen.
Select the telephone to be connected from the list.
Only one
telephone can be connected at a time.
A messa
ge is displayed on the screen of the telephone chosen: to accept the pairing, enter the same code on
the telephone, then confi rm by pressing OK.
The automatic connection authorised is onl
y active after the
telephone has been confi gured.
The directory and the call list can be accessed a
fter thesynchronisation period.
PAIRING A TELEPHONE
The pairin
g can also be initiated from the telephone.
(AVAILABILITY DEPENDS ON MODEL AND VERSION)
* If
your telephone is fully compatible.
If pairin
g fails, the number of attempts is not limited.
Page 250 of 260
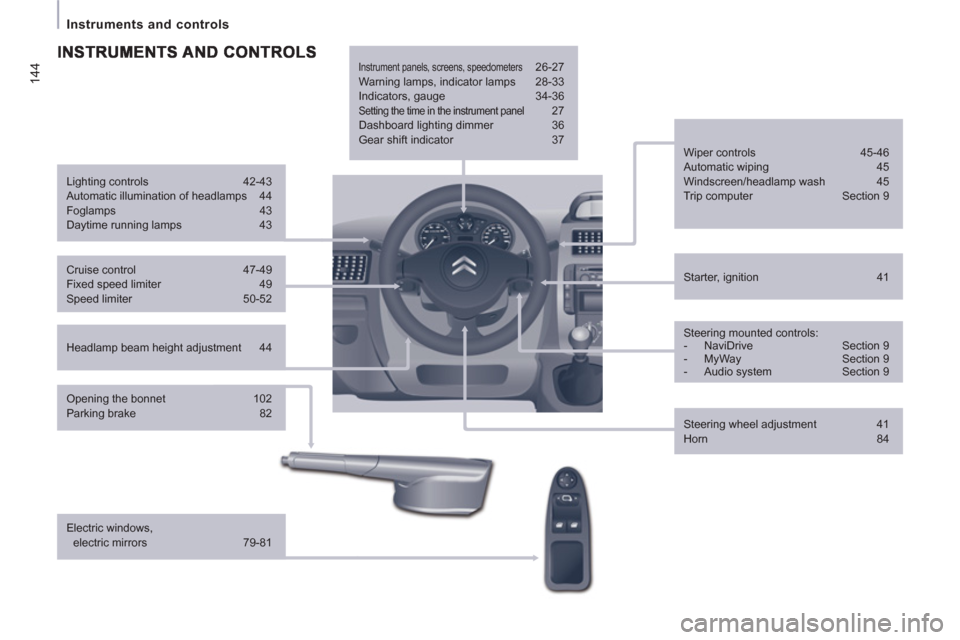
144
Instruments and controls
Headlamp beam height adjustment 44
Starter, ignition 41
Wiper controls 45-46
Automatic wiping 45
Windscreen/headlamp wash 45
Trip computer Section 9
Cruise control 47-49
Fixed speed limiter 49
Speed limiter 50-52
Steering mounted controls:
- NaviDrive Section 9
- MyWay Section 9
- Audio system Section 9
Lighting controls 42-43
Automatic illumination of headlamps 44
Foglamps 43
Daytime running lamps 43
Opening the bonnet 102
Parking brake 82
Electric windows,
electric mirrors 79-81
Instrument panels, screens, speedometers 26-27
Warning lamps, indicator lamps 28-33
Indicators, gauge 34-36
Setting the time in the instrument panel 27
Dashboard lighting dimmer 36
Gear shift indicator 37
Steering wheel adjustment 41
Horn 84