Ring Citroen JUMPY 2011 2.G Workshop Manual
[x] Cancel search | Manufacturer: CITROEN, Model Year: 2011, Model line: JUMPY, Model: Citroen JUMPY 2011 2.GPages: 260, PDF Size: 9.5 MB
Page 106 of 260
104
Under the bonnet
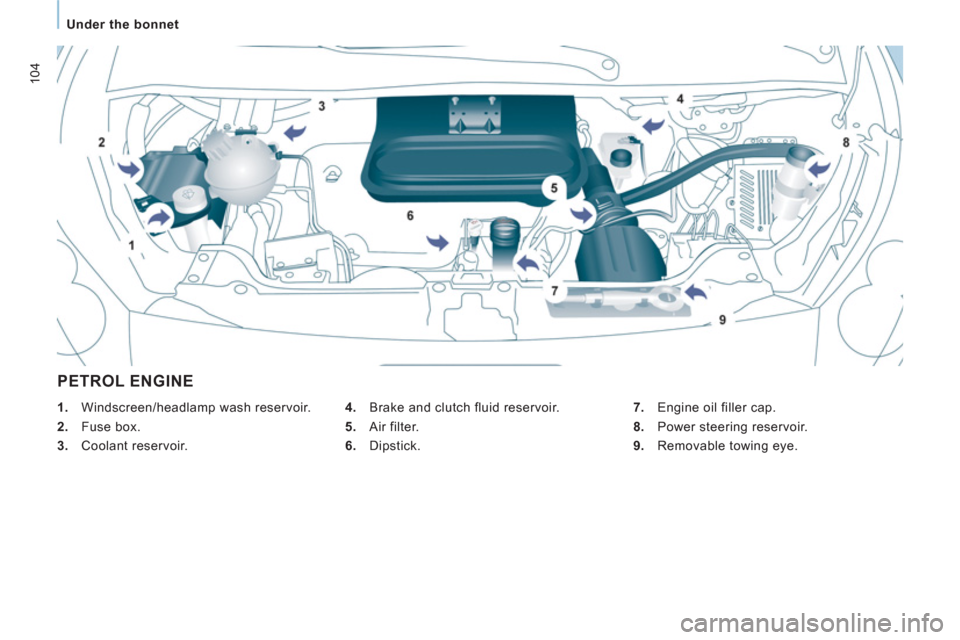
PETROL ENGINE
4.
Brake and clutch fluid reservoir.
5.
Air filter.
6.
Dipstick.
7.
Engine oil filler cap.
8.
Power steering reservoir.
9.
Removable towing eye.
1.
Windscreen/headlamp wash reservoir.
2.
Fuse box.
3.
Coolant reservoir.
Page 108 of 260
106
Levels
Cooling system
Only use the fluid recommended by the
manufacturer.
Otherwise, you risk seriously damaging your
engine.
When the engine is warm, the temperature
of the coolant is controlled by the engine
fan. As this fan can operate with the ignition
key removed and because the cooling
system is pressurised, wait for at least one
hour after the engine has stopped before
carrying out any work.
Slacken the cap by 1/4 of a turn to release
the pressure to prevent any risk of scalding.
When the pressure has dropped, remove the
cap and top up the level with coolant.
If fluid has to be added frequently, this
indicates a fault which must be checked by a
CITROËN dealer or a qualified workshop as
soon as possible.
Power steering fluid level
The vehicle must be parked on level ground
with the engine cold. Unscrew the cap
integrated with the gauge and check the
level which must be between the MIN and
MAX marks. When this occurs with the engine running it
is due to the start of saturation of the particle
emission filter (exceptionally prolonged
urban type driving conditions: low speed,
long traffic jams, ...).
In order to regenerate the filter, you are
advised to drive at a speed higher than
40 mph (60 km/h) for at least five minutes
as soon as possible, when traffic conditions
permit (until the message disappears and
the service warning lamp goes off).
During regeneration of the particle emission
filter, relay noise may be heard under the
dashboard.
If the message is still displayed and if the
service warning lamp remains on, contact a
CITROËN dealer or a qualified workshop.
Topping up
The level must be between the MIN and
MAX marks on the expansion bottle. If
more than 1 litre of fluid is required to top
up the level, have the system checked by a
CITROËN dealer or a qualified workshop.
Screenwash and headlamp wash
level
For best quality cleaning and for your safety,
we would advise that you use products of
the CITROËN range.
Capacity of the screenwash reservoir:
approximately 4.5 litres.
If your vehicle is fitted with headlamp
washers, the capacity of the reservoir is
7.5 litres.
To ensure optimum cleaning and prevent
freezing, this fluid must not be topped up or
replaced with plain water.
Diesel additive level (Diesel
with particle emission filter)
The minimum level of this additive
is indicated by lighting of the
service warning light, accompanied by an
audible signal and a message in the screen.
Topping up
This additive must be topped up by a
CITROËN dealer or a qualified workshop
without delay.
Page 109 of 260
Checks
CHECK
S
6
CHECKS
Battery
At the start of winter, have your battery
checked by a CITROËN dealer or a qualified
workshop.
Brake pads
Brake pad wear depends on the style of
driving, in particular for vehicles which are
used in town, over short distances. It may
be necessary to check the thickness of the
pads, even between services.
Unless there is a leak in the system, a drop
in the brake fluid level indicates that the
brake pads are worn.
Brake disc/drum wear
For any information on checking the brake
disc/drum wear, contact a CITROËN dealer
or a qualified workshop.
Parking brake
Where the parking brake travel is too great
or there is a reduction in the performance
of the system, the parking brake should be
adjusted, even between services.
Have the system checked by a CITROËN
dealer or a qualified workshop.
Oil filter
Change the filter regularly, in accordance
with the servicing schedule.
Carbon filter and passenger
compartment filter
The carbon filter permits continuous and
effective filtering of dust.
If the passenger compartment filter becomes
clogged, this may reduce the performance
of the air conditioning system and generate
unpleasant odours.
We recommend the use of a combined
passenger compartment filter. By means of
its second special active filter, it contributes
to the purification of the air breathed by
the occupants and the cleanness of the
passenger compartment (reduction of
allergic symptoms, unpleasant odours and
greasy deposits).
Refer to the servicing booklet to find out the
replacement interval for these components.
Depending on the environment (dusty
atmosphere...) and the use of the vehicle
(urban driving...), change them twice as
often if necessary.
Particle emission filter (Diesel)
This filter actively contributes
to the preservation of air quality
by trapping unburnt polluting
particles. It is controlled
completely and automatically by the engine
management system.
This warning lamp comes on if there is a risk
of blockage of the filter.
This alert signals the start of saturation of
the particle emissions filter (exceptionally
prolonged driving in urban conditions:
reduced speed, traffic jams…).
If this alert persists, contact a CITROËN
dealer or a qualified workshop.
On acceleration after the vehicle has been
running for a prolonged period at very low
speed or at idle, you may, in exceptional
circumstances, notice the emission of water
vapour at the exhaust. This water vapour
does not have any adverse effect on vehicle
handling or the environment.
To regenerate the filter, it is recommended
that as soon as driving conditions permit,
you drive at a speed of at least 36 mph
(60 km/h) for at least 5 minutes (until the
warning lamp goes off and/or the message
disappears). Refer to "Under the bonnet" in section 6.
Page 110 of 260

108
Checks
Manual gearbox
Have the level checked in accordance with
the manufacturer's servicing schedule.
To check the main levels and certain
components, in accordance with the
manufacturer's servicing schedule, refer to
the pages of the servicing booklet which
correspond to your vehicle's engine.
Only use products recommended by
CITROËN or products of equivalent
quality and specification.
In order to optimise the operation of units as
important as the braking system, CITROËN
selects and offers specific products.
In order to avoid damaging the electrical
units, high pressure washing to clean the
engine compartment is strictly prohibited.
Bleeding the water contained in the
Diesel filter
If this warning lamp comes on,
bleed the filter. Otherwise bleed
regularly each time the engine oil
is changed.
To evacuate the water, unscrew the bleed
screw located on the end of the transparent
pipe.
Operate until all of the water in the
transparent pipe has been drained out then
tighten the bleed screw.
HDi engines use advanced technology.
Contact a CITROËN or a qualified workshop
for all work on the system.
1.6 litre HDi
2 litre HDi
During this regeneration, you may notice
that the idling speed is higher than normal
and that the cooling fan is running. As
operation of the exhaust emissions controls
may cause the exhaust gas temperature to
reach very high levels, it is recommended
that you do not stop the vehicle over easily
inflammable surfaces (dry grass and leaves,
pine needles, edge of a meadow or forest).
Page 111 of 260

PARTNERS IN PERFORMANCE
AND PROTECTING THE
ENVIRONMENT
Innovation in the search for performance
For over 40 year, the TOTAL Research and
Development departments have developed
for CITROËN, lubricants to match the latest
technical innovations on CITROËN vehicles, both
for competition and for everyday motoring.
For you, this is an assurance that you will obtain
of the best performance for your engine.
Optimum protection for your
engine
By having your CITROËN vehicle
serviced with TOTAL lubricants, you
are contributing towards improving
the life and performances of your
engine, while also protecting the
environment.
prefers
Page 116 of 260
Repairing a wheel
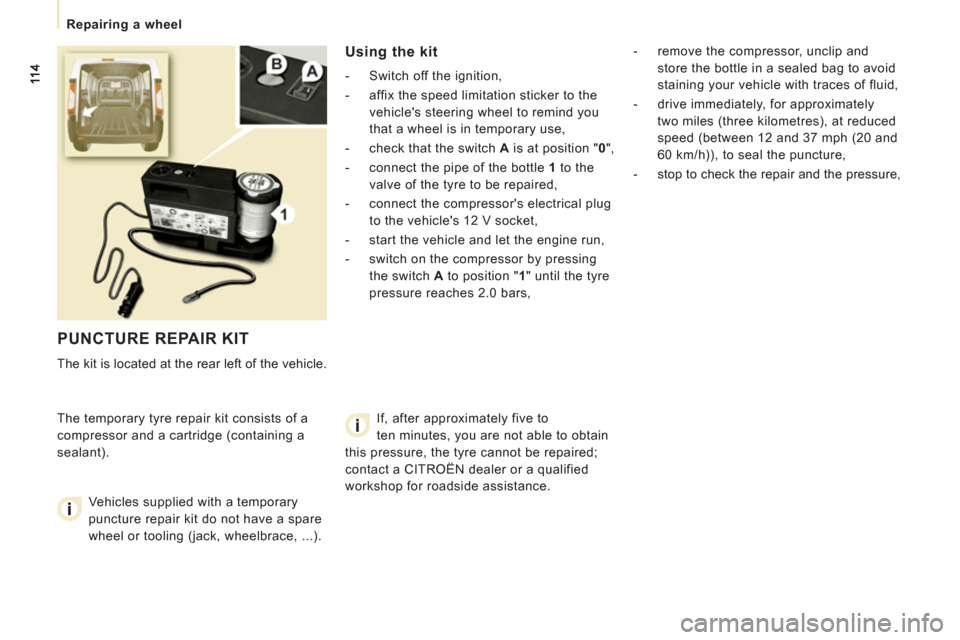
PUNCTURE REPAIR KIT
The kit is located at the rear left of the vehicle.
The temporary tyre repair kit consists of a
compressor and a cartridge (containing a
sealant).
Using the kit
- Switch off the ignition,
- affix the speed limitation sticker to the
vehicle's steering wheel to remind you
that a wheel is in temporary use,
- check that the switch A
is at position " 0
",
- connect the pipe of the bottle 1
to the
valve of the tyre to be repaired,
- connect the compressor's electrical plug
to the vehicle's 12 V socket,
- start the vehicle and let the engine run,
- switch on the compressor by pressing
the switch A
to position " 1
" until the tyre
pressure reaches 2.0 bars,
- remove the compressor, unclip and
store the bottle in a sealed bag to avoid
staining your vehicle with traces of fluid,
- drive immediately, for approximately
two miles (three kilometres), at reduced
speed (between 12 and 37 mph (20 and
60 km/h)), to seal the puncture,
- stop to check the repair and the pressure,
Vehicles supplied with a temporary
puncture repair kit do not have a spare
wheel or tooling (jack, wheelbrace, ...). If, after approximately five to
ten minutes, you are not able to obtain
this pressure, the tyre cannot be repaired;
contact a CITROËN dealer or a qualified
workshop for roadside assistance.
Page 117 of 260
11 5
Repairing a wheel
QUICK HEL
P
7
Warning, the sealant cartridge contains
ethylene-glycol, this product is harmful
if swallowed and causes irritation to the
eyes. Keep this product out of reach of
children.
The expiry date of the sealant is indicated
under the cartridge.
The cartridge is intended for a single use;
once opened, it must be replaced.
After use, do not discard the cartridge into the
environment, take it to a CITROËN dealer or
to a specialised waste disposal site.
Do not forget to obtain a new sealant
cartridge, available from a CITROËN dealer
or a qualified workshop.
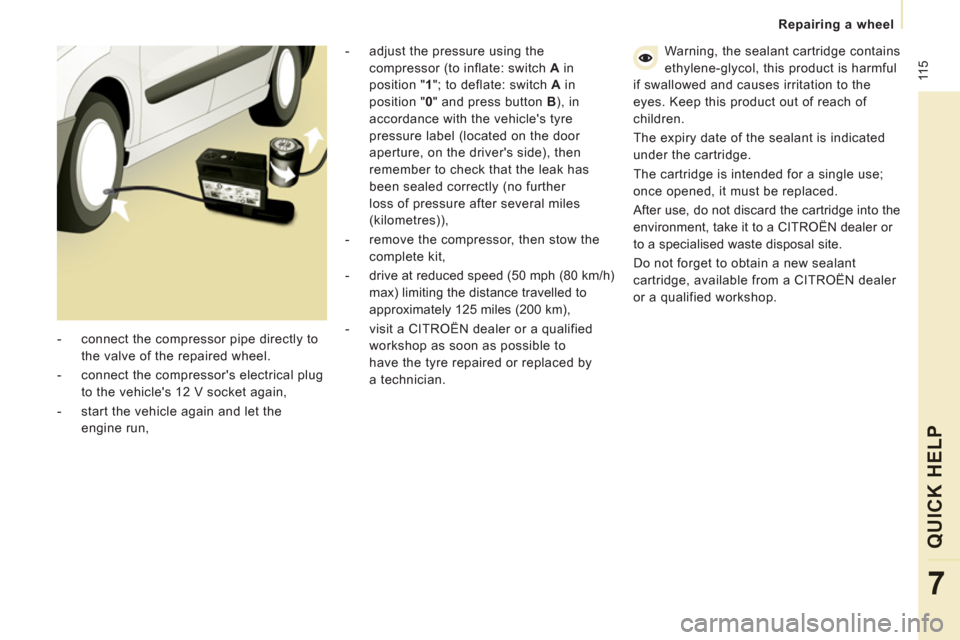
- connect the compressor pipe directly to
the valve of the repaired wheel.
- connect the compressor's electrical plug
to the vehicle's 12 V socket again,
- start the vehicle again and let the
engine run,
- adjust the pressure using the
compressor (to inflate: switch A
in
position " 1
"; to deflate: switch A
in
position " 0
" and press button B
), in
accordance with the vehicle's tyre
pressure label (located on the door
aperture, on the driver's side), then
remember to check that the leak has
been sealed correctly (no further
loss of pressure after several miles
(kilometres)),
- remove the compressor, then stow the
complete kit,
- drive at reduced speed (50 mph (80 km/h)
max) limiting the distance travelled to
approximately 125 miles (200 km),
- visit a CITROËN dealer or a qualified
workshop as soon as possible to
have the tyre repaired or replaced by
a technician.
Page 122 of 260
Snow screen
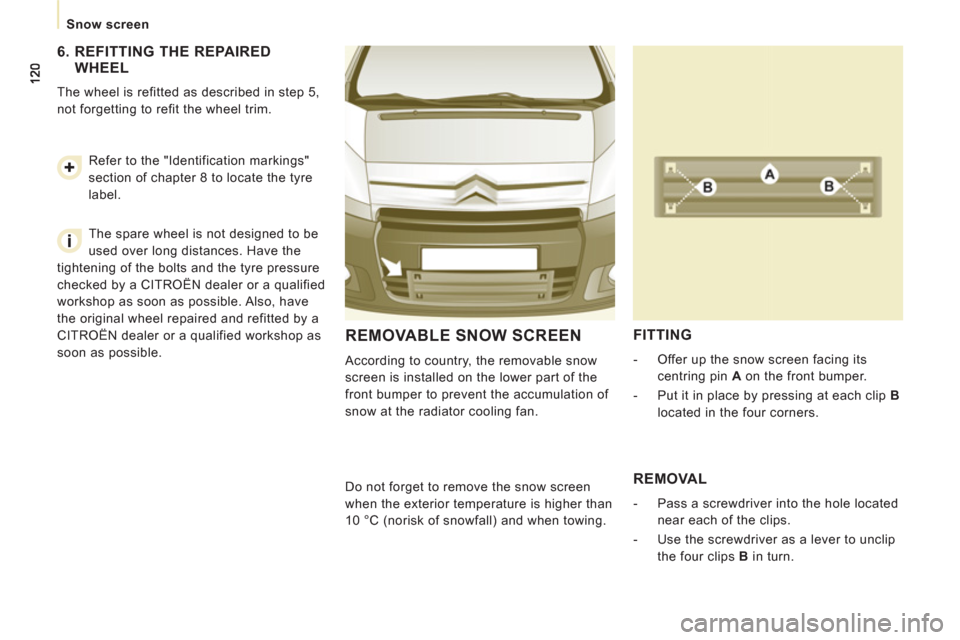
REMOVABLE SNOW SCREEN
According to country, the removable snow
screen is installed on the lower part of the
front bumper to prevent the accumulation of
snow at the radiator cooling fan.
FITTING
- Offer up the snow screen facing its
centring pin A
on the front bumper.
- Put it in place by pressing at each clip B
located in the four corners.
Do not forget to remove
the snow screen
when the exterior temperature is higher than
10 °C (no
risk of snowfall) and when towing.
REMOVAL
- Pass a screwdriver into the hole located
near each of the clips.
- Use the screwdriver as a lever to unclip
the four clips B
in turn.
6. REFITTING THE REPAIRED
WHEEL
The wheel is refitted as described in step 5,
not forgetting to refit the wheel trim.
Refer to the "Identification markings"
section of chapter 8 to locate the tyre
label.
The spare wheel is not designed to be
used over long distances. Have the
tightening of the bolts and the tyre pressure
checked by a CITROËN dealer or a qualified
workshop as soon as possible. Also, have
the original wheel repaired and refitted by a
CITROËN dealer or a qualified workshop as
soon as possible.
Page 123 of 260

12
1
Changing a bulb
QUICK HEL
P
7
CHANGING A BULB
Type A
Entirely glass bulb: pull
gently as it is fitted by
pressure.
Type B
Bayonet bulb: press
on the bulb then turn it
anticlockwise.
Type C
Halogen bulb: release
the retaining spring from
its housing.
TYPES OF BULB
Various types of bulb are installed on your vehicle. To remove them: Halogen bulbs must be changed
after the headlamp has been off for
several minutes (risk of serious burns).
Do not touch the bulb directly with your
fingers, use lint-free cloths.
When each operation has been completed,
check the operation of the lights.
Page 124 of 260

122
Changing a bulb
3.
Direction indicators
Type B
, PY21W - 21W (amber)
- Turn the bulb holder a quarter turn
anticlockwise.
- Remove the bulb by pressing it lightly
while turning it anticlockwise.
- Change the bulb.
- Ensure that the cover is refitted
correctly all the way round to ensure
sealing.
FRONT LAMPS
Open the bonnet. To access the bulbs,
reach behind the headlamp unit.
Carry out the operations in reverse order to
refit each bulb.
1.
Dipped/Main beam headlamps
Type C
, H4 - 55W
- Remove the centre cover by pulling
the flexible rubber tab.
- Disconnect the electrical connector.
- Release the retaining spring.
- Change the bulb taking care to
align the metal part with the slots in
the lamp.
2.
Sidelamps
Type A
, W5W - 5W
- Remove the cover by pulling the
flexible rubber tab.
- Remove the bulb holder fitted by
pressure by pulling the connector.
- Change the bulb.
- Ensure that the cover is refitted
correctly all the way round to ensure
sealing.
4.
Foglamps
Type C
, H1 - 55W
Contact a CITROËN dealer or a qualified
workshop.