height Citroen JUMPY 2012 2.G User Guide
[x] Cancel search | Manufacturer: CITROEN, Model Year: 2012, Model line: JUMPY, Model: Citroen JUMPY 2012 2.GPages: 268, PDF Size: 9.71 MB
Page 80 of 268

78
Rear suspension
Metal suspension
This equipment adopts long movement
limiters which make it possible to guarantee
stable behaviour both when loaded and
when empty. No action on your part is
required except to ensure that maintenance
is carried out and that the authorised loads
are complied with. irrespective of the weight of the load, within
the limit of the authorised values. On board,
the increasing or lightening of the load on
the vehicle's platform is detected by two
height sensors. When all of the doors are
closed, the sensors trigger the automatic
height correction and determine the optimum
height of the sill for the vehicle's driving
conditions.
Deactivation of automatic height correction
The control which permits deactivation of
automatic regulation is located on the right-
hand side, at the rear of the vehicle.
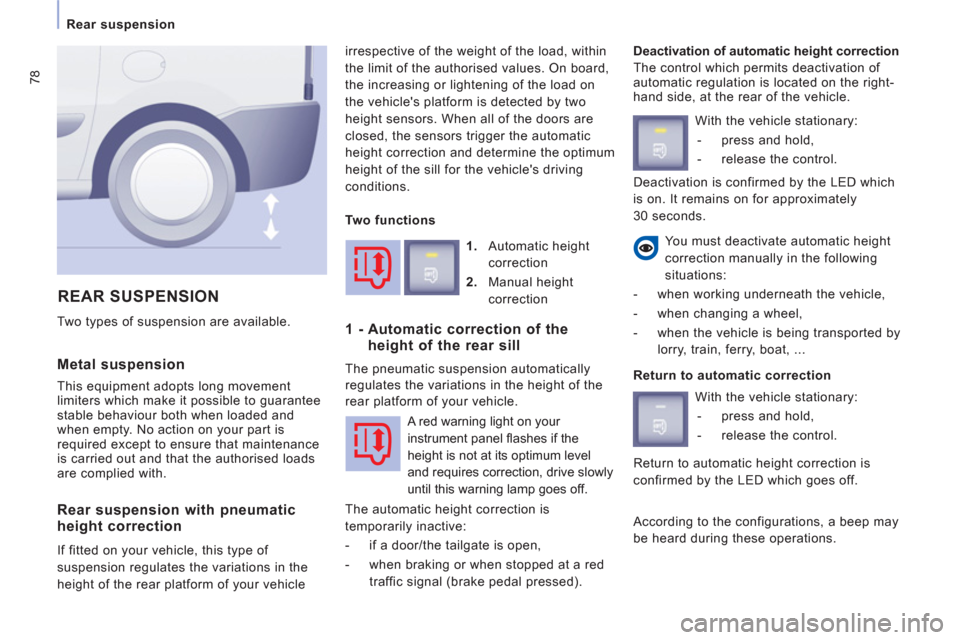
REAR SUSPENSION
You must deactivate automatic height
correction manually in the following
situations:
- when working underneath the vehicle,
- when changing a wheel,
- when the vehicle is being transported by
lorry, train, ferry, boat, ...
Two types of suspension are available.
Rear suspension with pneumatic
height correction
If fitted on your vehicle, this type of
suspension regulates the variations in the
height of the rear platform of your vehicle
1.
Automatic height
correction
2.
Manual height
correction
1 - Automatic correction of the
height of the rear sill
The pneumatic suspension automatically
regulates the variations in the height of the
rear platform of your vehicle.
A red warning light on your
instrument panel fl ashes if the
height is not at its optimum level
and requires correction, drive slowly
until this warning lamp goes off.
The automatic height correction is
temporarily inactive:
- if a door/the tailgate is open,
- when braking or when stopped at a red
traffic signal (brake pedal pressed). With the vehicle stationary:
- press and hold,
- release the control.
Return to automatic correction
With the vehicle stationary:
- press and hold,
- release the control.
According to the configurations, a beep may
be heard during these operations.
Two functions
Return to automatic height correction is
confirmed by the LED which goes off. Deactivation is confirmed by the LED which
is on. It remains on for approximately
30 seconds.
Page 81 of 268

79
Rear suspension
EASE OF USE
and COMFOR
T
3
2 - Manual correction of the height
of the rear sill
First use
To initialise the function, press the control
for approximately 2 seconds.
Return to the optimum sill height
Press the control up or down twice in
succession, the opposite of the position of
the load sill. Carry out these operations with the vehicle
still stationary and:
- with the front and side doors closed,
- with the parking brake applied,
- do not leave your foot on the brake
pedal.
If your vehicle is fitted with this adjustment,
the control is located on the right-hand side
at the rear of the vehicle.
This manual adjustment permits "lowering"
or "raising" of the height of the sill of the rear
platform to facilitate operations in a parking
area.
This adjustment of the height of the sill is
restricted by a lower limit and an upper limit.
Lower: downwards adjustment
of the platform sill
Press the control downwards
continuously.
Release the button to stop the movement,
"3 beeps" indicate that you have reached
the maximum limit, the movement stops
automatically.
Raise: upwards adjustment of
the platform sill
Press the control upwards
continuously.
Release the button to stop the movement,
"3 beeps" indicate that you have reached
the maximum limit, the movement stops
automatically.
Malfunctions
If the load sill is not adjusted when the
control is pressed, "3 beeps" indicate a
malfunction for the following reasons:
- foot on the brake pedal with the key in
the ignition,
- excessive use of the manual correction,
- low battery charge,
- other.
If the audible signal persists, contact a
CITROËN dealer or a qualified workshop.
Page 82 of 268

80
Rear suspension
Deactivation of manual height correction
Good practice
When stationary and with the ignition key
removed, excessive use of the system
consumes battery power.
Long term parking
Avoid parking for a long duration on ground
which could present a potential obstacle as
your vehicle could lower.
Following a long period out of use, the
height of the platform may change due to the
automatic height correction on unlocking or
on opening one of your vehicle's doors. With the vehicle stationary:
- press and hold,
- release the control.
Return to manual height correction
According to the configuration, a beep may
be heard during these operations.
You must deactivate the manual height
correction in the following situations:
- when working underneath the vehicle,
- when changing a wheel,
- when the vehicle is being transported by
lorry, train, ferry, boat, ...
Warning lamp Driving with the height of the rear platform:
- too low, risks damaging the technical
components underneath the vehicle,
- too high, risks unstable driving.
With the vehicle stationary:
- press and hold,
- release the control. Refer to the "Instruments and controls"
section of chapter 2.
If you start and the warning lamp flashes, to
switch it off:
- correct the position of the manual
control which is still at the lower or
upper limit,
- or drive slowly at above 6 mph
(10 km/h), until height correction returns
to automatic mode. Return to manual correction is confirmed by
the LED which goes off. Deactivation is confirmed by the LED which
is on. It remains on for approximately
30 seconds.
Page 92 of 268

90
Seat belts
Height adjustment
Squeeze the control with the return and slide
the assembly on the driver's seat side and
on the individual passenger seat side.
If your vehicle is fitted with a front bench,
the height of the seat belt associated with
the centre seat cannot be adjusted.
Unfastening
Press the red button.
SEAT BELTS
Good practice
The driver must ensure that passengers use
the seat belts correctly and that they are all
strapped in securely before moving off.
Wherever you are seated in the vehicle,
always fasten your seat belt, even for short
journeys.
The seat belts are fitted with an inertia reel
which automatically adjusts the length of the
strap to your size.
Do not use accessories (clothes pegs, clips,
safety pins, etc.) which allow the seat belt
straps to fit loosely.
Ensure that the seat belt has reeled in
correctly after use.
After folding or moving a seat or a rear
bench seat, ensure that the seat belt has
reeled in correctly and that the buckle is
ready to accommodate the tongue.
Depending on the nature and seriousness of
any impact, the pretensioning device may be
deployed before and independently of infl ation
of the airbags. It instantly tightens the seat
belts against the body of the occupants.
Deployment of the pretensioners is
accompanied by a slight discharge of
harmless smoke and a noise, due to the
activation of the pyrotechnic cartridge
incorporated in the system.
Fastening
Pull the strap, then insert the tongue into the
buckle.
Check that the seat belt is fastened correctly
by pulling the strap.
Driver's seat belt not fastened warning
lamp
Passenger seat belt not fastened warning
lamp When the vehicle is started, this
warning lamp comes on if the
driver has not fastened their seat
belt.
If your vehicle is fitted with a front
passenger seat, when the vehicle
is started, this warning lamp
comes on if the passenger has not
fastened their seat belt.
Page 107 of 268

105
Equipment
ACCESSORIE
S
5
The fitting of electrical equipment
or accessories which are not
recommended by CITROËN may result
in the failure of your vehicle's electronic
system. Please note this specific warning.
You are advised to contact a representative
of the Marque to be shown the range of
recommended equipment and accessories.
Depending on the country in which the
vehicle is sold or operated, it is compulsory
to have a high visibility safety vest, warning
triangle and replacement bulbs available in
the vehicle.
Installation of radiocommunication
transmitters
Before installing accessory
radiocommunication transmitters with an
external aerial on your vehicle, you are
advised to contact a representative of the
CITROËN marque.
The CITROËN dealer network can inform
you of the specifications (frequency
band, maximum output power, aerial
position, specific installation conditions)
of the transmitters which can be fitted,
in accordance with the Motor Vehicle
Electromagnetic Compatibility Directive
(2004/104/CE). Front mud flaps, rear mud flaps, ...
Range of trade equipment
Parts and Services technical information
publishes an accessory catalogue offering
various equipment and fittings, such as: Screenwash, replacement fuses, wiper
blades, interior and exterior cleaning
and maintenance products, replacement
bulbs, ...
Roof bars for short, medium and long
wheelbase (load retainers for all models).
Towbar, towbar harness: trailer towbar which
must be fitted by the network. Sill plate, loading roller, sill. Sill plate,
loading roller, sill.
Roof bars for the various heights, roof bars,
ladder.
Separation partitions and grilles, smooth,
non-slip wooden protective floor.
Protective grilles, multimedia.
Another range is also available, structured
around comfort, leisure and maintenance:
Anti-theft alarm, window engraving, first aid
kit, high visibility safety vest, rear parking
sensors, warning triangle,
Front seat covers compatible with airbags,
bench, rubber mats, carpet mats, snow
chains. To prevent the mat from becoming caught
under the pedals:
- ensure that the mat and its fixings are
positioned correctly,
- never fit one mat on top of another.
Audio equipment, hands-free kit, speakers,
CD changer, navigation, ...
Regardless of the audio and telematic
equipment offered on the market, the
technical constraints linked with the fi tting of
equipment of these families of products mean
that the special features of the equipment and
its compatibility with the capacities of the your
vehicle's standard equipment must be taken
into account. Please contact a dealer for
information before fi tting such equipment.
Page 108 of 268

106
Opening the bonnet
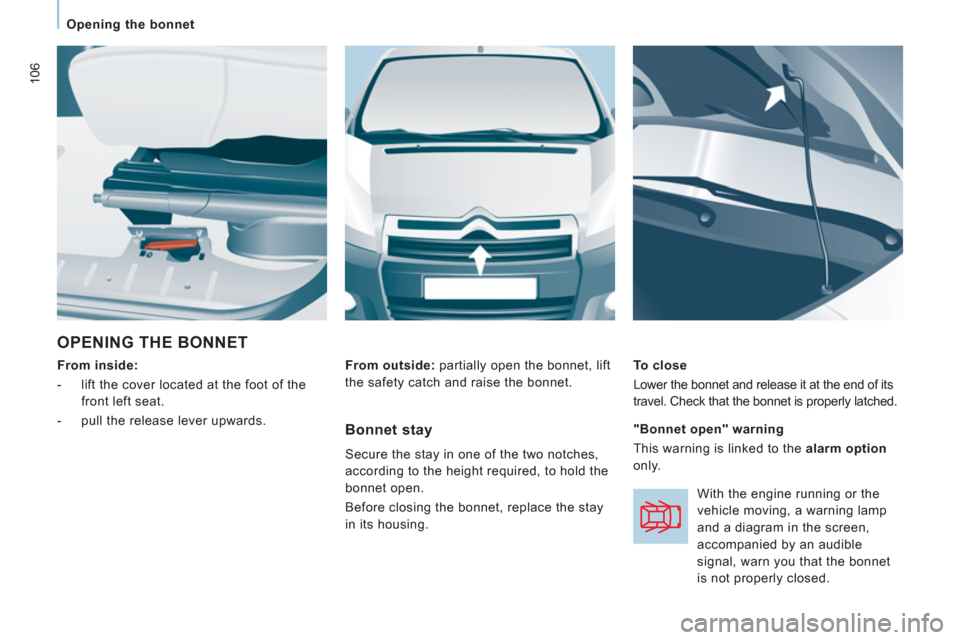
OPENING THE BONNET
From inside:
- lift the cover located at the foot of the
front left seat.
- pull the release lever upwards.
To close
Lower the bonnet and release it at the end of its
travel. Check that the bonnet is properly latched.
From outside:
partially open the bonnet, lift
the safety catch and raise the bonnet.
Bonnet stay
Secure the stay in one of the two notches,
according to the height required, to hold the
bonnet open.
Before closing the bonnet, replace the stay
in its housing.
"Bonnet open" warning
This warning is linked to the alarm option
only.
With the engine running or the
vehicle moving, a warning lamp
and a diagram in the screen,
accompanied by an audible
signal, warn you that the bonnet
is not properly closed.
Page 123 of 268

12
1
Changing a wheel
QUICK HEL
P
7
CHANGING A WHEEL
If your vehicle is equipped with a spare
wheel located underneath the vehicle, follow
these instructions.
1. PARKING THE VEHICLE
- You must ensure that the occupants
get out of the vehicle and wait in a safe
location.
- If possible, park the vehicle on level,
stable and non-slippery ground.
- Apply the parking brake, switch off the
ignition and engage first or reverse gear.
- If available, place a chock under the
wheel diagonally opposite the one to be
changed.
On certain types of ground and/or if heavy
loads are being transported, the vehicle
must be raised in order to disengage
the spare wheel from the carrier. Call a
CITROËN dealer or a qualified workshop.
If your vehicle is fitted with suspension
with pneumatic height correction,
please deactivate the system. Refer to the
"Rear suspension" section of chapter 3.
2. TOOLS
- If fitted on your vehicle, open the
plastic flap located at the rear left of
the vehicle.
- Unscrew the nut then take out the jack
and the wheelbrace.
1.
Wheelbrace.
2.
Jack.
3.
Towing eye.
The jack and the tool kit are specific to
your vehicle. Do not use them for other
purposes.
Page 134 of 268

132
Changing a fuse
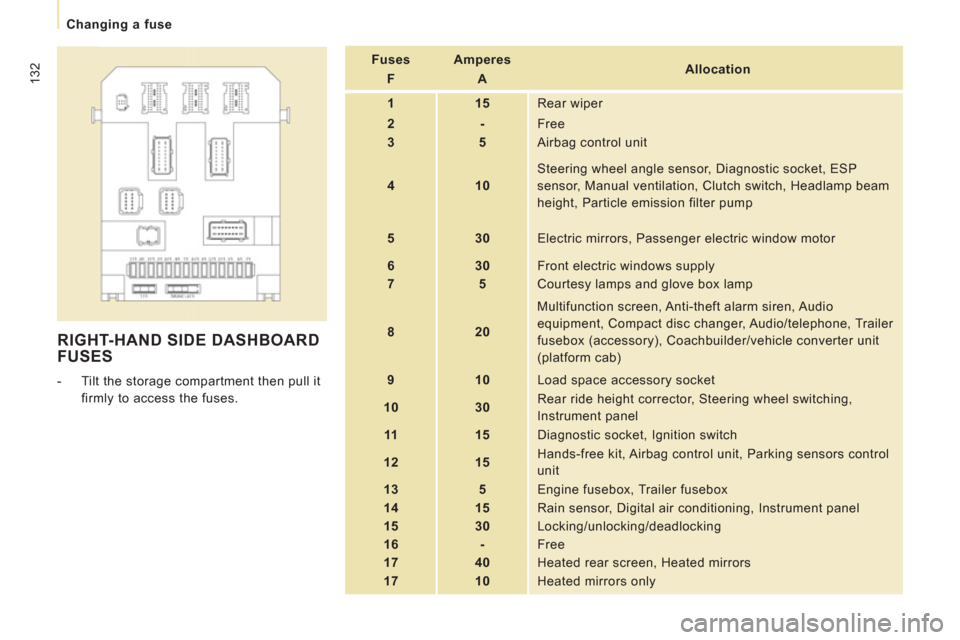
RIGHT-HAND SIDE DASHBOARD
FUSES
- Tilt the storage compartment then pull it
firmly to access the fuses.
Fuses
F
Amperes
A
Allocation
1
15
Rear wiper
2
-
Free
3
5
Airbag control unit
4
10
Steering wheel angle sensor, Diagnostic socket, ESP
sensor, Manual ventilation, Clutch switch, Headlamp beam
height, Particle emission filter pump
5
30
Electric mirrors, Passenger electric window motor
6
30
Front electric windows supply
7
5
Courtesy lamps and glove box lamp
8
20
Multifunction screen, Anti-theft alarm siren, Audio
equipment, Compact disc changer, Audio/telephone, Trailer
fusebox (accessory), Coachbuilder/vehicle converter unit
(platform cab)
9
10
Load space accessory socket
10
30
Rear ride height corrector, Steering wheel switching,
Instrument panel
11
15
Diagnostic socket, Ignition switch
12
15
Hands-free kit, Airbag control unit, Parking sensors control
unit
13
5
Engine fusebox, Trailer fusebox
14
15
Rain sensor, Digital air conditioning, Instrument panel
15
30
Locking/unlocking/deadlocking
16
-
Free
17
40
Heated rear screen, Heated mirrors
17
10 Heated mirrors only
Page 143 of 268

Dimensions
TECHNI
CAL DAT
A
8
*
Value for rear suspension.
L1
L2
H1
H1
H2
L Overall length
4805 to 4 813
5 135 to 5 143
H Overall height
1 894 * /1 942
2 204 * /2 276
A Wheelbase
3 000
3 122
B Front overhang
975
C Rear overhang
830 to 838
1 038 to 1 046
D Overall width:
over panels
1 870
with mouldings
1 895
with mirrors folded
1 986
with mirrors unfolded
2 194
E Width of front track
1 562 to 1 570
F Width of rear track
1 596 to 1 604
I Length of interior floor
2 254
2 584
J Maximum interior height under roof
1 449
1 750
K Maximum interior width
1 600
M Interior width between wheel arches
1 245
Turning circle between kerbs (m)
12.18
12.59
Maximum loads (kg)
Payload
1 000 to 1 200
On roof
170
m
3
5
6
7
DIMENSIONS (MM)
The vehicle is available in 2 lengths (L1, L2) and 2 heights (H1, H2),
refer to the tables:
Page 144 of 268

142
Dimensions
REAR DOORS (mm)
L1
L2
H1
H1
H2
N Usable height
1 272
1 630
O Usable width
1 237